brake HONDA CIVIC COUPE 1999 Owners Manual
[x] Cancel search | Manufacturer: HONDA, Model Year: 1999, Model line: CIVIC COUPE, Model: HONDA CIVIC COUPE 1999Pages: 269, PDF Size: 2.42 MB
Page 52 of 269
Instruments and Controls
This section gives information about
the controls and displays thatcontribute to the daily operation of
your Honda. All the essential
controls are within easy reach.
Control Locations............................ 52
Indicator Lights................................ 53
Gauges.............................................. 57
Speedometer................................ 57
Tachometer.................................. 57
Odometer...................................... 57
Trip Meter.................................... 57
Fuel Gauge................................... 58
Temperature Gauge.................... 58
Maintenance Required
Indicator.................................... 59
Controls Near the Steering Wheel........................................ 60
Headlights.................................... 61
Daytime Running Lights............. 61
Instrument Panel Brightness..... 62
Turn Signals................................. 62
Windshield Wipers...................... 63
Windshield Washers................... 63
Hazard Warning........................... 64
Rear Window Defogger.............. 64
Steering Wheel Adjustment....... 65
Steering Wheel Controls ................ 66 Cruise Control.............................. 66
Keys and Locks................................ 69
Keys.............................................. 69
Ignition Switch............................. 69
Door Locks................................... 70
Power Door Locks....................... 71
Remote Transmitter.................... 72
Trunk............................................ 75
Seat Adjustments............................. 76
Front Seat Adjustments.............. 76
Rear Seat Access......................... 77
Head Restraints........................... 77
Folding Rear Seat............................ 78
Power Windows............................... 79
Moonroof.......................................... 81
Mirrors.............................................. 81
Adjusting the Power Mirrors..... 82
Parking Brake.................................. 83 Glove Box......................................... 83
Beverage Holder.............................. 84
Accessory Power Socket................ 85
Ashtrays............................................ 85
Interior Light.................................... 86
Instruments and ControlsMain Menu s t
Page 54 of 269
Indicator Lights
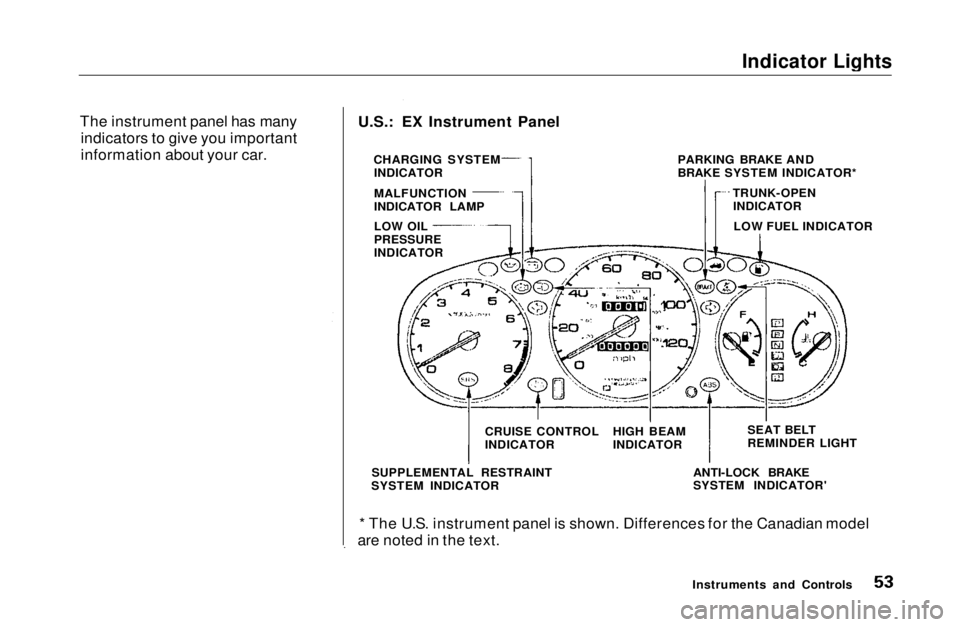
The instrument panel has many indicators to give you important
information about your car.
Instruments and Controls
U.S.: EX Instrument Panel
CHARGING SYSTEMINDICATOR
MALFUNCTION
INDICATOR LAMP
LOW OIL
PRESSURE
INDICATOR
CRUISE CONTROL
INDICATOR
SUPPLEMENTAL RESTRAINT
SYSTEM INDICATOR HIGH BEAM
INDICATOR
SEAT BELT
REMINDER LIGHT
ANTI-LOCK BRAKE
SYSTEM INDICATOR'
* The U.S. instrument panel is shown. Differences for the Canadian model
are noted in the text. PARKING BRAKE AND
BRAKE SYSTEM INDICATOR*
TRUNK-OPENINDICATOR
LOW FUEL INDICATORMain Menu Table of Contents s t
Page 55 of 269
Indicator Lights
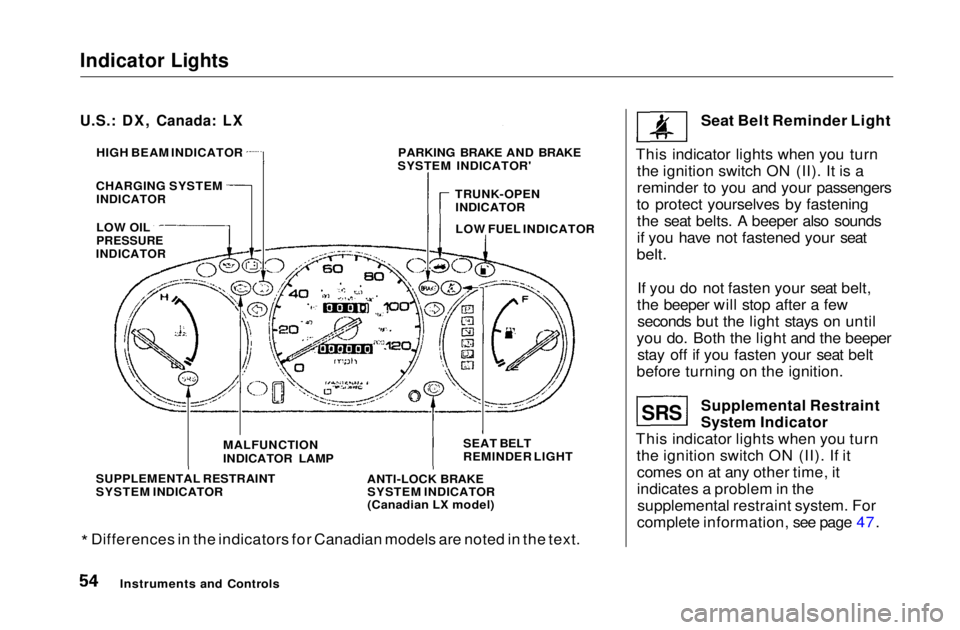
* Differences in the indicators for Canadian models are noted in the text. Seat Belt Reminder Light
This indicator lights when you turn the ignition switch ON (II). It is a
reminder to you and your passengers
to protect yourselves by fastening the seat belts. A beeper also sounds
if you have not fastened your seat
belt.
If you do not fasten your seat belt,
the beeper will stop after a few seconds but the light stays on until
you do. Both the light and the beeper stay off if you fasten your seat belt
before turning on the ignition.
Supplemental Restraint
System Indicator
This indicator lights when you turn the ignition switch ON (II). If itcomes on at any other time, it
indicates a problem in thesupplemental restraint system. For
complete information, see page 47.
Instruments and Controls
U.S.: DX, Canada: LX
HIGH BEAM INDICATOR
CHARGING SYSTEM
INDICATOR
LOW OIL
PRESSURE
INDICATOR
PARKING BRAKE AND BRAKE
SYSTEM INDICATOR'
TRUNK-OPENINDICATOR
LOW FUEL INDICATOR
SEAT BELT
REMINDER LIGHT
ANTI-LOCK BRAKE SYSTEM INDICATOR
(Canadian LX model)
MALFUNCTION
INDICATOR LAMP
SUPPLEMENTAL RESTRAINT
SYSTEM INDICATOR
SRSMain Menu Table of Contents s t
Page 56 of 269
Indicator Lights
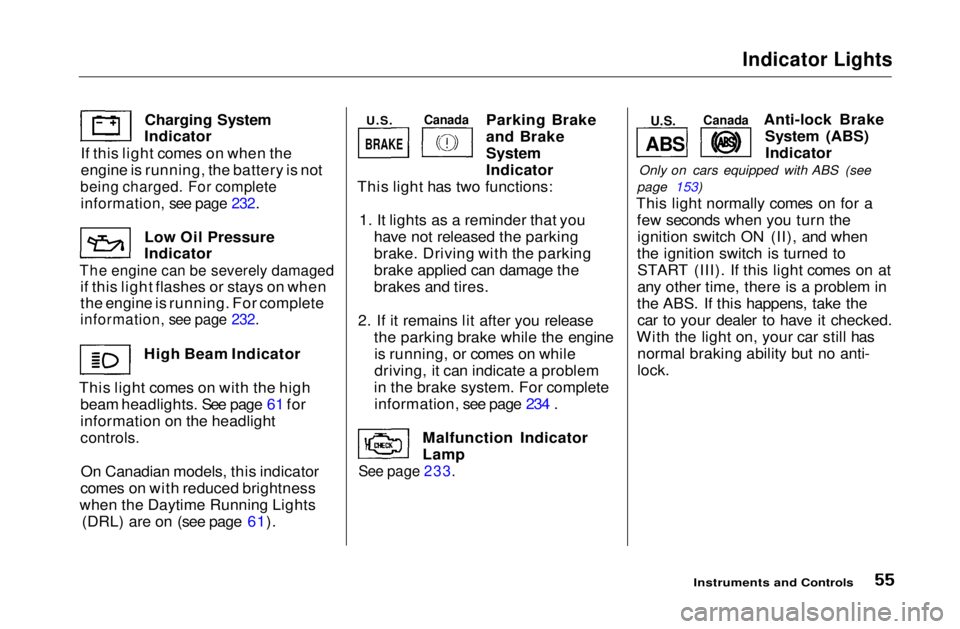
Charging System
Indicator
If this light comes on when the
engine is running, the battery is not
being charged. For complete
information, see page 232.
Low Oil Pressure
Indicator
The engine can be severely damaged
if this light flashes or stays on when
the engine is running. For complete
information, see page 232.
High Beam Indicator
This light comes on with the high beam headlights. See page 61 for
information on the headlight
controls.
On Canadian models, this indicator
comes on with reduced brightness
when the Daytime Running Lights (DRL) are on (see page 61). Parking Brake
and Brake
System
Indicator
This light has two functions:
1. It lights as a reminder that you have not released the parking
brake. Driving with the parking
brake applied can damage the
brakes and tires.
2. If it remains lit after you release the parking brake while the engineis running, or comes on while
driving, it can indicate a problem
in the brake system. For complete information, see page 234 .
Malfunction Indicator
Lamp
See page 233.
Anti-lock Brake
System (ABS)Indicator
Only on cars equipped with ABS (see
page 153)
This light normally comes on for a few seconds when you turn theignition switch ON (II), and when
the ignition switch is turned to START (III). If this light comes on at
any other time, there is a problem in
the ABS. If this happens, take the car to your dealer to have it checked.
With the light on, your car still has normal braking ability but no anti-
lock.
Instruments and Controls
U.S.
Canada
BRAKE
ABS
U.S.
CanadaMain Menu Table of Contents s t
Page 62 of 269
Controls Near the Steering Wheel
Headlights
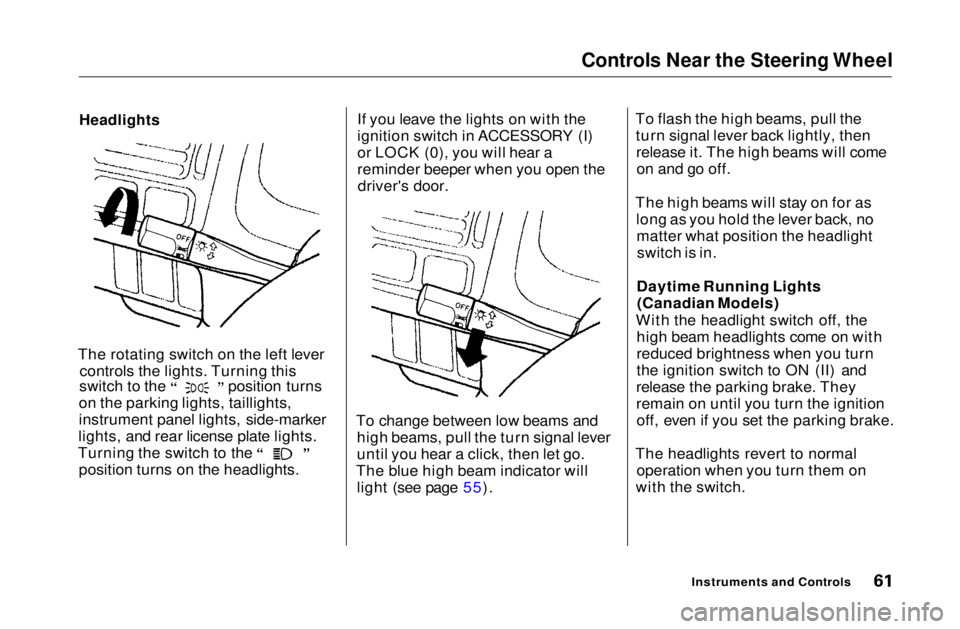
The rotating switch on the left lever controls the lights. Turning this switch to the position turns
on the parking lights, taillights,
instrument panel lights, side-marker
lights, and rear license plate lights. Turning the switch to the
position turns on the headlights. If you leave the lights on with the
ignition switch in ACCESSORY (I)
or LOCK (0), you will hear a
reminder beeper when you open the
driver's door.
To change between low beams and high beams, pull the turn signal lever
until you hear a click, then let go.
The blue high beam indicator will light (see page 55). To flash the high beams, pull the
turn signal lever back lightly, thenrelease it. The high beams will comeon and go off.
The high beams will stay on for as long as you hold the lever back, nomatter what position the headlightswitch is in.
Daytime Running Lights (Canadian Models)
With the headlight switch off, the high beam headlights come on with
reduced brightness when you turn
the ignition switch to ON (II) and
release the parking brake. They
remain on until you turn the ignition off, even if you set the parking brake.
The headlights revert to normal operation when you turn them on
with the switch.
Instruments and ControlsMain Menu Table of Contents s t
Page 68 of 269
Steering Wheel Controls
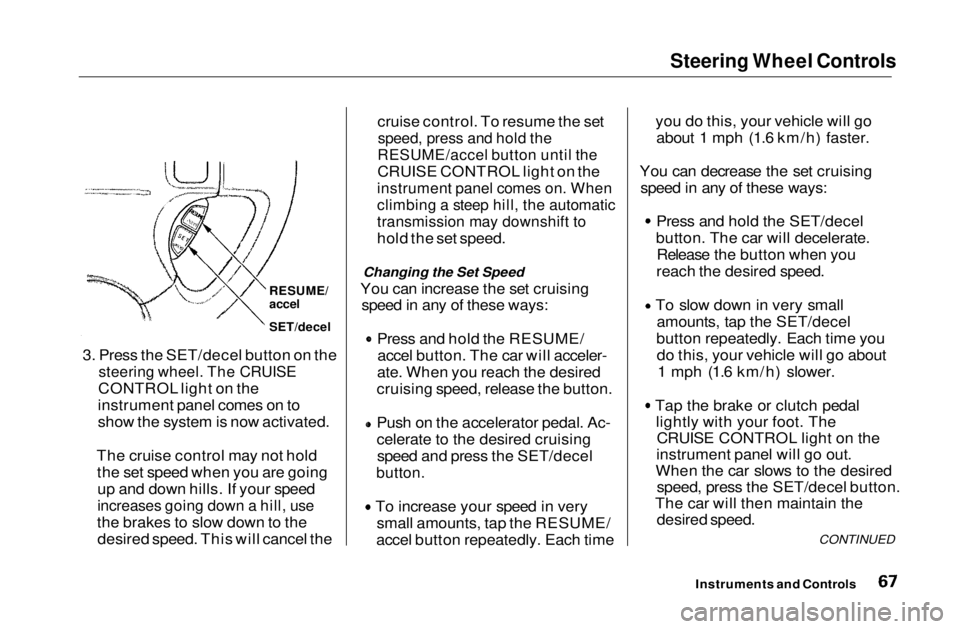
cruise control. To resume the set
speed, press and hold the
RESUME/accel button until the
CRUISE CONTROL light on the
instrument panel comes on. When
climbing a steep hill, the automatic
transmission may downshift to
hold the set speed.
Changing the Set Speed
You can increase the set cruising speed in any of these ways: Press and hold the RESUME/
accel button. The car will acceler-
ate. When you reach the desired
cruising speed, release the button. Push on the accelerator pedal. Ac-
celerate to the desired cruising
speed and press the SET/decel
button.
To increase your speed in very
small amounts, tap the RESUME/
accel button repeatedly. Each time you do this, your vehicle will go
about 1 mph (1.6 km/h) faster.
You can decrease the set cruising speed in any of these ways: Press and hold the SET/decel
button. The car will decelerate. Release the button when you
reach the desired speed. To slow down in very small
amounts, tap the SET/decel
button repeatedly. Each time you do this, your vehicle will go about 1 mph (1.6 km/h) slower. Tap the brake or clutch pedal
lightly with your foot. TheCRUISE CONTROL light on the
instrument panel will go out.
When the car slows to the desired speed, press the SET/decel button.
The car will then maintain the desired speed.
CONTINUED
Instruments and Controls
3. Press the SET/decel button on the
steering wheel. The CRUISE
CONTROL light on the
instrument panel comes on to
show the system is now activated.
The cruise control may not hold the set speed when you are goingup and down hills. If your speed
increases going down a hill, use
the brakes to slow down to the desired speed. This will cancel the
RESUME/
accel
SET/decelMain Menu Table of Contents s t
Page 69 of 269
Steering Wheel Controls
Even with the cruise control turned
on, you can still use the accelerator
pedal to speed up for passing. After
completing the pass, take your foot
off the accelerator pedal. The car
will return to the set cruising speed.
Resting your foot on the brake or
clutch pedal will cause the cruise
control to cancel. Cancelling the Cruise Control
You can cancel the cruise control in any of these ways: Tap the brake or clutch pedal.
Press the SET/decel and RE-
SUME/accel buttons at the same
time.
Press the Cruise Control Master
Switch.
When you tap the brake or clutch pedal, or press the SET and RE-SUME buttons at the same time, the
CRUISE CONTROL light on the
instrument panel will go out and thecar will begin to slow down. You can
use the accelerator pedal in the
normal way.
The system remembers the previously-set cruising speed. To
return to that speed, accelerate toabove 25 mph (40 km/h) and press
the RESUME/accel button until the
CRUISE CONTROL light comes on.
The car will accelerate to the same cruising speed as before.
Pressing the Cruise Control Master
Switch turns the system completely off and erases the previous cruising
speed from memory. To use the
system again, refer to Using the
Cruise Control.
Instruments and ControlsMain Menu Table of Contents s t
Page 80 of 269
Folding Rear Seat, Power Windows
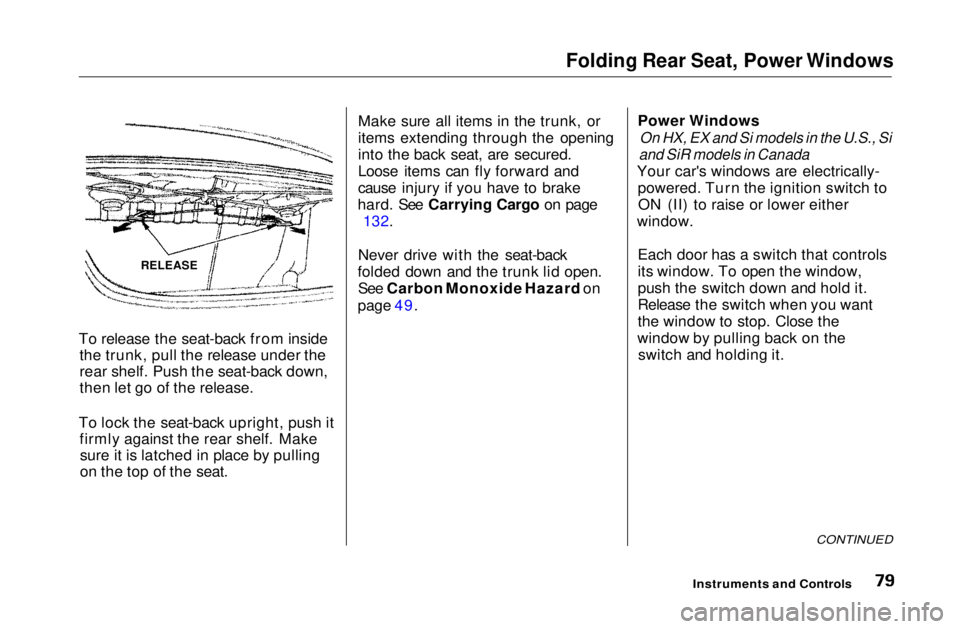
To release the seat-back from inside the trunk, pull the release under the
rear shelf. Push the seat-back down,
then let go of the release.
To lock the seat-back upright, push it firmly against the rear shelf. Makesure it is latched in place by pulling
on the top of the seat. Make sure all items in the trunk, or
items extending through the opening
into the back seat, are secured.
Loose items can fly forward and
cause injury if you have to brake
hard. See Carrying Cargo on page 132.
Never drive with the seat-back
folded down and the trunk lid open. See Carbon Monoxide Hazard on
page 49. Power Windows
On HX, EX and Si models in the U.S., Si
and SiR models in Canada
Your car's windows are electrically- powered. Turn the ignition switch toON (II) to raise or lower either
window.
Each door has a switch that controls
its window. To open the window,
push the switch down and hold it.
Release the switch when you want
the window to stop. Close the
window by pulling back on the switch and holding it.
CONTINUED
Instruments and Controls
RELEASEMain Menu Table of Contents s t
Page 84 of 269
Parking Brake, Glove Box
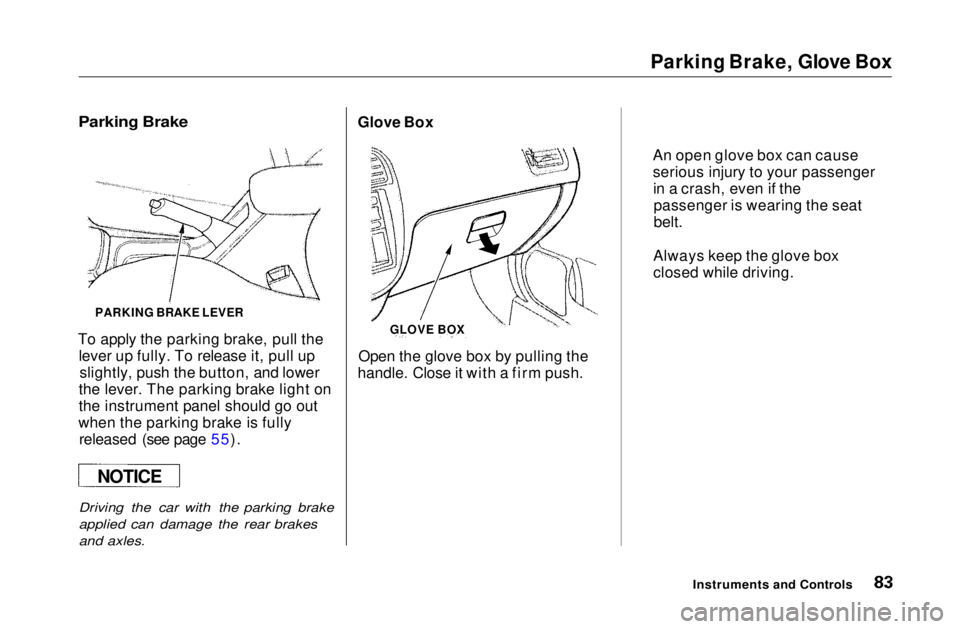
PARKING BRAKE LEVER
To apply the parking brake, pull the lever up fully. To release it, pull upslightly, push the button, and lower
the lever. The parking brake light on
the instrument panel should go out
when the parking brake is fully released (see page 55).
Driving the car with the parking brake
applied can damage the rear brakes
and axles.
Open the glove box by pulling the
handle. Close it with a firm push.
Instruments and Controls
GLOVE BOX
Glove Box
An open glove box can cause
serious injury to your passengerin a crash, even if thepassenger is wearing the seat
belt.
Always keep the glove box
closed while driving.
NOTICE
Parking BrakeMain Menu Table of Contents s t
Page 124 of 269
Break-in Period, Gasoline
Break-in Period
Help assure your car's future
reliability and performance by paying extra attention to how you drive
during the first 600 miles (1,000 km).
During this period: Avoid full-throttle starts and rapid
acceleration.
Avoid hard braking. New brakes
need to be broken-in by moderate
use for the first 200 miles (300
km).
You should follow these same re- commendations with an overhauledor exchanged engine, or when the
brakes are relined.
Gasoline
Your Honda is designed to operate on unleaded gasoline.
We recommend gasolines containing detergent additives that help prevent
fuel system and engine deposits.
Using gasoline containing lead will
damage your car's emissions
controls. This contributes to air
pollution.
In Canada, some gasolines contain
an octane-enhancing additive called
MMT. If you use such gasolines,
your emission control system performance may deteriorate and
the Malfunction Indicator Lamp on
your instrument panel may turn on. If this happens, contact your
authorized Honda dealer for service.
(U.S. DX, HX, EX models, and Canadian
DX and Si models)
Use an unleaded gasoline with a
pump octane number of 86 or higher. Use of a lower octane gasoline can
cause a persistent, heavy metallic
rapping noise in the engine that can
lead to mechanical damage.
(U.S. Si model and Canadian SiR model)
Use a premium unleaded gasoline
with a pump octane number of 91 or higher.
If you are unable to find premium
unleaded gasoline, you may substi-
tute an unleaded regular gasoline.
The engine will compensate for the lower octane, but you may notice aslight decrease in power as a result.
Before DrivingMain Menu Table of Contents s t