clock HONDA CIVIC COUPE 1999 Owners Manual
[x] Cancel search | Manufacturer: HONDA, Model Year: 1999, Model line: CIVIC COUPE, Model: HONDA CIVIC COUPE 1999Pages: 269, PDF Size: 2.42 MB
Page 4 of 269
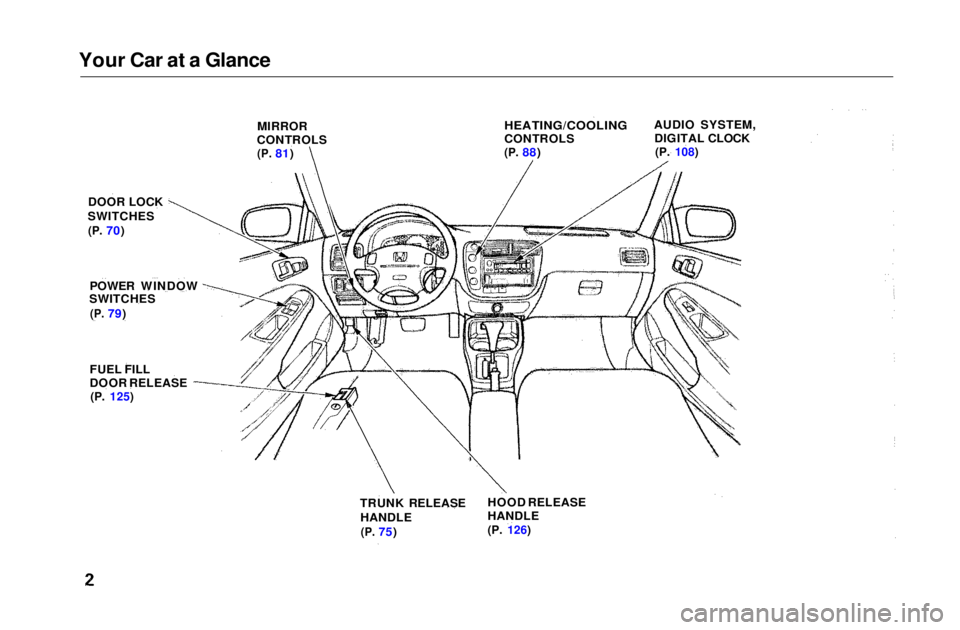
Your Car at a Glance
DOOR LOCK
SWITCHES
(P.
70) MIRROR
CONTROLS
(P.
81)
HEATING/COOLING
CONTROLS
(P.
88)
AUDIO SYSTEM,
DIGITAL CLOCK
(P. 108)
POWER WINDOW
SWITCHES
(P.
79)
FUEL FILL
DOOR RELEASE
(P. 125)
TRUNK RELEASEHANDLE
(P.
75) HOOD RELEASE
HANDLE
(P. 126)Main Menu s t
Page 53 of 269
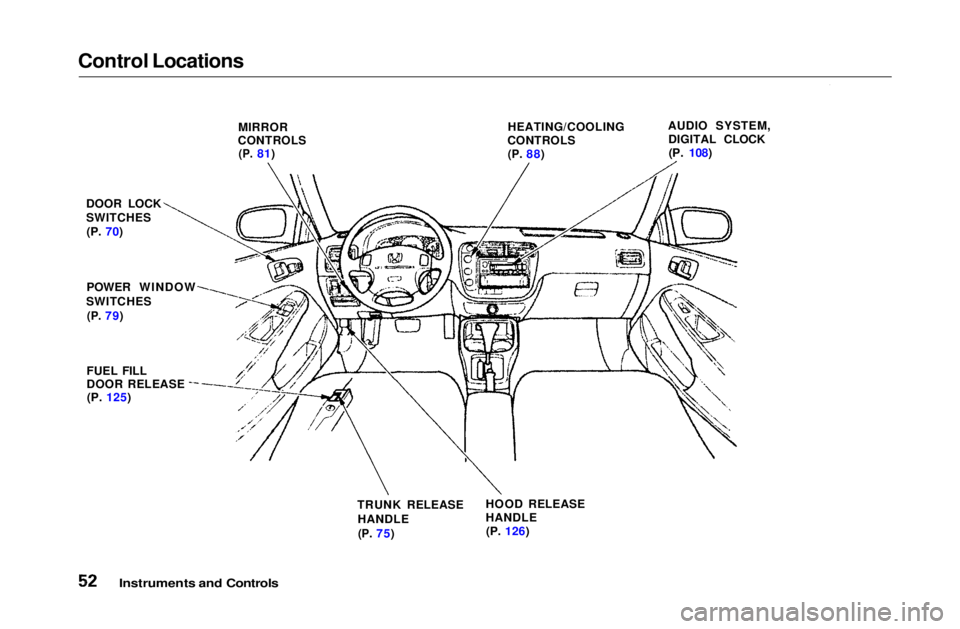
Control Locations
MIRROR
CONTROLS
(P.
81) HEATING/COOLING
CONTROLS
(P.
88) AUDIO SYSTEM,
DIGITAL CLOCK(P. 108)
DOOR LOCK
SWITCHES (P. 70)
POWER WINDOW
SWITCHES
(P.
79)
FUEL FILL
DOOR RELEASE (P. 125)
TRUNK RELEASEHANDLE
(P.
75) HOOD RELEASE
HANDLE
(P. 126)
Instruments and ControlsMain Menu Table of Contents s t
Page 74 of 269
Keys and Locks
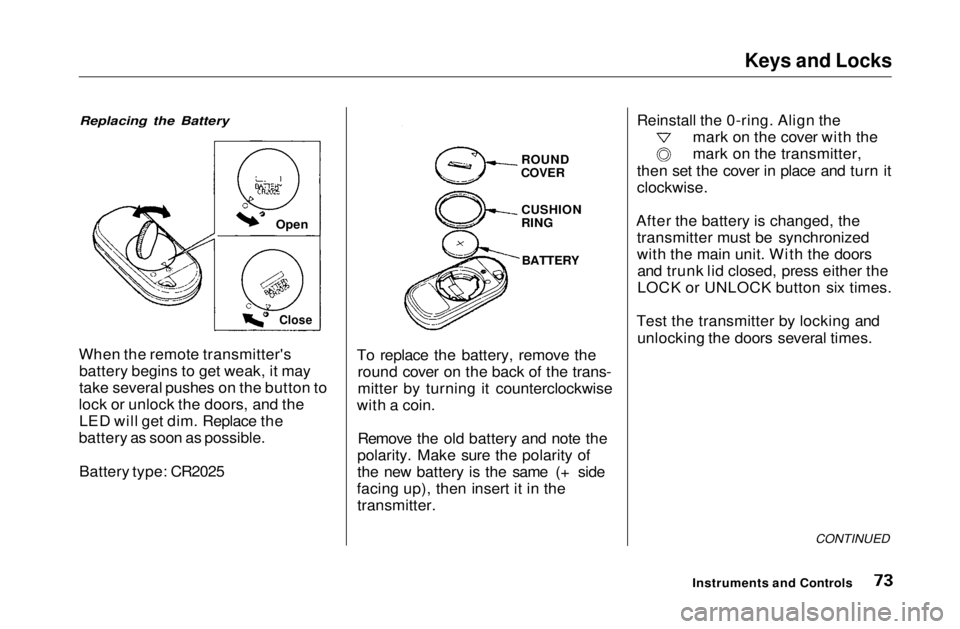
Replacing the Battery
When the remote transmitter's battery begins to get weak, it may
take several pushes on the button to
lock or unlock the doors, and the LED will get dim. Replace the
battery as soon as possible.
Battery type: CR2025 To replace the battery, remove the
round cover on the back of the trans-
mitter by turning it counterclockwise
with a coin.
Remove the old battery and note the
polarity. Make sure the polarity of
the new battery is the same (+ side
facing up), then insert it in the transmitter. Reinstall the 0-ring. Align the
mark on the cover with the
mark on the transmitter,
then set the cover in place and turn it
clockwise.
After the battery is changed, the transmitter must be synchronized
with the main unit. With the doorsand trunk lid closed, press either the
LOCK or UNLOCK button six times.
Test the transmitter by locking and unlocking the doors several times.
CONTINUED
Instruments and Controls
Open
Close
ROUND
COVER
CUSHION
RING
BATTERYMain Menu Table of Contents s t
Page 79 of 269
Seat Adjustments, Folding Rear Seat
The front head restraints adjust for height. You need both hands to
adjust the restraint. Do not attempt
to adjust it while driving. To raise it, pull upward. To lower the restraint,
push the release button sideways and push the restraint down.
To remove a head restraint for cleaning or repair, pull it up as far as
it will go. Push the release button
and pull the restraint out of the seat-
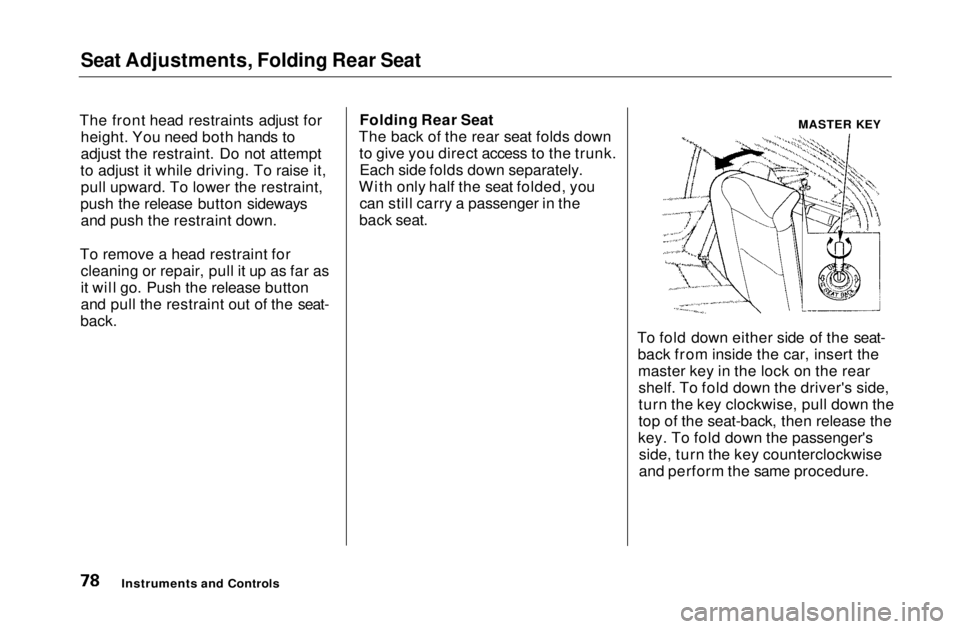
back. Folding Rear Seat
The back of the rear seat folds down to give you direct access to the trunk.Each side folds down separately.
With only half the seat folded, you can still carry a passenger in the
back seat.
To fold down either side of the seat-back from inside the car, insert themaster key in the lock on the rearshelf. To fold down the driver's side,
turn the key clockwise, pull down the
top of the seat-back, then release the
key. To fold down the passenger's side, turn the key counterclockwise
and perform the same procedure.
Instruments and Controls
MASTER KEYMain Menu Table of Contents s t
Page 88 of 269
Comfort and Convenience Features
The heating and air conditioning*
systems in your Honda provide a
comfortable driving environment in
all weather conditions.
The standard audio system has
many features. This section de-
scribes those features and how to
use them. (If you selected an optional audio system, refer to the
operating instructions that came
with it.)
* Air conditioning is standard on the
EX and Si models in the U.S. and on
SiR model in Canada. It is optional on
other models.
Heating and Cooling........................ 88
What Each Control Does............ 88How to Use the System............... 90
To Turn Everything Off ............. 95
Audio System................................... 96 Operating the Radio.................... 96
Adjusting the Sound.................... 98 Digital Clock................................. 99Operating the Optional CD Player/Changer.............. 100
CD Changer Error Indications.............................. 102
AM/FM/CD Audio System..... 103 Operating the Radio.................. 104
Adjusting the Sound.................. 107 Digital Clock............................... 108
Operating the CD Player.......... 109
Protecting Compact Discs........ 112 CD Changer Error Indications.............................. 114
Operating the Cassette Player...................................... 115
Theft Protection........................ 119 Radio Frequencies..................... 120
Radio Reception......................... 120
Comfort and Convenience FeaturesMain Menu s t
Page 89 of 269
Heating and Cooling
Proper use of the Heating and
Cooling system can make the
interior dry and comfortable, and
keep the windows clear for best
visibility.
If your car does not have air
conditioning, it can be installed at
any time. Your dealer will install aGenuine Honda air conditioning
system that meets Honda's high
quality standards and is designed to
exactly fit your car. Please contact
your dealer for more information.
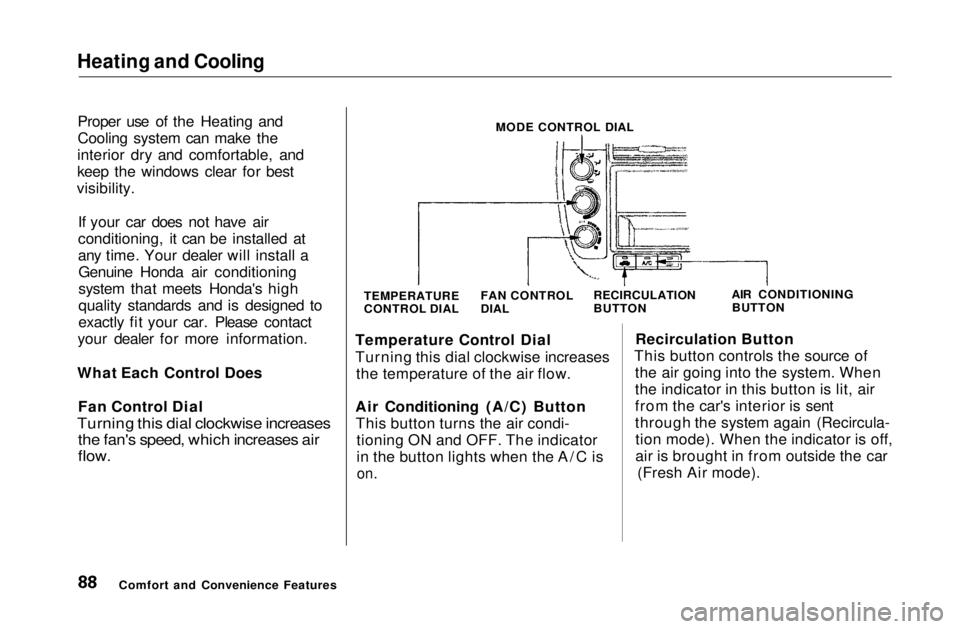
What Each Control Does Fan Control Dial
Turning this dial clockwise increases
the fan's speed, which increases air
flow.
MODE CONTROL DIAL
TEMPERATURE
CONTROL DIAL AIR CONDITIONING
BUTTON
Temperature Control Dial
Turning this dial clockwise increases the temperature of the air flow.
Air Conditioning (A/C) Button This button turns the air condi- tioning ON and OFF. The indicator
in the button lights when the A/C is
on.
Recirculation Button
This button controls the source of the air going into the system. When
the indicator in this button is lit, air
from the car's interior is sent
through the system again (Recircula-tion mode). When the indicator is off,
air is brought in from outside the car (Fresh Air mode).
Comfort and Convenience Features FAN CONTROL
DIAL
RECIRCULATION
BUTTONMain Menu Table of Contents s t
Page 100 of 269
Audio System
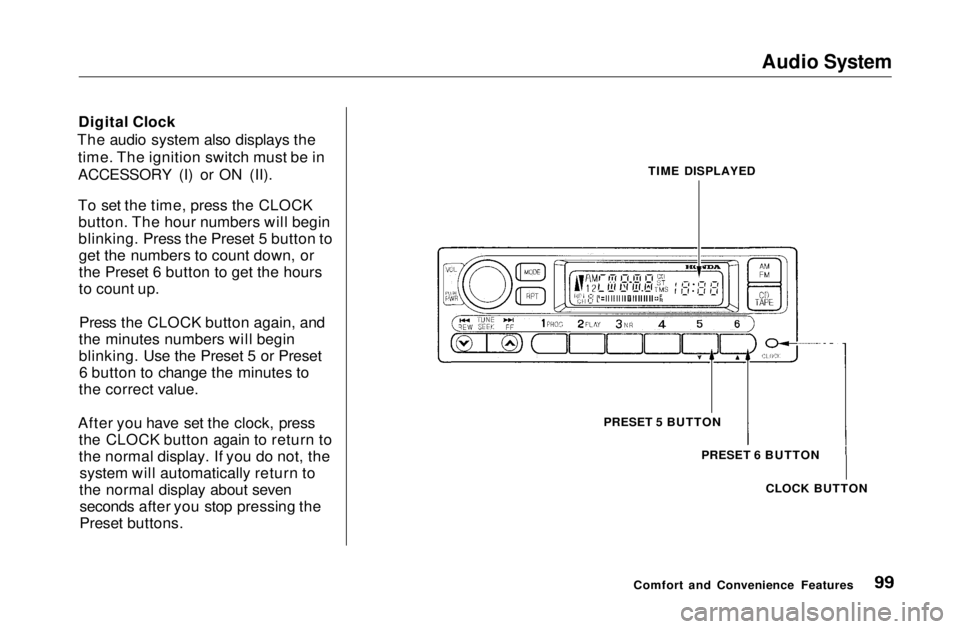
Digital Clock
The audio system also displays the time. The ignition switch must be in
ACCESSORY (I) or ON (II).
To set the time, press the CLOCKbutton. The hour numbers will begin
blinking. Press the Preset 5 button toget the numbers to count down, or
the Preset 6 button to get the hours
to count up.
Press the CLOCK button again, and
the minutes numbers will begin
blinking. Use the Preset 5 or Preset 6 button to change the minutes to
the correct value.
After you have set the clock, press the CLOCK button again to return to
the normal display. If you do not, thesystem will automatically return to
the normal display about seven seconds after you stop pressing the
Preset buttons.
Comfort and Convenience FeaturesTIME DISPLAYED
PRESET 5 BUTTON PRESET 6 BUTTON
CLOCK BUTTONMain Menu Table of Contents s t
Page 109 of 269
Audio System
Audio System Lighting
You can use the instrument panelbrightness control dial to adjust the il-
lumination of the audio system (see
page 62). The audio system
illuminates when the parking lightsare on, even if the radio is turned off.
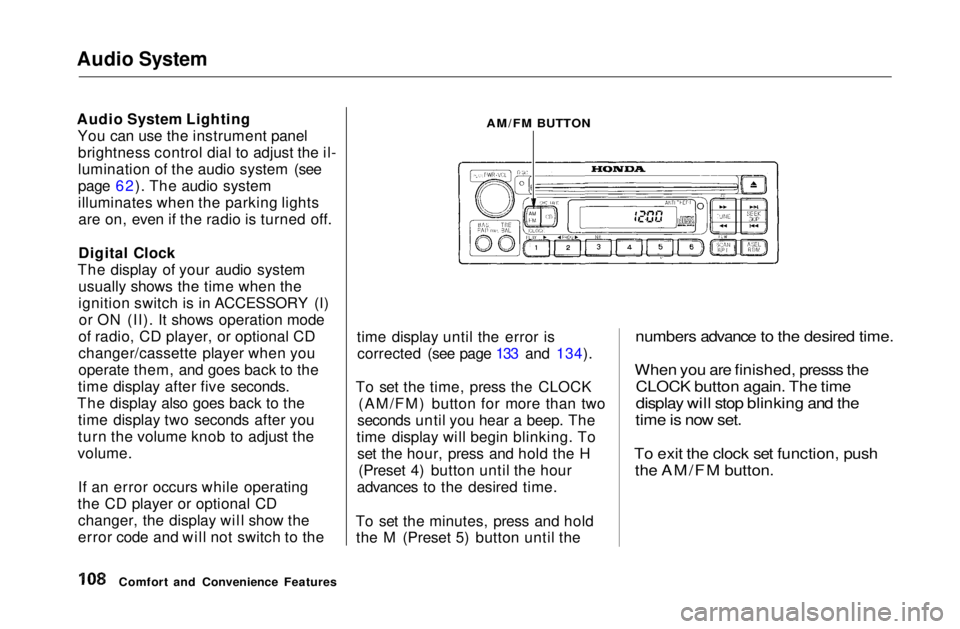
Digital Clock
The display of your audio system usually shows the time when the
ignition switch is in ACCESSORY (I)or ON (II). It shows operation mode
of radio, CD player, or optional CD
changer/cassette player when you
operate them, and goes back to the
time display after five seconds.
The display also goes back to the time display two seconds after you
turn the volume knob to adjust the
volume.
If an error occurs while operating
the CD player or optional CD changer, the display will show the
error code and will not switch to the time display until the error is
corrected (see page 133 and 134).
To set the time, press the CLOCK (AM/FM) button for more than two
seconds until you hear a beep. The
time display will begin blinking. To set the hour, press and hold the H (Preset 4) button until the hour
advances to the desired time.
To set the minutes, press and hold the M (Preset 5) button until the
numbers advance to the desired time.
When you are finished, presss the
CLOCK button again. The time
display will stop blinking and the
time is now set.
To exit the clock set function, push
the AM/FM button.
Comfort and Convenience Features
AM/FM BUTTONMain Menu Table of Contents s t
Page 175 of 269
Cooling System
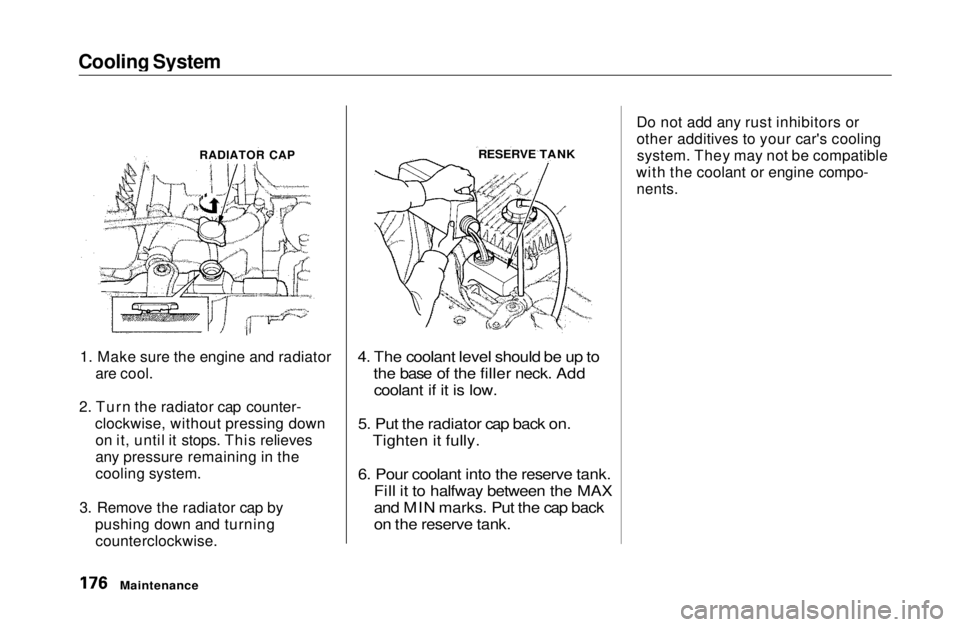
1. Make sure the engine and radiator are cool.
2. Turn the radiator cap counter- clockwise, without pressing downon it, until it stops. This relieves
any pressure remaining in the
cooling system.
3. Remove the radiator cap by pushing down and turningcounterclockwise.
4. The coolant level should be up to
the base of the filler neck. Addcoolant if it is low.
5. Put the radiator cap back on. Tighten it fully.
6. Pour coolant into the reserve tank. Fill it to halfway between the MAX
and MIN marks. Put the cap back
on the reserve tank.
Do not add any rust inhibitors or
other additives to your car's cooling
system. They may not be compatible
with the coolant or engine compo-
nents.
Maintenance
RADIATOR CAP
RESERVE TANKMain Menu Table of Contents s t
Page 204 of 269
Lights
4. Unclip the end of the hold-down wire from its slot. Pivot it out ofthe way and remove the bulb.
5. Insert the new bulb into the hole, making sure the tabs are in theirslots. Pivot the hold-down wire
back in place and clip the end into
the slot.
6. Install the rubber seal over the back of the headlight assembly.Make sure it is right side up; it is
marked "TOP."
7. Push the electrical connector onto the tabs of the new bulb. Makesure it locks in place.
Turn on the headlights to test the new bulb.
8. (Driver's side) Reinstall the power steering
reservoir.
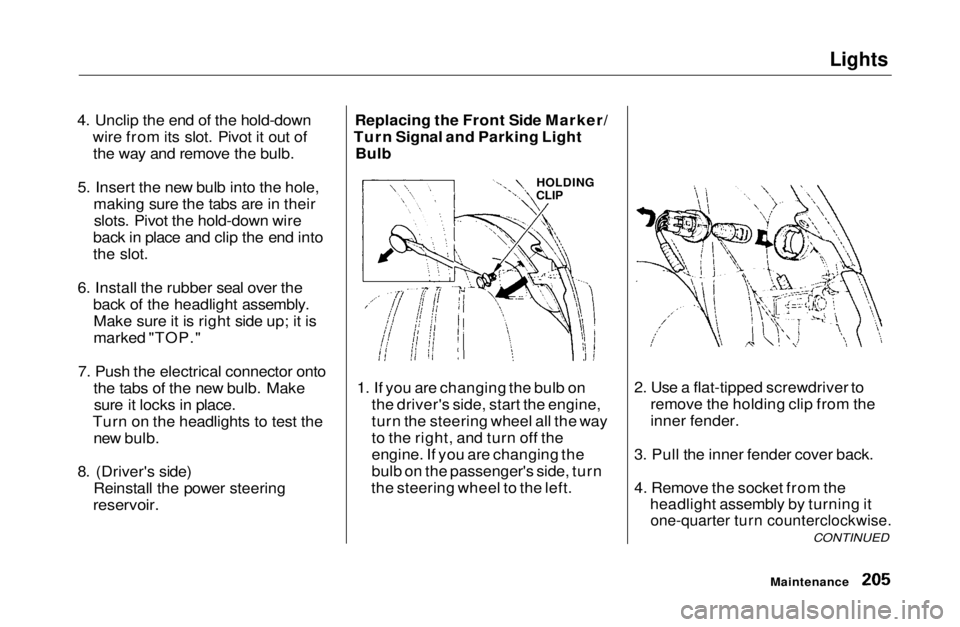
Replacing the Front Side Marker/
Turn Signal and Parking Light Bulb
1. If you are changing the bulb on the driver's side, start the engine,
turn the steering wheel all the way
to the right, and turn off the
engine. If you are changing the
bulb on the passenger's side, turn
the steering wheel to the left. 2. Use a flat-tipped screwdriver to
remove the holding clip from the
inner fender.
3. Pull the inner fender cover back.
4. Remove the socket from the headlight assembly by turning it
one-quarter turn counterclockwise.
CONTINUED
Maintenance
HOLDING
CLIPMain Menu Table of Contents s t