remote control HONDA CIVIC COUPE 1999 Owners Manual
[x] Cancel search | Manufacturer: HONDA, Model Year: 1999, Model line: CIVIC COUPE, Model: HONDA CIVIC COUPE 1999Pages: 269, PDF Size: 2.42 MB
Page 52 of 269
Instruments and Controls
This section gives information about
the controls and displays thatcontribute to the daily operation of
your Honda. All the essential
controls are within easy reach.
Control Locations............................ 52
Indicator Lights................................ 53
Gauges.............................................. 57
Speedometer................................ 57
Tachometer.................................. 57
Odometer...................................... 57
Trip Meter.................................... 57
Fuel Gauge................................... 58
Temperature Gauge.................... 58
Maintenance Required
Indicator.................................... 59
Controls Near the Steering Wheel........................................ 60
Headlights.................................... 61
Daytime Running Lights............. 61
Instrument Panel Brightness..... 62
Turn Signals................................. 62
Windshield Wipers...................... 63
Windshield Washers................... 63
Hazard Warning........................... 64
Rear Window Defogger.............. 64
Steering Wheel Adjustment....... 65
Steering Wheel Controls ................ 66 Cruise Control.............................. 66
Keys and Locks................................ 69
Keys.............................................. 69
Ignition Switch............................. 69
Door Locks................................... 70
Power Door Locks....................... 71
Remote Transmitter.................... 72
Trunk............................................ 75
Seat Adjustments............................. 76
Front Seat Adjustments.............. 76
Rear Seat Access......................... 77
Head Restraints........................... 77
Folding Rear Seat............................ 78
Power Windows............................... 79
Moonroof.......................................... 81
Mirrors.............................................. 81
Adjusting the Power Mirrors..... 82
Parking Brake.................................. 83 Glove Box......................................... 83
Beverage Holder.............................. 84
Accessory Power Socket................ 85
Ashtrays............................................ 85
Interior Light.................................... 86
Instruments and ControlsMain Menu s t
Page 70 of 269
Keys and Locks
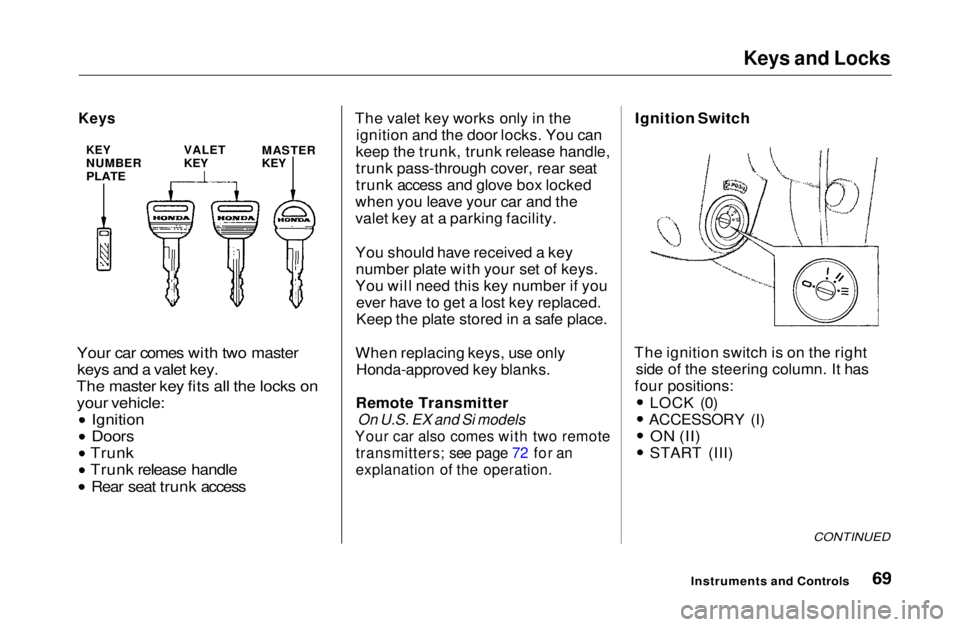
Your car comes with two master keys and a valet key.
The master key fits all the locks on your vehicle: Ignition
Doors
Trunk
Trunk release handle Rear seat trunk access
The valet key works only in the
ignition and the door locks. You can
keep the trunk, trunk release handle,
trunk pass-through cover, rear seat
trunk access and glove box locked
when you leave your car and the
valet key at a parking facility.
You should have received a key number plate with your set of keys.
You will need this key number if you ever have to get a lost key replaced.
Keep the plate stored in a safe place.
When replacing keys, use only Honda-approved key blanks.
Remote Transmitter
On U.S. EX and Si models
Your car also comes with two remote
transmitters; see page 72 for an
explanation of the operation.
Ignition Switch
The ignition switch is on the right side of the steering column. It has
four positions:
LOCK (0)
ACCESSORY (I)
ON (II)
START (III)
CONTINUED
Instruments and Controls
Keys
KEY
NUMBER
PLATE
VALET
KEY
MASTER
KEYMain Menu Table of Contents s t
Page 73 of 269
Keys and Locks
On EX and Si models in the U. S.
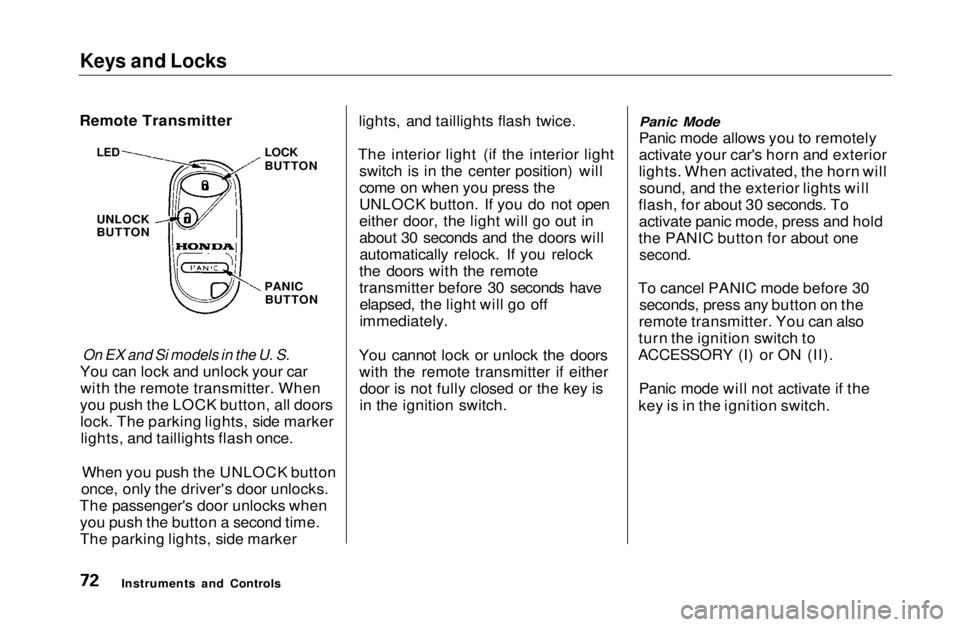
You can lock and unlock your car with the remote transmitter. When
you push the LOCK button, all doors lock. The parking lights, side markerlights, and taillights flash once.
When you push the UNLOCK button
once, only the driver's door unlocks.
The passenger's door unlocks when you push the button a second time.
The parking lights, side marker lights, and taillights flash twice.
The interior light (if the interior light switch is in the center position) will
come on when you press the
UNLOCK button. If you do not open
either door, the light will go out in
about 30 seconds and the doors willautomatically relock. If you relock
the doors with the remote
transmitter before 30 seconds have elapsed, the light will go off
immediately.
You cannot lock or unlock the doors with the remote transmitter if eitherdoor is not fully closed or the key is
in the ignition switch.
Panic Mode
Panic mode allows you to remotely
activate your car's horn and exterior
lights. When activated, the horn will sound, and the exterior lights will
flash, for about 30 seconds. To activate panic mode, press and hold
the PANIC button for about one
second.
To cancel PANIC mode before 30 seconds, press any button on the
remote transmitter. You can also
turn the ignition switch to
ACCESSORY (I) or ON (II).
Panic mode will not activate if the
key is in the ignition switch.
Instruments and Controls
Remote Transmitter
LOCK
BUTTON
LED
UNLOCK
BUTTON
PANICBUTTONMain Menu Table of Contents s t
Page 74 of 269
Keys and Locks
Replacing the Battery
When the remote transmitter's battery begins to get weak, it may
take several pushes on the button to
lock or unlock the doors, and the LED will get dim. Replace the
battery as soon as possible.
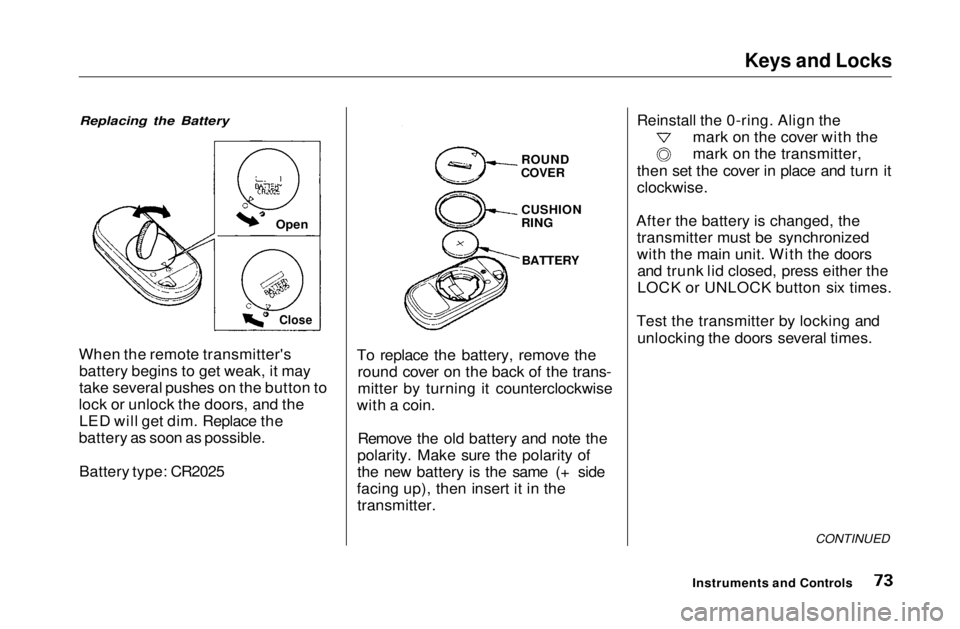
Battery type: CR2025 To replace the battery, remove the
round cover on the back of the trans-
mitter by turning it counterclockwise
with a coin.
Remove the old battery and note the
polarity. Make sure the polarity of
the new battery is the same (+ side
facing up), then insert it in the transmitter. Reinstall the 0-ring. Align the
mark on the cover with the
mark on the transmitter,
then set the cover in place and turn it
clockwise.
After the battery is changed, the transmitter must be synchronized
with the main unit. With the doorsand trunk lid closed, press either the
LOCK or UNLOCK button six times.
Test the transmitter by locking and unlocking the doors several times.
CONTINUED
Instruments and Controls
Open
Close
ROUND
COVER
CUSHION
RING
BATTERYMain Menu Table of Contents s t
Page 87 of 269
Interior Light
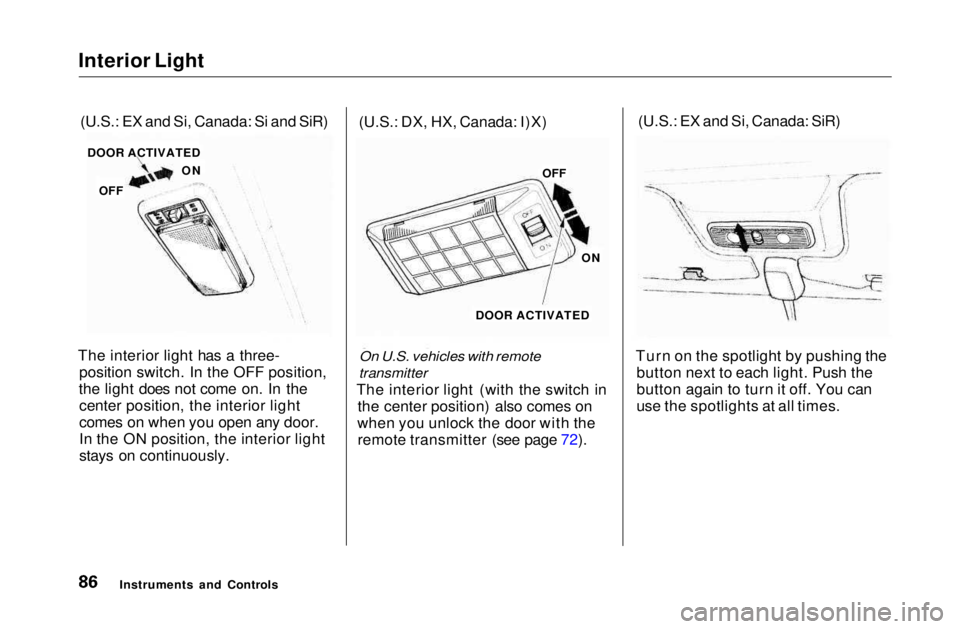
The interior light has a three- position switch. In the OFF position,
the light does not come on. In the center position, the interior light
comes on when you open any door.
In the ON position, the interior light
stays on continuously. (U.S.: DX, HX, Canada: I)X)
On U.S. vehicles with remote
transmitter
The interior light (with the switch in the center position) also comes on
when you unlock the door with the remote transmitter (see page 72). (U.S.: EX and Si, Canada: SiR)
Turn on the spotlight by pushing the button next to each light. Push the
button again to turn it off. You can
use the spotlights at all times.
Instruments and Controls
(U.S.: EX and Si, Canada: Si and SiR)
DOOR ACTIVATED
ON
OFF OFF
ON
DOOR ACTIVATEDMain Menu Table of Contents s t
Page 266 of 269
Index
Reclining the Seat Backs................ 76 Recommended Shift Speeds ........ 138
Reminder Lights.............................. 53
Remote Transmitter........................ 72
Replacement Information Air Cleaner Element.................. 185Coolant........................................ 177
Engine Oil and Filter................. 173
Fuses........................................... 236
Light Bulbs................................. 202
Schedule..................................... 160
Spark Plugs................................. 187
Timing Belt................................. 194
Tires............................................ 195
Wiper Blades.............................. 191
Replacing Seat Belts After a Crash............................................. 44
Reserve Tank, Engine Coolant.... 128
Restraint Child................................ 21
Reverse Gear Position................... 143
Rotation, Tire................................. 198
Safety Belts......................................... 8
Safety Defects, Reporting* .......... 262
Safety Features.................................. 7
Airbags............................................ 9Door Locks................................... 11
Head Restraints........................... 10
Seat Belts........................................ 8
Seats & Seat-Backs...................... 10
Safety Labels, Location of.............. 50
Safety Messages................................ii
Seat Belt, Additional Information.. 42 Lap Belt.........................................43
Lap/Shoulder Belt....................... 42
Seat Belt Maintenance................ 44
Seat Belt System Components... 42
Seat Belts............................................ 8
Cleaning...................................... 216
Maintenance................................. 44
Reminder Light and Beeper....... 54
System Components.................... 42
Tether Attachment Points.......... 40 Use During Pregnancy................ 19
Seats, Adjusting the......................... 76
Serial Number................................ 244
Service Intervals............................ 160
Service Manual* ............................ 263
Service Station Procedures.......... 125
Setting the Clock............................. 99 Shifting
The Automatic Transmission .. 140
The 5-speed Manual Transmission.......................... 138
Shift Lever Position Indicator...... 140
Shift Lock Release......................... 144
Side Marker Lights, Bulb
Replacement in.......................... 205
Signaling Turns................................ 62
Snow Tires...................................... 200
Solvent-type Cleaners.................... 214
Sound System................................... 96
Spare Tire Inflating....................................... 195Specifications............................. 248
Spark Plugs, Replacing................. 187
Specifications Charts..................... 246
Speed Control................................... 66
Speedometer.................................... 57
CONTINUEDMain Menu s t