buttons HONDA CIVIC COUPE 2015 9.G Owners Manual
[x] Cancel search | Manufacturer: HONDA, Model Year: 2015, Model line: CIVIC COUPE, Model: HONDA CIVIC COUPE 2015 9.GPages: 441, PDF Size: 18.4 MB
Page 6 of 441
5Quick Reference Guide
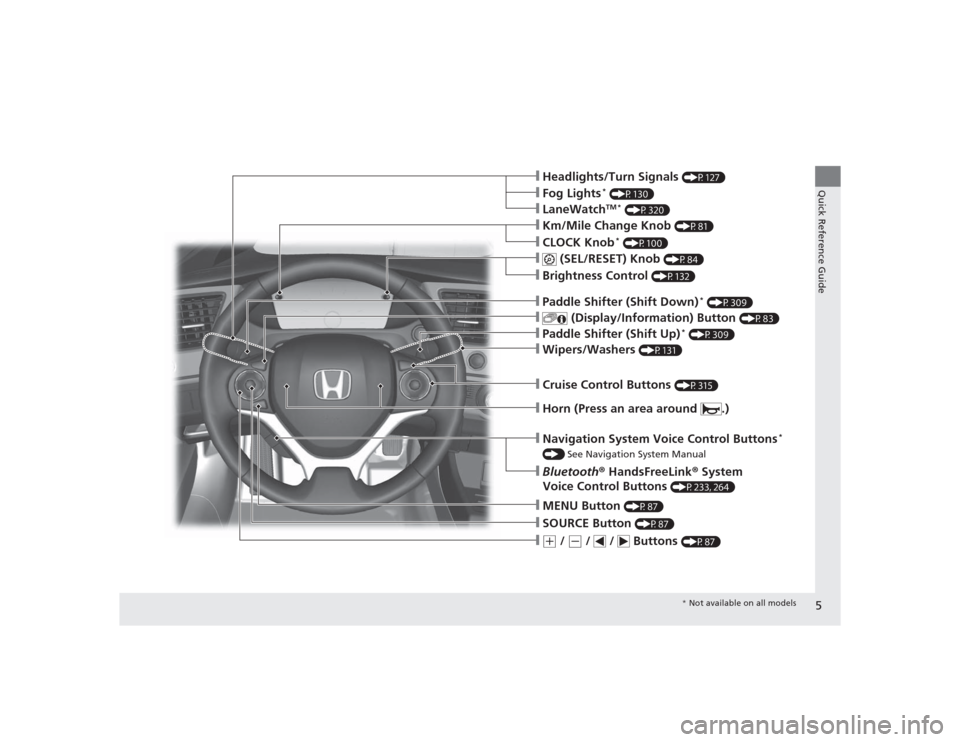
ŌØÖHeadlights/Turn Signals
(P127)
ŌØÖWipers/Washers
(P131)
ŌØÖKm/Mile Change Knob
(P81)
ŌØÖCLOCK Knob
* (P100)
ŌØÖMENU Button
(P87)
ŌØÖ(+
/
(-
/ / Buttons
(P87)
ŌØÖNavigation System Voice Control Buttons
*
() See Navigation System ManualŌØÖBluetooth┬« HandsFreeLink ┬« System
Voice Control Buttons
(P233, 264)
ŌØÖ
(SEL/RESET) Knob
(P84)
ŌØÖSOURCE Button
(P87)
ŌØÖ
(Display/Information) Button
(P83)
ŌØÖBrightness Control
(P132)
ŌØÖLaneWatch
TM *
(P320)
ŌØÖFog Lights
* (P130)
ŌØÖPaddle Shifter (Shift Down)
* (P309)
ŌØÖPaddle Shifter (Shift Up)
* (P309)
ŌØÖCruise Control Buttons
(P315)
ŌØÖHorn (Press an area around .)
* Not available on all models
Page 15 of 441
14Quick Reference Guide
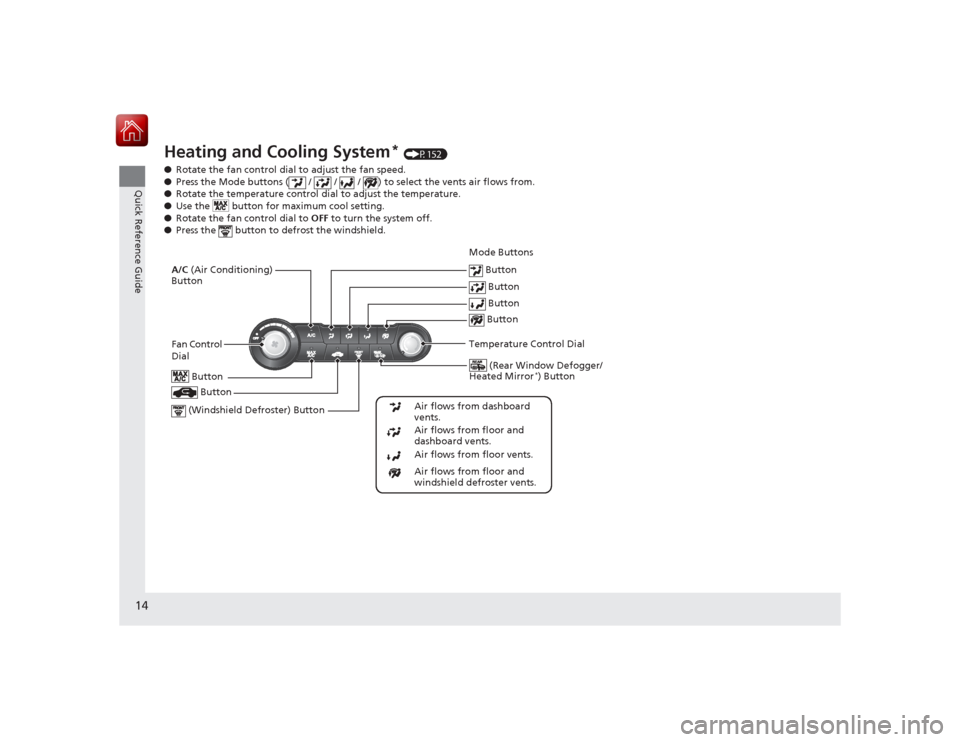
Heating and Cooling System
* (P152)
ŌŚÅ Rotate the fan control dial to adjust the fan speed.
ŌŚÅ Press the Mode buttons ( / / / ) to select the vents air flows from.
ŌŚÅ Rotate the temperature control dial to adjust the temperature.
ŌŚÅ Use the button for maximum cool setting.
ŌŚÅ Rotate the fan control dial to OFF to turn the system off.
ŌŚÅ Press the button to defrost the windshield.
Fan Control
Dial
(Rear Window Defogger/
Heated Mirror
*) Button
(Windshield Defroster) Button
A/C (Air Conditioning)
Button
Air flows from floor and
windshield defroster vents.
Air flows from floor vents. Air flows from floor and
dashboard vents. Air flows from dashboard
vents.
Button Button
Button Button
Temperature Control Dial Button
Button
Mode Buttons
Page 17 of 441
16Quick Reference Guide
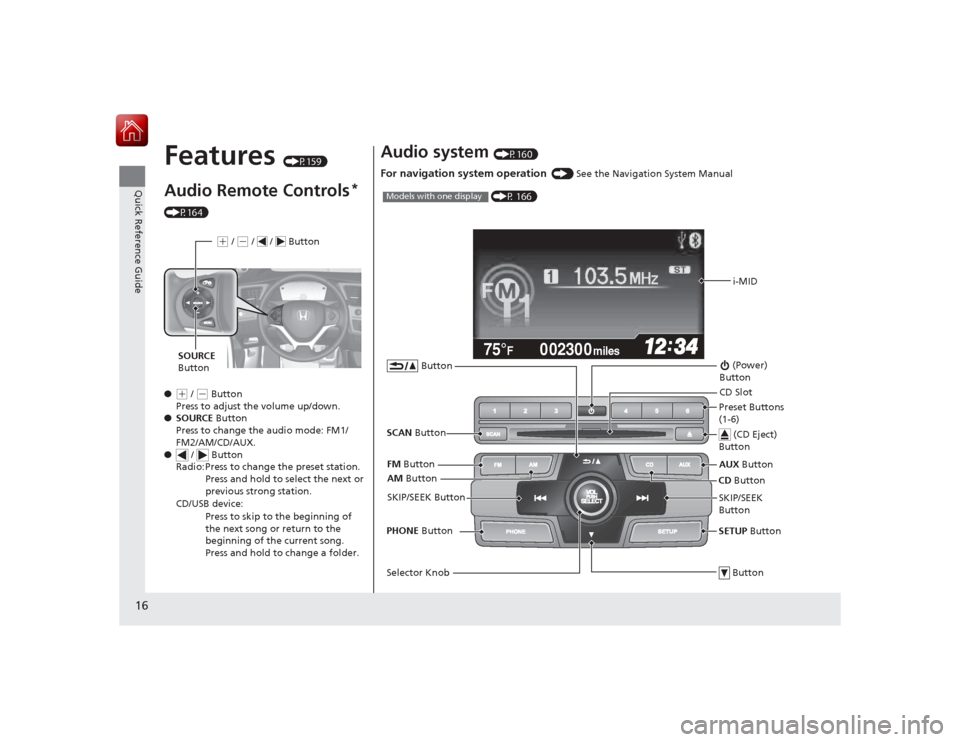
Features
(P159)
Audio Remote Controls
*
(P164)
ŌŚÅ
(+ / ( - Button
Press to adjust the volume up/down.
ŌŚÅ SOURCE Button
Press to change the audio mode: FM1/
FM2/AM/CD/AUX.
ŌŚÅ / Button
Radio: Press to change the preset station.
Press and hold to select the next or
previous strong station.
CD/USB device: Press to skip to the beginning of
the next song or return to the
beginning of the current song.
Press and hold to change a folder.(+ / (- / / Button
SOURCE
Button
Audio system
(P160)
For navigation system operation
() See the Navigation System Manual002300
75┬░
F miles
i-MID
AM Button
FM
Button
SCAN Button
SKIP/SEEK Button
Selector Knob Button (Power)
ButtonCD Button
AUX
Button
CD Slot
(CD Eject)
ButtonPreset Buttons
(1-6)
ButtonSETUP Button
SKIP/SEEK
Button
PHONE
Button
(P 166)
Models with one display
Page 66 of 441
65
Instrument Panel
This chapter describes the buttons, indicators, and gauges that are used while driving.
Indicators............................................ 66intelligent Multi-Information Display (i-MID)
Warning and Information Messages ..... 76Gauges and Multi-Information Display Gauges .............................................. 81
intelligent Multi-Inf ormation Display (i-
MID) ................................................ 83
Page 153 of 441
152Controls
Heating and Cooling
*
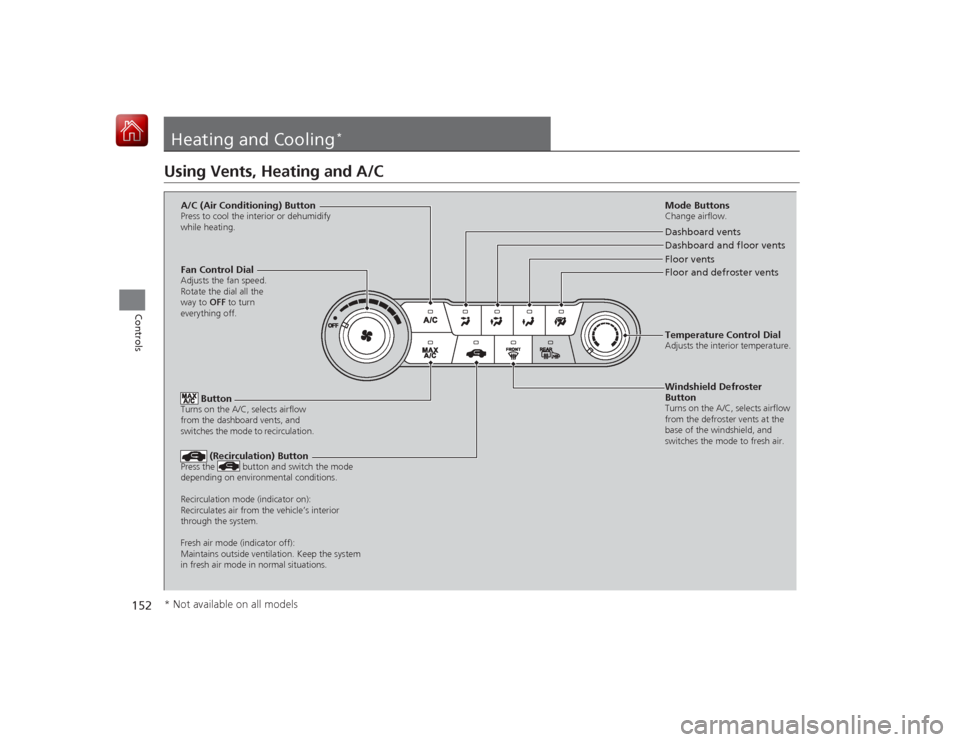
Using Vents, Heating and A/C
Mode ButtonsChange airflow.Floor and defroster vents Floor vents Dashboard and floor vents Dashboard vents
Fan Control Dial
Adjusts the fan speed.
Rotate the dial all the
way to OFF to turn
everything off.
Button
Turns on the A/C, selects airflow
from the dashboard vents, and
switches the mode to recirculation.A/C (Air Conditioning) ButtonPress to cool the interior or dehumidify
while heating.
Windshield Defroster
ButtonTurns on the A/C, selects airflow
from the defroster vents at the
base of the windshield, and
switches the mode to fresh air.Temperature Control DialAdjusts the interior temperature.
(Recirculation) Button
Press the button and switch the mode
depending on environmental conditions.
Recirculation mode (indicator on):
Recirculates air from the vehicleŌĆÖs interior
through the system.
Fresh air mode (indicator off):
Maintains outside ventilation. Keep the system
in fresh air mode in normal situations.
* Not available on all models
Page 156 of 441
155
Continued
Controls
Climate Control System
*
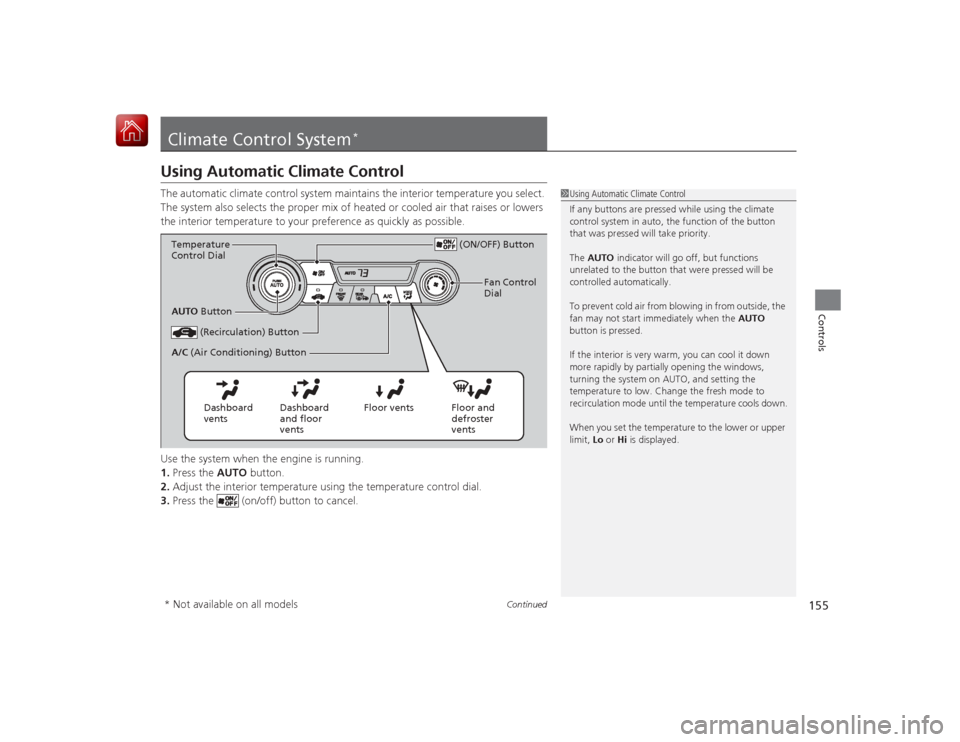
Using Automatic Climate ControlThe automatic climate control system maintains the interior temperature you select.
The system also selects the proper mix of heated or cooled air that raises or lowers
the interior temperature to your preference as quickly as possible.
Use the system when the engine is running.
1.Press the AUTO button.
2. Adjust the interior temperature using the temperature control dial.
3. Press the (on/off) button to cancel.
1Using Automatic Climate Control
If any buttons are pressed while using the climate
control system in auto, the function of the button
that was pressed will take priority.
The AUTO indicator will go off, but functions
unrelated to the button that were pressed will be
controlled automatically.
To prevent cold air from blowing in from outside, the
fan may not start immediately when the AUTO
button is pressed.
If the interior is very warm, you can cool it down
more rapidly by partially opening the windows,
turning the system on AUTO, and setting the
temperature to low. Change the fresh mode to
recirculation mode until the temperature cools down.
When you set the temperature to the lower or upper
limit, Lo or Hi is displayed.
(ON/OFF) Button
(Recirculation) Button
Floor and
defroster
vents
Floor vents
Dashboard
and floor
vents
Dashboard
vents
AUTO
Button
A/C (Air Conditioning) Button
Temperature
Control Dial
Fan Control
Dial
* Not available on all models
Page 161 of 441
160Features
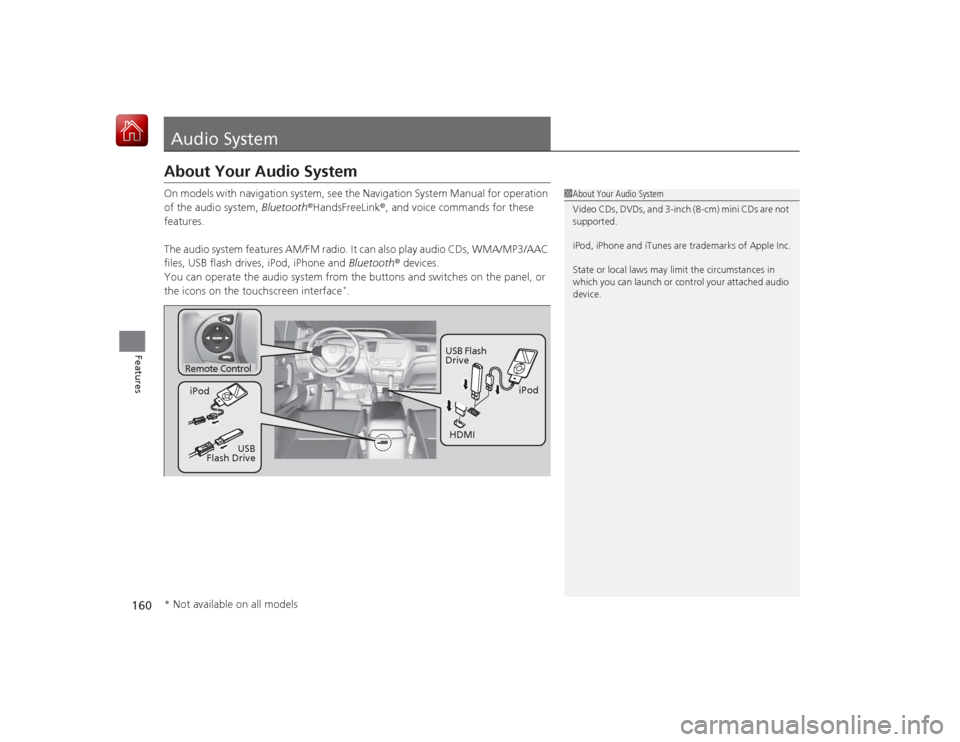
Audio SystemAbout Your Audio SystemOn models with navigation system, see the Navigation System Manual for operation
of the audio system, Bluetooth®HandsFreeLink ®, and voice commands for these
features.
The audio system features AM/FM radio. It can also play audio CDs, WMA/MP3/AAC
files, USB flash drives, iPod, iPhone and Bluetooth® devices.
You can operate the audio system from the buttons and switches on the panel, or
the icons on the touchscreen interface
*.
1 About Your Audio System
Video CDs, DVDs, and 3-inch (8-cm) mini CDs are not
supported.
iPod, iPhone and iTunes are trademarks of Apple Inc.
State or local laws may limit the circumstances in
which you can launch or control your attached audio
device.
Remote Control
iPod
USB Flash
Drive
iPod
HDMI
USB
Flash Drive
* Not available on all models
Page 163 of 441
162
uuAudio System uUSB Adapter Cable
Features
USB Adapter Cable
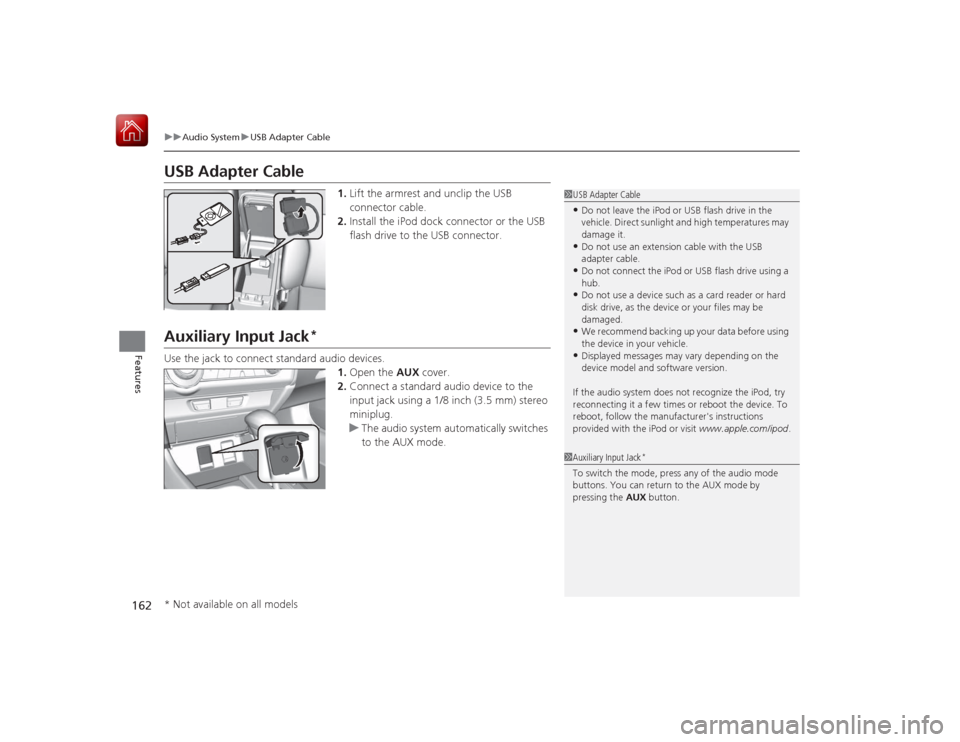
1. Lift the armrest and unclip the USB
connector cable.
2. Install the iPod dock connector or the USB
flash drive to the USB connector.
Auxiliary Input Jack
*
Use the jack to connect standard audio devices.
1.Open the AUX cover.
2. Connect a standard audio device to the
input jack using a 1/8 inch (3.5 mm) stereo
miniplug.
u The audio system automatically switches
to the AUX mode.
1USB Adapter CableŌĆóDo not leave the iPod or USB flash drive in the
vehicle. Direct sunlight and high temperatures may
damage it.ŌĆóDo not use an extension cable with the USB
adapter cable.ŌĆóDo not connect the iPod or USB flash drive using a
hub.ŌĆóDo not use a device such as a card reader or hard
disk drive, as the device or your files may be
damaged.ŌĆóWe recommend backing up your data before using
the device in your vehicle.ŌĆóDisplayed messages may vary depending on the
device model and software version.
If the audio system does not recognize the iPod, try
reconnecting it a few times or reboot the device. To
reboot, follow the manufacturer's instructions
provided with the iPod or visit www.apple.com/ipod.
1Auxiliary Input Jack
*
To switch the mode, press any of the audio mode
buttons. You can return to the AUX mode by
pressing the AUX button.
* Not available on all models
Page 165 of 441
164
uuAudio System uAudio Remote Controls
Features
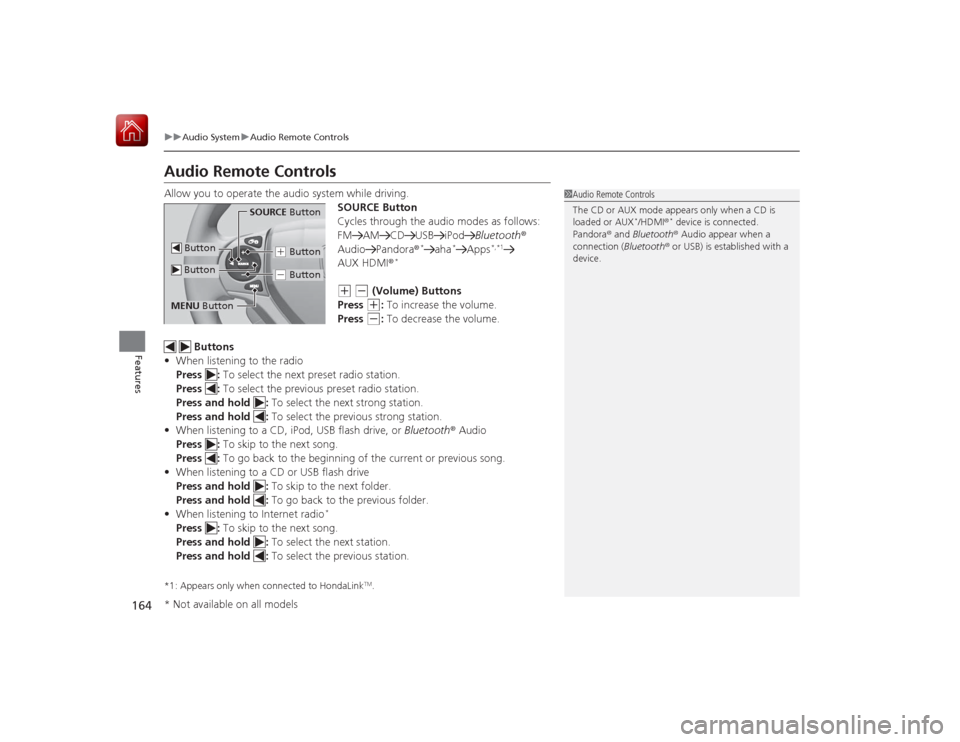
Audio Remote ControlsAllow you to operate the audio system while driving.
SOURCE Button
Cycles through the audio modes as follows:
FM AM CD USB iPodBluetooth®
Audio Pandora ®
*
aha
*
Apps
*,*1
AUX HDMI®
*
(+
(-
(Volume) Buttons
Press (+
: To increase the volume.
Press
(-
: To decrease the volume.
Buttons
ŌĆó When listening to the radio
Press : To select the next preset radio station.
Press : To select the previous preset radio station.
Press and hold : To select the next strong station.
Press and hold : To select the previous strong station.
ŌĆó When listening to a CD, iPod, USB flash drive, or Bluetooth┬« Audio
Press : To skip to the next song.
Press : To go back to the begi nning of the current or previous song.
ŌĆó When listening to a CD or USB flash drive
Press and hold : To skip to the next folder.
Press and hold : To go back to the previous folder.
ŌĆó When listening to Internet radio
*
Press : To skip to the next song.
Press and hold : To select the next station.
Press and hold : To select the previous station.*1: Appears only when connected to HondaLink
TM.
1Audio Remote Controls
The CD or AUX mode appears only when a CD is
loaded or AUX
*/HDMI ®
* device is connected.
Pandora ® and Bluetooth® Audio appear when a
connection (Bluetooth ® or USB) is established with a
device.
SOURCE Button
(+ Button(- Button
Button ButtonMENU Button* Not available on all models
Page 169 of 441
168
uuAudio System Basic Operation uPlaying AM/FM Radio
Features
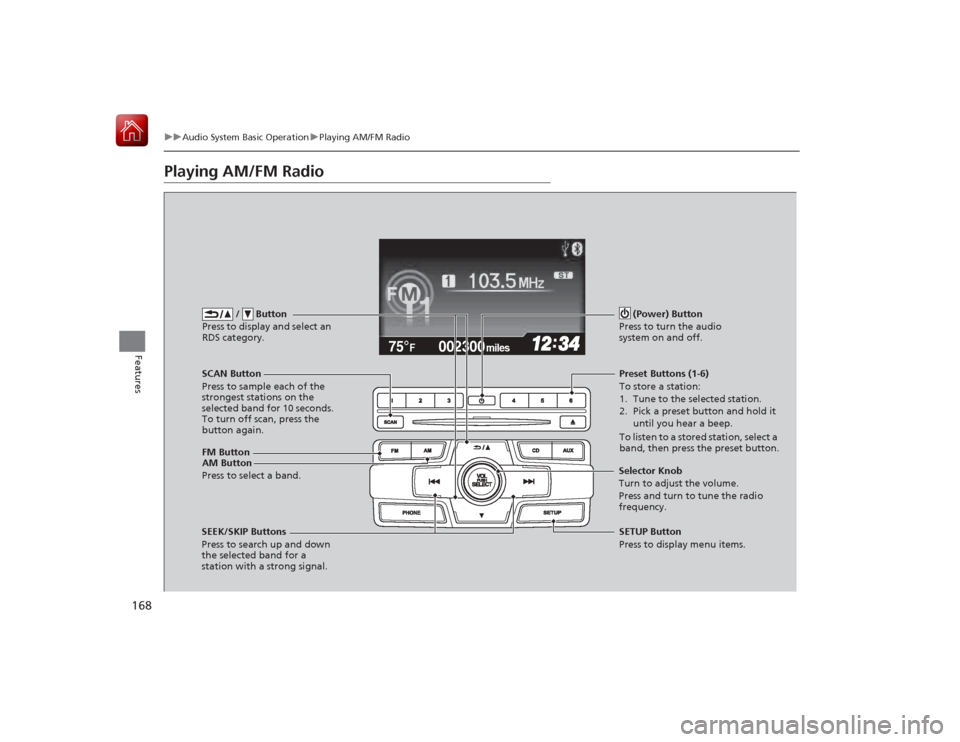
Playing AM/FM Radio
002300
75┬░
F miles
FM Button / Button
Press to display and select an
RDS category.SCAN Button
Press to sample each of the
strongest stations on the
selected band for 10 seconds.
To turn off scan, press the
button again. (Power) Button
Press to turn the audio
system on and off.
Preset Buttons (1-6)
To store a station:
1. Tune to the selected station.
2. Pick a preset button and hold it until you hear a beep.
To listen to a stored station, select a
band, then press the preset button.
SEEK/SKIP Buttons
Press to search up and down
the selected band for a
station with a strong signal. SETUP Button
Press to display menu items.
Selector Knob
Turn to adjust the volume.
Press and turn to tune the radio
frequency.
AM Button
Press to select a band.