ECU HONDA CIVIC HYBRID 2011 8.G Owner's Guide
[x] Cancel search | Manufacturer: HONDA, Model Year: 2011, Model line: CIVIC HYBRID, Model: HONDA CIVIC HYBRID 2011 8.GPages: 369, PDF Size: 6.85 MB
Page 249 of 369
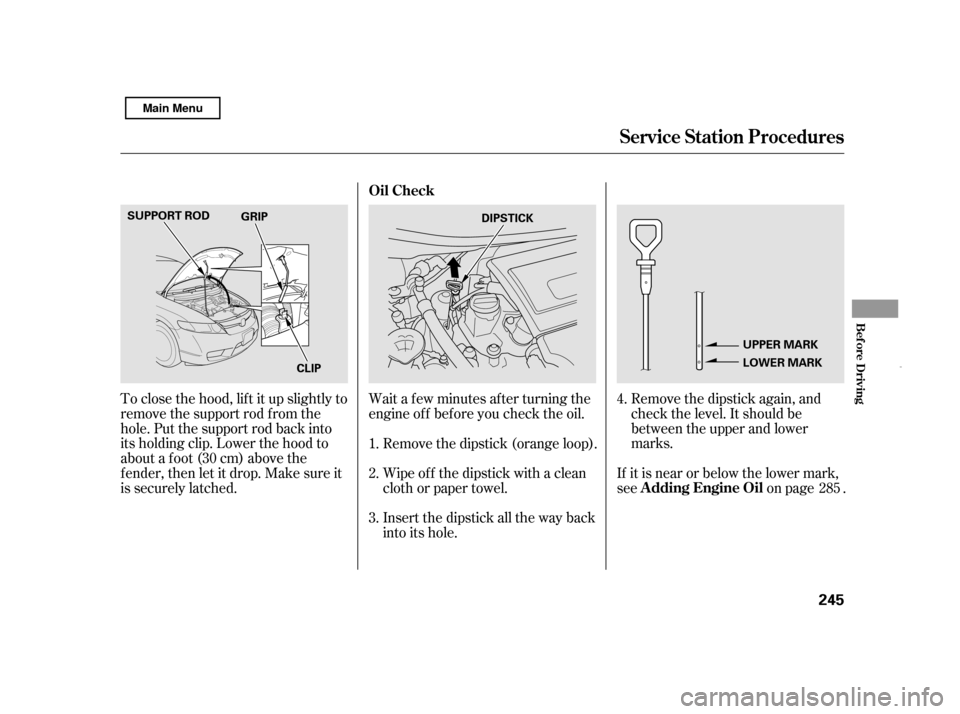
Remove the dipstick again, and
check the level. It should be
between the upper and lower
marks.
To close the hood, lif t it up slightly to
remove the support rod f rom the
hole. Put the support rod back into
its holding clip. Lower the hood to
about a f oot (30 cm) above the
f ender, then let it drop. Make sure it
is securely latched.
If it is near or below the lower mark,
see on page .
Wait a f ew minutes af ter turning the
engine of f bef ore you check the oil.
Remove the dipstick (orange loop).
Wipe of f the dipstick with a clean
cloth or paper towel.
Insert the dipstick all the way back
into its hole.
2. 3.
1.
4.
285
Service Station Procedures
Oil Check
A dding Engine Oil
Bef ore Driving
245
DIPSTICK
UPPER MARK
LOWER MARK
SUPPORT ROD
CLIP
GRIP
Main Menu
Page 259 of 369

Store or secure all items that could
be thrown around and hurt
someone during a crash.Distribute cargo evenly on the
f loor of the trunk, placing the
heaviest items on the bottom and
as far forward as possible.
Do not put any items on the rear
shelf that could cover the IMA
battery air intake. They can block
your view, or be thrown around
the vehicle during a crash.
The air intake for the IMA battery
and electronics is located on top of
the rear shelf . Do not block this air
intake; it may cause the IMA battery
and the power control unit to
overheat, causing the IMA system to
shut down. It will start working again
af ter it cools.
Be sure items placed on the f loor
behind the f ront seats cannot roll
underneath and interf ere with the
proper operation of the seats, the
sensors under the seats, or the
driver’s ability to operate the
pedals. If you carry large items that
prevent you f rom closing the trunk
lid, exhaust gas can enter the
passenger area. To avoid the
possibility of carbon monoxide
poisoning, f ollow the instructions
on page .
Keep the glove box closed while
driving. If it is open, a passenger
could injure their knees during a
crash or sudden stop. 52
CONT INUED
Air Intake
Carrying Cargo in the T runk
Carrying Items in the Passenger
Compartment
Carrying Cargo
Bef ore Driving
255
AIR INTAKE
Main Menu
Page 262 of 369

Make sure all windows, mirrors,
and outside lights are clean and
unobstructed. Remove f rost, snow,
or ice.Check that any items you may be
carrying are stored properly or
f astened down securely.
Check the seat adjustment (see
page ).
Check the adjustment of the
inside and outside mirrors (see
page ).
Check the steering wheel
adjustment (see page ).
Make sure the doors are securely
closed and locked.Fasten your seat belt. Check that
your passengers have f astened
their seat belts (see page ).
Youshoulddothefollowingchecks
and adjustments bef ore you drive
your vehicle.
When you start the engine, check
the gauges and indicators in the
instrument panel (see page ).
Check that the hood and trunk are
f ully closed.
Visually check the tires. If a tire
looks low, use a gauge to check its
pressure (see page ).
1. 2. 3.
8.
7.
6. 9.
4. 5.
57
10.
91
98 77
303 15
Preparing to Drive
258
Main Menu
Page 270 of 369

Make sure the windows are closed.
Turn of f the lights.
Place any packages, valuables, etc.,
in the trunk or take them with you.If the vehicle is f acing downhill,
turn the front wheels toward the
curb.
Make sure the parking brake is
f ully released bef ore driving away.
Driving with the parking brake
partially set can overheat or
damage the rear brakes.
Lock the doors.
Check the indicator on the
instrument panel to verif y that the
security system is set.
Never park over dry leaves, tall
grass, or other f lammable
materials. The hot three way
catalytic converter could cause
these materials to catch on fire.
If the vehicle is f acing uphill, turn
the front wheels away from the
curb.
Set the parking brake bef ore you put
the transmission in Park. This keeps
the vehicle from moving and putting
pressure on the parking mechanism
in the transmission.
Always use the parking brake when
you park your vehicle. Make sure
the parking brake is set f irmly, or
your vehicle may roll if it is parked
on an incline.
Parking T ips
Parking
266 Never install a sunshade between the
upper and lower meters on the
instrument panel. If you do, you could
cause heat damage to the upper meter
on a very hot day.
Main Menu
Page 289 of 369

The oil viscosity or weight is
provided on the container’s label.
Oil is a major contributor to your
engine’s perf ormance and longevity.
Always use a premium-grade 0W-20
detergent oil displaying the API
Certif ication Seal. This seal indicates
the oil is energy conserving, and that
it meets the American Petroleum
Institute’s latest requirements.
Honda Motor Oil is the pref erred
0W-20 lubricant f or your vehicle. It is
highly recommended that you use
Honda Motor Oil in your vehicle f or optimum engine protection. Make
sure the API Certif ication Seal says
‘‘For Gasoline Engines’’.
A very low-viscosity, f uel-ef f icient
0W-20 oil is the pref erred engine
lubricant f or your Civic Hybrid. This
special oil is f ormulated to help your
engine use less fuel. It is available at
your dealer. A 5W-20 oil may be used
if 0W-20 is not available.
Unscrew and remove the engine oil
fill cap on the valve cover. Pour the
oil slowly and caref ully so you do not
spill any. Clean up any spills
immediately. Spilled oil could
damage components in the engine
compartment.
Reinstall the engine oil f ill cap, and
tighten it securely. Wait a f ew
minutes, and recheck the oil level on
the engine oil dipstick. Do not f ill
above the upper mark; you could
damage the engine. Recommended Engine Oil
A dding Engine Oil
Maint enance
285
API CERTIFICATION SEAL
Ambient Temperature
ENGINE OIL FILL CAP
Main Menu
Page 292 of 369

Turn of f the engine, let it sit f or
several minutes, then check the oil
level on the dipstick. If necessary,
add more oil.
Put the under-cover back in place
and reinstall the nine holding clips.
Locktheclipssecurelybypushing
on the center of each clip.If the coolant level in the reserve
tank is at or below the MIN line, add
coolant to bring it up to between the
MIN and MAX lines. Inspect the
cooling system f or leaks. If Honda antif reeze/coolant is not
available, you may use another
major-brand non-silicate coolant as a
temporaryreplacement.Makesureit
is a high-quality coolant
recommended f or aluminum engines.
Continued use of any non-Honda
coolant can result in corrosion,
causingthecoolingsystemto
malf unction or f ail. Have the cooling
system f lushed and ref illed with
Honda antif reeze/coolant as soon as
possible.
Always use Honda Long-lif e Anti-
f reeze/Coolant Type 2. This coolant
is pre-mixed with 50 percent
antif reeze and 50 percent distilled
water. Never add straight antif reeze
or plain water.
11. 12.
Only on U.S. models
A dding Engine Coolant
Changing the Oil and Filter, Engine Coolant
288 RESERVE TANK
Improper disposal of engine oil can be
harmf ul to the environment. If you
change your own oil, please dispose of
the used oil properly. Put it in a sealed
container and take it to a recycling
center. Do not discard it in a trash bin
or dump it on the ground.
Main Menu
Page 295 of 369

Check the f luid level with the engine
at normal operating temperature.Remove the dipstick (yellow loop)
f rom the transmission, and wipe it
with a clean cloth.
Insert the dipstick all the way into
the transmission securely as
shown in the illustration.
Remove the dipstick and check
the f luid level. It should be
between the upper and lower
marks within the HOT range.If the level is below the lower
mark, add f luid into the dipstick
hole to bring it to the level
between the upper and lower
marks.
Pour the f luid slowly and caref ully
so you do not spill any. Clean up
any spill immediately; it could
damage components in the engine
compartment.
Park the vehicle on level ground.
Start the engine, let it run until the
radiator f an comes on, then shut
of f the engine. For accurate
results, wait about 60 seconds (but
no longer than 90 seconds) bef ore
doing step 2. Always use Honda CVTF
(continuously variable
transmission f luid).
3. 4. 5.
2.
1.
CONT INUED
Continuously Variable
Transmission (CVT)
T ransmission Fluid
Maint enance
291
DIPSTICK
UPPER
MARK
LOWER
MARK
HOT
Range
Main Menu
Page 296 of 369

Check the brake f luid level in the
reservoirs monthly.
Insert the dipstick all the way back
into the transmission securely.
The transmission should be drained
and ref illed with new f luid when this
service is indicated by a maintenance
message on the inf ormation display.
If you are not sure how to add f luid,
contact your dealer.
Check the f luid level several seconds
after you turn the ignition switch to
the ON (II) position. The f luid level
should be between the MIN and
MAXmarksonthesideof the
reservoir. If the level is at or below
the MIN mark, your brake system
needs attention. Have the brake
system inspected f or leaks or worn
brake pads.
Independent of the Maintenance
Minder inf ormation, replace the
brake f luid every 3 years.
Brake f luid marked DOT 5 is not
compatible with your vehicle’s
braking system and can cause
extensive damage.
Using any non-Honda brake f luid can
cause corrosion and decrease the lif e
of the system. Have the brake
system f lushed and ref illed with
Honda Heavy Duty Brake Fluid
DOT 3 as soon as possible.
Always use Honda Heavy Duty
Brake Fluid DOT 3. If it is not
available, you should use only DOT 3
or DOT 4 f luid, f rom a sealed
container, as a temporary
replacement.
6.
T ransmission Fluid, Brake Fluid
Brake Fluid
292 MAX
MIN
Main Menu
Page 302 of 369

Pull the bulb straight out of its
socket. Push the new bulb straight
into the socket until it bottoms.
Insert the socket back into the
light assembly. Turn it clockwise
to lock it in place.
Push the trunk lid trim back into
position.
Put the f asteners into the holes on
the trunk lid trim. Reinstall the
screws.Beforeusinganautomaticcarwash,
remove the audio antenna so it does
not get damaged. Remove the
antenna by unscrewing it. When you
reinstall the antenna, tighten it
securely.
Bef ore entering or parking in areas
with low ceiling height, remove the
antenna.
Turn on the lights to make sure
the new bulb is working.
Remove the socket by turning it
one-quarter turn counterclockwise.
2. 3. 4.5. 6.7.
Lights, Roof Antenna
A udio A ntenna
298 BULB
SOCKET
Main Menu
Page 312 of 369

Mount tire chains on your tires when
required by driving conditions or
local laws. Install them only on the
f ront tires.
Because your vehicle has limited tire
clearance, Honda strongly
recommends using the chains listed
below, made by Security Chain
Company (SCC).
Cable-type: SCC RADIAL CHAIN
SC1030
When installing cables, f ollow the
manuf acturer’s instructions, and
mount them as tight as you can.
Make sure they are not contacting
the brake lines or suspension. Drive
slowly with them installed. If you
hear them coming into contact with
the body or chassis, stop and
investigate. Remove them as soon as
you begin driving on cleared roads.Check the condition of the 12 volt
battery monthly by looking at the
test indicator window. The label on
the battery explains the test
indicator’s colors.
T ire Chains
Tires, Checking the 12 Volt Battery
Checking the 12 Volt Battery
308 TEST INDICATOR WINDOW
Using the wrong chains, or not
properly installing chains, can
damage the brake lines and
cause a crash in which you can
be seriously injured or killed.
Follow all instructions in this
owner’s manual regarding the
selection and use of tire chains.
Traction devices that are the wrong
size or improperly installed can
damage your vehicle’s brake lines,
suspension, body, and wheels. Stop
driving if they are hitting any part of
the vehicle.
Main Menu