headlights HONDA CIVIC HYBRID 2012 9.G Owners Manual
[x] Cancel search | Manufacturer: HONDA, Model Year: 2012, Model line: CIVIC HYBRID, Model: HONDA CIVIC HYBRID 2012 9.GPages: 313, PDF Size: 8.65 MB
Page 4 of 313
3Quick Reference Guide
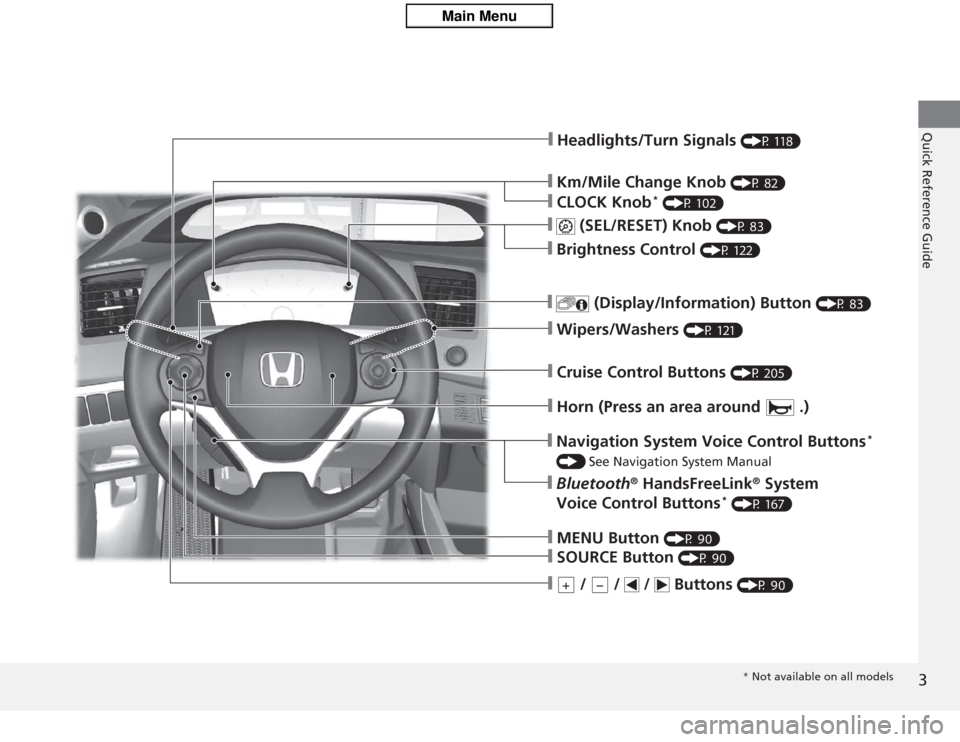
❙Km/Mile Change Knob
(P 82)
❙Headlights/Turn Signals
(P 118)
❙CLOCK Knob
* (P 102)
❙
(SEL/RESET) Knob
(P 83)
❙Brightness Control
(P 122)
❙
(Display/Information) Button
(P 83)
❙Wipers/Washers
(P 121)
❙Cruise Control Buttons
(P 205)
❙Horn (Press an area around .)❙MENU Button
(P 90)
❙SOURCE Button
(P 90)
❙
/ / / Buttons
(P 90)
+
−
❙Navigation System Voice Control Buttons
*
() See Navigation System Manual❙Bluetooth
® HandsFreeLink
® System
Voice Control Buttons
* (P 167)* Not available on all models
Page 7 of 313
Visual Index
6Quick Reference Guide
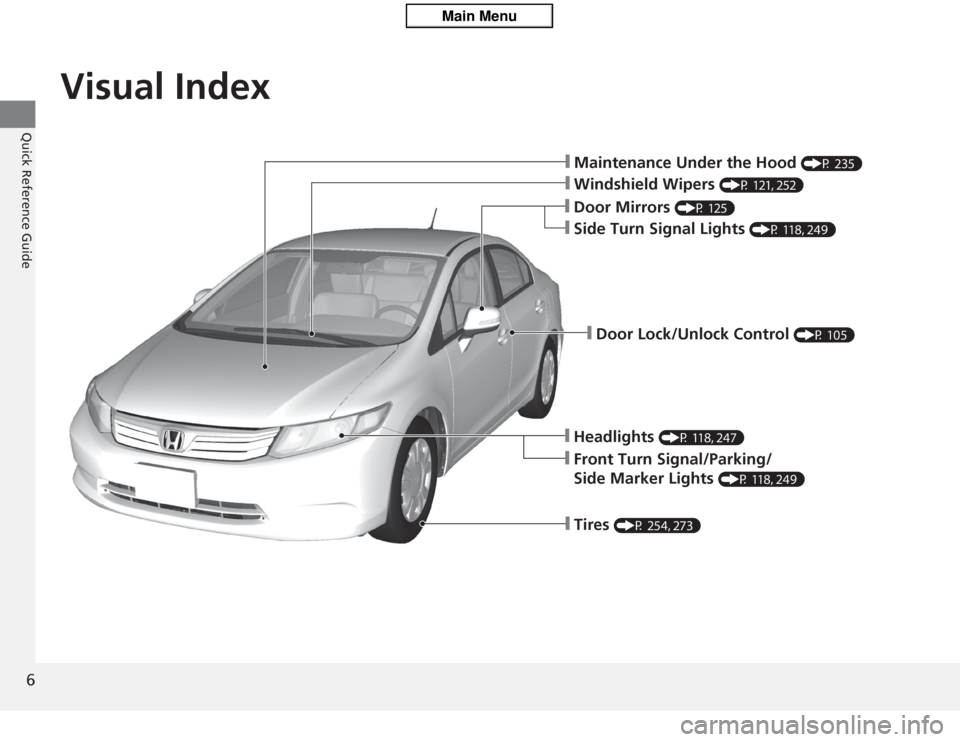
❙Maintenance Under the Hood
(P 235)
❙Windshield Wipers
(P 121, 252)
❙Door Mirrors
(P 125)
❙Headlights
(P 118, 247)
❙Front Turn Signal/Parking/
Side Marker Lights
(P 118, 249)
❙Tires
(P 254, 273)
❙Side Turn Signal Lights
(P 118, 249)
❙Door Lock/Unlock Control
(P 105)
Page 78 of 313
77
uuIndicators u
Continued
Instrument Panel
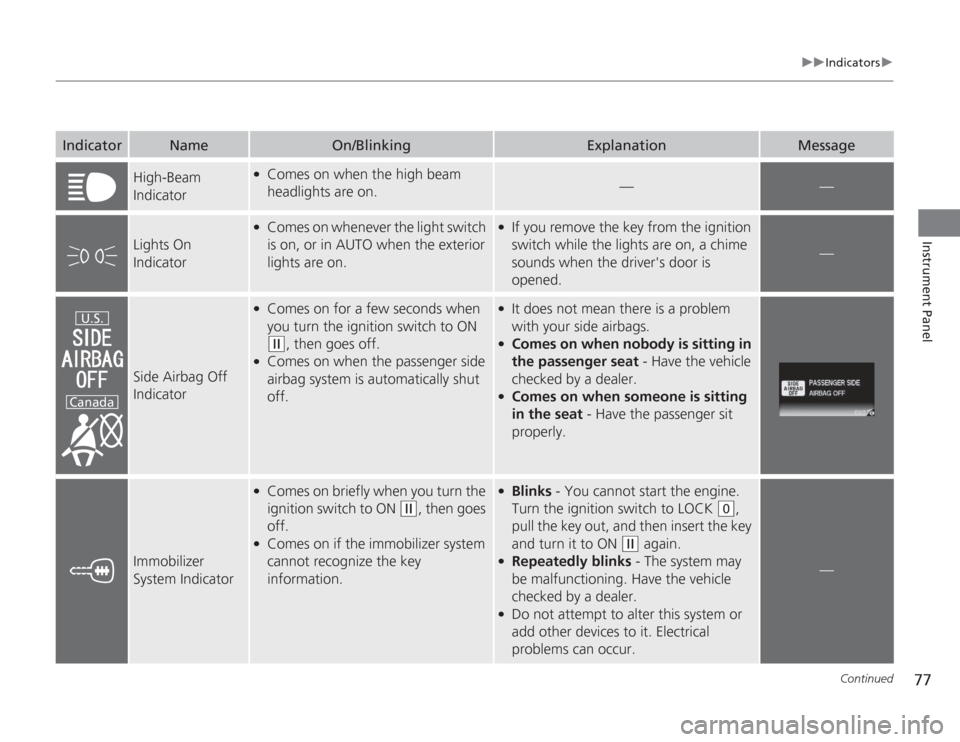
Indicator
Name
On/Blinking
Explanation
Message
High-Beam
Indicator
●
Comes on when the high beam
headlights are on.
—
—
Lights On
Indicator
●
Comes on whenever the light switch
is on, or in AUTO when the exterior
lights are on.
●
If you remove the key from the ignition
switch while the lights are on, a chime
sounds when the driver's door is
opened.
—
Side Airbag Off
Indicator
●
Comes on for a few seconds when
you turn the ignition switch to ON (w
, then goes off.
●
Comes on when the passenger side
airbag system is automatically shut
off.
●
It does not mean there is a problem
with your side airbags.
●
Comes on when nobo dy is sitting in
the passenger seat - Have the vehicle
checked by a dealer.
●
Comes on when someone is sitting
in the seat - Have the passenger sit
properly.
Immobilizer
System Indicator
●
Comes on briefly when you turn the
ignition switch to ON
(w
, then goes
off.
●
Comes on if the immobilizer system
cannot recognize the key
information.
●
Blinks - You cannot start the engine.
Turn the ignition switch to LOCK
(0
,
pull the key out, and then insert the key
and turn it to ON
(w
again.
●
Repeatedly blinks - The system may
be malfunctioning. Have the vehicle
checked by a dealer.
●
Do not attempt to alter this system or
add other devices to it. Electrical
problems can occur.
—
U.S.
Canada
Page 96 of 313
95
uuGauges and Multi-Information Display uMulti-Information Display
Continued
Instrument Panel
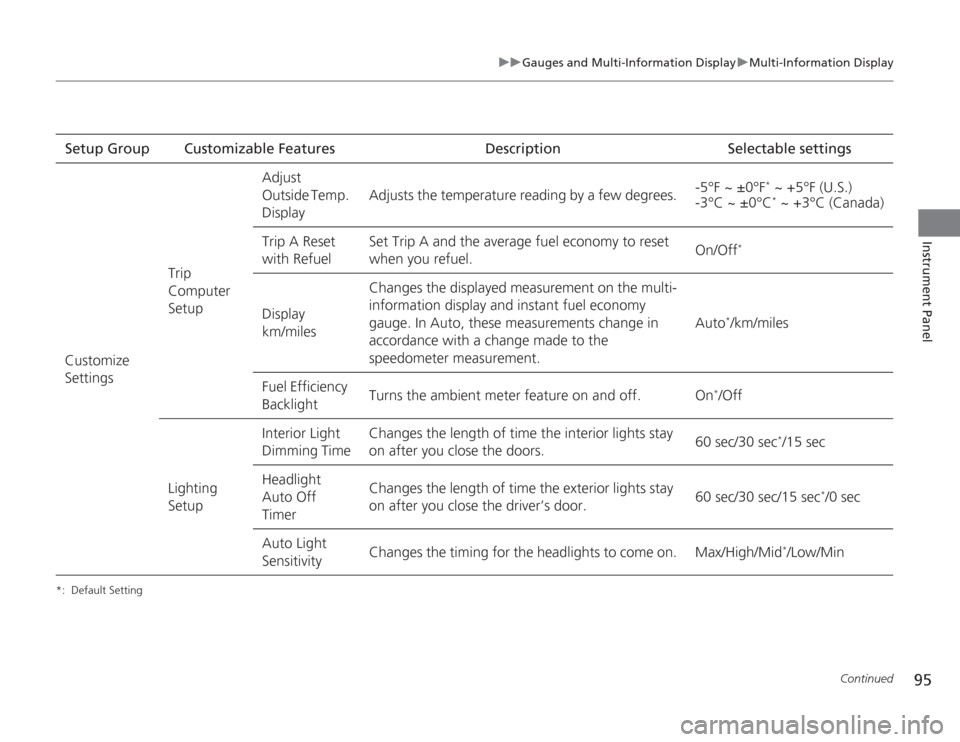
*: Default SettingSetup Group Customizable Features Description Selectable settings
Customize
Settings Trip
Computer
SetupAdjust
Outside Temp.
Display
Adjusts the temperature reading by a few degrees.
-5°F ~ ±0°F
* ~ +5°F (U.S.)
-3°C ~ ±0°C* ~ +3°C (Canada)
Trip A Reset
with Refuel Set Trip A and the average fuel economy to reset
when you refuel.
On/Off
*
Display
km/milesChanges the displayed measurement on the multi-
information display and instant fuel economy
gauge. In Auto, these measurements change in
accordance with a change made to the
speedometer measurement.
Auto
*/km/miles
Fuel Efficiency
Backlight Turns the ambient meter feature on and off. On
*/Off
Lighting
SetupInterior Light
Dimming Time
Changes the length of time the interior lights stay
on after you close the doors.
60 sec/30 sec
*/15 sec
Headlight
Auto Off
Timer Changes the length of time the exterior lights stay
on after you close the driver’s door.
60 sec/30 sec/15 sec
*/0 sec
Auto Light
Sensitivity Changes the timing for the headlights to come on. Max/High/Mid
*/Low/Min
Page 119 of 313
118
uuOperating the Switches Around the Steering Wheel uTurn Signals
Controls
Turn Signals
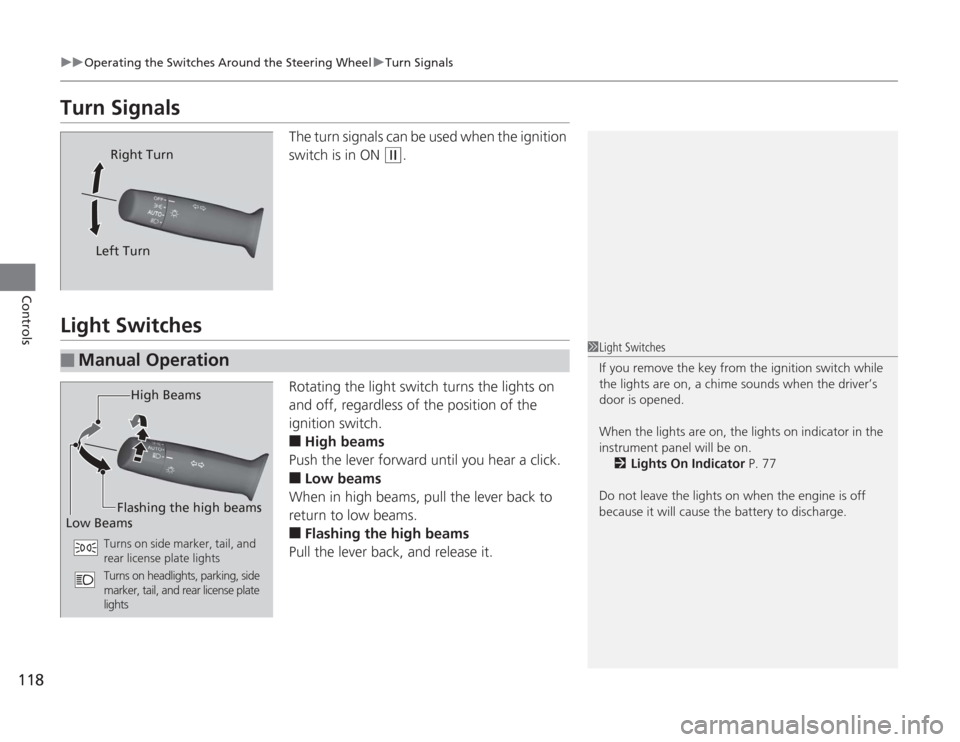
The turn signals can be used when the ignition
switch is in ON
(w
.
Light Switches
Rotating the light switch turns the lights on
and off, regardless of the position of the
ignition switch.■
High beams
Push the lever forward until you hear a click.
■
Low beams
When in high beams, pull the lever back to
return to low beams.
■
Flashing the high beams
Pull the lever back, and release it.
Right Turn
Left Turn
■
Manual Operation
1 Light Switches
If you remove the key fr om the ignition switch while
the lights are on, a chime sounds when the driver’s
door is opened.
When the lights are on, the lights on indicator in the
instrument panel will be on.
2 Lights On Indicator P. 77
Do not leave the lights on when the engine is off
because it will cause the battery to discharge.
High Beams
Flashing the high beams
Low Beams
Turns on side marker, tail, and
rear license plate lights
Turns on headlights, parking, side
marker, tail, and rear license plate
lights
Page 120 of 313
119
uuOperating the Switches Around the Steering Wheel uLight Switches
Controls
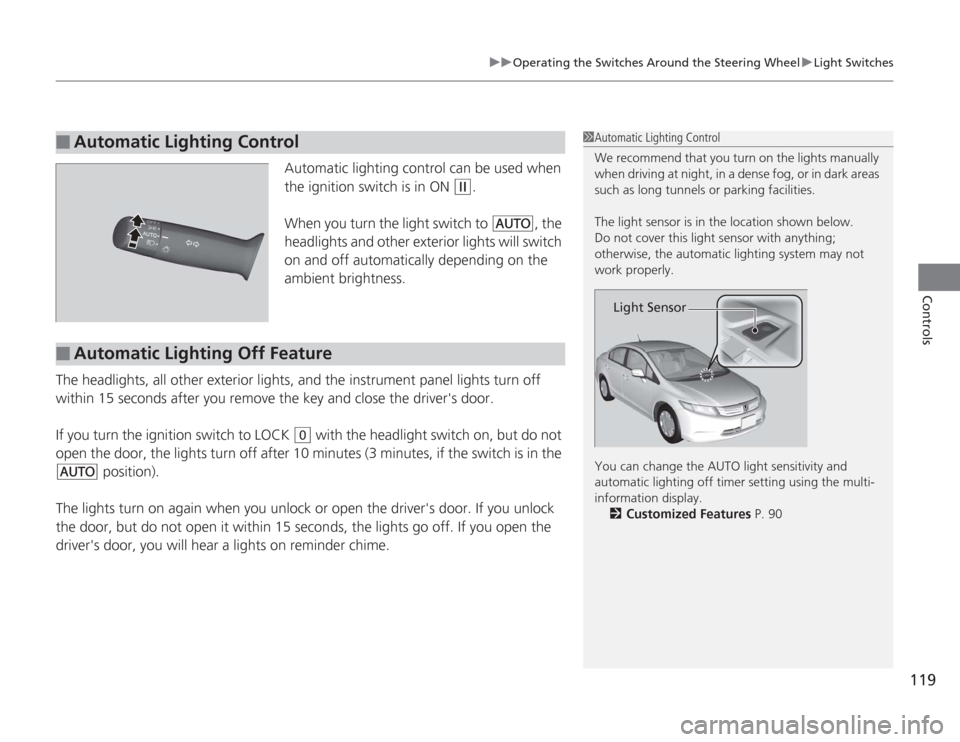
Automatic lighting control can be used when
the ignition switch is in ON
(w
.
When you turn the light switch to
#Y
, the
headlights and other exterior lights will switch
on and off automatically depending on the
ambient brightness.
The headlights, all other exterior lights, and the instrument panel lights turn off
within 15 seconds after you remove the key and close the driver's door.
If you turn the ignition switch to LOCK
(0
with the headlight switch on, but do not
open the door, the lights turn off after 10 minutes (3 minutes, if the switch is in the
#Y
position).
The lights turn on again when you unlock or open the driver's door. If you unlock
the door, but do not open it within 15 secon ds, the lights go off. If you open the
driver's door, you will hear a lights on reminder chime.
■
Automatic Lighting Control
1 Automatic Lighting Control
We recommend that you turn on the lights manually
when driving at night, in a dense fog, or in dark areas
such as long tunnels or parking facilities.
The light sensor is in the location shown below.
Do not cover this light sensor with anything;
otherwise, the automatic lighting system may not
work properly.
You can change the AUTO light sensitivity and
automatic lighting off timer setting using the multi-
information display.
2 Customized Features P. 90
Light Sensor
■
Automatic Lighting Off Feature
Page 121 of 313
120
uuOperating the Switches Around the Steering Wheel uDaytime Running Lights
Controls
Daytime Running LightsThe high beam headlights come on slightly dimmer than normal when the following
conditions have been met:
• The ignition switch is in ON
(w
.
• The headlight switch is off, or in .
• The parking brake is released.
The lights remain on even if you set the parking brake. Turning off the ignition
switch will turn off the daytime running lights.
The high beam headlights return to the original brightness once the headlight
switch is turned on.
Page 126 of 313
125
Controls
Adjusting the MirrorsInterior Rearview MirrorAdjust the angle of the rearview mirror when you are sitting in the correct driving
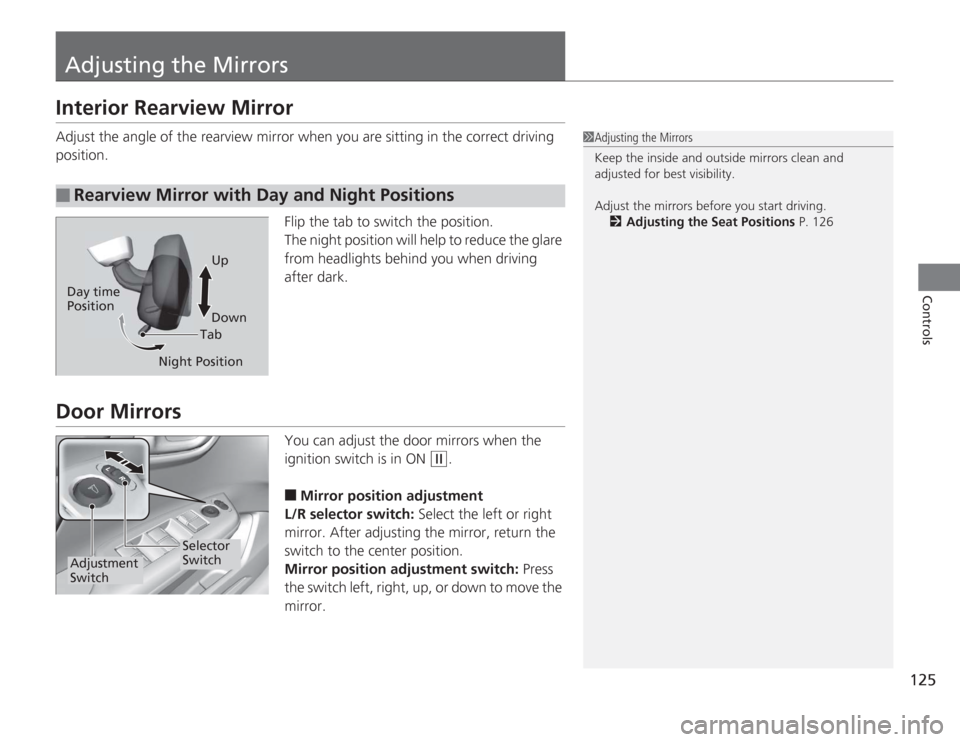
position.Flip the tab to switch the position.
The night position will help to reduce the glare
from headlights behind you when driving
after dark.Door Mirrors
You can adjust the door mirrors when the
ignition switch is in ON
(w
.
■
Mirror position adjustment
L/R selector switch: Select the left or right
mirror. After adjusting the mirror, return the
switch to the center position.
Mirror position adjustment switch: Press
the switch left, right, up, or down to move the
mirror.
■
Rearview Mirror with Day and Night Positions
1 Adjusting the Mirrors
Keep the inside and outside mirrors clean and
adjusted for best visibility.
Adjust the mirrors before you start driving.
2 Adjusting the Seat Positions P. 126
TabUp
Down
Night Position
Day time
Position
Selector
Switch
Adjustment
Switch
Page 248 of 313
247
Continued
Maintenance
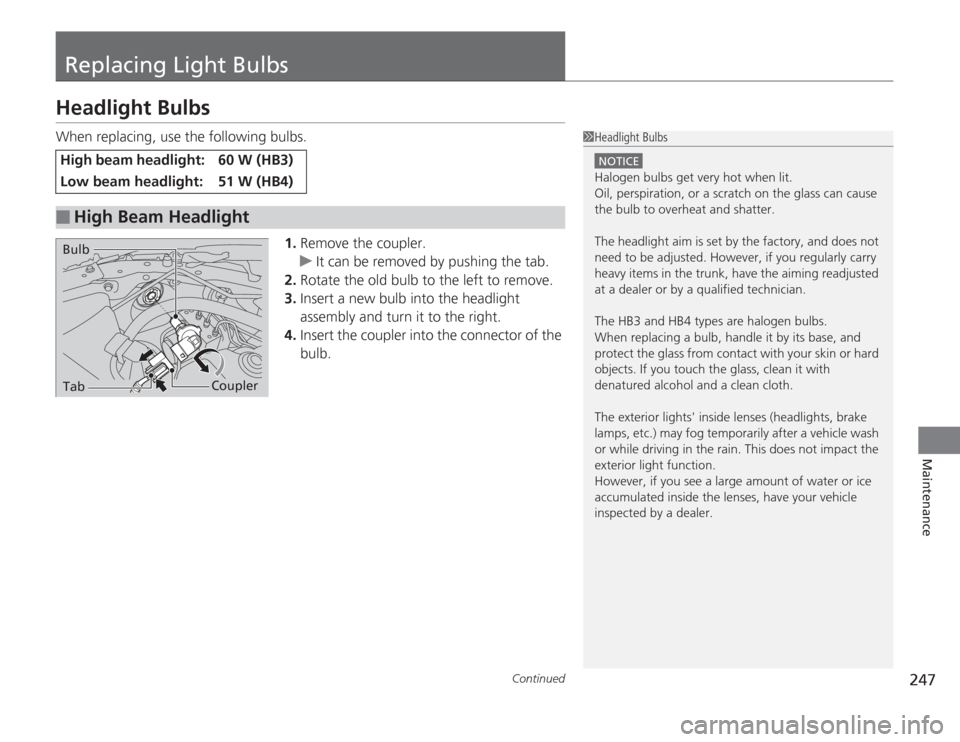
Replacing Light BulbsHeadlight BulbsWhen replacing, use the following bulbs.1.Remove the coupler.
u It can be removed by pushing the tab.
2. Rotate the old bulb to the left to remove.
3. Insert a new bulb into the headlight
assembly and turn it to the right.
4. Insert the coupler into the connector of the
bulb.High beam headlight:
60 W (HB3)
Low beam headlight:
51 W (HB4)
■
High Beam Headlight
1Headlight Bulbs
NOTICEHalogen bulbs get very hot when lit.
Oil, perspiration, or a scratch on the glass can cause
the bulb to overheat and shatter.
The headlight aim is set by the factory, and does not
need to be adjusted. However, if you regularly carry
heavy items in the trunk, have the aiming readjusted
at a dealer or by a qualified technician.
The HB3 and HB4 types are halogen bulbs.
When replacing a bulb, handle it by its base, and
protect the glass from contact with your skin or hard
objects. If you touch the glass, clean it with
denatured alcohol and a clean cloth.
The exterior lights' inside lenses (headlights, brake
lamps, etc.) may fog temporarily after a vehicle wash
or while driving in the rain. This does not impact the
exterior light function.
However, if you see a large amount of water or ice
accumulated inside the lenses, have your vehicle
inspected by a dealer.
Tab
Coupler
Bulb
Page 249 of 313
uuReplacing Light Bulbs uHeadlight Bulbs
248Maintenance
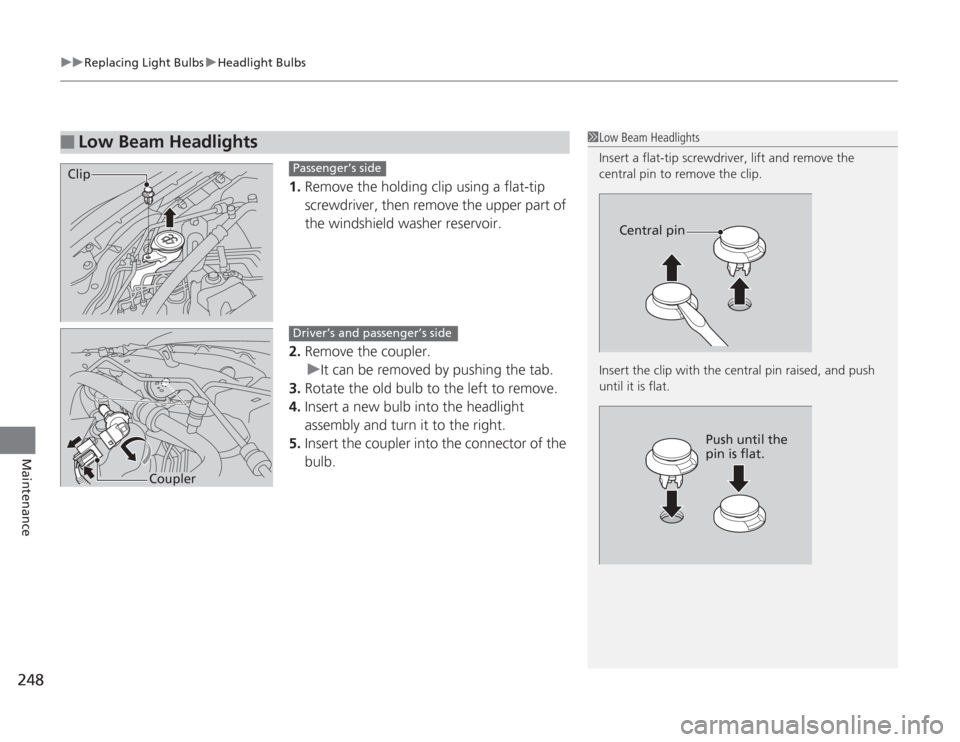
1. Remove the holding clip using a flat-tip
screwdriver, then remove the upper part of
the windshield washer reservoir.
2. Remove the coupler.
u It can be removed by pushing the tab.
3. Rotate the old bulb to the left to remove.
4. Insert a new bulb into the headlight
assembly and turn it to the right.
5. Insert the coupler into the connector of the
bulb.
■
Low Beam Headlights
1Low Beam Headlights
Insert a flat-tip screwdri ver, lift and remove the
central pin to remove the clip.
Insert the clip wi th the central pin raised, and push
until it is flat.
Central pin
Push until the
pin is flat.
Clip
Passenger’s side
Coupler
Driver’s and passenger’s side