seats HONDA CLARITY ELECTRIC 2017 (in English) Owner's Guide
[x] Cancel search | Manufacturer: HONDA, Model Year: 2017, Model line: CLARITY ELECTRIC, Model: HONDA CLARITY ELECTRIC 2017Pages: 543, PDF Size: 24.2 MB
Page 170 of 543
168
uuAdjusting the Seats uHead Restraints
Controls
Head Restraints
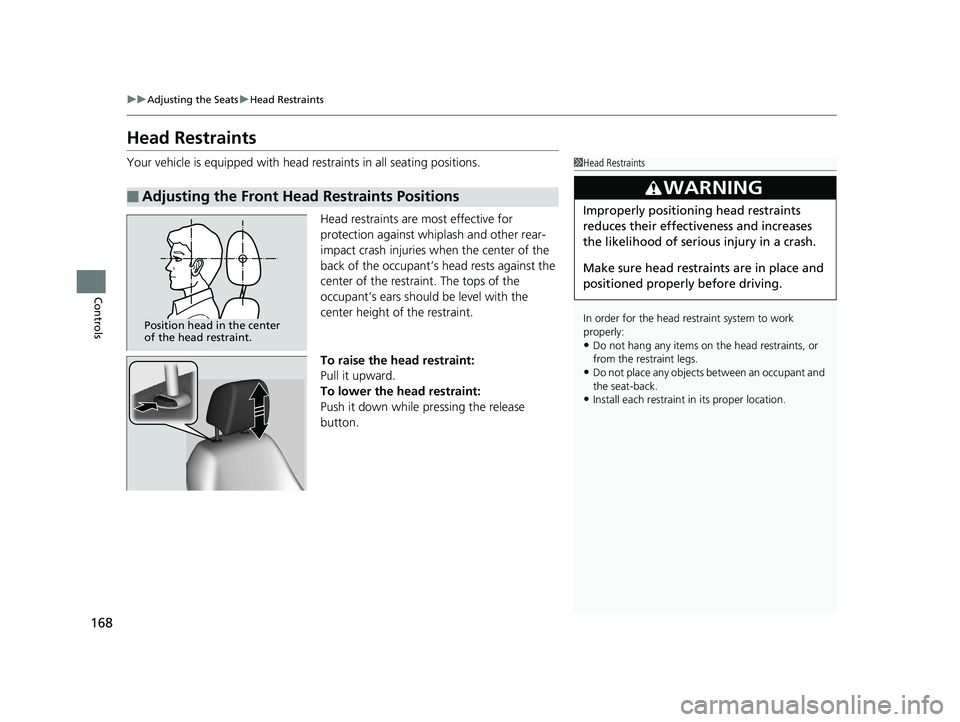
Your vehicle is equipped with head restraints in all seating positions.
Head restraints are most effective for
protection against whiplash and other rear-
impact crash injuries when the center of the
back of the occupant’s head rests against the
center of the restraint. The tops of the
occupant’s ears should be level with the
center height of the restraint.
To raise the head restraint:
Pull it upward.
To lower the head restraint:
Push it down while pressing the release
button.
■Adjusting the Front Head Restraints Positions
1Head Restraints
In order for the head restraint system to work
properly:
•Do not hang any items on the head restraints, or
from the restraint legs.
•Do not place any objects between an occupant and
the seat-back.
•Install each restraint in its proper location.
3WARNING
Improperly positioning head restraints
reduces their effectiveness and increases
the likelihood of serious injury in a crash.
Make sure head restraints are in place and
positioned properly before driving.
Position head in the center
of the head restraint.
17 CLARITY BEV CSS-31TRV6000.book 168 ページ 2017年4月14日 金曜日 午前11 時8分
Page 171 of 543
169
uuAdjusting the Seats uHead Restraints
Controls
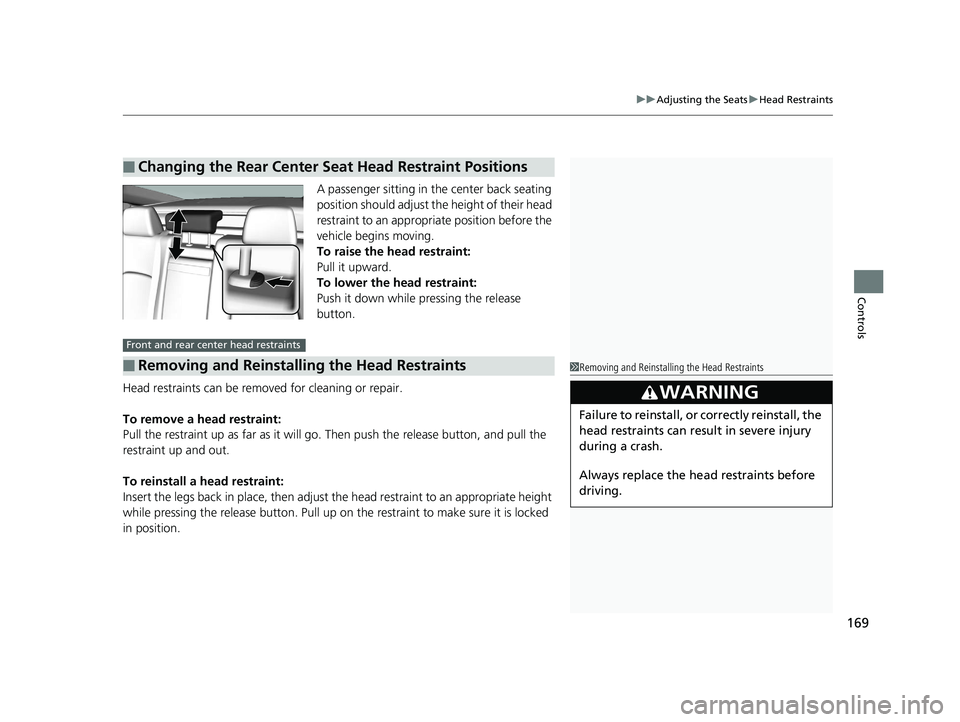
A passenger sitting in th e center back seating
position should adjust the height of their head
restraint to an appropriate position before the
vehicle begins moving.
To raise the head restraint:
Pull it upward.
To lower the head restraint:
Push it down while pressing the release
button.
Head restraints can be removed for cleaning or repair.
To remove a head restraint:
Pull the restraint up as far as it will go. Then push the release button, and pull the
restraint up and out.
To reinstall a head restraint:
Insert the legs back in place, then adjust the head restraint to an appropriate height
while pressing the release button. Pull up on the restraint to make sure it is locked
in position.
■Changing the Rear Center Seat Head Restraint Positions
■Removing and Reinstalling the Head Restraints
Front and rear center head restraints
1 Removing and Reinstalling the Head Restraints
3WARNING
Failure to reinstall, or correctly reinstall, the
head restraints can result in severe injury
during a crash.
Always replace the he ad restraints before
driving.
17 CLARITY BEV CSS-31TRV6000.book 169 ページ 2017年4月14日 金曜日 午前11 時8分
Page 172 of 543
170
uuAdjusting the Seats uMaintain a Proper Sitting Position
Controls
Maintain a Proper Sitting Position
After all occupants have adjusted their seats and head restraints, and put on their
seat belts, it is very important that they continue to sit upright, well back in their
seats, with their feet on th e floor, until the vehicle is safely parked and the power
system is off.
Sitting improperly can increase the chance of injury during a crash. For example, if
an occupant slouches, lies down, turns si deways, sits forward, leans forward or
sideways, or puts one or both feet up, the chance of injury during a crash is greatly
increased.
In addition, an occupant who is out of position in the front seat can be seriously or
fatally injured in a crash by striking interior parts of the vehicle or being struck by an
inflating front airbag.1 Maintain a Proper Sitting Position
3WARNING
Sitting improperly or out of position can
result in serious injury or death in a crash.
Always sit upright, well back in the seat,
with your feet on the floor.
17 CLARITY BEV CSS-31TRV6000.book 170 ページ 2017年4月14日 金曜日 午前11 時8分
Page 173 of 543
171
uuAdjusting the Seats uRear Seats
Controls
Rear Seats
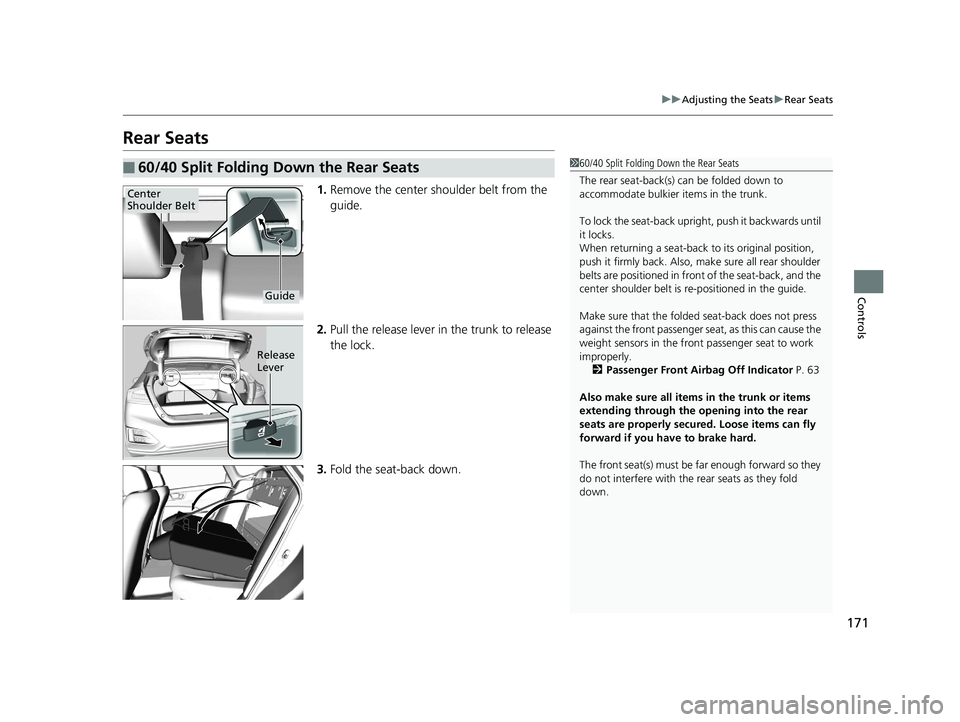
1. Remove the center shoulder belt from the
guide.
2. Pull the release lever in the trunk to release
the lock.
3. Fold the seat-back down.
■60/40 Split Folding Down the Rear Seats160/40 Split Folding Down the Rear Seats
The rear seat-back(s) can be folded down to
accommodate bulkier items in the trunk.
To lock the seat-back upri ght, push it backwards until
it locks.
When returning a seat-back to its original position,
push it firmly back. Also, m ake sure all rear shoulder
belts are positioned in front of the seat-back, and the
center shoulder belt is re -positioned in the guide.
Make sure that the folded seat-back does not press
against the front passenger seat, as this can cause the
weight sensors in the front passenger seat to work
improperly.
2 Passenger Front Airbag Off Indicator P. 63
Also make sure all items in the trunk or items
extending through the opening into the rear
seats are properly secured. Loose items can fly
forward if you have to brake hard.
The front seat(s) must be far enough forward so they
do not interfere with the rear seats as they fold
down.
Center
Shoulder Belt
Guide
Release
Lever
17 CLARITY BEV CSS-31TRV6000.book 171 ページ 2017年4月14日 金曜日 午前11 時8分
Page 174 of 543
172
uuAdjusting the Seats uArmrest
Controls
Armrest
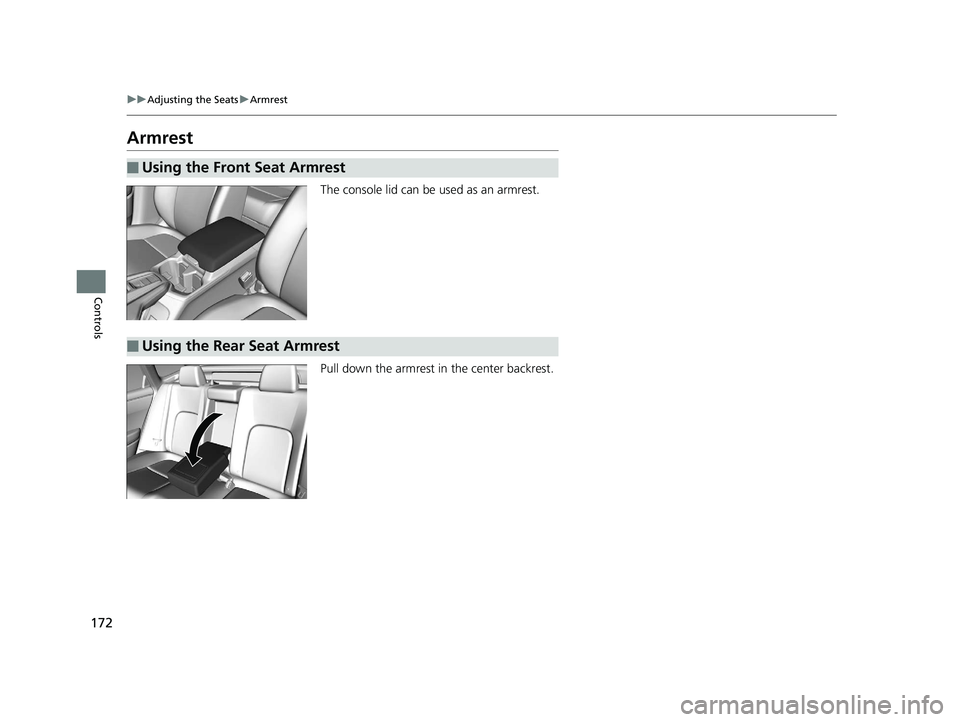
The console lid can be used as an armrest.
Pull down the armrest in the center backrest.
■Using the Front Seat Armrest
■Using the Rear Seat Armrest
17 CLARITY BEV CSS-31TRV6000.book 172 ページ 2017年4月14日 金曜日 午前11 時8分
Page 347 of 543
Continued345
uuBefore Driving uDriving Preparation
Driving
• Store or secure all items on board properly.
u Carrying too much cargo, or improperly storing it, can affect your vehicle’s
handling, stability, sto pping distance, and tires, and make it unsafe.
2Maximum Load Limit P. 347
•Do not pile items higher than the seat height.
u They can block your view and may be thrown forward in the event of sudden
braking.
• Do not place anything in the front seat footwells. Make sure to secure the floor
mat.
u An object or unsecured floor mat can in terfere with your brake and accelerator
pedal operation while driving.
• If you have any animals on board, do not let them move around in the vehicle.
u They may interfere with driv ing and a crash could occur.
• Securely close and lock all doors and the trunk.
2 Locking/Unlocking the Doors from the Inside P. 137
•Adjust your seating position properly.
u Adjust the head restraint, too.
2Adjusting the Seats P. 166
2 Adjusting the Front Head Restraints Positions P. 168
•Adjust the mirrors and steering wh eel properly for your driving.
u Adjust them while sitting in the proper driving position.
2 Adjusting the Mirrors P. 164
2 Adjusting the Steering Wheel P. 163
■Interior Checks1Interior Checks
The headlight aim is set by the factory, and does not
need to be adjusted. Howeve r, if you regularly carry
heavy items in the trunk, have the aiming readjusted
at an authorized Honda Clar ity Electric dealer or by a
qualified technician.
17 CLARITY BEV CSS-31TRV6000.book 345 ページ 2017年4月14日 金曜日 午前11 時8分
Page 348 of 543
346
uuBefore Driving uDriving Preparation
Driving
• Be sure items placed on the floor behind the front seats cannot roll under the
seats.
u They can interfere with the driver’s ability to operate the pedals, the operation
of the seats, or the operation of the sensors under the seats.
• Everyone in the vehicle must fasten their seat belt.
2Fastening a Seat Belt P. 45
•Make sure that the indicators in the ins trument panel come on when you start the
vehicle, and go off soon after.
u Always have an authorized Honda Clarit y Electric dealer check the vehicle if a
problem is indicated.
2 Indicators P. 80
17 CLARITY BEV CSS-31TRV6000.book 346 ページ 2017年4月14日 金曜日 午前11 時8分
Page 475 of 543
473
uuCleaning uInterior Care
Maintenance
Wipe using a glass cleaner.
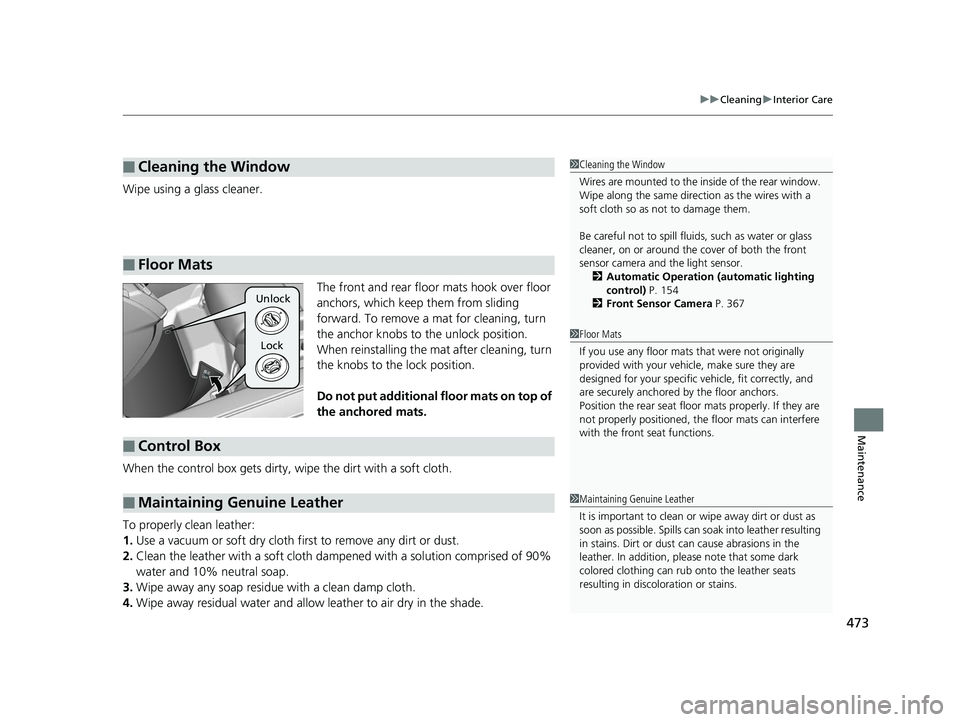
The front and rear floor mats hook over floor
anchors, which keep them from sliding
forward. To remove a mat for cleaning, turn
the anchor knobs to the unlock position.
When reinstalling the mat after cleaning, turn
the knobs to the lock position.
Do not put additional floor mats on top of
the anchored mats.
When the control box gets dirty, wipe the dirt with a soft cloth.
To properly clean leather:
1. Use a vacuum or soft dry cloth first to remove any dirt or dust.
2. Clean the leather with a soft cloth dampen ed with a solution comprised of 90%
water and 10% neutral soap.
3. Wipe away any soap residu e with a clean damp cloth.
4. Wipe away residual water and allo w leather to air dry in the shade.
■Cleaning the Window
■Floor Mats
1Cleaning the Window
Wires are mounted to the in side of the rear window.
Wipe along the same direct ion as the wires with a
soft cloth so as not to damage them.
Be careful not to spill flui ds, such as water or glass
cleaner, on or around the co ver of both the front
sensor camera and the light sensor.
2 Automatic Operation (automatic lighting
control) P. 154
2 Front Sensor Camera P. 367
1Floor Mats
If you use any floor mats that were not originally
provided with your vehicle, make sure they are
designed for your specific ve hicle, fit correctly, and
are securely anchored by the floor anchors.
Position the rear seat floor mats properly. If they are
not properly positioned, the floor mats can interfere
with the front seat functions.
Unlock
Lock
■Control Box
■Maintaining Genuine Leather1 Maintaining Genuine Leather
It is important to clean or wipe away dirt or dust as
soon as possible. Spills can soak into leather resulting
in stains. Dirt or dust ca n cause abrasions in the
leather. In addition, pl ease note that some dark
colored clothing can rub onto the leather seats
resulting in discol oration or stains.
17 CLARITY BEV CSS-31TRV6000.book 473 ページ 2017年4月14日 金曜日 午前11 時8分
Page 480 of 543
478
Maintenance
Accessories and Modifications
Accessories
When installing accessories, check the following:
• Do not install accessories on the windshie ld. They can obstruct your view and
delay your reaction to driving conditions. In addition, they may become projectiles
in a crash.
• Do not install any accessorie s over areas marked SRS Airbag, on the sides or backs
of the front seats, on front or side pillars, or near the side windows. Accessories
installed in these areas may interfere wi th proper operation of the vehicle’s
airbags or may be propelled into you or another occupant if the airbags deploy.
• Be sure electronic accessories do not over load electrical circuits or interfere with
proper operation of your vehicle.
2 Fuses P. 508
•Before installing any electronic accessory, have the installer contact an authorized
Honda Clarity Electric dealer for assistance . If possible, have an authorized Honda
Clarity Electric dealer inspect the final installation.
1 Accessories and Modifications
Honda Genuine accessor ies are recommended to
ensure proper operati on on your vehicle.
3WARNING
Improper accessories or modifications can
affect your vehicle’s handling, stability, and
performance, and cause a crash in which
you can be seriously hurt or killed.
Follow all instruction s in this owner’s
manual regarding accessories and
modifications.
3WARNING
Use of improperly designed, engineered or
manufactured high-voltage battery
assemblies could cause a fire in your
vehicle.
A vehicle fire could result in a crash or
injury.
Only use a genuine Honda high-voltage
battery assembly, or it s equivalent, in your
vehicle.
17 CLARITY BEV CSS-31TRV6000.book 478 ページ 2017年4月14日 金曜日 午前11 時8分
Page 532 of 543
Index
530
Index
Index
Numbers
120V AC (AC Level 1)................................ 425
12-Volt Battery Charging System Indicator .................................................... 84
240V AC (AC Level 2) ................................ 427
A
ABS (Anti-lock Brake System) ................... 409
Accessories and Modifications ................. 478
Accessory Power Sockets .......................... 179
Acoustic Vehicle Alerting System ............ 366
Adaptive Cruise Control (ACC) with
Low Speed Follow (LSF) .................... 95, 373
Additives Washer .................................................... 453
Adjusting Armrest ................................................... 172
Front Seats .............................................. 166
Head Restraints........................................ 168
Mirrors .................................................... 164
Steering Wheel ........................................ 163
Temperature ............................................ 120
Agile Handling Assist ................................ 397
Air Conditioning System (Climate Control System) .................................................... 183
Changing the Mode ................................ 185
Defrosting the Windshield and Windows ............................................... 187
Dust and Pollen Filter ............................... 471
Sensors .................................................... 190 Synchronization Mode............................. 188
Using Automatic Climate Control ............ 183
Air Pressure ....................................... 460, 521
Airbags ........................................................ 50
Advanced Airbags ..................................... 56
Airbag Care............................................... 64
Driver’s Knee Airbag.................................. 57
Event Data Recorder .................................... 0
Front Airbags (SRS) .................................... 53
Indicator.............................................. 62, 88
Passenger Front Airbag Off Indicator ......... 63
Sensors ..................................................... 50
Side Airbags .............................................. 59
Side Curtain Airbags.................................. 61
AM/FM Radio ............................................ 229
Android Auto ........................................... 266
Anti-lock Brake System (ABS) .................. 409
Indicator.................................................... 87
Apple CarPlay ........................................... 263
Armrest ..................................................... 172
Audio Remote Controls ........................... 195
Audio System .................................... 192, 198
Adjusting the Sound................................ 222
Audio/Information Screen........................ 199
Changing the Home Screen Icon Layout .. 205
Changing the Screen Interface ................ 219
Closing Apps ........................................... 221
Customizing the Meter............................ 205
Display Setup .......................................... 223
Error Messages ........................................ 270
General Information ................................ 274 Home Screen .......................................... 211
Limitations for Manual Operation ............ 224
Menu Customize .................................... 220
MP3/WMA/AAC ..................................... 250
Reactivating ............................................ 194
Recommended Devices ........................... 276
Remote Controls ..................................... 195
Security Code ......................................... 194
Selecting an Audio Source ...................... 224
Status Area ............................................. 218
Theft Protection ...................................... 194
USB Flash Drives...................................... 276
USB Port ................................................. 193
Wallpaper Setup ..................................... 209
Audio/Information Screen ....................... 199
Authorized Manuals ................................ 527
Auto Door Locking/Unlocking ................ 140
Automatic Brake Hold ............................. 407
Indicator ........................................... 81, 407
Automatic Brake Hold System Indicator ........................................... 81, 407
Automatic Lighting .................................. 154
Average Energy Consumption ........ 120, 123
Average Speed ......................................... 121
B
Battery
12-Volt ................................................... 468
12-Volt Battery Charging System
Indicator ......................................... 84, 502
17 CLARITY BEV CSS-31TRV6000.book 530 ページ 2017年4月14日 金曜日 午前11 時8分