tow HONDA CLARITY ELECTRIC 2017 Owner's Manual (in English)
[x] Cancel search | Manufacturer: HONDA, Model Year: 2017, Model line: CLARITY ELECTRIC, Model: HONDA CLARITY ELECTRIC 2017Pages: 543, PDF Size: 24.2 MB
Page 4 of 543
Contents
This owner’s manual should be considered a permanent part of the
vehicle and should remain with the vehicle when it is sold.
This owner’s manual covers all models of your vehicle. You may find
descriptions of equipment and features that are not on your
particular model.
Images throughout this owner’s manu al (including the front cover)
represent features and equipment that are available on some, but
not all, models. Your particular mo del may not have some of these
features.
The information and specifications in cluded in this publication were
in effect at the time of approval for printing. Honda Motor Co., Ltd.
reserves the right, however, to discontinue or change specifications
or design at any time without notice and without incurring any
obligation.2 Safe Driving P. 37
For Safe Driving P. 38 Seat Belts P. 42 Airbags P. 50
2Instrument Panel P. 79
Indicators P. 80 Gauges and Driver Information Interface P. 114
2Controls P. 127
Clock P. 128 Locking and Unlocking the Doors P. 129
Operating the Switches Ar ound the Steering Wheel P. 149
Interior Lights/Interior Convenience Items P. 173
2 Features P. 191
Audio System P. 192 Audio System Basic Operation P. 198
Customized Features P. 280 HomeLink® Universal Transceiver P. 306
2 Driving P. 343
Before Driving P. 344 Towing a Trailer P. 349
Multi-View Rear Camera P. 421 Charging P. 423
2 Maintenance P. 441
Before Performing Maintenance P. 442 Maintenance MinderTM P. 445
Checking and Maintaining Wiper Blades P. 456
Climate Control System Main tenance P. 471 Cleaning P. 472
2Handling the Unexpected P. 481
If a Tire Goes Flat P. 482 Handling of the Jack P. 494
Indicator, Coming On/Blinking P. 502 Fuses P. 508
When You Cannot Disengage the Charging Connector P. 517
2Information P. 519
Specifications P. 520 Identification Numbers P. 522
Warranty Coverages P. 525 Authorized Manuals P. 527
17 CLARITY BEV CSS-31TRV6000.book 2 ページ 2017年4月14日 金曜日 午前11時8分
Page 5 of 543
Contents
Child Safety P. 65Safety Labels P. 78
Opening and Closing the Trunk P. 141 Security System P. 144 Opening and Closing the Windows P. 147
Adjusting the Mirrors P. 164 Adjusting the Seats P. 166
Climate Control System P. 183
Audio Error Messages P. 270 General Information on the Audio System P. 274
Bluetooth® HandsFreeLink ® P. 309
When Driving P. 350 Braking P. 404Parking Your Vehicle P. 419
Energy Economy P. 439
Maintenance Under the Hood P. 449 Replacing Light Bulbs P. 454
Checking and Maintaining Tires P. 459 12-Volt Battery P. 468 Remote Transmitter Care P. 470
Accessories and Modifications P. 478
Power System Won’t Start P. 495 Jump Starting P. 498 Overheating P. 501
Emergency Towing P. 515 When You Cannot Open the Charge Lid P. 516
When You Cannot Open the Trunk P. 518
Devices that Emit Radio Waves P. 523 Reporting Safety Defects P. 524
Customer Service Information P. 528
Quick Reference GuideP. 4
Safe DrivingP. 37
Instrument PanelP. 79
ControlsP. 127
FeaturesP. 191
DrivingP. 343
MaintenanceP. 441
Handling the UnexpectedP. 481
InformationP. 519
IndexP. 530
17 CLARITY BEV CSS-31TRV6000.book 3 ページ 2017年4月14日 金曜日 午前11時8分
Page 25 of 543
23
Quick Reference Guide
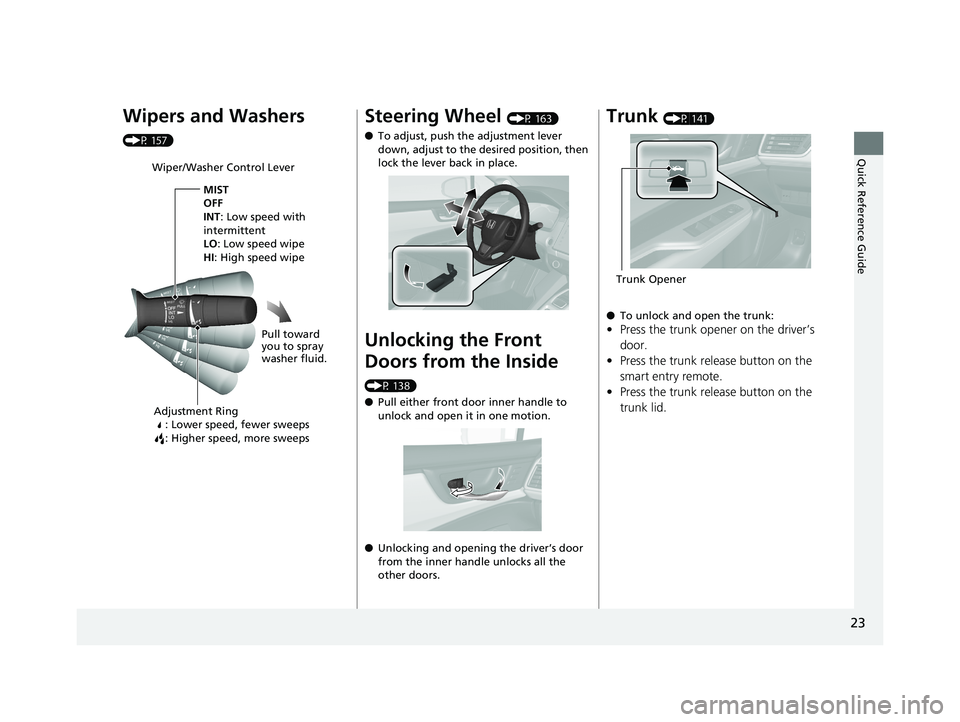
Wipers and Washers
(P 157)
Wiper/Washer Control LeverAdjustment Ring : Lower speed, fewer sweeps
: Higher speed, more sweeps
MIST
OFF
INT: Low speed with
intermittent
LO : Low speed wipe
HI: High speed wipe
Pull toward
you to spray
washer fluid.
Steering Wheel (P 163)
● To adjust, push the adjustment lever
down, adjust to the desired position, then
lock the lever back in place.
Unlocking the Front
Doors from the Inside
(P 138)
●Pull either front door inner handle to
unlock and open it in one motion.
● Unlocking and opening the driver’s door
from the inner handle unlocks all the
other doors.
Trunk (P 141)
● To unlock and open the trunk:
•Press the trunk opener on the driver’s
door.
• Press the trunk release button on the
smart entry remote.
• Press the trunk release button on the
trunk lid.
Trunk Opener
17 CLARITY BEV CSS-31TRV6000.book 23 ページ 2017年4月14日 金曜日 午前11時 8分
Page 35 of 543
Quick Reference Guide
33
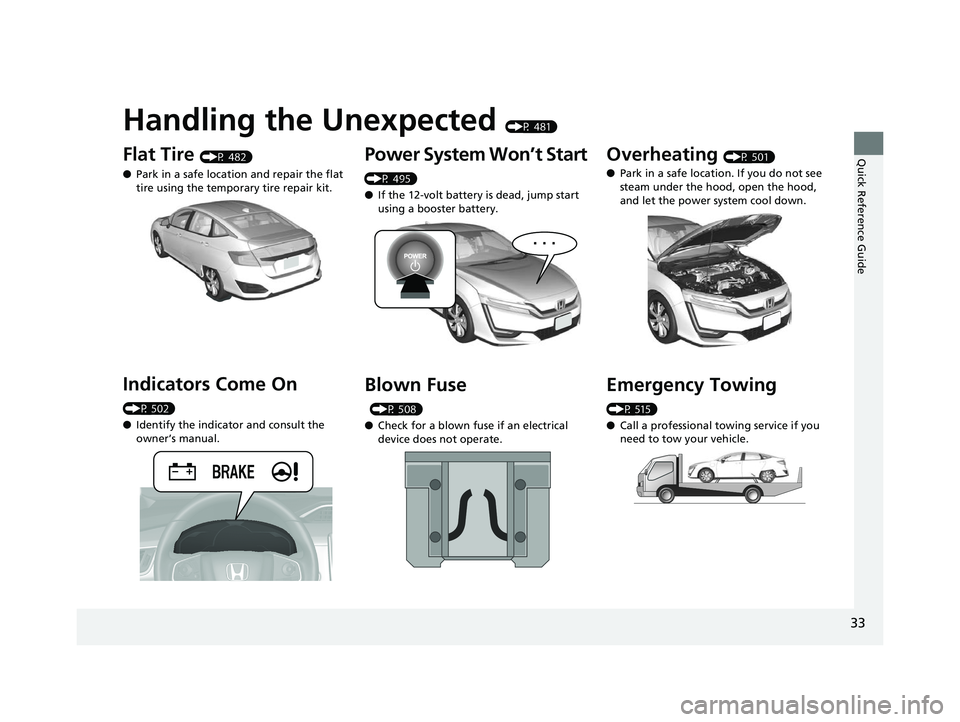
Handling the Unexpected (P 481)
Flat Tire (P 482)
● Park in a safe location and repair the flat
tire using the temporary tire repair kit.
Indicators Come On
(P 502)
●Identify the indica tor and consult the
owner’s manual.
Power System Won’t Start
(P 495)
● If the 12-volt battery is dead, jump start
using a booster battery.
Blown Fuse
(P 508)
● Check for a blown fuse if an electrical
device does not operate.
Overheating (P 501)
● Park in a safe location. If you do not see
steam under the hood, open the hood,
and let the power system cool down.
Emergency Towing
(P 515)
●Call a professional towing service if you
need to tow your vehicle.
17 CLARITY BEV CSS-31TRV6000.book 33 ページ 2017年4月14日 金曜日 午前11時 8分
Page 48 of 543
uuSeat Belts uFastening a Seat Belt
46
Safe Driving
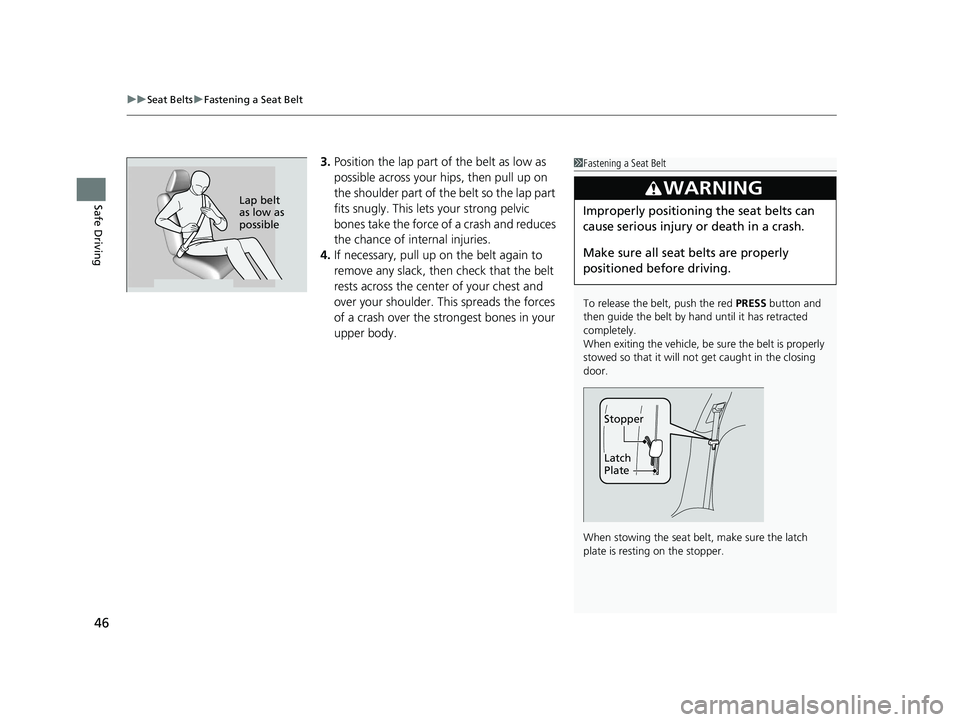
3. Position the lap part of the belt as low as
possible across your hips, then pull up on
the shoulder part of the belt so the lap part
fits snugly. This lets your strong pelvic
bones take the force of a crash and reduces
the chance of internal injuries.
4. If necessary, pull up on the belt again to
remove any slack, then check that the belt
rests across the center of your chest and
over your shoulder. Th is spreads the forces
of a crash over the strongest bones in your
upper body.1 Fastening a Seat Belt
To release the belt, push the red PRESS button and
then guide the belt by hand until it has retracted
completely.
When exiting the vehicle, be sure the belt is properly
stowed so that it will not get caught in the closing
door.
When stowing the seat belt, make sure the latch
plate is resting on the stopper.
3WARNING
Improperly positioning the seat belts can
cause serious injury or death in a crash.
Make sure all seat belts are properly
positioned before driving.
Latch
Plate
Stopper
Lap belt
as low as
possible
17 CLARITY BEV CSS-31TRV6000.book 46 ページ 2017年4月14日 金曜日 午前11時 8分
Page 57 of 543
55
uuAirbags uFront Airbags (SRS)
Continued
Safe Driving
■When front airbags should not deploy
Minor frontal crashes: Front airbags were designed to supplement seat belts and
help save lives, not to prevent minor scrape s, or even broken bones that might occur
during a less than moderate-to-severe frontal crash.
Side impacts: Front airbags can provide protecti on when a sudden deceleration
causes a driver or front passenger to move towards the front of the vehicle. Side
airbags and side curtain airbags have been specifically designed to help reduce the
severity of injuries that can occur during a moderate-to-severe side impact which
can cause the driver or passenger to move towards the side of the vehicle.
Rear impacts: Head restraints and seat belts ar e your best protection during a rear
impact. Front airbags cannot provide any significant protection and are not designed
to deploy in such collisions.
Rollovers: In a rollover, your best form of protection is a seat belt or, if your vehicle
is equipped with a rollover sensor, both a seat belt and a side curtain airbag. Front
airbags, however, are not designed to depl oy in a rollover as they would provide
little if any protection.
■When front airbags deploy with little or no visible damage
Because the airbag system senses sudden deceleration, a strong impact to the
vehicle framework or suspension might cause one or more of the airbags to deploy.
Examples include running into a curb, the edge of a hole, or other low fixed object
that causes a sudden deceleration in th e vehicle chassis. Since the impact is
underneath the vehicle, damage may not be readily apparent.
■When front airbags may not deploy , even though exterior damage
appears severe
Since crushable body parts absorb crash energy during an impact, the amount of
visible damage does not always indicate proper airbag operation. In fact, some
collisions can result in severe damage but no airbag deployment because the airbags
would not have been needed or would not have provided protection even if they
had deployed.
17 CLARITY BEV CSS-31TRV6000.book 55 ページ 2017年4月14日 金曜日 午前11時 8分
Page 58 of 543
uuAirbags uFront Airbags (SRS)
56
Safe DrivingThe airbags have advanced features to help reduce the likelihood of airbag related
injuries to smaller occupants.
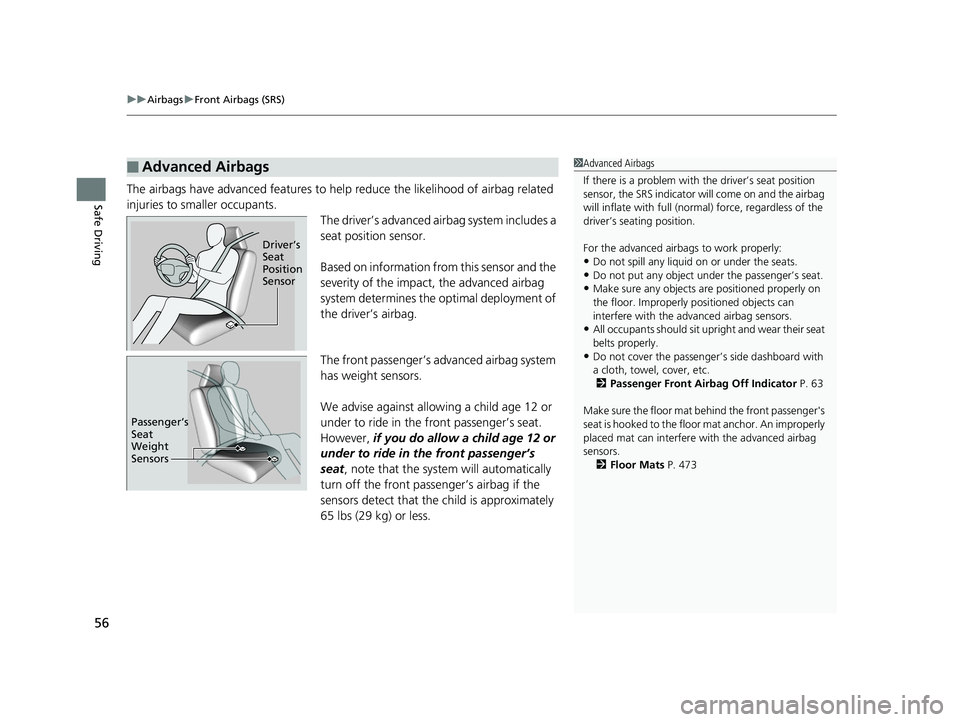
The driver’s advanced airbag system includes a
seat position sensor.
Based on information from this sensor and the
severity of the impact, the advanced airbag
system determines the optimal deployment of
the driver’s airbag.
The front passenger’s ad vanced airbag system
has weight sensors.
We advise against allowing a child age 12 or
under to ride in the front passenger’s seat.
However, if you do allow a child age 12 or
under to ride in the front passenger’s
seat , note that the system will automatically
turn off the front passenger’s airbag if the
sensors detect that the child is approximately
65 lbs (29 kg) or less.
■Advanced Airbags1 Advanced Airbags
If there is a problem with the driver’s seat position
sensor, the SRS indicator wi ll come on and the airbag
will inflate with full (normal) force, regardless of the
driver’s seating position.
For the advanced airbags to work properly:
•Do not spill any liquid on or under the seats.•Do not put any object under the passenger’s seat.
•Make sure any objects are positioned properly on
the floor. Improperly pos itioned objects can
interfere with the advanced airbag sensors.
•All occupants should sit upri ght and wear their seat
belts properly.
•Do not cover the passenger ’s side dashboard with
a cloth, towel, cover, etc. 2 Passenger Front Airbag Off Indicator P. 63
Make sure the floor mat behind the front passenger's
seat is hooked to the floor mat anchor. An improperly
placed mat can interfere with the advanced airbag
sensors. 2 Floor Mats P. 473
Driver’s
Seat
Position
Sensor
Passenger’s
Seat
Weight
Sensors
17 CLARITY BEV CSS-31TRV6000.book 56 ページ 2017年4月14日 金曜日 午前11時 8分
Page 62 of 543

60
uuAirbags uSide Airbags
Safe Driving
■When a side airbag deploys with little or no visible damage
Because the airbag system senses sudden acceleration, a strong impact to the side
of the vehicle’s framework can cause a side airbag to deploy. In such cases, there
may be little or no damage, but the side impact sensors detected a severe enough
impact to deploy the airbag.
■When a side airbag may not deploy, even though visible damage appears
severe
It is possible for a side airbag to not deploy during an impact that results in
apparently severe damage. This can occur when the point of impact was toward the
far front or rear of the vehicle, or when the vehicle’s crushable body parts absorbed
most of the crash energy. In either case , the side airbag would not have been
needed nor provided protection even if it had deployed.
17 CLARITY BEV CSS-31TRV6000.book 60 ページ 2017年4月14日 金曜日 午前11時 8分
Page 159 of 543
157
uuOperating the Switches Around the Steering Wheel uWipers and Washers
Continued
Controls
Wipers and Washers
The windshield wipers and washers can be
used when the power mode is in ON.
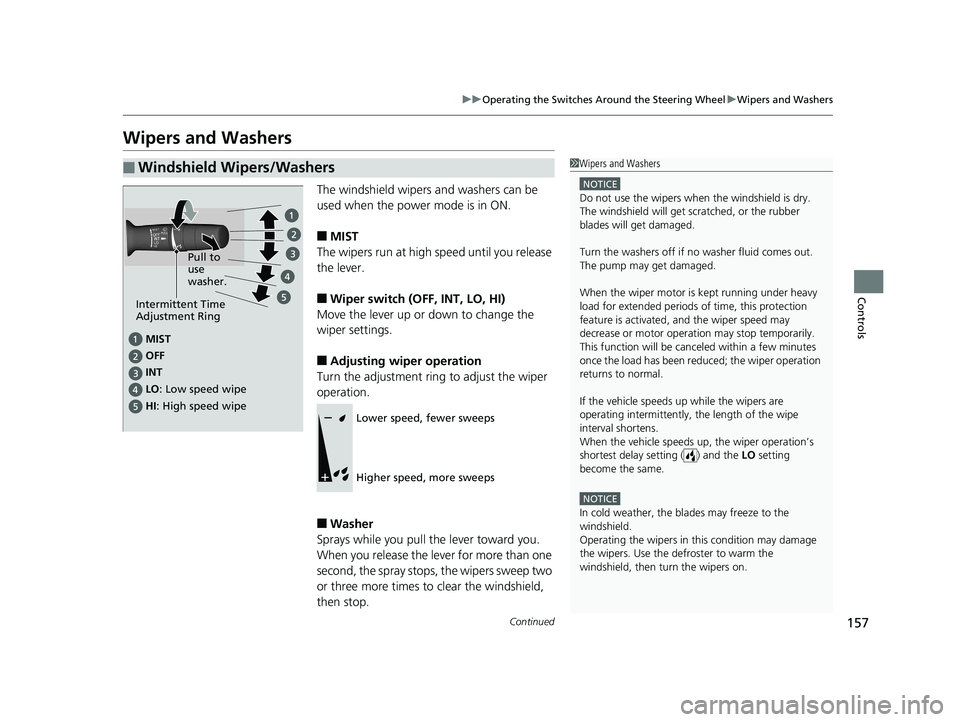
■MIST
The wipers run at high speed until you release
the lever.
■Wiper switch (OFF, INT, LO, HI)
Move the lever up or down to change the
wiper settings.
■Adjusting wiper operation
Turn the adjustment ring to adjust the wiper
operation.
■Washer
Sprays while you pull the lever toward you.
When you release the le ver for more than one
second, the spray stops, the wipers sweep two
or three more times to clear the windshield,
then stop.
■Windshield Wipers/Washers1 Wipers and Washers
NOTICE
Do not use the wipers when the windshield is dry.
The windshield will get sc ratched, or the rubber
blades will get damaged.
Turn the washers off if no washer fluid comes out.
The pump may get damaged.
When the wiper motor is kept running under heavy
load for extended periods of time, this protection
feature is activated, and the wiper speed may
decrease or motor operat ion may stop temporarily.
This function will be canceled within a few minutes
once the load has been reduced; the wiper operation
returns to normal.
If the vehicle speeds up while the wipers are
operating intermittently, the length of the wipe
interval shortens.
When the vehicle speeds up, the wiper operation’s
shortest delay se tting ( ) and the LO setting
become the same.
NOTICE
In cold weather, the blades may freeze to the
windshield.
Operating the wipers in th is condition may damage
the wipers. Use the defroster to warm the
windshield, then turn the wipers on.
MIST
OFF
LO : Low speed wipe
HI: High speed wipe Pull to
use
washer.
INT
Intermittent Time
Adjustment Ring
Lower speed, fewer sweeps
Higher speed, more sweeps
17 CLARITY BEV CSS-31TRV6000.book 157 ページ 2017年4月14日 金曜日 午前11 時8分
Page 345 of 543
343
Driving
This chapter discusses driving and charging.
Before Driving................................... 344
Towing a Trailer ................................ 349
When Driving Turning on the Power ...................... 350
Precautions While Driving................. 353
Transmission .................................... 354
Shifting ............................................ 355
SPORT Mode.................................... 361
Deceleration Paddle Selector ............ 362
ECON Button ................................... 365
Acoustic Vehicle Al erting System ...... 366
Front Sensor Camera ....................... 367
Road Departure Mi tigation (RDM)
System ........................................ 369
Adaptive Cruise Control (ACC) with Low
Speed Follow (LSF) ......................... 373
Lane Keeping Assist System (LKAS)...... 388Vehicle Stability Assist (VSA ®), aka Electronic
Stability Control (ESC), System ............. 395
Agile Handling Assist ....................... 397Tire Pressure Monitoring System (TPMS) .. 398Tire Pressure Monitoring System (TPMS) - Required Federal Explanation ......... 400
LaneWatchTM....................................... 402Braking Brake System ................................... 404
Anti-lock Brake System (ABS) ........... 409
Brake Assist System.......................... 410 Collision Mitigation Braking System
TM
(CMBSTM) ....................................... 411
Parking Your Vehicle When Stopped ................................ 419
Multi-View Rear Camera .................. 421
Charging ............................................ 423
Before Charging .............................. 423
Charge the High Voltage battery using a Level 1, 2 or SAE J1772 DC charger ...424
Control Box ..................................... 431
High Voltage Battery........................ 436
Using a Timer .................................. 437
Energy Economy ............................... 439
17 CLARITY BEV CSS-31TRV6000.book 343 ページ 2017年4月14日 金曜日 午前11 時8分