remote start HONDA CLARITY ELECTRIC 2018 Owner's Manual (in English)
[x] Cancel search | Manufacturer: HONDA, Model Year: 2018, Model line: CLARITY ELECTRIC, Model: HONDA CLARITY ELECTRIC 2018Pages: 559, PDF Size: 27.8 MB
Page 7 of 559
Contents
Child Safety P. 67Safety Labels P. 80
Opening and Closing the Trunk P. 144 Security System P. 147 Opening and Closing the Windows P. 150
Adjusting the Mirrors P. 167 Adjusting the Seats P. 169
Climate Control System P. 186
Audio Error Messages P. 274 General Information on the Audio System P. 278
Bluetooth ® HandsFreeLink ® P. 325
When Driving P. 366 Braking P. 420Parking Your Vehicle P. 436
Energy Economy P. 456
Maintenance Under the Hood P. 465 Replacing Light Bulbs P. 470
Checking and Maintaining Tires P. 475 12-Volt Battery P. 484 Remote Transmitter Care P. 486
Accessories and Modifications P. 494
Power System Won’t Start P. 511 Jump Starting P. 514 Overheating P. 517
Emergency Towing P. 531 When You Cannot Open the Charge Lid P. 532
When You Cannot Open the Trunk P. 534
Devices that Emit Radio Waves P. 539 Reporting Safety Defects P. 540
Customer Service Information P. 544
Quick Reference GuideP. 6
Safe DrivingP. 39
Instrument PanelP. 81
ControlsP. 129
FeaturesP. 195
DrivingP. 359
MaintenanceP. 457
Handling the UnexpectedP. 497
InformationP. 535
IndexP. 546
18 CLARITY ELECTRIC CSS-31TRV6100.book 5 ページ 2018年2月5日 月曜日 午後12時0分
Page 135 of 559
133
uuLocking and Unlocking the Doors uLocking/Unlocking the Doors from the Outside
Continued
Controls
Locking/Unlocking the Doors from the Outside
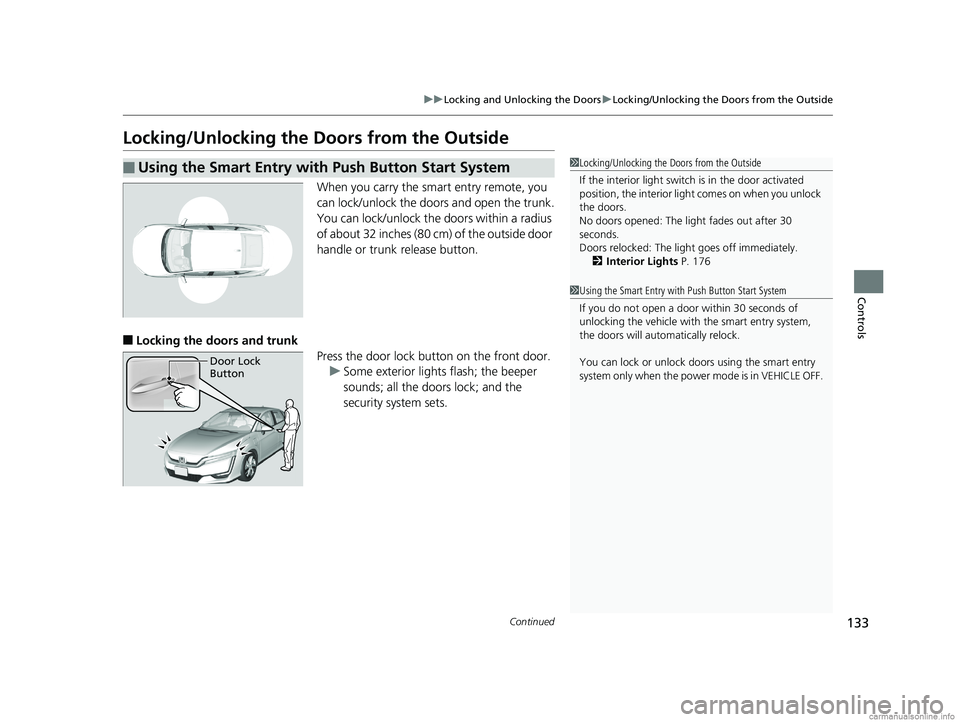
When you carry the sm art entry remote, you
can lock/unlock the doors and open the trunk.
You can lock/unlock the doors within a radius
of about 32 inches (80 cm) of the outside door
handle or trunk release button.
■Locking the doors and trunk Press the door lock button on the front door.u Some exterior lights flash; the beeper
sounds; all the doors lock; and the
security system sets.
■Using the Smart Entry with Push Button Start System1Locking/Unlocking the Doors from the Outside
If the interior light switch is in the door activated
position, the interior light comes on when you unlock
the doors.
No doors opened: The li ght fades out after 30
seconds.
Doors relocked: The light goes off immediately.
2 Interior Lights P. 176
1Using the Smart Entry with Push Button Start System
If you do not open a door within 30 seconds of
unlocking the vehicle with the smart entry system,
the doors will automatically relock.
You can lock or unlock doors using the smart entry
system only when the power mode is in VEHICLE OFF.
Door Lock
Button
18 CLARITY ELECTRIC CSS-31TRV6100.book 133 ページ 2018年2月5日 月曜日 午後12時0分
Page 138 of 559
uuLocking and Unlocking the Doors uLocking/Unlocking the Doors from the Outside
136
Controls
■Unlocking the doors and trunk
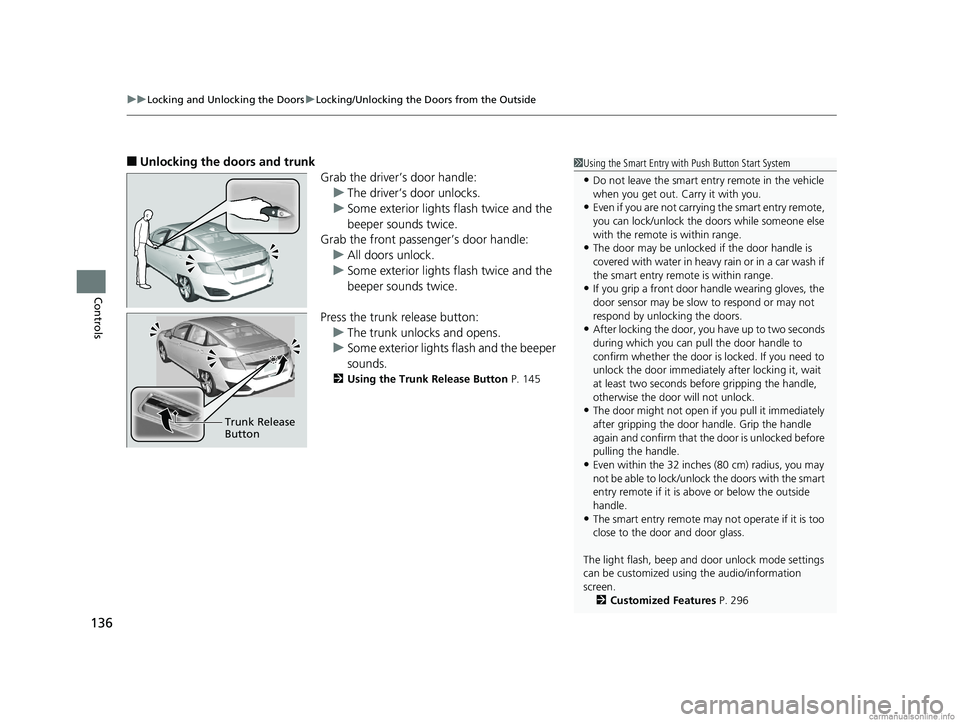
Grab the driver’s door handle:u The driver’s door unlocks.
u Some exterior lights flash twice and the
beeper sounds twice.
Grab the front passenger’s door handle:
u All doors unlock.
u Some exterior lights flash twice and the
beeper sounds twice.
Press the trunk release button: u The trunk unlocks and opens.
u Some exterior lights flash and the beeper
sounds.
2 Using the Trunk Release Button P. 145
Trunk Release
Button
1Using the Smart Entry with Push Button Start System
•Do not leave the smart entry remote in the vehicle
when you get out. Carry it with you.
•Even if you are not carrying the smart entry remote,
you can lock/unlock the doors while someone else
with the remote is within range.
•The door may be unlocked if the door handle is
covered with water in heavy rain or in a car wash if
the smart entry remote is within range.
•If you grip a front door handle wearing gloves, the
door sensor may be slow to respond or may not
respond by unlocking the doors.
•After locking the door, you have up to two seconds
during which you can pull the door handle to
confirm whether the door is locked. If you need to
unlock the door immediately after locking it, wait
at least two seconds befo re gripping the handle,
otherwise the door will not unlock.
•The door might not open if you pull it immediately
after gripping the door handle. Grip the handle
again and confirm that th e door is unlocked before
pulling the handle.
•Even within the 32 inches (80 cm) radius, you may
not be able to lock/unlock the doors with the smart
entry remote if it is a bove or below the outside
handle.
•The smart entry remote may not operate if it is too
close to the door and door glass.
The light flash, beep and door unlock mode settings
can be customized using the audio/information
screen.
2 Customized Features P. 296
18 CLARITY ELECTRIC CSS-31TRV6100.book 136 ページ 2018年2月5日 月曜日 午後12時0分
Page 149 of 559
147Continued
Controls
Security System
Immobilizer System
The immobilizer system prevents a key that has not been pre-registered from
starting the power system. Each key cont ains electronic transmitters that use
electronic signals to verify the key.
Pay attention to the follo wing when pressing the POWER button:
• Do not allow objects that emit strong radio waves near the POWER button.
• Make sure the key is not covered by or touching a metal object.
• Do not bring a key from another vehicle’s immobilizer system near the POWER
button.
• Do not put the key near magnetic items. Electronic devices, such as televisions
and audio systems emit strong magnetic fields. Note that even a key chain can
become magnetic.
Security System Alarm
The security system alarm activates when the trunk, hood or doors are forcibly
opened. The alarm does not activate if the trunk or doors are opened with the key,
remote transmitter or smart entry system.
However, the alarm activates if a door is opened with the key and then the hood is
opened before the power mode is set to ON.
■When the security system alarm activates
The horn sounds intermittently and some exterior lights flash.
■To deactivate the security system alarm
Unlock the vehicle using the key, remote transmitter or smart entry system. The
system, along with the horn and flashing lights, is deactivated.
1 Immobilizer System
NOTICE
Leaving the key in the vehicl e can result in theft or
accidental movement of the vehicle.
Always take the key with you whenever you leave the
vehicle unattended.
Do not alter the system or add other devices to it.
Doing so may damage the system and make your
vehicle inoperable.
1 Security System Alarm
Do not alter the system or add other devices to it.
Doing so may damage the system and make your
vehicle inoperable.
The security alarm continues for a maximum of two
minutes until the security system alarm deactivates.
18 CLARITY ELECTRIC CSS-31TRV6100.book 147 ページ 2018年2月5日 月曜日 午後12時0分
Page 154 of 559
152
Controls
Operating the Switches Around the Steering Wheel
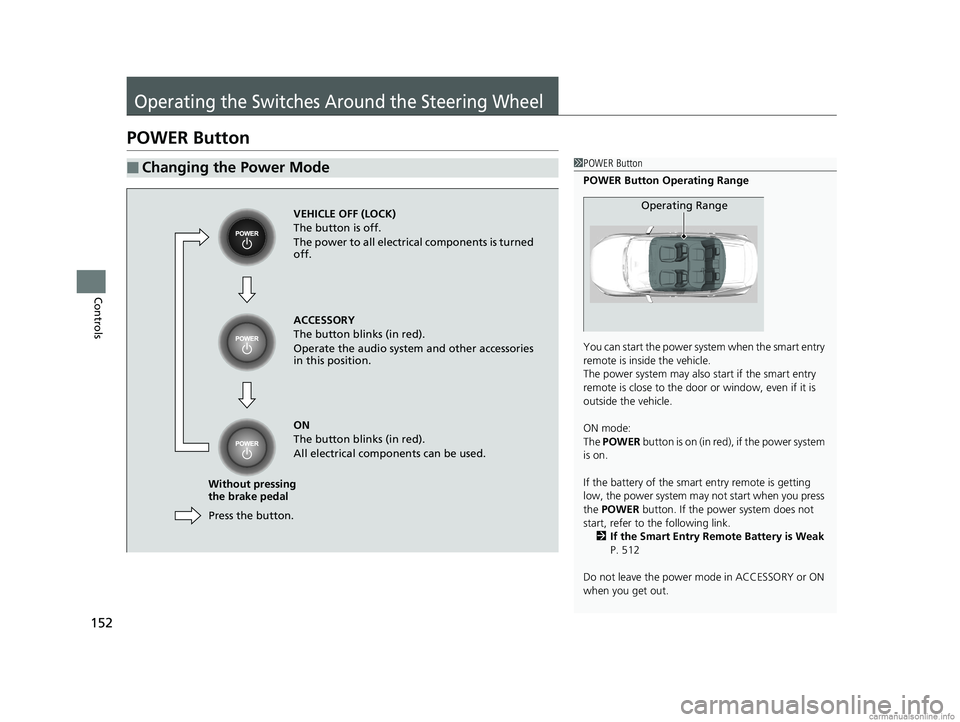
POWER Button
■Changing the Power Mode1POWER Button
POWER Button Operating Range
You can start the power system when the smart entry
remote is inside the vehicle.
The power system may also start if the smart entry
remote is close to the door or window, even if it is
outside the vehicle.
ON mode:
The POWER button is on (in red), if the power system
is on.
If the battery of the smar t entry remote is getting
low, the power system may not start when you press
the POWER button. If the power system does not
start, refer to the following link. 2 If the Smart Entry Remote Battery is Weak
P. 512
Do not leave the power mode in ACCESSORY or ON
when you get out.
Operating RangeVEHICLE OFF (LOCK)
The button is off.
The power to all electrical components is turned
off.
Press the button.
Without pressing
the brake pedal ACCESSORY
The button blinks (in red).
Operate the audio system and other accessories
in this position.
ON
The button blinks (in red).
All electrical components can be used.
18 CLARITY ELECTRIC CSS-31TRV6100.book 152 ページ 2018年2月5日 月曜日 午後12時0分
Page 156 of 559
uuOperating the Switches Around the Steering Wheel uPOWER Button
154
Controls
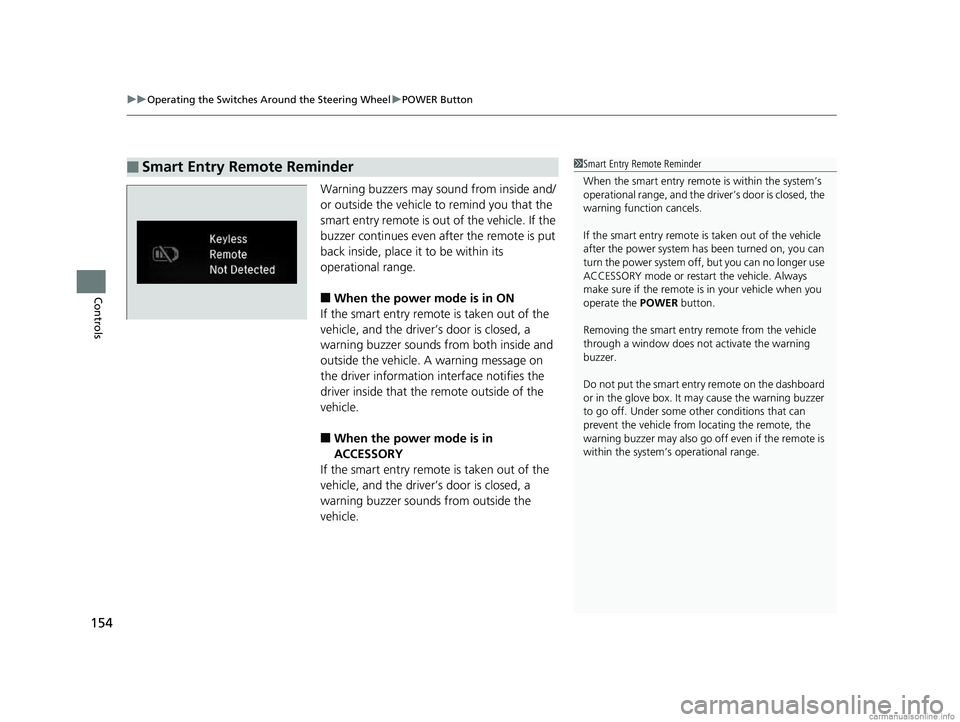
Warning buzzers may sound from inside and/
or outside the vehicle to remind you that the
smart entry remote is out of the vehicle. If the
buzzer continues even after the remote is put
back inside, place it to be within its
operational range.
■When the power mode is in ON
If the smart entry remote is taken out of the
vehicle, and the driver’s door is closed, a
warning buzzer sounds from both inside and
outside the vehicle. A warning message on
the driver information interface notifies the
driver inside that the remote outside of the
vehicle.
■When the power mode is in
ACCESSORY
If the smart entry remote is taken out of the
vehicle, and the driver’s door is closed, a
warning buzzer sounds from outside the
vehicle.
■Smart Entry Remote Reminder1 Smart Entry Remote Reminder
When the smart entry remote is within the system’s
operational range, and the driv er’s door is closed, the
warning function cancels.
If the smart entry remote is taken out of the vehicle
after the power system has been turned on, you can
turn the power system off, but you can no longer use
ACCESSORY mode or restart the vehicle. Always
make sure if the remote is in your vehicle when you
operate the POWER button.
Removing the smart entry remote from the vehicle
through a window does not activate the warning
buzzer.
Do not put the smart entr y remote on the dashboard
or in the glove box. It may cause the warning buzzer
to go off. Under some other conditions that can
prevent the vehicle from locating the remote, the
warning buzzer may al so go off even if the remote is
within the system’s operational range.
18 CLARITY ELECTRIC CSS-31TRV6100.book 154 ページ 2018年2月5日 月曜日 午後12時0分
Page 240 of 559
uuAudio System Basic Operation uPlaying SiriusXM ® Radio
238
Features
1. Select .
2. Select Tune Mode .
3. Select Channel Mode or Category Mode .
■To Change the Tune Mode1Playing SiriusXM ® Radio
In the channel mode, all available channels are
selectable. In the categor y mode, you can select a
channel within a ca tegory (Jazz, Rock, Classical, etc.).
There may be instances when SiriusXM ® Radio does
not broadcast all the data fi elds (artist name, title).
This does not indicate a problem with your audio
system.
SiriusXM ® Radio stations load in ascending order,
which can take about a minute. Once they have
loaded you will be able to scroll up or down to make
your selections.
Switching the Audio Mode
Press the or button on the steering wheel or
select SOURCE on the screen.
2 Audio Remote Controls P. 199
Tune Start:
When you change to a preset channel, a song being
played on that channel restarts from the beginning
with this function. This can be turned on or off from
the Audio settings screen.
2 Customized Features P. 296
34
18 CLARITY ELECTRIC CSS-31TRV6100.book 238 ページ 2018年2月5日 月曜日 午後12時0分
Page 447 of 559
Continued445
uuCharging uCharge the High Voltage battery using a Level 1, 2 or SAE J1772 DC charger
Driving
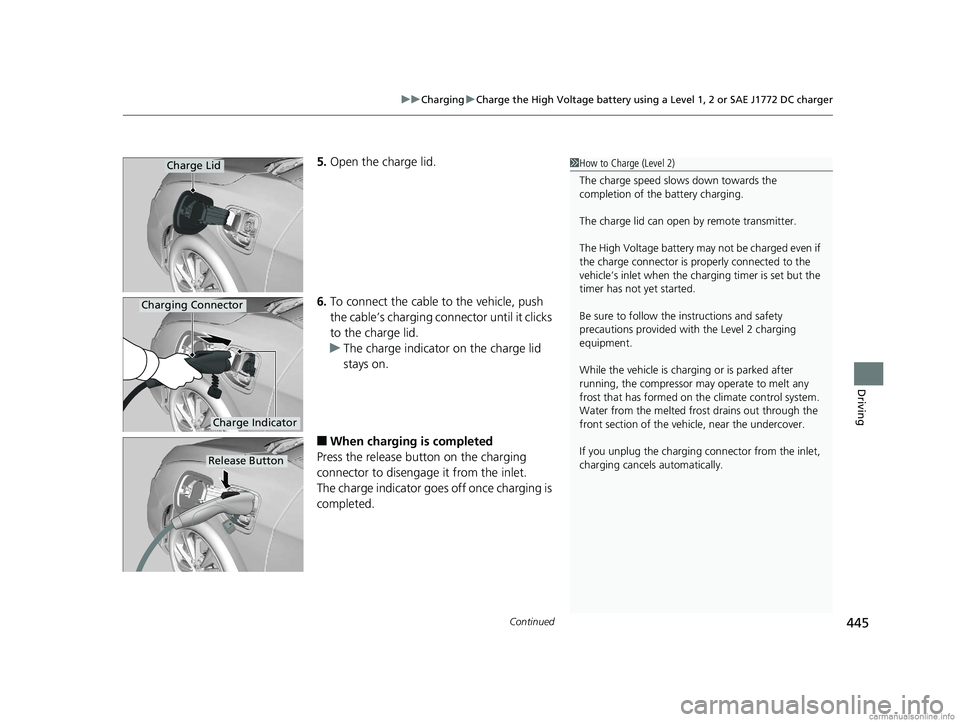
5. Open the charge lid.
6. To connect the cable to the vehicle, push
the cable’s charging conn ector until it clicks
to the charge lid.
u The charge indicator on the charge lid
stays on.
■When charging is completed
Press the release button on the charging
connector to disengage it from the inlet.
The charge indicator goes off once charging is
completed.
1 How to Charge (Level 2)
The charge speed slows down towards the
completion of the battery charging.
The charge lid can open by remote transmitter.
The High Voltage battery may not be charged even if
the charge connector is properly connected to the
vehicle’s inlet when the charging timer is set but the
timer has not yet started.
Be sure to follow the instructions and safety
precautions provided with the Level 2 charging
equipment.
While the vehicle is charging or is parked after
running, the compressor may operate to melt any
frost that has formed on the climate control system.
Water from the melt ed frost drains out through the
front section of the vehi cle, near the undercover.
If you unplug the charging connector from the inlet,
charging cancels automatically.Charge Lid
Charge Indicator
Charging Connector
Release Button
18 CLARITY ELECTRIC CSS-31TRV6100.book 445 ページ 2018年2月5日 月曜日 午後12時0分
Page 452 of 559
450
uuCharging uControl Box
Driving
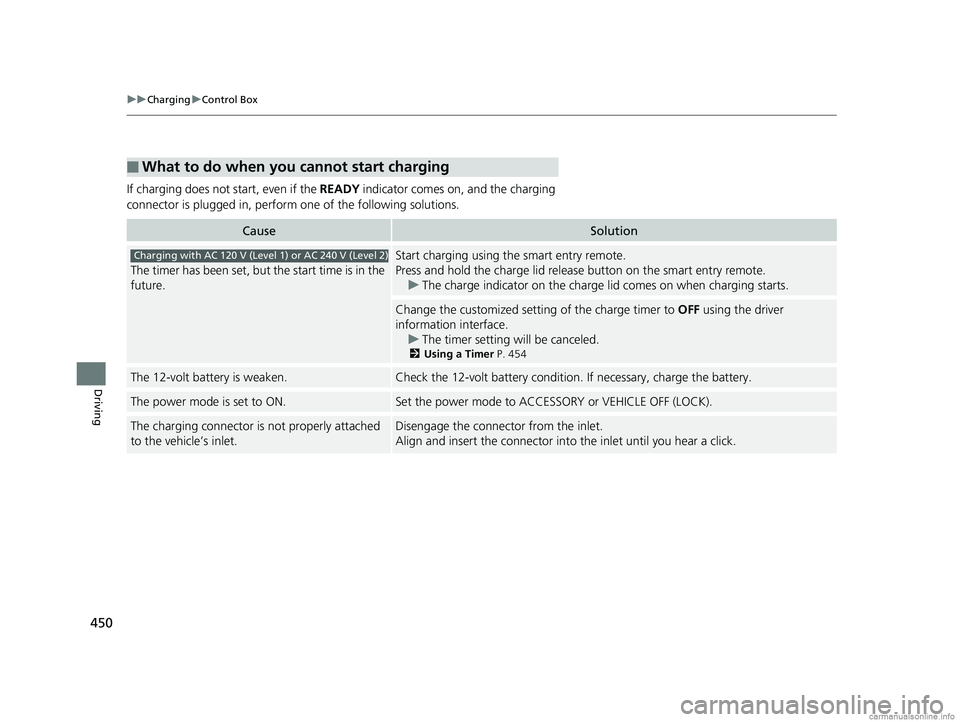
If charging does not start, even if the READY indicator comes on, and the charging
connector is plugged in, perform one of the following solutions.
■What to do when you cannot start charging
CauseSolution
The timer has been set, but the start time is in the
future.
Start charging using the smart entry remote.
Press and hold the charge lid releas e button on the smart entry remote.
u The charge indicator on the charge lid comes on when charging starts.
Change the customized setting of the charge timer to OFF using the driver
information interface.
u The timer setting will be canceled.
2Using a Timer P. 454
The 12-volt battery is weaken.Check the 12-volt battery condition. If necessary, charge the battery.
The power mode is set to ON.Set the power mode to ACCESS ORY or VEHICLE OFF (LOCK).
The charging connector is not properly attached
to the vehicle’s inlet.Disengage the connector from the inlet.
Align and insert the connector into the inlet until you hear a click.
Charging with AC 120 V (Level 1) or AC 240 V (Level 2)
18 CLARITY ELECTRIC CSS-31TRV6100.book 450 ページ 2018年2月5日 月曜日 午後12時0分
Page 454 of 559
452
uuCharging uControl Box
Driving
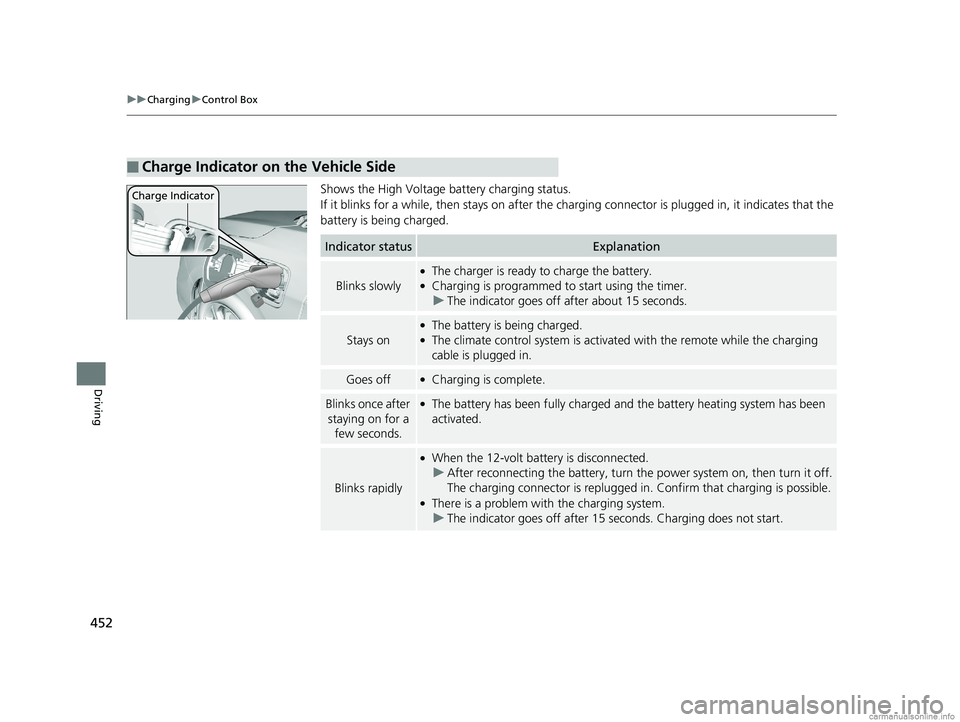
Shows the High Voltage battery charging status.
If it blinks for a while, then st ays on after the charging connector is plugged in, it indicates that the
battery is being charged.
■Charge Indicator on the Vehicle Side
Charge Indicator
Indicator statusExplanation
Blinks slowly
●The charger is ready to charge the battery.●Charging is programmed to start using the timer. u The indicator goes off after about 15 seconds.
Stays on
●The battery is being charged.●The climate control system is activate d with the remote while the charging
cable is plugged in.
Goes off●Charging is complete.
Blinks once after
staying on for a few seconds.●The battery has been fully charged and the battery heating system has been
activated.
Blinks rapidly
●When the 12-volt battery is disconnected.u After reconnecting the batt ery, turn the power system on, then turn it off.
The charging connector is replugged in. Confirm that charging is possible.
●There is a problem with the charging system.
u The indicator goes off after 15 seconds. Charging does not start.
18 CLARITY ELECTRIC CSS-31TRV6100.book 452 ページ 2018年2月5日 月曜日 午後12時0分