dashboard HONDA CLARITY FUEL CELL 2017 (in English) User Guide
[x] Cancel search | Manufacturer: HONDA, Model Year: 2017, Model line: CLARITY FUEL CELL, Model: HONDA CLARITY FUEL CELL 2017Pages: 527, PDF Size: 17.62 MB
Page 188 of 527
186
uuClimate Control System uUsing Automatic Climate Control
Controls
Use the system when the power system is on.
1. Press the AUTO button.
2. Adjust the interior temperature using the driver’s side or passenger’s side
temperature control dial.
3. Press the (ON/OFF) button to cancel.
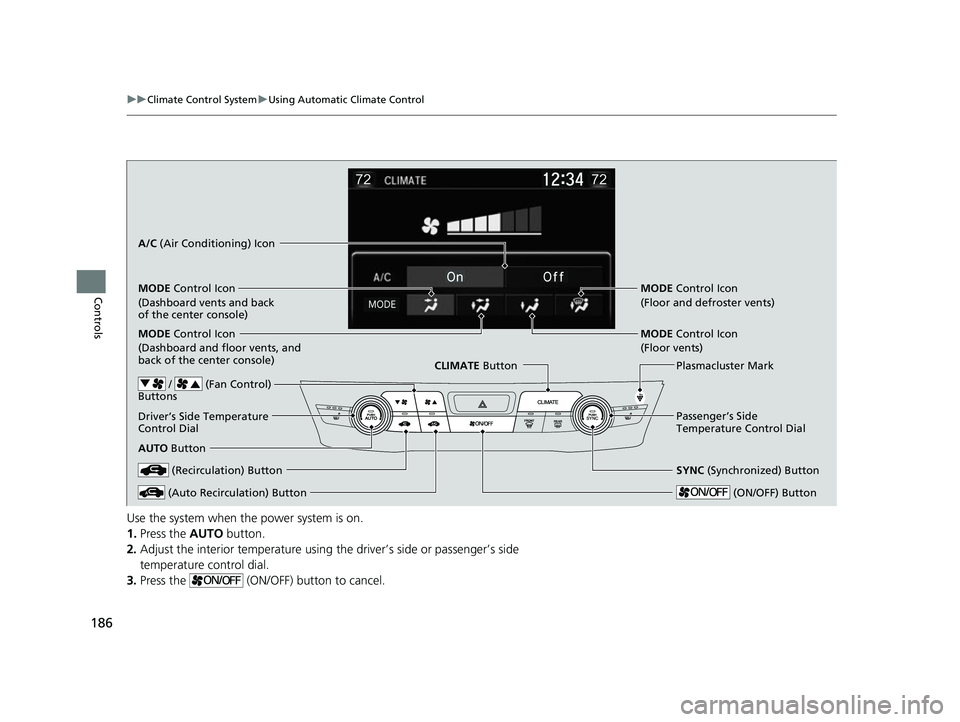
/ (Fan Control)
Buttons
A/C (Air Conditioning) Icon
MODE Control Icon
(Dashboard vents and back
of the center console)
MODE Control Icon
(Dashboard and floor vents, and
back of the center console) CLIMATE Button
Driver’s Side Temperature
Control Dial
AUTO Button
SYNC (Synchronized) Button
Passenger’s Side
Temperature Control Dial Plasmacluster Mark
MODE Control Icon
(Floor vents) MODE Control Icon
(Floor and defroster vents)
(Recirculation) Button
(Auto Recirculation) Button (ON/OFF) Button
17 CLARITY FCV PPO-31TRT6000.book 186 ページ 2016年10月27日 木曜日 午後3 時11分
Page 230 of 527
228
uuAudio System Basic Operation uVoice Control Operation
Features
Voice Control Operation
Your vehicle has a voice control system that allows hands-free operation.
The voice control system uses the ( Talk) and (hang-up/back) buttons on
the steering wheel and a microphone near the map lights in the ceiling.
To achieve optimum voice recognition when using the voice control system:
• Make sure the correct screen is displa yed for the voice command that you are
using.
• Close the windows.
• Adjust the dashboard and side vents so air does not blow onto the microphone in
the ceiling.
• Speak clearly in a natural speaking vo ice without pausing between words.
• Reduce any background noise if possible. The system may misinterpret your
command if more than one person is speaking at the same time.
■Voice Recognition
1Voice Control Operation
When you press the button, a helpful prompt asks
what you would like to do. Press and release the
button again to bypass th is prompt and give a
command.
1 Voice Recognition
The voice control system can only be used from the
driver’s seat because the microphone unit removes
noises from the front passenger’s side.
17 CLARITY FCV PPO-31TRT6000.book 228 ページ 2016年10月27日 木曜日 午後3 時11分
Page 414 of 527
uuBraking uCollision Mitigation Braking SystemTM (CMBSTM)
412
Driving
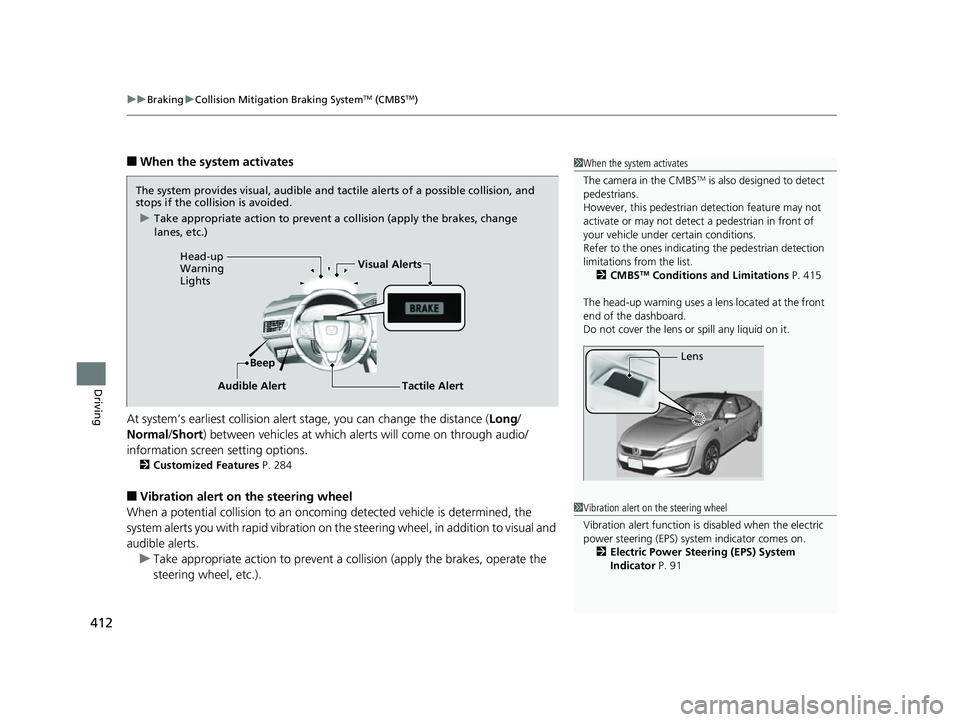
■When the system activates
At system’s earliest collision alert stage, you can change the distance ( Long/
Normal /Short) between vehicles at which aler ts will come on through audio/
information screen setting options.
2 Customized Features P. 284
■Vibration alert on the steering wheel
When a potential collision to an oncoming detected vehicle is determined, the
system alerts you with rapid vibration on th e steering wheel, in addition to visual and
audible alerts.
u Take appropriate action to prevent a co llision (apply the brakes, operate the
steering wheel, etc.).
1 When the system activates
The camera in the CMBS
TM is also designed to detect
pedestrians.
However, this pedestrian detection feature may not
activate or may not detect a pedestrian in front of
your vehicle under certain conditions.
Refer to the ones indicating the pedestrian detection
limitations from the list. 2 CMBS
TM Conditions and Limitations P. 415
The head-up warning uses a lens located at the front
end of the dashboard.
Do not cover the lens or spill any liquid on it.
Lens
The system provides visual, audible and tactile alerts of a possible collision, and
stops if the collision is avoided.
u Take appropriate action to prevent a collision (apply the brakes, change
lanes, etc.)
Beep
Head-up
Warning
Lights
Visual Alerts
Audible Alert
Tactile Alert
1 Vibration alert on the steering wheel
Vibration alert function is disabled when the electric
power steering (EPS) system indicator comes on. 2 Electric Power Steering (EPS) System
Indicator P. 91
17 CLARITY FCV PPO-31TRT6000.book 412 ページ 2016年10月27日 木曜日 午後3 時11分
Page 438 of 527
436
uuMaintenance Under the Hood uOpening the Hood
Maintenance
Opening the Hood
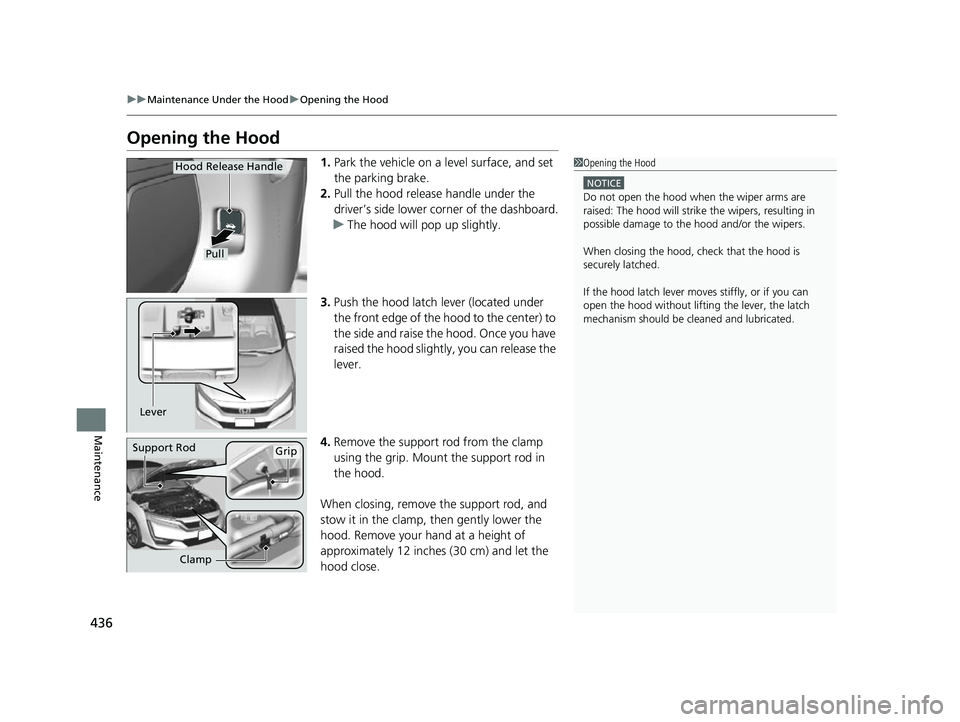
1. Park the vehicle on a level surface, and set
the parking brake.
2. Pull the hood release handle under the
driver’s side lower co rner of the dashboard.
u The hood will pop up slightly.
3. Push the hood latch lever (located under
the front edge of the hood to the center) to
the side and raise the hood. Once you have
raised the hood slight ly, you can release the
lever.
4. Remove the support rod from the clamp
using the grip. Mount the support rod in
the hood.
When closing, remove the support rod, and
stow it in the clamp, then gently lower the
hood. Remove your hand at a height of
approximately 12 inches (30 cm) and let the
hood close.1 Opening the Hood
NOTICE
Do not open the hood when the wiper arms are
raised: The hood will strike the wipers, resulting in
possible damage to the hood and/or the wipers.
When closing the hood, check that the hood is
securely latched.
If the hood latch lever moves stiffly, or if you can
open the hood without lifti ng the lever, the latch
mechanism should be cleaned and lubricated.
Pull
Hood Release Handle
Lever
Support RodGrip
Clamp
17 CLARITY FCV PPO-31TRT6000.book 436 ページ 2016年10月27日 木曜日 午後3 時11分
Page 498 of 527
496
uuFuses uFuse Locations
Handling the Unexpected
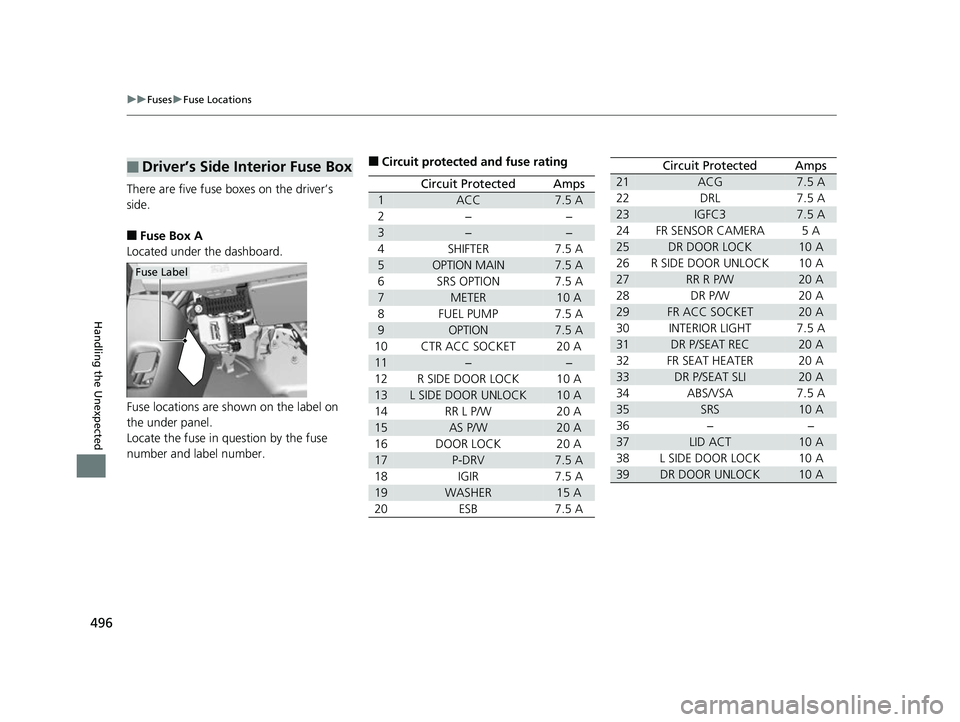
There are five fuse boxes on the driver’s
side.
■Fuse Box A
Located under the dashboard.
Fuse locations are shown on the label on
the under panel.
Locate the fuse in question by the fuse
number and label number.
■Driver’s Side Interior Fuse Box
Fuse Label
■Circuit protected and fuse rating
Circuit ProtectedAmps
1ACC7.5 A
2−−
3−−
4SHIFTER7.5 A
5OPTION MAIN7.5 A
6SRS OPTION7.5 A
7METER10 A
8FUEL PUMP7.5 A
9OPTION7.5 A
10CTR ACC SOCKET20 A
11−−
12R SIDE DOOR LOCK10 A
13L SIDE DOOR UNLOCK10 A
14RR L P/W20 A
15AS P/W20 A
16DOOR LOCK20 A
17P-DRV7.5 A
18IGIR7.5 A
19WASHER15 A
20ESB7.5 A
21ACG7.5 A
22DRL7.5 A
23IGFC37.5 A
24FR SENSOR CAMERA5A
25DR DOOR LOCK10 A
26R SIDE DOOR UNLOCK10 A
27RR R P/W20 A
28DR P/W20 A
29FR ACC SOCKET20 A
30INTERIOR LIGHT7.5 A
31DR P/SEAT REC20 A
32FR SEAT HEATER20 A
33DR P/SEAT SLI20 A
34ABS/VSA7.5 A
35SRS10 A
36−−
37LID ACT10 A
38L SIDE DOOR LOCK10 A
39DR DOOR UNLOCK10 A
Circuit ProtectedAmps
17 CLARITY FCV PPO-31TRT6000.book 496 ページ 2016年10月27日 木曜日 午後3 時11分
Page 499 of 527
497
uuFuses uFuse Locations
Continued
Handling the Unexpected
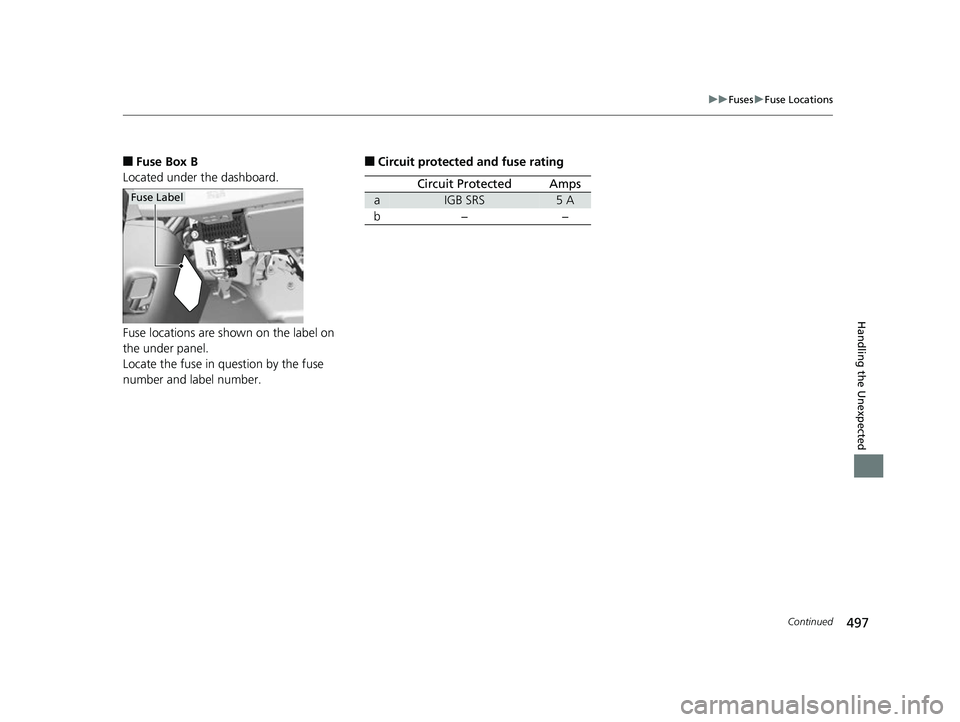
■Fuse Box B
Located under the dashboard.
Fuse locations are shown on the label on
the under panel.
Locate the fuse in question by the fuse
number and label number.
Fuse Label
■Circuit protected and fuse rating
Circuit ProtectedAmps
aIGB SRS5A
b−−
17 CLARITY FCV PPO-31TRT6000.book 497 ページ 2016年10月27日 木曜日 午後3 時11分