trunk HONDA CLARITY PLUG-IN 2018 (in English) Owner's Guide
[x] Cancel search | Manufacturer: HONDA, Model Year: 2018, Model line: CLARITY PLUG-IN, Model: HONDA CLARITY PLUG-IN 2018Pages: 591, PDF Size: 29.97 MB
Page 156 of 591
uuSecurity System uSecurity System Alarm
154
Controls
■Setting the security system alarm
The security system alarm automatically sets when the following conditions have
been met:
• The power mode is set to VEHICLE OFF (LOCK).
• The hood is closed.
• All doors and the trunk are locked from outside with the key, remote transmitter
or smart entry system.
■When the security system alarm sets
The security system alarm indicator in the instrument panel blinks. When the
blinking interval changes after about 15 seconds, the security system alarm is set.
■To cancel the security system alarm
The security system alarm is canceled when the vehicle is unlocked using the remote
transmitter, smart entry system, or the power mode is set to ON. The security system
alarm indicator goes off at the same time.
1 Security System Alarm
Do not set the security system alarm when someone
is in the vehicle or a window is open. The system can
accidentally activate when:
•Unlocking the door with the lock tab.•Opening the trunk with the trunk opener or the
emergency trunk opener.
•Opening the hood with the hood release.
If the 12-volt battery goes dead after you have set the
security system alarm, the security alarm may go off
once the 12-volt battery is recharged or replaced.
If this occurs, deactivate the security system alarm by
unlocking a door using the key, remote transmitter or
smart entry system.
18 CLARITY PHEV CSS-31TRW6000.book 154 ページ 2017年12月25日 月曜日 午後2時22分
Page 183 of 591

181
uuAdjusting the Seats uRear Seats
Controls
Rear Seats
1. Remove the center shoulder belt from the
guide.
2. Pull the release lever in the trunk to release
the lock.
3. Fold the seat-back down.
■60/40 Split Folding Down the Rear Seats160/40 Split Folding Down the Rear Seats
The rear seat-back(s) can be folded down to
accommodate bulkier items in the trunk.
Never drive with a seat-back folded down and the
trunk lid open.
2 Exhaust Gas Hazard P. 82
To lock the seat-back upri ght, push it backwards until
it locks.
When returning a seat-back to its original position,
push it firmly back. Also, m ake sure all rear shoulder
belts are positioned in front of the seat-back, and the
center shoulder belt is re -positioned in the guide.
Make sure that the folded seat-back does not press
against the front passenger se at, as this can cause the
weight sensors in the front passenger seat to work
improperly. 2 Passenger Front Airbag Off Indicator P. 67
Also make sure all items in the trunk or items
extending through the opening into the rear
seats are properly secured. Loose items can fly
forward if you have to brake hard.
The front seat(s) must be far enough forward so they
do not interfere with the rear seats as they fold
down.
Center
Shoulder Belt
Guide
Release
Lever
18 CLARITY PHEV CSS-31TRW6000.book 181 ページ 2017年12月25日 月曜日 午後2時22分
Page 373 of 591

Continued371
uuBefore Driving uDriving Preparation
Driving
• Store or secure all items on board properly.
u Carrying too much cargo, or improperly storing it, can affect your vehicle’s
handling, stability, sto pping distance, and tires, and make it unsafe.
2Maximum Load Limit P. 373
•Do not pile items higher than the seat height.
u They can block your view and may be thrown forward in the event of sudden
braking.
• Do not place anything in the front seat footwells. Make sure to secure the floor
mat.
u An object or unsecured floor mat can in terfere with your brake and accelerator
pedal operation while driving.
• If you have any animals on board, do not let them move around in the vehicle.
u They may interfere with driving and a crash could occur.
• Securely close and lock all doors and the trunk.
2 Locking/Unlocking the Doors from the Inside P. 146
•Adjust your seating position properly.
u Adjust the head restraint, too.
2Adjusting the Seats P. 175
2 Adjusting the Front Head Restraints Positions P. 178
•Adjust the mirrors and steering wh eel properly for your driving.
u Adjust them while sitting in the proper driving position.
2 Adjusting the Mirrors P. 173
2 Adjusting the Steering Wheel P. 172
■Interior Checks1Interior Checks
The headlight aim is set by the factory, and does not
need to be adjusted. Howeve r, if you regularly carry
heavy items in the trunk, have the aiming readjusted
at an authorized Honda Clar ity Plug-In Hybrid dealer
or by a qualif ied technician.
18 CLARITY PHEV CSS-31TRW6000.book 371 ページ 2017年12月25日 月曜日 午後2時22分
Page 458 of 591

uuCharging uCharge the High Voltage battery using a Level 1 or 2 charger
456
Driving
1. Put the transmission into (P and set the
power mode to OFF.
2. Press and hold the lid open button on the
remote transmitter, or press and hold the
charge lid release button on the dashboard.
u The lid opens.
u The illumination lamp inside the charge
lid comes on for a few minutes.
3. Open the trunk, and remove the bag.
4. Open the bag, and take the charging cable
out.
u Do not tie or coil the cable when in use.
■How to Charge (Level 1)1Charging
3WARNING
Charging the High Vo ltage battery under
the following conditions is a potential
source of electric shock and fire, which can
result in serious injury or death:
• Charging the battery during an electric
storm.
• Using the charging cable near water or
handling with wet hands.
• Using a charger, whose case is broken or
cracked or whose cable is frayed or
damaged.
Never charge the vehi cle in any of the
above situations.
3WARNING
Using a charger that is damaged or
modified can cause electrical shock and
fire, which can result in serious injury or
death.
Never disassemble or modify the charger. If
the charger becomes damaged, stop using
it and consult an authorized Honda Clarity
Plug-In Hybrid dealer.
Charge Lid
Release
Button
Charging Cable Bag
18 CLARITY PHEV CSS-31TRW6000.book 456 ページ 2017年12月25日 月曜日 午後2時22分
Page 496 of 591

494
Maintenance
Replacing Light Bulbs
Headlights
Headlights are LED type. Have an authorized Honda Clarity Plug-In Hybrid dealer
inspect and replace the light assembly.
Front Turn Signal and Front Side Marker Lights
Front turn signal and front side marker lights are LED type. Have an authorized
Honda Clarity Plug-In Hybrid dealer inspect and replace the light assembly.
Parking/Daytime Running Lights
Parking/daytime running lights are LED type. Have an authorized Honda Clarity Plug-
In Hybrid dealer inspect a nd replace the light assembly.
1Headlights
The headlight aim is set by the factory, and does not
need to be adjusted. Howeve r, if you regularly carry
heavy items in the trunk, have the aiming readjusted
at an authorized Honda Clar ity Plug-In Hybrid dealer
or by a qualif ied technician.
18 CLARITY PHEV CSS-31TRW6000.book 494 ページ 2017年12月25日 月曜日 午後2時22分
Page 523 of 591
521
Handling the Unexpected
This chapter explains how to handle unexpected troubles.
If a Tire Goes FlatTemporarily Repairi ng a Flat Tire....... 522
Handling of the Jack ......................... 534
Power System Won’t Start Checking the Procedure ................... 535
If the Smart Entry Remote Battery is Weak .......................................... 537
Emergency Power System Off........... 538
Jump Starting .................................... 539
Overheating How to Handle Overheating ............. 542
Indicator, Coming On/Blinking
If the Low Oil Pressure Warning Appears .. 545
If the 12-Volt Battery Charging System Indicator Comes On ....................... 546
If the Malfunction Indicator Lamp Comes
On or Blinks ..................................... 547
If the Brake System Indicator (Red) Comes On or Blinks ....................................... 548
If the Electric Power Steering (EPS) System Indicator Comes On ........................... 549
If the Brake System Indicator (Red) Comes On or Blinks at the Same Time
When the Brake System Indicator
(Amber) Comes On ...................... 550
If the Low Tire Pressure/TPMS Indicator
Comes On or Blinks ....................... 551
If the Transmission System Indicator Blinks
along with the Warning Message .... 552
Fuses Fuse Locations ................................. 553
Inspecting and Changing Fuses ........ 560
Emergency Towing ........................... 561
When You Cannot Unlock the Fuel Fill
Door ................................................. 562
When You Cannot Open the Charge
Lid ................................................. 563
When You Cannot Open the Trunk .. 564
18 CLARITY PHEV CSS-31TRW6000.book 521 ページ 2017年12月25日 月曜日 午後2時22分
Page 526 of 591

524
uuIf a Tire Goes Flat uTemporarily Repairing a Flat Tire
Handling the Unexpected
1. Remove the charging cable by releasing the
belt.
2. Pull the strap on the right side of the trunk
and open the lid.
3. Open the fastener and take the kit out of
the trunk.
4. Place the kit face up, on flat ground near
the flat tire, and away from traffic. Do not
place the kit on its side.
Charging Cable
Fastener
Strap
Lid
18 CLARITY PHEV CSS-31TRW6000.book 524 ページ 2017年12月25日 月曜日 午後2時22分
Page 533 of 591

Continued531
uuIf a Tire Goes Flat uTemporarily Repairing a Flat Tire
Handling the Unexpected
You can use the kit to inflate a non-punctured under-inflated tire.
1.Open the trunk floor lid.
2 Getting Ready to Temporarily Repair
the Flat Tire P. 523
2.Remove the kit from the case.
3. Place the kit, face up, on flat ground near
the flat tire, away from traffic. Do not
place the kit on its side.
4. Remove the air only hose from the kit.
5. Remove the valve cap.
6. Attach the sealant/air hose onto the tire
valve stem. Screw it until it is tight.
■Inflating an Under-inflated Tire1Inflating an Under-inflated Tire
NOTICE
Do not operate the temporary tire repair kit
compressor for more than 15 minutes. The
compressor can overheat and become permanently
damaged.Sealant/Air Hose
Valve Cap
Valve Stem
Sealant/Air Hose
18 CLARITY PHEV CSS-31TRW6000.book 531 ページ 2017年12月25日 月曜日 午後2時22分
Page 564 of 591

562
Handling the Unexpected
When You Cannot Unlock the Fuel Fill Door
■What to Do When Unable to Unlock the Fuel Fill Door
If you cannot open the fuel fill door, use the following procedure. 1.Open the trunk and pull off the left inside
cover.
2. Pull the release lever towards you.
u The release lever opens the fuel fill door
when it is pulled.
3. Slowly remove the fuel fill cap by turning it
to the left. If you hear a release of pressure,
wait until it stops, then continue to slowly
remove the fuel fill cap.
2 How to Refuel P. 452
4.Add fuel very slowly.
u The automatic fuel tank vent valve does
not operate when the fuel fill door is
opened manually. Trying to add fuel too
rapidly when the vent valve is closed will
cause fuel vapors to be pushed out the
filler pipe and can cause a small amount
of liquid fuel to be spilled onto the
ground.
1When You Cannot Unlock the Fuel Fill Door
The automatic fuel tank ve nt does not operate when
using the manual fuel door release. Gradually release
pressure by slowly turning th e fuel fill cap to the left.
If you hear a release of fuel vapors, wait until it stops,
then continue to slowly remove the fuel fill cap.
The malfunction indicator lamp may come on when
driving after you have refueled by manually opening
the fuel fill door.
2 If the Malfunction Indicator Lamp Comes
On or Blinks P. 547
After taking these steps, contact an authorized
Honda Clarity Plug-In Hybrid dealer to have the
vehicle checked.
3WARNING
Gasoline vapors in tank are under pressure.
• If using the manual fuel door release,
open the cap slowly to gradually release
pressure.
• Stop the engine, and keep all sparks,
heat, and flame away.
Release Lever
18 CLARITY PHEV CSS-31TRW6000.book 562 ページ 2017年12月25日 月曜日 午後2時22分
Page 566 of 591
564
Handling the Unexpected
When You Cannot Open the Trunk
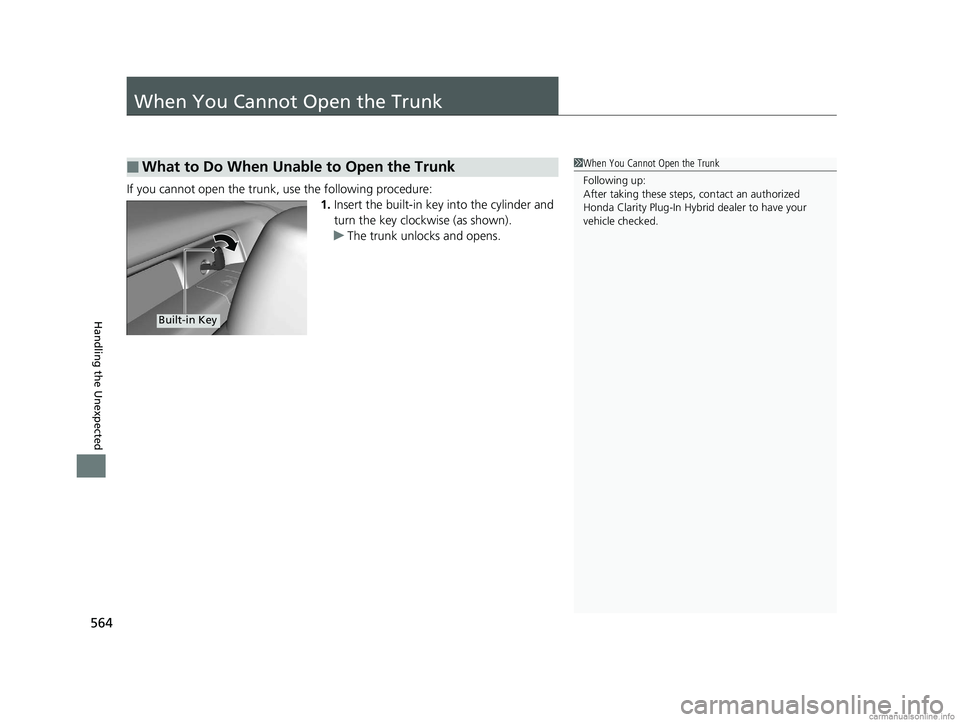
If you cannot open the trunk, use the following procedure:1.Insert the built-in key into the cylinder and
turn the key clockwise (as shown).
u The trunk unlocks and opens.
■What to Do When Unable to Open the Trunk1When You Cannot Open the Trunk
Following up:
After taking these steps, contact an authorized
Honda Clarity Plug-In Hybrid dealer to have your
vehicle checked.
Built-in Key
18 CLARITY PHEV CSS-31TRW6000.book 564 ページ 2017年12月25日 月曜日 午後2時22分