HONDA CR-V 2001 RD1-RD3 / 1.G Owners Manual
Manufacturer: HONDA, Model Year: 2001, Model line: CR-V, Model: HONDA CR-V 2001 RD1-RD3 / 1.GPages: 326, PDF Size: 4.58 MB
Page 221 of 326
Coolin
g Syste m
Replacin g Engin e Coolan t
Th e coolin g syste m shoul d b e
completel y draine d an d refille d wit h
ne w coolan t accordin g t o th e tim e
an d distanc e recommendation s i n
th e maintenanc e schedule . Onl y us e
Hond a Al l Seaso n Antifreeze /
Coolan t Typ e 2 .
Drainin g th e coolan t require s acces s
t o th e undersid e o f th e vehicle .
Unles s yo u hav e th e tool s an d
knowledge , yo u shoul d hav e thi s
maintenanc e don e b y a skille d
mechanic .
1
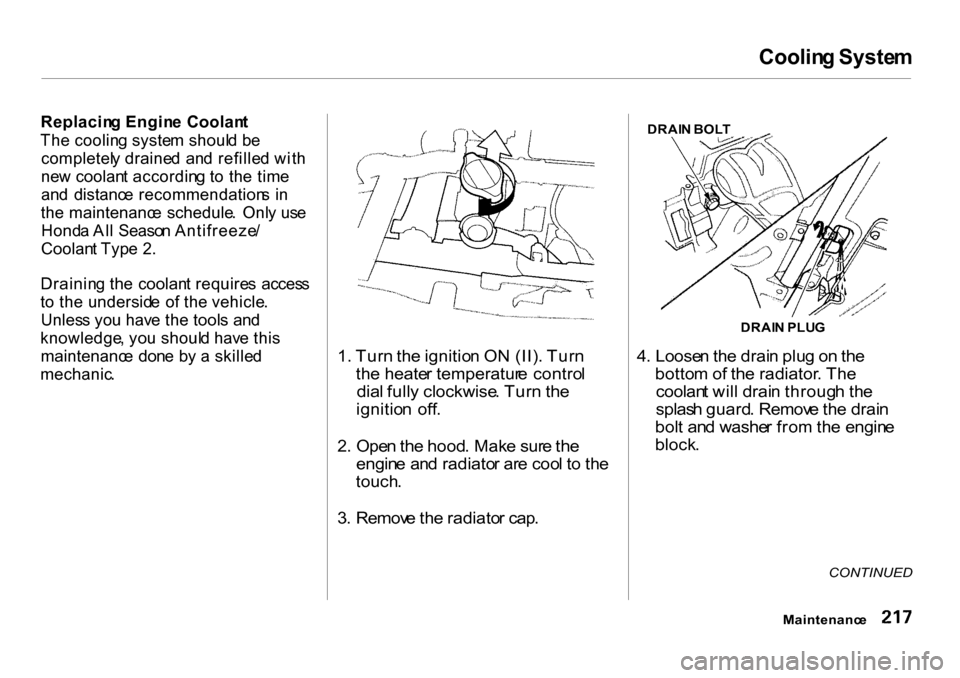
. Tur n th e ignitio n O N (II) . Tur n
th e heate r temperatur e contro l
dia l full y clockwise . Tur n th e
ignitio n off .
2 . Ope n th e hood . Mak e sur e th e
engin e an d radiato r ar e coo l t o th e
touch .
3 . Remov e th e radiato r cap . DRAI
N BOL T
DRAI N PLU G
4 . Loose n th e drai n plu g o n th e
botto m o f th e radiator . Th e
coolan t wil l drai n throug h th e
splas h guard . Remov e th e drai n
bol t an d washe r fro m th e engin e
block .
CONTINUED
Maintenanc e
Page 222 of 326
Coolin
g Syste m
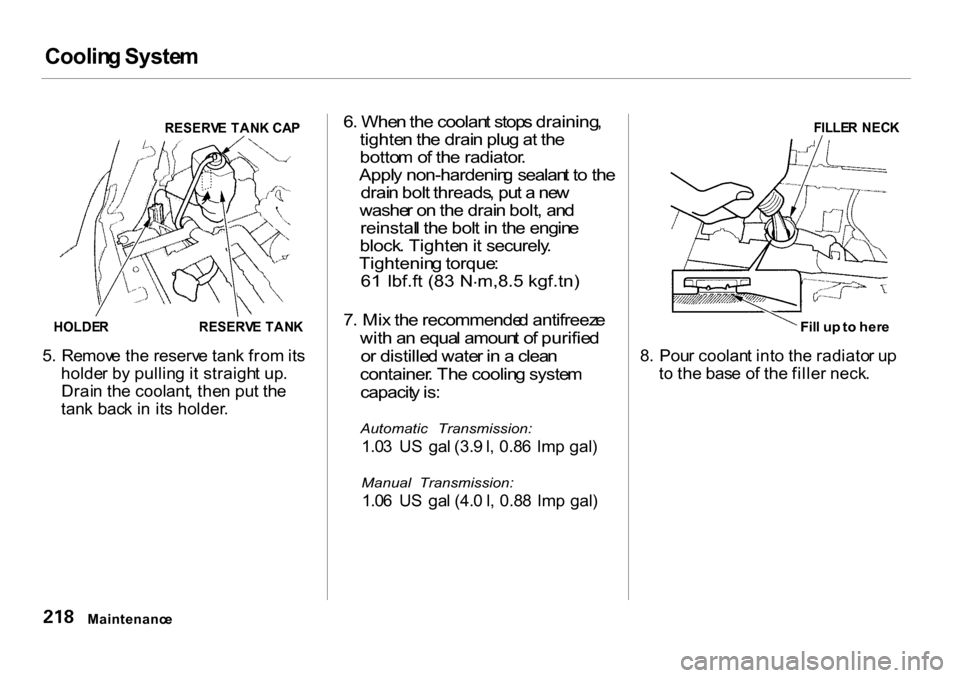
RESERV E TAN K CA P
HOLDE R
RESERVE TAN K
5 . Remov e th e reserv e tan k fro m its
holde r b y pullin g it straigh t up .
Drai n th e coolant , the n pu t th e
tan k bac k i n it s holder .
6
. Whe n th e coolan t stop s draining ,
tighte n th e drai n plu g a t th e
botto m of th e radiator .
Appl y non-hardenin g sealan t t o th e
drai n bol t threads , pu t a ne w
washe r o n th e drai n bolt , an d
reinstal l th e bol t i n th e engin e
block . Tighte n it securely .
Tightenin g torque :
61 lbf.ft (83 N.
m,8.5 kgf.tn)
7 . Mi x
th
e recommende d antifreez e
wit h a n equa l amoun t o f purifie d
o r distille d wate r i n a clea n
container . Th e coolin g syste m
capacit y is :
Automatic Transmission:
1.03 U S ga l (3. 9 l, 0.8 6 Im p gal )
Manual Transmission:
1.06 U S ga l (4. 0 l, 0.8 8 Im p gal )
FILLE R NEC K
Fil l
u
p to her e
8 . Pou r coolan t int o th e radiato r u p
t o th e bas e o f th e fille r neck .
Maintenanc e
Page 223 of 326
Coolin
g Syste m
9 . Star t th e engin e an d le t i t ru n fo r
abou t 3 0 seconds . The n tur n of f
th e engine .
10 . Chec k th e leve l i n th e radiator ,
ad d coolan t i f needed .
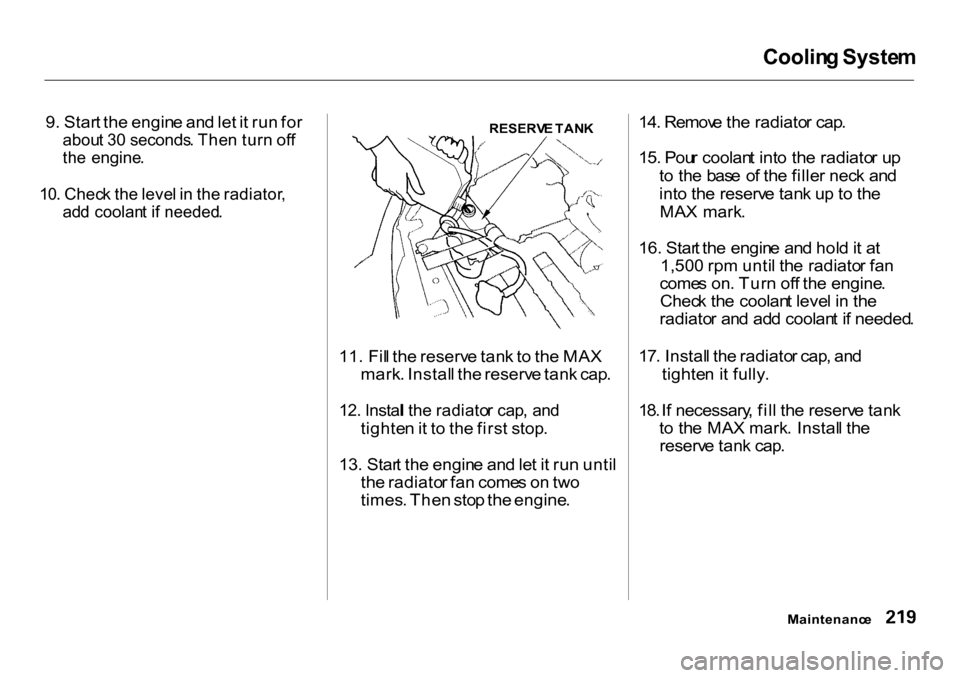
RESERV
E TAN K
11. Fil l th e reserv e tan k to th e MA X
mark . Instal l th e reserv e tan k cap .
12. Instal l th e radiato r cap , an d
tighte n it t o th e firs t stop .
13. Star t th e engin e an d le t i t ru n unti l
th e radiato r fa n come s o n tw o
times . The n sto p th e engine . 14. Remov
e th e radiato r cap .
15. Pou r coolan t int o th e radiato r u p
t o th e bas e o f th e fille r nec k an d
int o th e reserv e tan k u p to th e
MA X mark .
16. Star t th e engin e an d hol d it a t
1,500 rpm unti l th e radiato r fa n
come s on . Tur n of f th e engine .
Chec k th e coolan t leve l i n th e
radiato r an d ad d coolan t i f needed .
17 . Instal l th e radiato r cap , an d
tighte n it fully .
18. If necessary , fil l th e reserv e tan k
t o th e MA X mark . Instal l th e
reserv e tan k cap .
Maintenanc e
Page 224 of 326
Windshiel
d Washer s
Chec k th e leve l i n th e windshiel d
washe r reservoi r a t leas t monthl y
durin g norma l usage . I n ba d weather ,
whe n yo u us e th e washer s often ,
chec k th e leve l ever y tim e yo u sto p
fo r fuel .
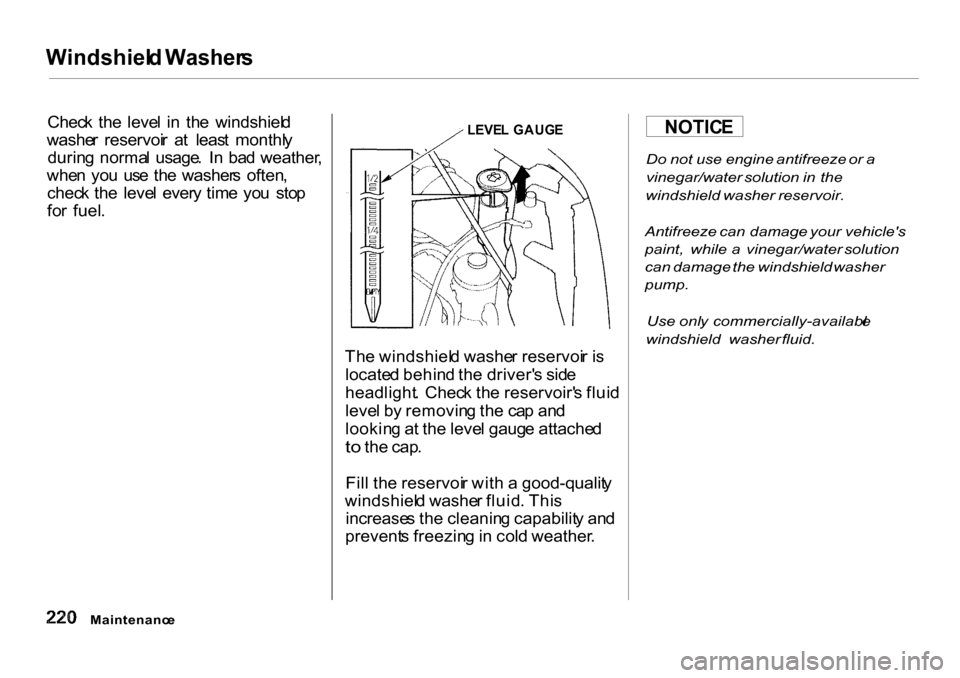
LEVE
L GAUG E
Th e windshiel d washe r reservoi r i s
locate d behin d th e driver' s sid e
headlight . Chec k th e reservoir' s flui d
leve l b y removin g th e ca p an d
lookin g a t th e leve l gaug e attache d
t o
th e cap .
Fil l th e reservoi r wit h a good-qualit y
windshiel d washe r fluid . Thi s
increase s th e cleanin g capabilit y an d
prevent s freezin g in col d weather .
Do
not use engine antifreeze or a
vinegar/water solution in the
windshield washer reservoir.
Antifreeze can damage your vehicle's
paint, while a vinegar/water solution
can damage the windshield washer
pump.
Use only commercially-availabl e
windshield washer fluid.
Maintenanc e
NOTIC
E
Page 225 of 326
Transmissio
n Flui d
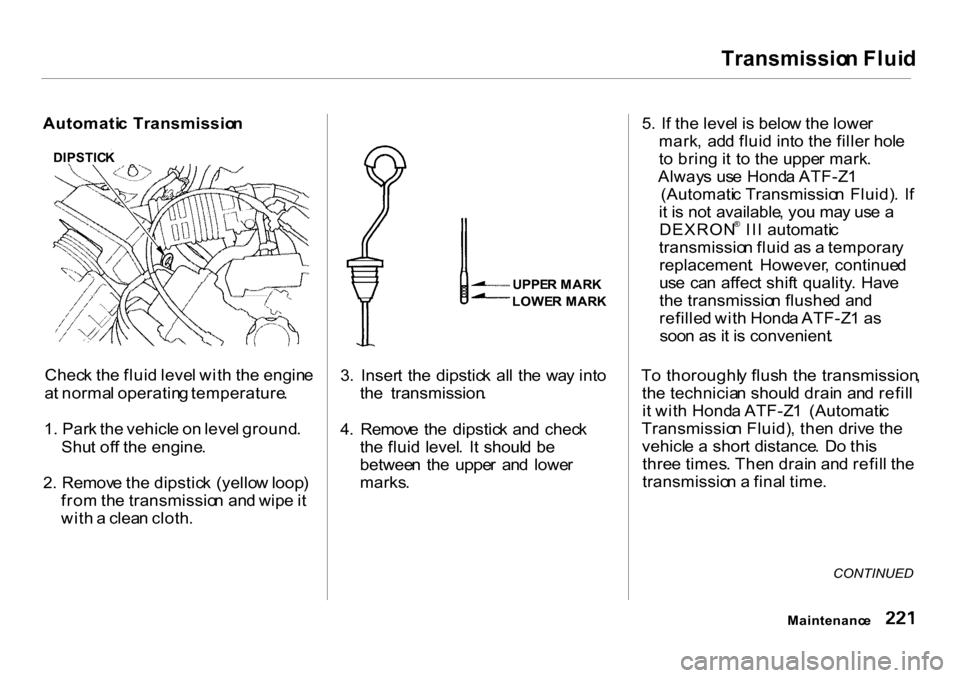
Automati c Transmissio n
Chec k th e flui d leve l wit h th e engin e
a t norma l operatin g temperature .
1 . Par k th e vehicl e o n leve l ground .
Shu t of f th e engine .
2 . Remov e th e dipstic k (yello w loop )
fro m th e transmissio n an d wip e it
wit h a clea n cloth . 3
. Inser t th e dipstic k al l th e wa y int o
th e transmission .
4 . Remov e th e dipstic k an d chec k
th e flui d level . I t shoul d b e
betwee n th e uppe r an d lowe r
marks . 5
. I f th e leve l i s belo w th e lowe r
mark , ad d flui d int o th e fille r hol e
t o brin g it t o th e uppe r mark .
Alway s us e Hond a ATF-Z 1
(Automati c Transmissio n Fluid) . I f
i t i s no t available , yo u ma y us e a
DEXRON ® II I automati c
transmissio n flui d a s a temporar y
replacement . However , continue d
us e ca n affec t shif t quality . Hav e
th e transmissio n flushe d an d
refille d wit h Hond a ATF-Z 1 a s
soo n a s i t i s convenient .
T o thoroughl y flus h th e transmission ,
th e technicia n shoul d drai n an d refil l
i t wit h Hond a ATF-Z 1 (Automati c
Transmissio n Fluid) , the n driv e th e
vehicl e a shor t distance . D o thi s
thre e times . The n drai n an d refil l th e
transmissio n a fina l time .
CONTINUED
Maintenanc e
DIPSTIC
K
UPPER MAR K
LOWE R MAR K
Page 226 of 326
Transmissio
n Flui d
6 . Inser t th e dipstic k al l th e wa y bac k
int o th e transmissio n securel y a s
show n in th e illustration .
Th e transmissio n shoul d b e draine d
an d refille d wit h ne w flui d accordin g
t o th e tim e an d distanc e recommen -
dation s i n th e maintenanc e schedule .5-spee
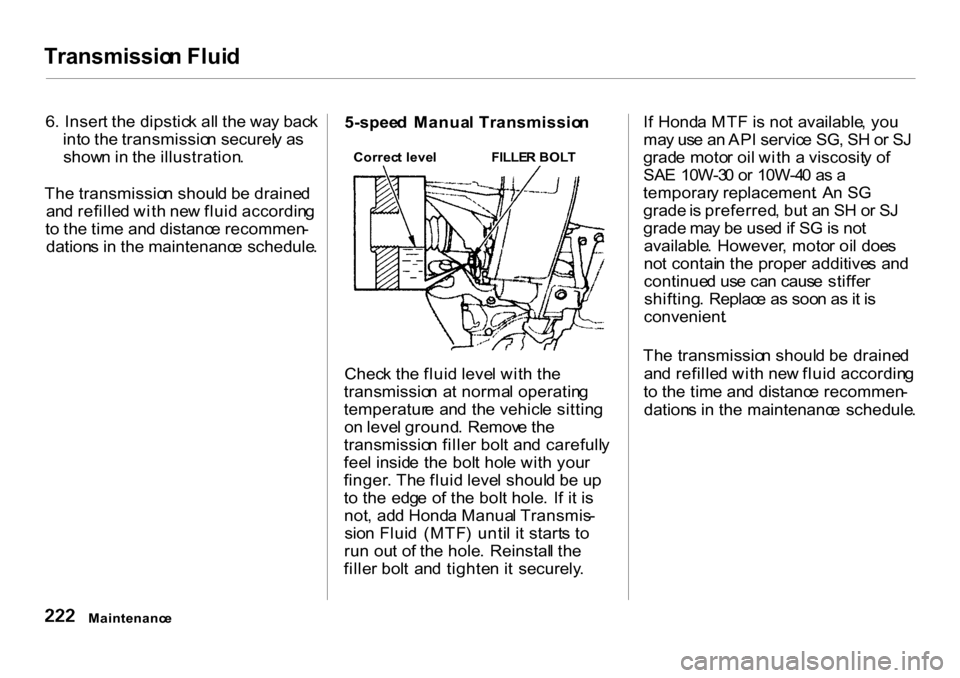
d Manua l Transmissio n
Correc t leve l FILLER BOL T
Chec k th e flui d leve l wit h th e
transmissio n a t norma l operatin g
temperatur e an d th e vehicl e sittin g
o n leve l ground . Remov e th e
transmissio n fille r bol t an d carefull y
fee l insid e th e bol t hol e wit h you r
finger . Th e flui d leve l shoul d b e u p
t o th e edg e o f th e bol t hole . I f i t i s
not , ad d Hond a Manua l Transmis -
sio n Flui d (MTF ) unti l i t start s t o
ru n ou t o f th e hole . Reinstal l th e
fille r bol t an d tighte n i t securely .I
f Hond a MT F is no t available , yo u
ma y us e a n AP I servic e SG , S H o r S J
grad e moto r oi l wit h a viscosit y o f
SA E 10W-3 0 o r 10W-4 0 a s a
temporar y replacement . A n S G
grade is preferred , bu t a n S H o r S J
grade may b e use d if S G is no t
available . However , moto r oi l doe s
no t contai n th e prope r additive s an d
continue d us e ca n caus e stiffe r
shifting . Replac e a s soo n a s it i s
convenient .
Th e transmissio n shoul d b e draine d
an d refille d wit h ne w flui d accordin g
t o th e tim e an d distanc e recommen -
dation s i n th e maintenanc e schedule .
Maintenanc e
Page 227 of 326
Rea
r Differentia l Flui d
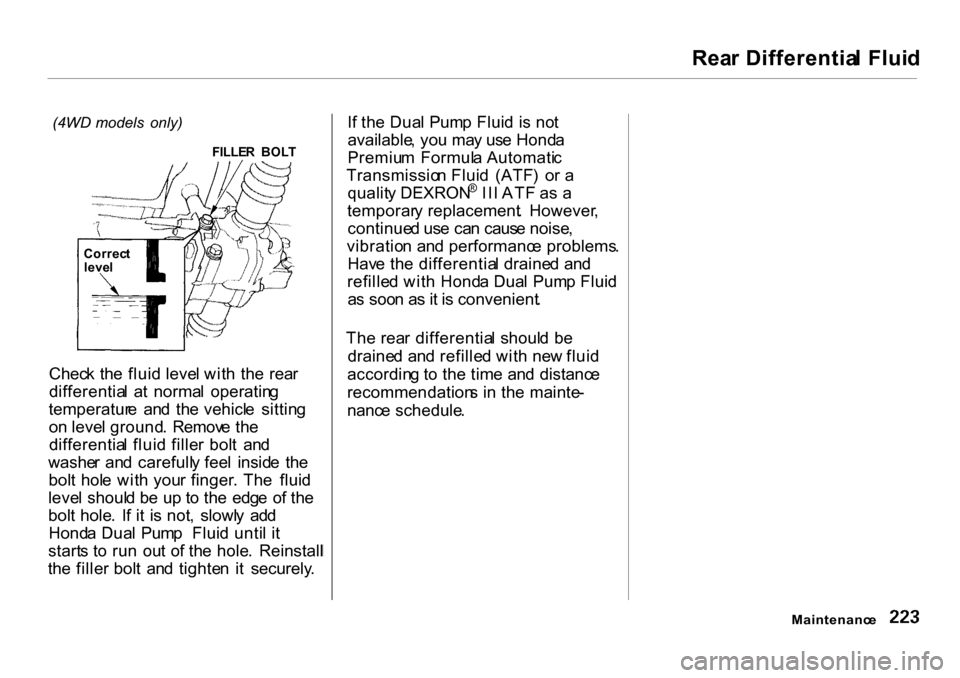
(4WD models only)
FILLER BOL T
Chec k th e flui d leve l wit h th e rea r
differentia l a t norma l operatin g
temperatur e an d th e vehicl e sittin g
o n leve l ground . Remov e th e
differentia l flui d fille r bol t an d
washe r an d carefull y fee l insid e th e
bol t hol e wit h you r finger . Th e flui d
leve l shoul d b e u p t o th e edg e o f th e
bol t hole . I f i t i s not , slowl y ad d
Hond a Dua l Pum p Flui d unti l i t
start s t o ru n ou t o f th e hole . Reinstall l
th e fille r bol t an d tighte n i t securely .I
f th e Dua l Pum p Flui d i s no t
available , yo u ma y us e Hond a
Premiu m Formul a Automati c
Transmissio n Flui d (ATF ) o r a
qualit y DEXRON ®
II I AT F a s a
temporar y replacement . However ,
continue d us e ca n caus e noise ,
vibratio n an d performanc e problems .
Hav e th e differentia l draine d an d
refille d wit h Hond a Dua l Pum p Flui d
a s soo n a s it i s convenient .
Th e rea r differentia l shoul d b e
draine d an d refille d wit h ne w flui d
accordin g t o th e tim e an d distanc e
recommendation s i n th e mainte -
nanc e schedule .
Maintenance
Correc
t
leve l
Page 228 of 326
Brak
e an d Clutc h Flui d
Chec k th e flui d leve l i n th e reser -
voir s monthly . Ther e ar e u p t o tw o
reservoirs , dependin g o n th e model .
The y are : Brak
e flui d reservoi r (al l models )
Clutc h flui d reservoi r
(manua l transmissio n only )
Th e brak e flui d shoul d b e replace d
accordin g to th e tim e an d distanc e
recommendation s i n th e mainte -
nanc e schedule . Alway
s us e Hond a Heav y Dut y
Brak e Flui d DO T 3 . I f i t i s no t
available , yo u shoul d us e onl y DO T 3
o r DO T 4 fluid , fro m a seale d
container , a s a temporar y
replacement . However , th e us e o f
an y non-Hond a brak e flui d ca n caus e
corrosio n an d decreas e th e lif e o f th e
system . Hav e th e brak e syste m
flushe d an d refille d wit h Hond a
Heav y Dut y Brak e Flui d DO T 3 a s
soo n a s possible.
Brak e flui d marke d DO T 5 is no t
compatibl e wit h you r vehicle' s
brakin g syste m an d ca n caus e
extensiv e damage . Brak
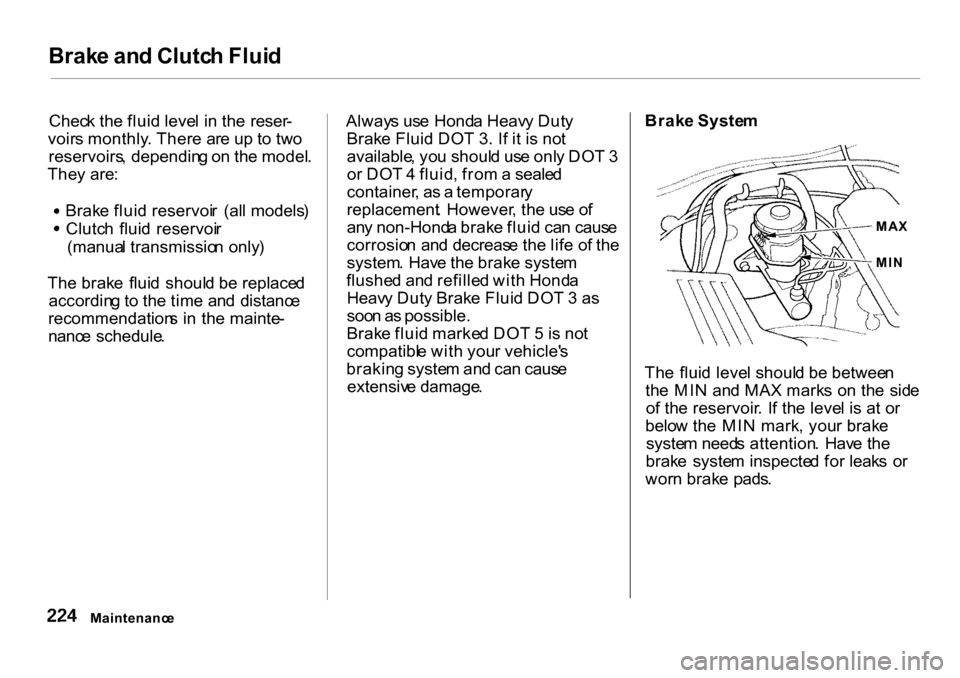
e Syste m
Th e flui d leve l shoul d b e betwee n
th e MI N an d MA X mark s o n th e sid e
o f th e reservoir . I f th e leve l i s a t o r
belo w th e MI N mark , you r brak e
syste m need s attention . Hav e th e
brak e syste m inspecte d fo r leak s o r
wor n brak e pads .
Maintenanc e
MA
X
MI N
Page 229 of 326
Brak
e an d Clutc h Fluid , Powe r Steerin g
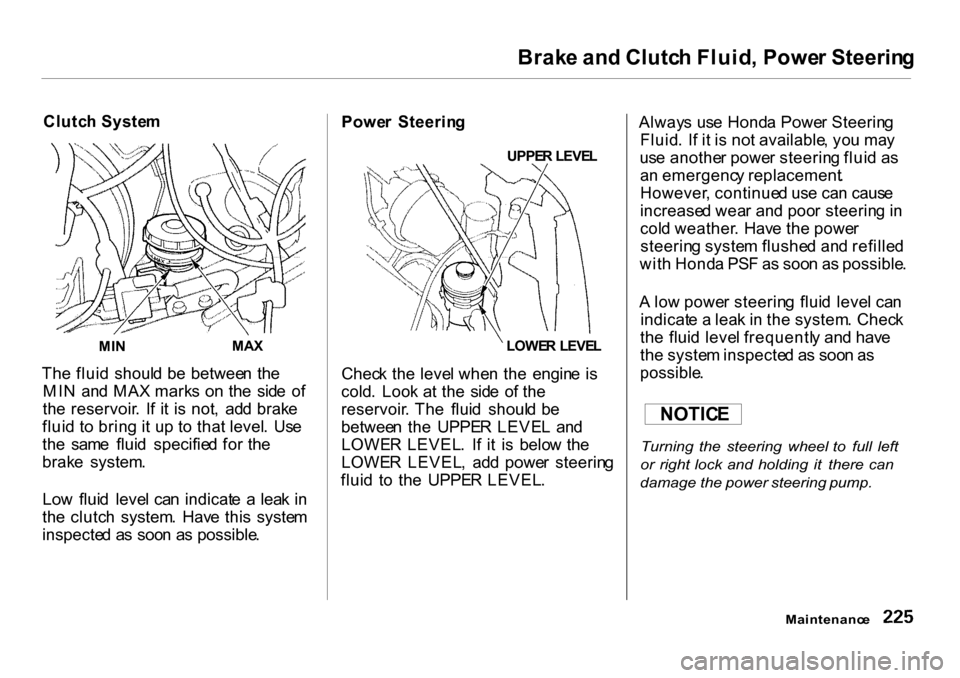
Clutc h Syste m
MI N MA
X
Th e flui d shoul d b e betwee n th e
MI N an d MA X mark s o n th e sid e o f
th e reservoir . I f i t i s not , ad d brak e
flui d t o brin g i t u p t o tha t level . Us e
th e sam e flui d specifie d fo r th e
brak e system .
Lo w flui d leve l ca n indicat e a lea k i n
th e clutc h system . Hav e thi s syste m
inspecte d a s soo n a s possible . Powe
r Steerin g
UPPER LEVE L
LOWE R LEVE L
Chec k th e leve l whe n th e engin e i s
cold . Loo k a t th e sid e o f th e
reservoir . Th e flui d shoul d b e
betwee n th e UPPE R LEVE L an d
LOWE R LEVEL . I f i t i s belo w th e
LOWE R LEVEL , ad d powe r steerin g
flui d t o th e UPPE R LEVEL . Alway
s us e Hond a Powe r Steerin g
Fluid . I f i t i s no t available , yo u ma y
us e anothe r powe r steerin g flui d a s
a n emergenc y replacement .
However , continue d us e ca n caus e
increase d wea r an d poo r steerin g in
col d weather . Hav e th e powe r
steerin g syste m flushe d an d refille d
wit h Hond a PS F a s soo n a s possible .
A lo w powe r steerin g flui d leve l ca n
indicat e a lea k i n th e system . Chec k
th e flui d leve l frequentl y an d hav e
th e syste m inspecte d a s soo n a s
possible .
Turning the steering wheel to full left
or right lock and holding it there can
damage the power steering pump.
Maintenanc e
NOTIC
E
Page 230 of 326
Ai
r Cleane r Elemen t
Th e ai r cleane r elemen t shoul d b e
replace d accordin g t o th e tim e an d
distanc e recommendation s i n th e
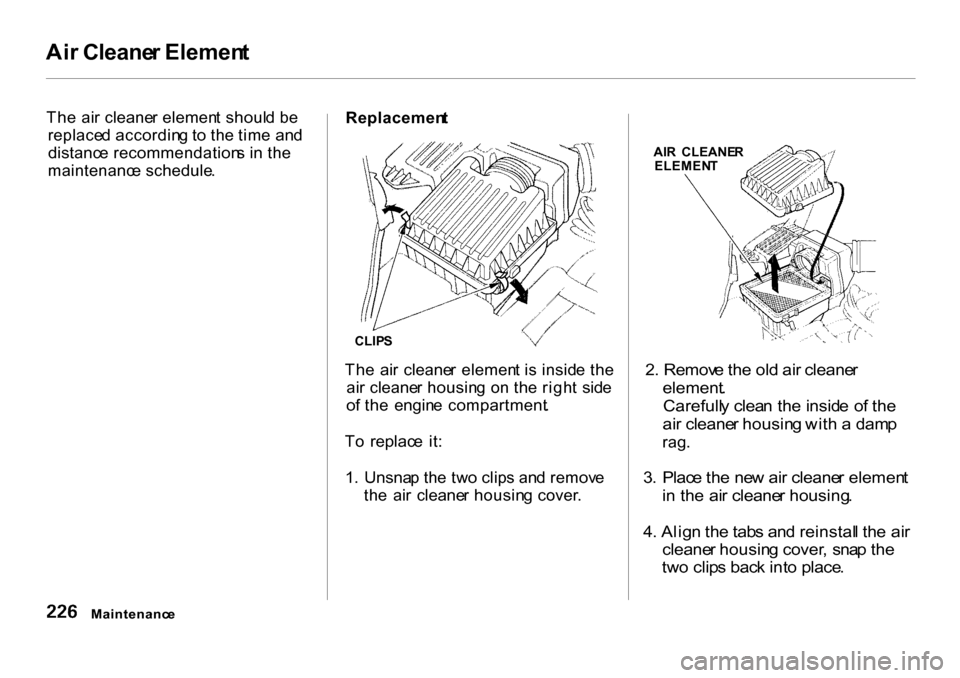
maintenanc e schedule . Replacemen
t
CLIP S
Th e ai r cleane r elemen t i s insid e th e
ai r cleane r housin g o n th e righ t sid e
o f th e engin e compartment .
T o replac e it :
1 . Unsna p th e tw o clip s an d remov e
th e ai r cleane r housin g cover . AI
R CLEANE R
ELEMEN T
2 . Remov e th e ol d ai r cleane r
element .
Carefull y clea n th e insid e o f th e
ai r cleane r housin g wit h a dam p
rag .
3 . Plac e th e ne w ai r cleane r elemen t
i n th e ai r cleane r housing .
4 . Alig n th e tab s an d reinstal l th e ai r
cleane r housin g cover , sna p th e
tw o clip s bac k int o place .
Maintenanc e