cooling HONDA CR-V 2002 RD4-RD7 / 2.G User Guide
[x] Cancel search | Manufacturer: HONDA, Model Year: 2002, Model line: CR-V, Model: HONDA CR-V 2002 RD4-RD7 / 2.GPages: 372, PDF Size: 4.49 MB
Page 139 of 372
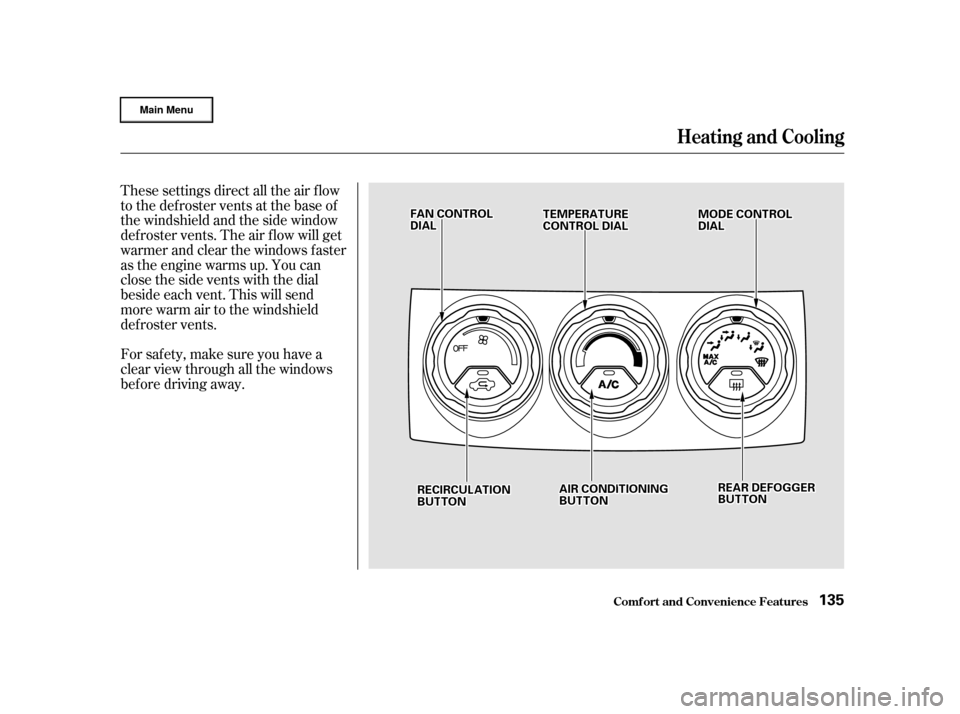
These settings direct all the air f low
to the defroster vents at the base of
the windshield and the side window
def roster vents. The air f low will get
warmer and clear the windows faster
as the engine warms up. You can
close the side vents with the dial
beside each vent. This will send
more warm air to the windshield
defroster vents.
For saf ety, make sure you have a
clear view through all the windows
bef ore driving away.
Heating and Cooling
Comf ort and Convenience Feat ures135
R REEC
CI IRRC CUUL LAA T
TI
IOON N
B
BU UT TT
TO
ON N
F
FA
A N
N C
COON NTTR
RO OL L
D
D I
IAA L
L M
M
O
ODDE
E C
COON NTTR
RO OL L
D
D I
IAA L
L
T
T
E
EM
M P
PE
ER
RA A T
TU
UR REE
C
CO ON NTTR
RO OL L D
DI
IAA L
L
R
REEA
A R
R D
DE
EF
FOOG GGGEER
R
B
BU UT TT
TO
ON N
A
A
I
IRR C
COON NDDI
ITT I
IOON NIINNG G
B
BU UT TT
TO
ON N
Page 140 of 372

To shut of f the system temporarily,
turn the fan speed and temperature
control dials all the way to the lef t.
You should shut the system
completely of f only f or the f irst f ew
minutes of driving in cold weather,
until the engine coolant warms up
enough to operate the heater. Keep
the fan on at all other times so stale
air does not build up in the interior. To Turn Everything Of f
Comf ort and Convenience Feat ures
Heating and Cooling
136
Page 225 of 372
Many states and Canadian provinces
require special outside mirrors when
towing a trailer. Even if they don’t,
you should install special mirrors if
you cannot clearly see behind you, or
if the trailer creates a blind spot.
Askyourtrailersalesorrental
agency if any other items are
recommended or required f or your
towing situation.When preparing to tow, and bef ore
driving away, be sure to check the
f ollowing:
The vehicle has been properly
serviced, and the tires, brakes,
suspension, and cooling system
are in good operating condition. The lights and brakes on your
vehicle and the trailer are working
properly.
The trailer has been properly
serviced and is in good condition.
Allitemsonandinthetrailerare
properly secured and cannot shif t
while you drive. Thehitch,safetychains,andany
other attachments are secure. Your vehicle tires and spare are
properly inf lated (see page ),
and the trailer tires and spare are
inflated as recommended by the
trailer maker.
All weights and loads are within
limits (see pages and ). If you tow f requently, f ollow the
Severe Conditions maintenance
schedule. 217 218 278
Additional Trailer EquipmentPre-T ow Checklist
Towing a Trailer
Driving221
Page 237 of 372
This section explains why it is
important to keep your vehicle well
maintained and to f ollow basic
maintenance saf ety precautions.
This section also includes
Maintenance Schedules f or normal
driving and severe driving conditions,
a Maintenance Record, and instruc-
tions f or simple maintenance tasks
you may want to take care of
yourself .
If you have the skills and tools to per-
f orm more complex maintenance
tasks on your Honda, you may want
to purchase the Service Manual. See
page f or inf ormation on how to
obtain a copy, or see your Honda
dealer.......................
Maintenance Saf ety .234
.
Important Safety Precautions . 235
.................
Maintenance Schedule . 236 ...
Required Maintenance Record . 243
.......
Owner Maintenance Checks . 245
..............................
Fluid Locations .246
......................................
Engine Oil .247
..................................
Adding Oil .247
....................
Recommended Oil .247
..............................
Synthetic Oil .248
....................................
Additives .248
.....
Changing the Oil and Filter . 249
.............................
Cooling System .251
............
Adding Engine Coolant . 251
.......
Replacing Engine Coolant . 253
....................
Windshield Washers .258
.......................
Transmission Fluid .260
..........
Automatic Transmission . 260
5-speed Manual .........................
Transmission .261
.................
Rear Dif f erential Fluid . 262
................
Brake and Clutch Fluid . 263
............................
Brake System .263
...........................
Clutch System .264
..............................
Power Steering .264
.....................
Air Cleaner Element .265
....................................
Hood Latch .266
....................................
Spark Plugs .267
..............................
Replacement .267 ............................
Specif ications .268
...........................................
Battery .269
.................................
Wiper Blades .271
..............
Air Conditioning System . 274
..................
DustandPollenFilter . 275
.......................................
Drive Belt .277
...............................................
Tires .278
......................................
Inf lation .278
Recommended Tire Pressures f or Normal ...........................
Driving .279
Tire Pressure Adjustment f or ..........
High Speed Driving . 279
..................................
Inspection .280
..............................
Maintenance .280
.............................
Tire Rotation .281
...
Replacing Tires and Wheels . 282
......................
Wheels and Tires .283
..........................
Winter Driving .283
.............................
Snow Tires .283
............................
Tire Chains .284
.............................................
Lights .285
.....................
Headlight Aiming .287
........................
Replacing Bulbs .287
....................
Storing Your Vehicle .295
357
Maintenance
Maint enance233
Page 255 of 372
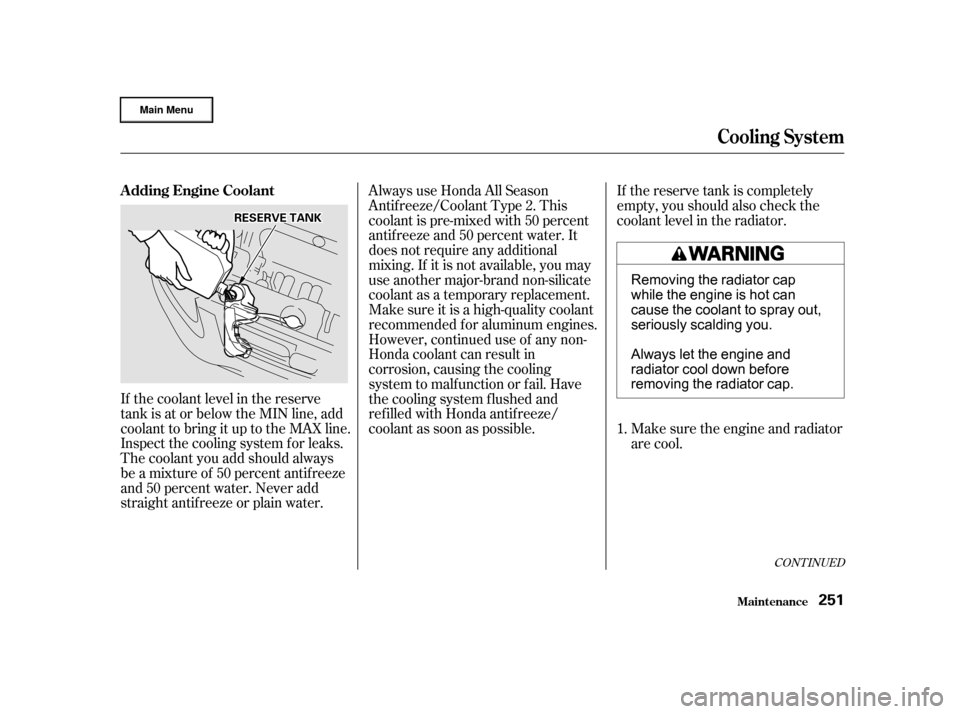
If the coolant level in the reserve
tank is at or below the MIN line, add
coolant to bring it up to the MAX line.
Inspect the cooling system f or leaks.
The coolant you add should always
be a mixture of 50 percent antif reeze
and 50 percent water. Never add
straight antif reeze or plain water.Always use Honda All Season
Antif reeze/Coolant Type 2. This
coolant is pre-mixed with 50 percent
antif reeze and 50 percent water. It
does not require any additional
mixing. If it is not available, you may
use another major-brand non-silicate
coolant as a temporary replacement.
Make sure it is a high-quality coolant
recommended f or aluminum engines.
However, continued use of any non-
Honda coolant can result in
corrosion, causing the cooling
system to malf unction or f ail. Have
the cooling system f lushed and
ref illed with Honda antif reeze/
coolant as soon as possible.
If the reserve tank is completely
empty, you should also check the
coolant level in the radiator.
Make sure the engine and radiator
are cool.
1.
CONT INUED
A dding Engine Coolant
Cooling Syst em
Maint enance251
R RE
ES
SE ER
RV V E
E T
TA
A N
NK K
Removing the radiator cap
while the engine is hot can
cause the coolant to spray out,
seriously scalding you.
Always let the engine and
radiator cool down before
removing the radiator cap.
Page 256 of 372
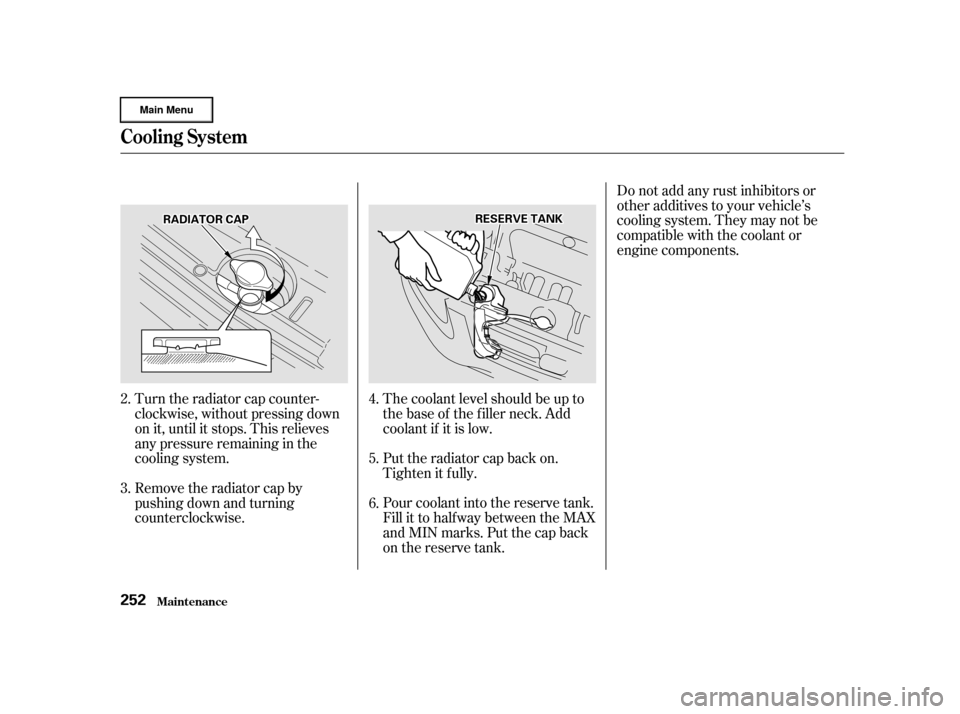
Do not add any rust inhibitors or
other additives to your vehicle’s
cooling system. They may not be
compatible with the coolant or
engine components.
Pour coolant into the reserve tank.
Fill it to half way between the MAX
and MIN marks. Put the cap back
on the reserve tank. Put the radiator cap back on.
Tighten it f ully. The coolant level should be up to
the base of the f iller neck. Add
coolant if it is low.
Turn the radiator cap counter-
clockwise, without pressing down
on it, until it stops. This relieves
any pressure remaining in the
cooling system.
Remove the radiator cap by
pushing down and turning
counterclockwise.
2.
3.
4.
5.
6.
Cooling Syst em
Maint enance252
R RA
A D
DI
IAA T
TO
OR R C
CAA P
P R
RE
ES
SE ER
RV V E
E T
TA
A N
NK K
Page 257 of 372
CONT INUED
Thecoolingsystemshouldbe
completely drained and ref illed with
new coolant according to the time
and distance recommendations in
the maintenance schedule. Only use
Honda All Season Antif reeze/
Coolant Type 2.
Draining the coolant requires access
to the underside of the vehicle.
Unless you have the tools and
knowledge, you should have this
maintenance done by a skilled
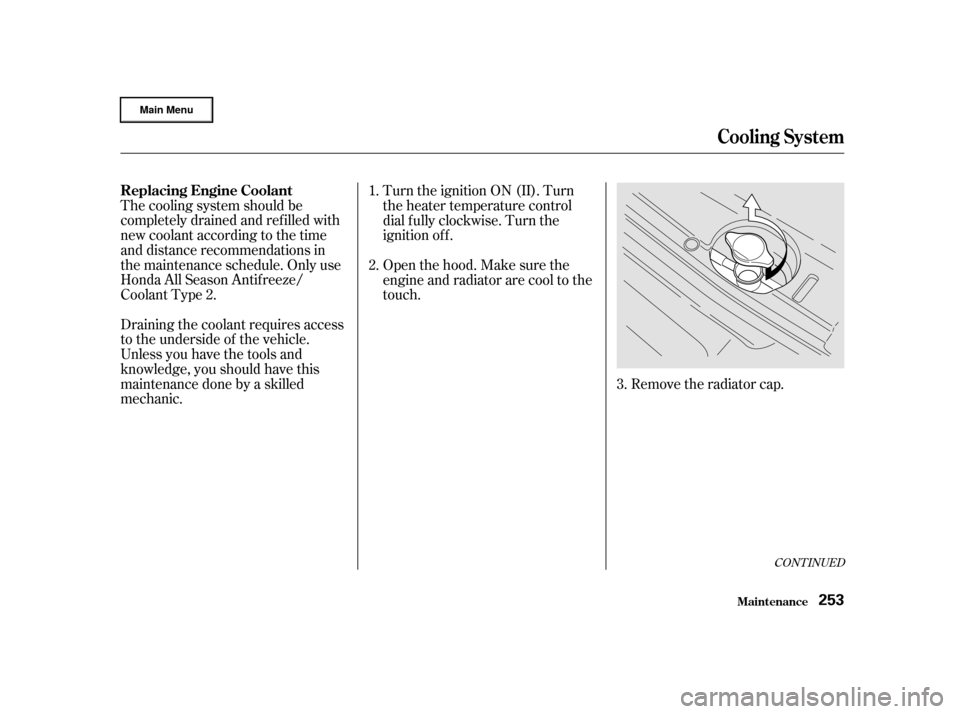
mechanic.Remove the radiator cap.
Turn the ignition ON (II). Turn
the heater temperature control
dial f ully clockwise. Turn the
ignition of f .
Openthehood.Makesurethe
engine and radiator are cool to the
touch.
1.
2.
3.
Replacing Engine Coolant
Cooling Syst em
Maint enance253
Page 258 of 372
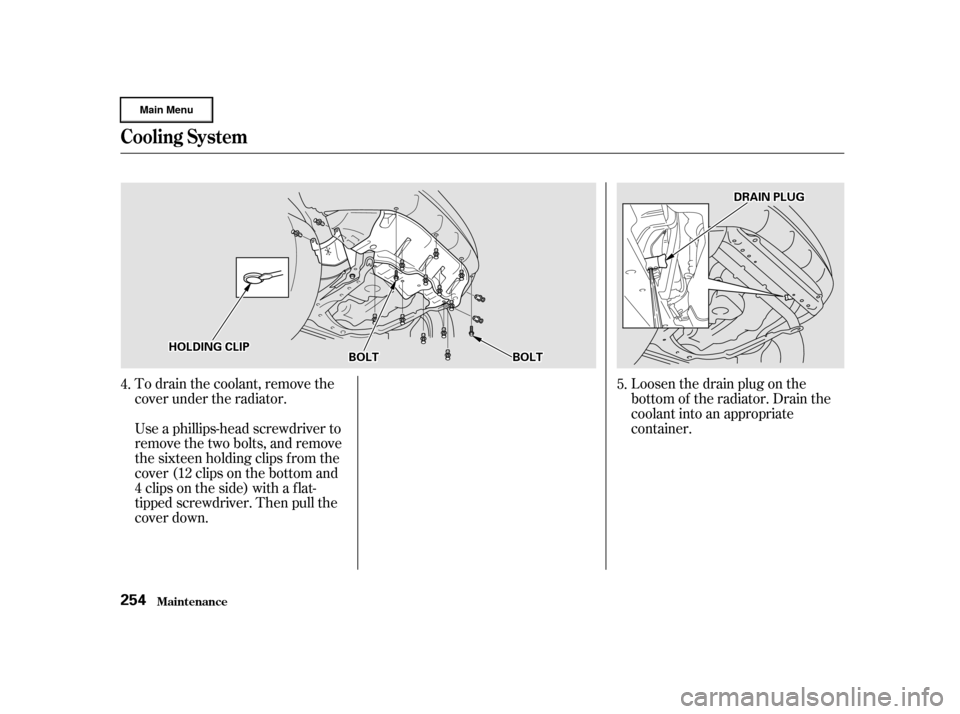
To drain the coolant, remove the
cover under the radiator.Loosen the drain plug on the
bottom of the radiator. Drain the
coolant into an appropriate
container.
Use a phillips-head screwdriver to
remove the two bolts, and remove
the sixteen holding clips f rom the
cover (12 clips on the bottom and
4 clips on the side) with a f lat-
tipped screwdriver. Then pull the
cover down.
4.
5.
Cooling Syst em
Maint enance254
D DR
RAA I
INN P
PL
LUUG G
H
H O
OL LDD I
INNG G C
CLLIIPP
B
BOOL LTT B
BOOL LTT
Page 259 of 372
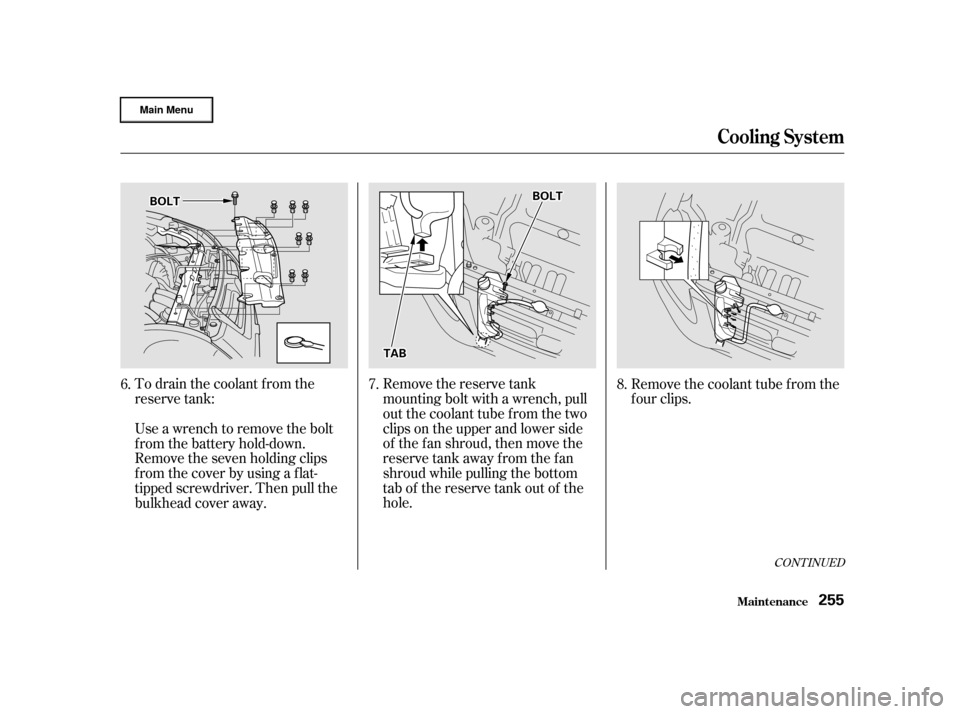
To drain the coolant from the
reserve tank:Remove the reserve tank
mounting bolt with a wrench, pull
out the coolant tube f rom the two
clips on the upper and lower side
of the fan shroud, then move the
reserve tank away f rom the f an
shroud while pulling the bottom
tab of the reserve tank out of the
hole.Remove the coolant tube f rom the
f our clips.
Use a wrench to remove the bolt
from the battery hold-down.
Remove the seven holding clips
f rom the cover by using a f lat-
tipped screwdriver. Then pull the
bulkhead cover away.
6.
7.8.
CONT INUED
Cooling Syst em
Maint enance255
B BOOL LTT
T
TA
A B
B B
BO
OL LTT
Page 260 of 372
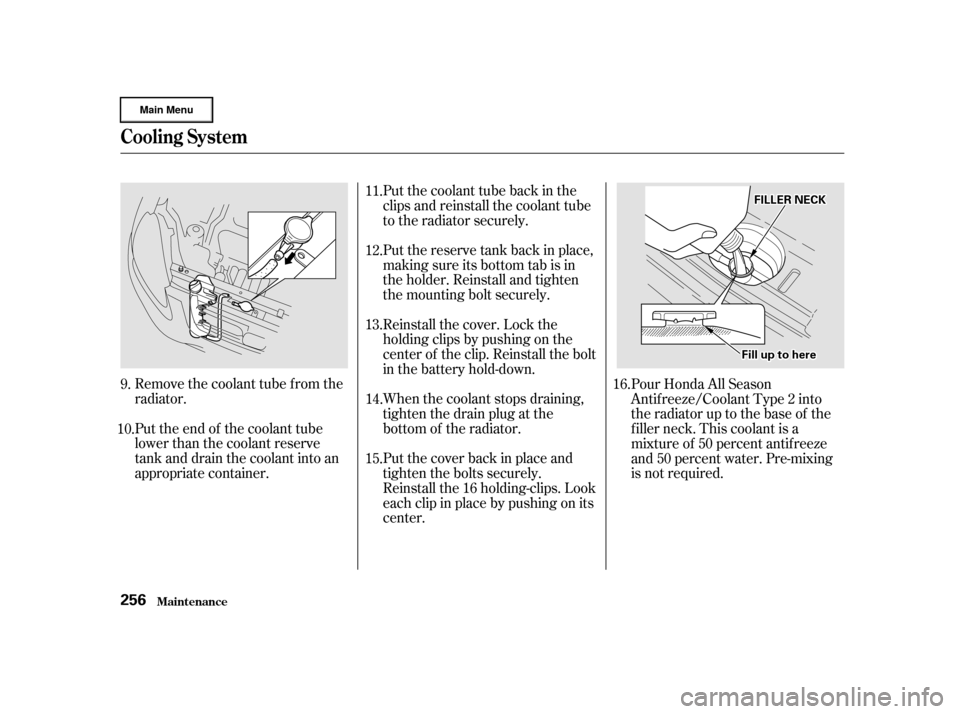
Remove the coolant tube f rom the
radiator.
Put the end of the coolant tube
lower than the coolant reserve
tank and drain the coolant into an
appropriate container.Put the reserve tank back in place,
making sure its bottom tab is in
the holder. Reinstall and tighten
the mounting bolt securely.
Reinstall the cover. Lock the
holding clips by pushing on the
center of the clip. Reinstall the bolt
in the battery hold-down.
When the coolant stops draining,
tightenthedrainplugatthe
bottom of the radiator.
Put the cover back in place and
tighten the bolts securely.
Reinstall the 16 holding-clips. Look
each clip in place by pushing on its
center.
Pour Honda All Season
Antif reeze/Coolant Type 2 into
the radiator up to the base of the
f iller neck. This coolant is a
mixture of 50 percent antif reeze
and 50 percent water. Pre-mixing
is not required.
Put the coolant tube back in the
clips and reinstall the coolant tube
to the radiator securely.
12.
13.
9.
10. 11.
14.
15. 16.
Cooling Syst em
Maint enance256
F FI
ILLL LEE R
R N
NEEC
CK K
F
Fi illll u
u p
p t
too h
he
erree