HONDA CR-V 2003 RD4-RD7 / 2.G Owners Manual
CR-V 2003 RD4-RD7 / 2.G
HONDA
HONDA
https://www.carmanualsonline.info/img/13/5782/w960_5782-0.png
HONDA CR-V 2003 RD4-RD7 / 2.G Owners Manual
Trending: transmission oil, climate control, oil pan, maintenance reset, reset, sensor, fuse
Page 311 of 374

This section covers the more-
common problems that motorists
experience with their vehicles. It
gives you inf ormation about how to
safely evaluate the problem and what
to do to correct it. If the problem has
stranded you on the side of the road,
you may be able to get going again.
If not, you will also f ind instructions
on getting your vehicle towed.....................
Changing a Flat Tire .308
..........
If Your Engine Won’t Start . 318
Nothing Happens or the Starter Motor Operates Very .................................
Slowly .318
The Starter Operates ................................
Normally .319
................................
Jump Starting .320
............
If Your Engine Overheats . 323
.........
Low Oil Pressure Indicator . 325
..........
Charging System Indicator . 326
.......
Malf unction Indicator Lamp . 327
.......................
Readiness Codes .328
...............
Brake System Indicator . 329
..................
Closing the Moonroof . 330
..............................................
Fuses .331
..........
Checking and Replacing . 332
......................
Emergency Towing .337
Taking Care of the Unexpected
T aking Care of t he Unexpect ed307
Page 312 of 374
If you have a f lat tire while driving,
stop in a saf e place to change it.
Stopping in traf f ic or on the shoulder
of a busy road is dangerous. Drive
slowly along the shoulder until you
gettoanexitoranareatostopthat
is far away from the traffic lanes.Park the vehicle on f irm, level and
non-slippery ground away f rom
traffic. Put the transmission in
Park (automatic) or Reverse
(manual). Apply the parking brake.
Turn on the hazard warning lights,
and turn the ignition switch to
LOCK (0). Have all the
passengers get out of the vehicle
while you change the tire. If you are towing a trailer, unhitch
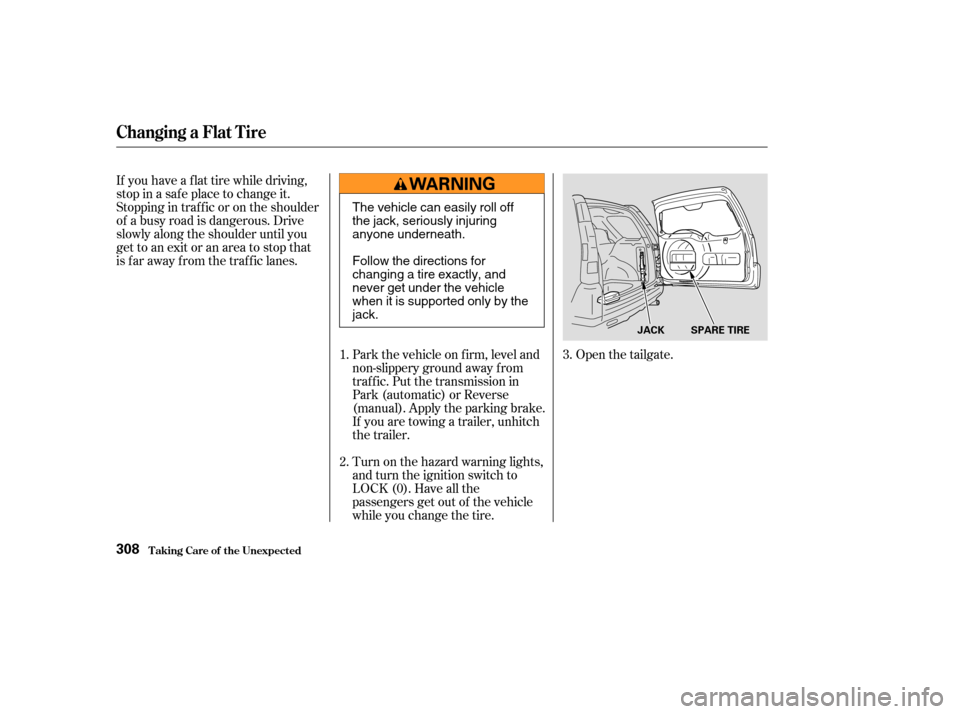
the trailer.Open the tailgate.
1.
2. 3.
T aking Care of t he Unexpect ed
Changing a Flat T ire
308
JACK SPARE TIRE
The vehicle can easily roll off
the jack, seriously injuring
anyone underneath.
Follow the directions for
changing a tire exactly, and
never get under the vehicle
when it is supported only by the
jack.
Page 313 of 374
CONT INUED
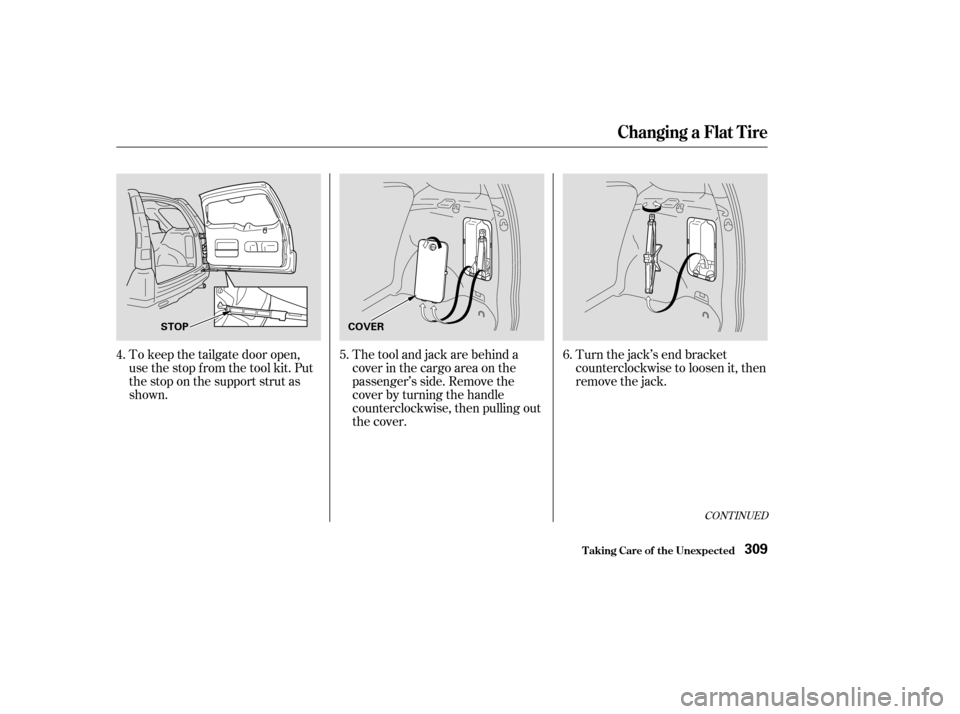
Turn the jack’s end bracket
counterclockwise to loosen it, then
remove the jack.
To keep the tailgate door open,
use the stop f rom the tool kit. Put
the stop on the support strut as
shown. The tool and jack are behind a
cover in the cargo area on the
passenger’s side. Remove the
cover by turning the handle
counterclockwise, then pulling out
the cover.6.
5.
4.
T aking Care of t he Unexpect ed
Changing a Flat T ire
309
STOP COVER
Page 314 of 374
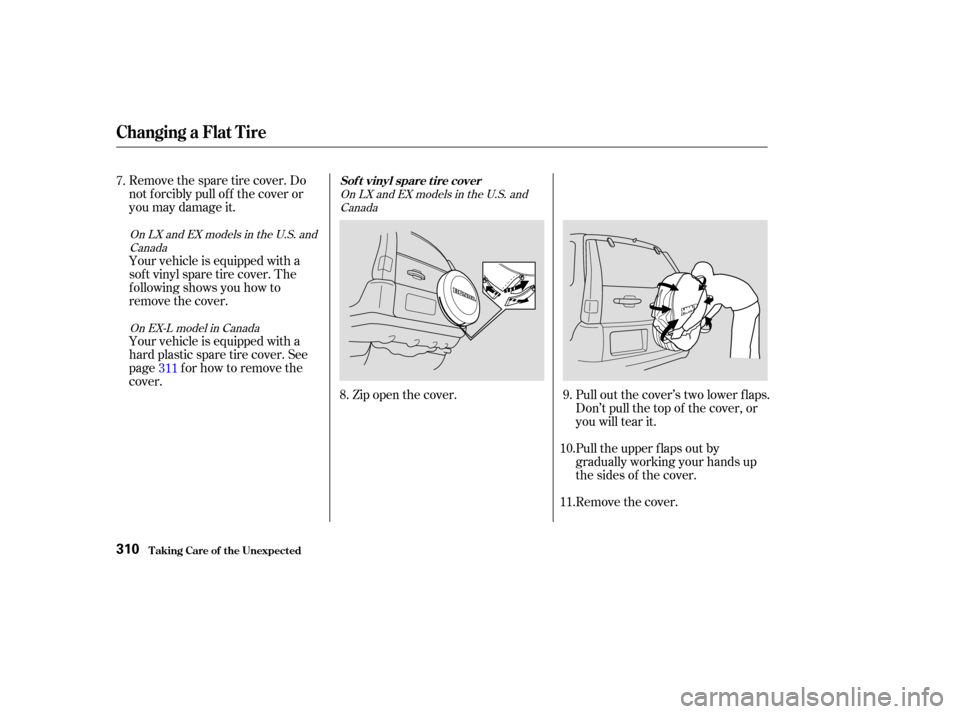
Remove the spare tire cover. Do
not f orcibly pull of f the cover or
you may damage it.
Your vehicle is equipped with a
sof t vinyl spare tire cover. The
f ollowing shows you how to
remove the cover.
Your vehicle is equipped with a
hard plastic spare tire cover. See
page f or how to remove the
cover.Zip open the cover.Pull out the cover’s two lower f laps.
Don’t pull the top of the cover, or
you will tear it.
Remove the cover. Pull the upper f laps out by
gradually working your hands up
the sides of the cover.
7.
8.9.
11. 10.
311
OnLXandEXmodelsintheU.S.and
Canada
On EX-L model in Canada OnLXandEXmodelsintheU.S.and
Canada
Sof t vinyl spare t ire cover
Changing a Flat T ire
T aking Care of t he Unexpect ed310
Page 315 of 374
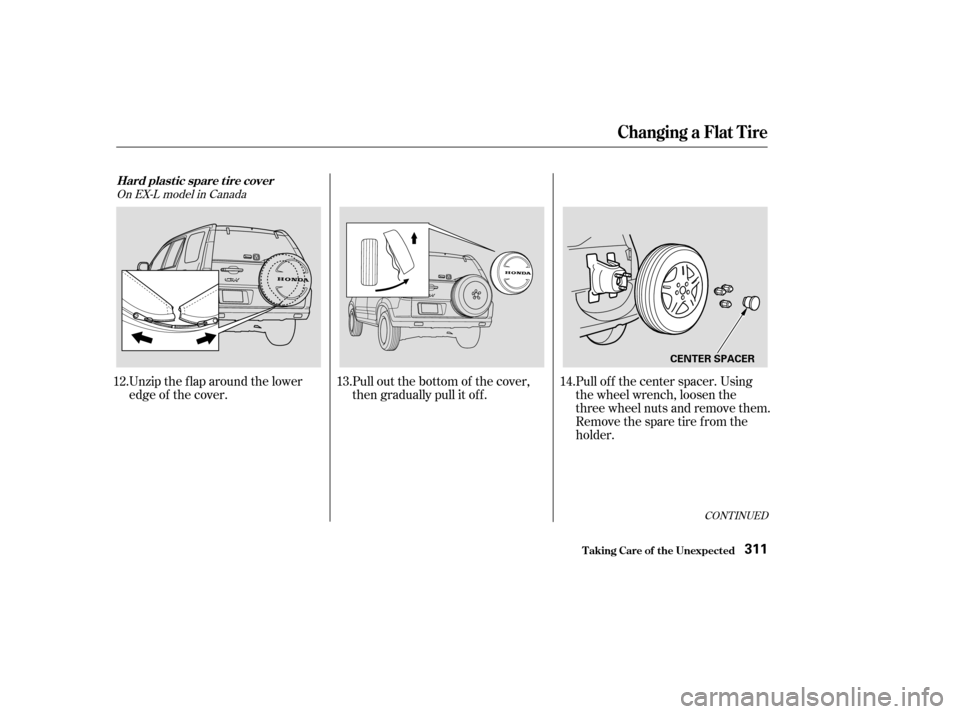
Unzip the flap around the lower
edge of the cover.Pull of f the center spacer. Using
the wheel wrench, loosen the
three wheel nuts and remove them.
Remove the spare tire from the
holder.
Pull out the bottom of the cover,
then gradually pull it of f .
12.
14.
13.
CONT INUED
On EX-L model in Canada
Hard plastic spare tire cover
T aking Care of t he Unexpect ed
Changing a Flat T ire
311
CENTER SPACER
Page 316 of 374
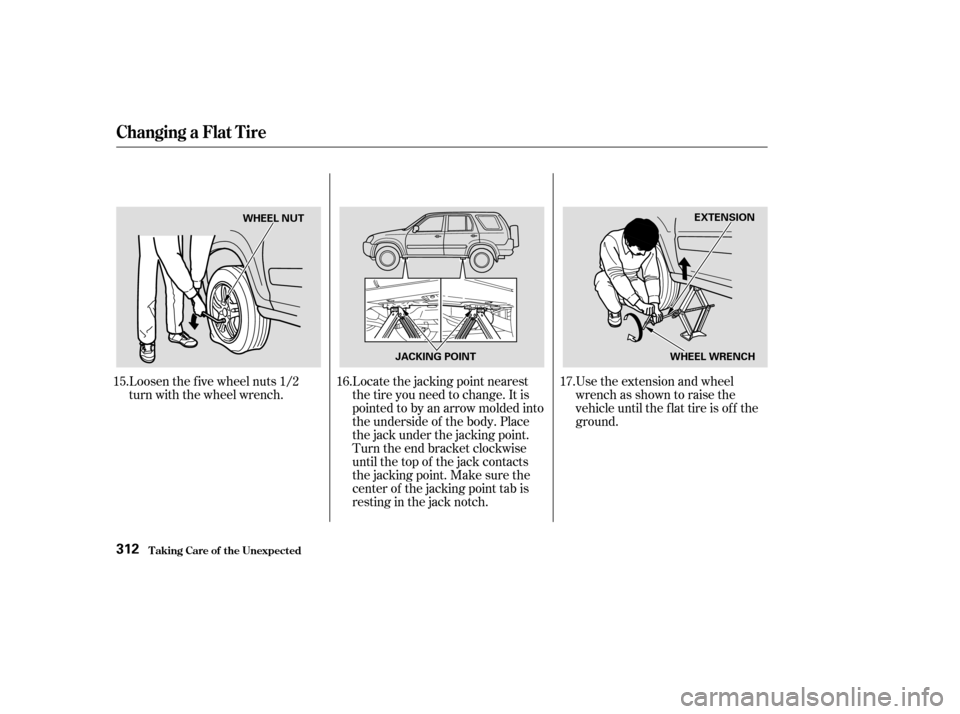
Loosen the f ive wheel nuts 1/2
turn with the wheel wrench.Locate the jacking point nearest
thetireyouneedtochange.Itis
pointed to by an arrow molded into
the underside of the body. Place
the jack under the jacking point.
Turn the end bracket clockwise
until the top of the jack contacts
the jacking point. Make sure the
center of the jacking point tab is
restinginthejacknotch.Use the extension and wheel
wrench as shown to raise the
vehicle until the f lat tire is of f the
ground.
15.
16.17.
T aking Care of t he Unexpect ed
Changing a Flat T ire
312
WHEEL NUT
JACKING POINT WHEEL WRENCHEXTENSION
Page 317 of 374
CONT INUED
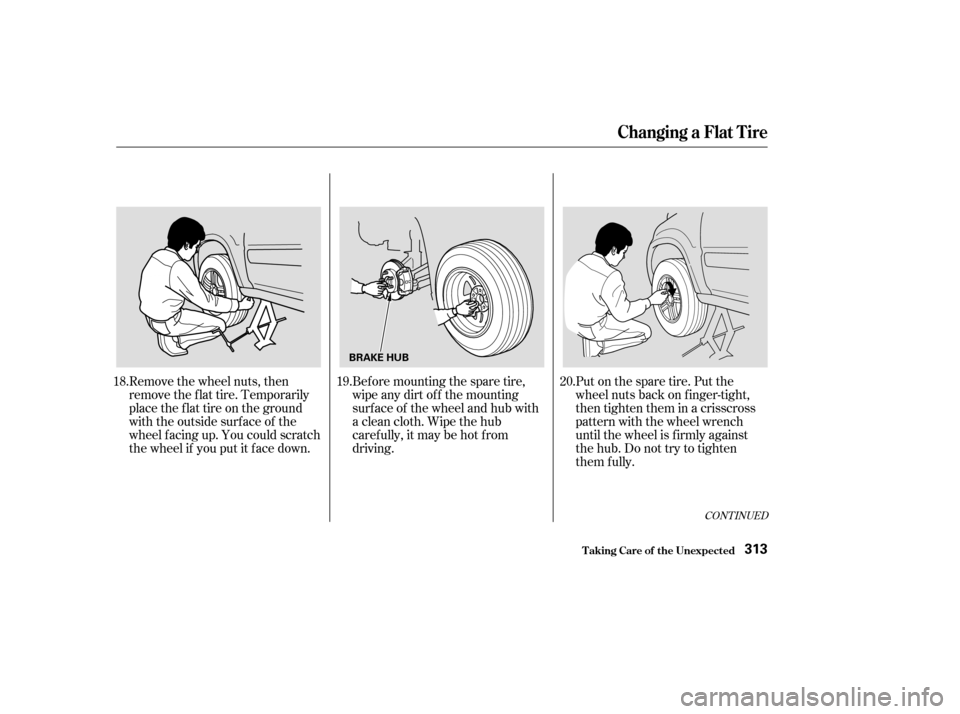
Put on the spare tire. Put the
wheel nuts back on f inger-tight,
then tighten them in a crisscross
pattern with the wheel wrench
until the wheel is f irmly against
the hub. Do not try to tighten
them f ully.
Bef ore mounting the spare tire,
wipeanydirtoff themounting
surface of the wheel and hub with
a clean cloth. Wipe the hub
carefully,itmaybehotfrom
driving.
Remove the wheel nuts, then
remove the f lat tire. Temporarily
place the f lat tire on the ground
with the outside surface of the
wheel f acing up. You could scratch
the wheel if you put it f ace down.
18.
19.20.
Changing a Flat T ire
T aking Care of t he Unexpect ed313
BRAKE HUB
Page 318 of 374
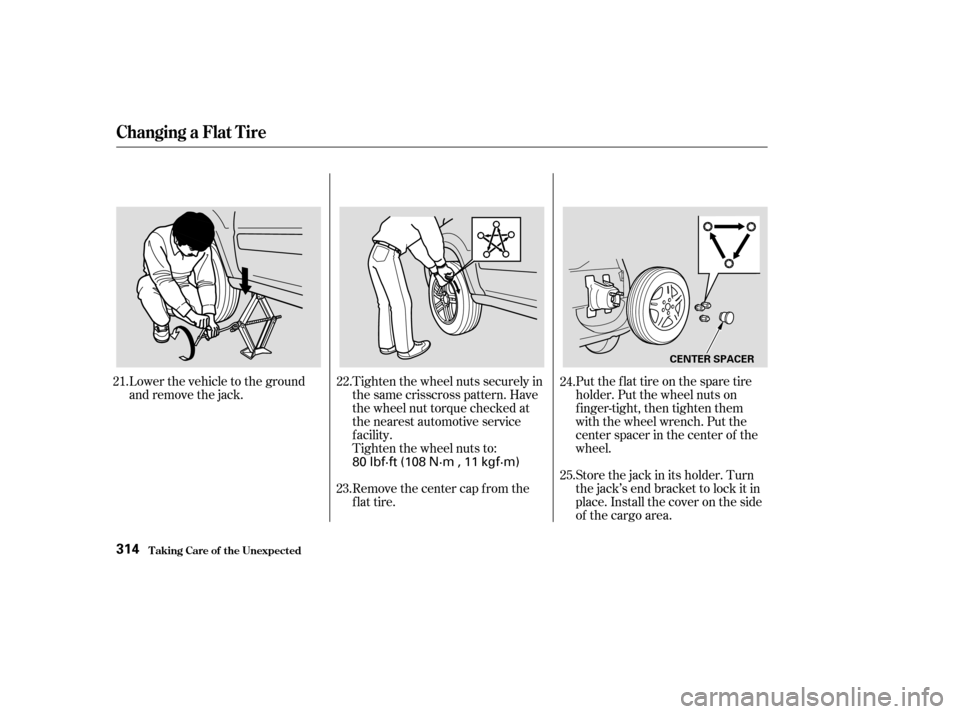
Put the flat tire on the spare tire
holder. Put the wheel nuts on
finger-tight, then tighten them
with the wheel wrench. Put the
center spacer in the center of the
wheel.
Store the jack in its holder. Turn
the jack’s end bracket to lock it in
place. Install the cover on the side
of the cargo area.
Tighten the wheel nuts securely in
the same crisscross pattern. Have
the wheel nut torque checked at
the nearest automotive service
f acility.
Tighten the wheel nuts to:
Remove the center cap from the
flat tire.
Lower the vehicle to the ground
and remove the jack.
23.
21.
22.
24.
25.
T aking Care of t he Unexpect ed
Changing a Flat T ire
314
CENTER SPACER
80 lbf·ft (108 N·m , 11 kgf·m)
Page 319 of 374
CONT INUED
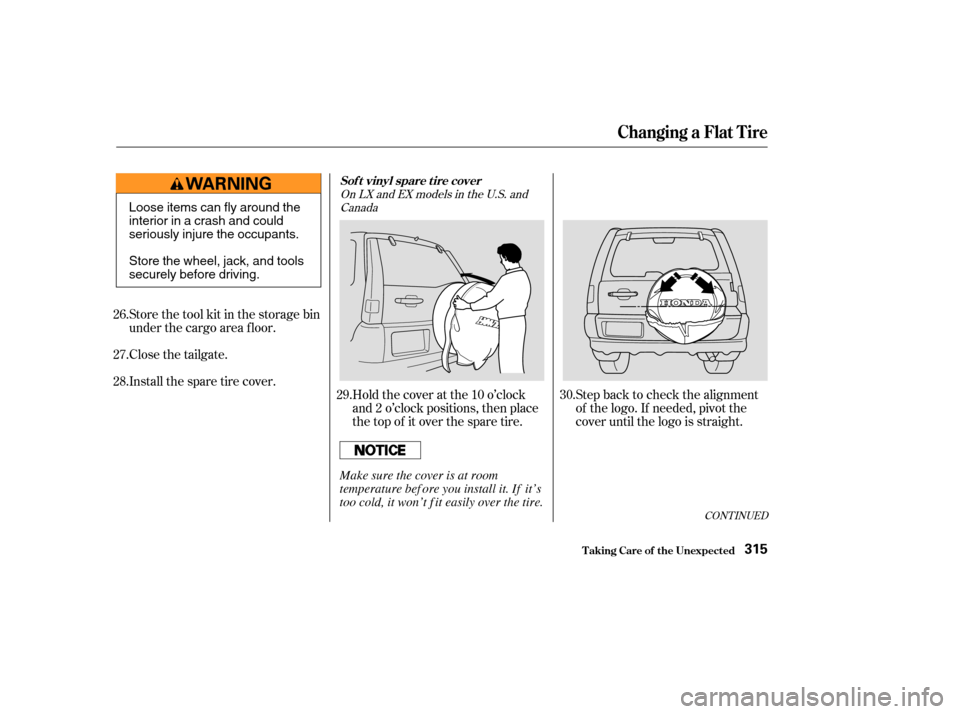
Step back to check the alignment
of the logo. If needed, pivot the
cover until the logo is straight.
Holdthecoveratthe10o’clock
and 2 o’clock positions, then place
the top of it over the spare tire.
Store the tool kit in the storage bin
under the cargo area f loor.
Close the tailgate.
Install the spare tire cover.
26.
27.
28.
29.30.
OnLXandEXmodelsintheU.S.and
Canada
Changing a Flat T ire
T aking Care of t he Unexpect ed
Sof t vinyl spare t ire cover
315
Loose items can fly around the
interior in a crash and could
seriously injure the occupants.
Store the wheel, jack, and tools
securely before driving.
Make sure the cover is at room
temperature bef ore you install it. If it’s
too cold, it won’t f it easily over the tire.
Page 320 of 374
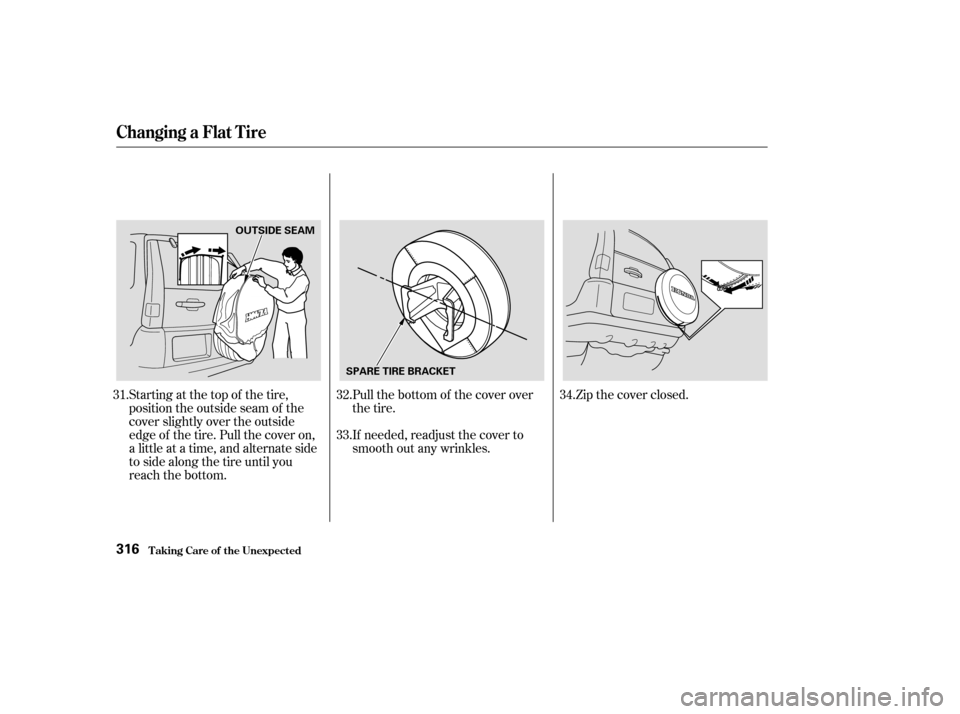
Starting at the top of the tire,
position the outside seam of the
cover slightly over the outside
edge of the tire. Pull the cover on,
a little at a time, and alternate side
to side along the tire until you
reach the bottom.If needed, readjust the cover to
smooth out any wrinkles. Pull the bottom of the cover over
the tire.
Zip the cover closed.
31. 32.
33.34.
Changing a Flat T ire
T aking Care of t he Unexpect ed316
OUTSIDE SEAM
SPARE TIRE BRACKET
Trending: dashboard, deactivate airbag, recommended oil, glove box, brake, fuses, key

