HONDA CR-V 2004 RD4-RD7 / 2.G Owners Manual
Manufacturer: HONDA, Model Year: 2004, Model line: CR-V, Model: HONDA CR-V 2004 RD4-RD7 / 2.GPages: 256, PDF Size: 2.96 MB
Page 121 of 256

Your vehicle’s audio system will
disable itself if it is disconnected
f rom electrical power f or any reason.
To make it work again, you must
enter a specif ic f ive-digit code in the
preset buttons. Because there are
hundreds of number combinations
possible f rom f ive-digits, making the
system work without knowing the
exact code is nearly impossible.
Youshouldhavereceivedacardthat
lists your audio system code number
and serial number. It is best to store
this card in a saf e place at home. In
addition, you should write the audio
system’s serial number in this
Owner’s Manual.
If youshouldhappentolosethecard,
you must obtain the code number
f rom a Honda dealer. To do this, you
will need the system’s serial number.If your vehicle’s battery is discon-
nected or goes dead, the audio
system will disable itself . If this
happens, you will see ‘‘COdE’’ in the
frequencydisplaythenexttimeyou
turn on the system. Use the Preset
buttons to enter the five-digit code.
The code is located on the radio code
card included in your Owner’s
Manual kit. When it is entered
correctly, the radio will start playing.
If you make a mistake entering the
code, do not start over; complete the
f ive-digit sequence, then enter the
correct code. You have ten tries to
enter the correct code. If you are
unsuccessful in ten attempts, you
must then leave the system on for 1
hour bef ore trying again.
If the code card is lost, a Honda
dealer can access your code with
your radio’s serial number. To
access the serial number, turn the
radio on. It must display ‘‘COdE’’,
then turn the radio off. Push the
preset 1 and preset 6 at the same
time, then quickly release.
You will have to store your favorite
stations in the Preset buttons after
the system begins working. Your
original settings were lost when the
power was disconnected.
Radio T hef t Prot ect ion
Comf ort and Convenience Feat ures
Radio T hef t Protection
117
Page 122 of 256

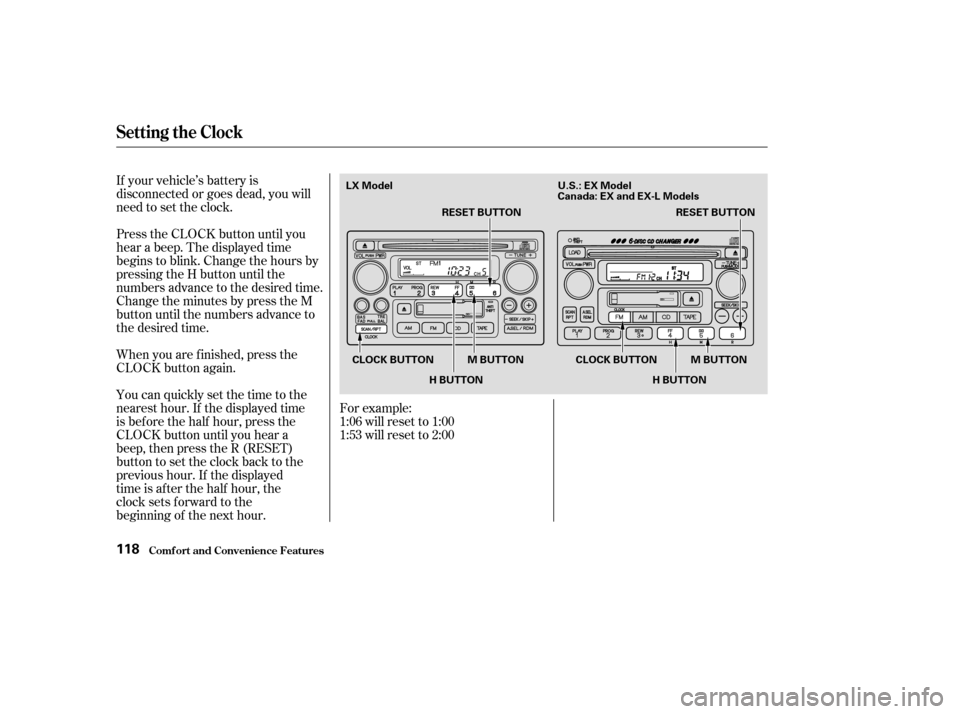
If your vehicle’s battery is
disconnected or goes dead, you will
need to set the clock.
Press the CLOCK button until you
hear a beep. The displayed time
begins to blink. Change the hours by
pressing the H button until the
numbers advance to the desired time.
Change the minutes by press the M
button until the numbers advance to
the desired time.
When you are f inished, press the
CLOCK button again.
You can quickly set the time to the
nearest hour. If the displayed time
is bef ore the half hour, press the
CLOCK button until you hear a
beep, then press the R (RESET)
button to set the clock back to the
previous hour. If the displayed
time is af ter the half hour, the
clock sets f orward to the
beginning of the next hour.For example:
1:06 will reset to 1:00
1:53 will reset to 2:00
Setting the Clock
Comf ort and Convenience Feat ures118
LX Model
RESET BUTTON
CLOCK BUTTON H BUTTON
H BUTTON CLOCK BUTTON
M BUTTON M BUTTON
RESET BUTTON
U.S.: EX Model
Canada: EX and EX-L Models
Page 123 of 256

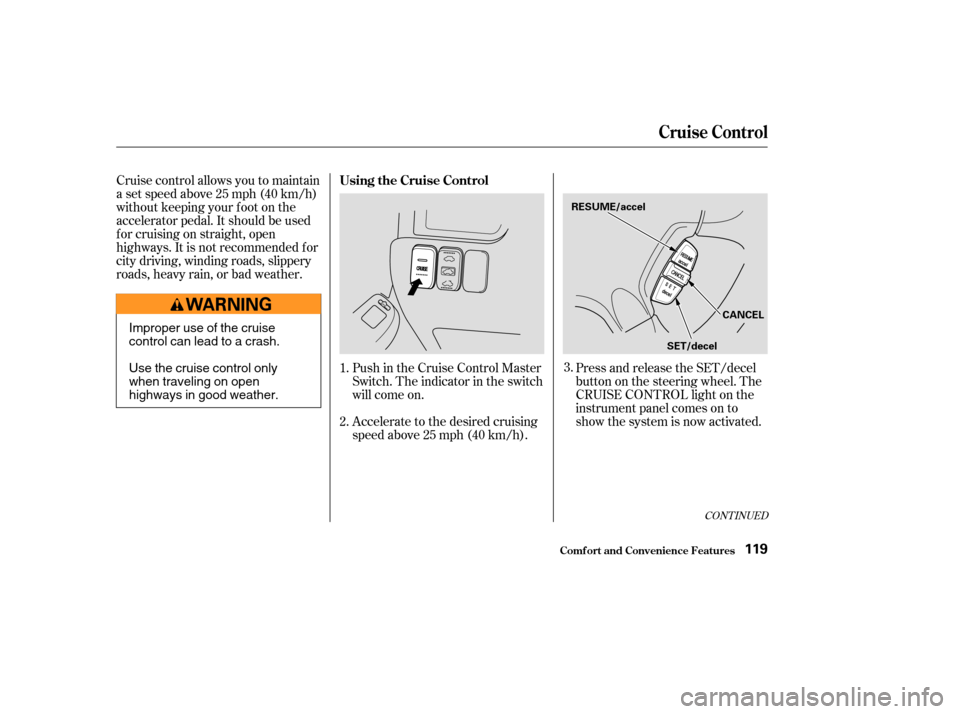
Cruise control allows you to maintain
asetspeedabove25mph(40km/h)
without keeping your f oot on the
accelerator pedal. It should be used
f or cruising on straight, open
highways. It is not recommended f or
city driving, winding roads, slippery
roads, heavy rain, or bad weather.Push in the Cruise Control Master
Switch. The indicator in the switch
will come on.
Accelerate to the desired cruising
speedabove25mph(40km/h).Press and release the SET/decel
buttononthesteeringwheel.The
CRUISE CONTROL light on the
instrument panel comes on to
show the system is now activated.
1.
2. 3.
CONT INUED
Using the Cruise Control
Cruise Control
Comf ort and Convenience Feat ures119
SET/decel
RESUME/accel
CANCEL
Improper use of the cruise
control can lead to a crash.
Use the cruise control only
when traveling on open
highways in good weather.
Page 124 of 256

Cruise control may not hold the set
speed when you are going up and
down hills. If your speed increases
going down a hill, use the brakes to
slow down. This will cancel the
cruise control. To resume the set
speed, press the RESUME/accel
button. The CRUISE CONTROL
light on the instrument panel will
come back on.You can increase the set cruising
speed in any of these ways:
Press and hold the RESUME/
accel button. When you reach the
desired cruising speed, release the
button.
To increase your speed in very
small amounts, tap the RESUME/
accel button. Each time you do
this, your vehicle will speed up
about 1 mph (1.6 km/h).
Push on the accelerator pedal.
Accelerate to the desired cruising
speed and press the SET/decel
button. You can decrease the set cruising
speed in any of these ways:
Press and hold the SET/decel
button. Release the button when
you reach the desired speed.
To slow down in very small
amounts, tap the SET/decel
button. Each time you do this,
your vehicle will slow down about
1 mph (1.6 km/h).
Tap the brake or clutch pedal
lightly with your f oot. The
CRUISE CONTROL light on the
instrument panel will go out.
When the vehicle slows to the
desired speed, press the SET/
decel button.
Changing the Set Speed
Cruise Control
Comf ort and Convenience Feat ures120
Page 125 of 256

Even with the cruise control turned
on, you can still use the accelerator
pedal to speed up f or passing. Af ter
completing the pass, take your foot
of f the accelerator pedal. The vehicle
will return to the set cruising speed.
Resting your f oot on the brake or
clutch pedal will cause the cruise
control to cancel.Youcancancelthecruisecontrolin
any of these ways:
Tap the brake or clutch pedal.
Push the CANCEL button on the
steering wheel.
Press the Cruise Control Master
Switch. When you push the CANCEL button,
or tap the brake or clutch pedal, the
system remembers the previously-
set cruising speed. To return to that
speed, accelerate to above 25 mph
(40 km/h) and then press and
release the RESUME/accel button.
The CRUISE CONTROL light comes
on. The vehicle will accelerate to the
same cruising speed as bef ore.
Pressing the Cruise Control Master
Switch turns the system of f and
erases the previous cruising speed.
Cancelling the Cruise Control Resuming the Set Speed
Cruise Control
Comf ort and Convenience Feat ures121
Page 126 of 256

122
Page 127 of 256

Bef ore you begin driving your Honda,
youshouldknowwhatgasolineto
use, and how to check the levels of
important f luids. You also need to
know how to properly store luggage
or packages. The inf ormation in this
section will help you. If you plan to
add any accessories to your vehicle,
please read the inf ormation in this
section f irst..............................
Break-in Period .124
...............................
Gasoline Type .124
...........
Service Station Procedure . 125
...............................
Fuel Economy .129
...
Accessories and Modif ications . 130
.............................
Carrying Cargo .132
Bef ore Driving
Bef ore Driving
123
Page 128 of 256

Help assure your vehicle’s f uture
reliability and perf ormance by paying
extra attention to how you drive
during the f irst 600 miles (1,000 km).Avoid full throttle starts and rapid
acceleration.
Do not change the oil until the
scheduled maintenance time.
Avoidhardbrakingforthefirst
200 miles (300 km).
During this period:
Your Honda is designed to operate
on unleaded gasoline with a pump
octane number of 86 or higher. Use
of a lower octane gasoline can cause
a persistent, heavy, metallic rapping
noise in the engine that can lead to
mechanical f ailure.
We recommend using a gasoline
containing detergent additives that
help prevent f uel system and engine
deposits.
In addition, in order to maintain good
perf ormance, f uel economy, and
emissions control, we strongly
recommend, in areas where it is
available, the use of gasoline that
does NOT contain manganese-based
f uel additives such as MMT.
Use of gasoline with these additives
may adversely af f ect perf ormance,
and cause the Malfunction Indicator
Lamp on your instrument panel to
come on. If this happens, contactyour authorized Honda dealer f or
service.
For f urther important f uel-related
inf ormation, please ref er to your
Quick Start Guide.
You should also f ollow these re-
commendations with an overhauled
or exchanged engine, or when the
brakes are replaced. Do not tow a trailer. Some gasoline today is blended with
oxygenates such as ethanol or
MTBE. Your vehicle is designed to
operate on oxygenated gasoline
containing up to 10 percent ethanol
by volume and up to 15 percent
MTBE by volume. Do not use
gasoline containing methanol.
Bef ore Driving
Break-in Period
Gasoline Type
Break-in Period, Gasoline T ype
124
Page 129 of 256

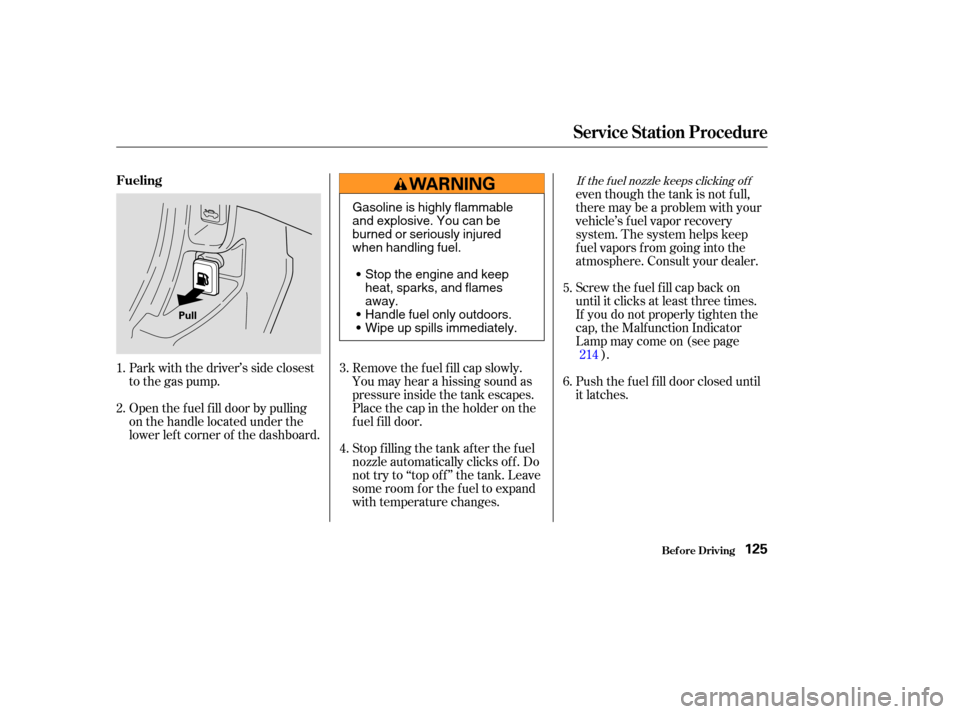
Park with the driver’s side closest
to the gas pump.
Open the f uel f ill door by pulling
on the handle located under the
lower lef t corner of the dashboard.Screw the f uel f ill cap back on
until it clicks at least three times.
If you do not properly tighten the
cap, the Malfunction Indicator
Lampmaycomeon(seepage
).
Push the f uel f ill door closed until
it latches. even though the tank is not f ull,
there may be a problem with your
vehicle’s fuel vapor recovery
system. The system helps keep
f uel vapors f rom going into the
atmosphere. Consult your dealer.
Stop f illing the tank af ter the f uel
nozzle automatically clicks of f . Do
not try to ‘‘top off’’ the tank. Leave
some room f or the f uel to expand
with temperature changes. Remove the f uel f ill cap slowly.
You may hear a hissing sound as
pressure inside the tank escapes.
Place the cap in the holder on the
fuel fill door.
1.
2.
3.
4.5.
6.
214
If the f uel nozzle keeps clicking of f
Service Station Procedure
Bef ore Driving
Fueling
125
Pull
Gasoline is highly flammable
and explosive. You can be
burned or seriously injured
when handling fuel.
Stop the engine and keep
heat, sparks, and flames
away.
Handle fuel only outdoors.
Wipe up spills immediately.
Page 130 of 256

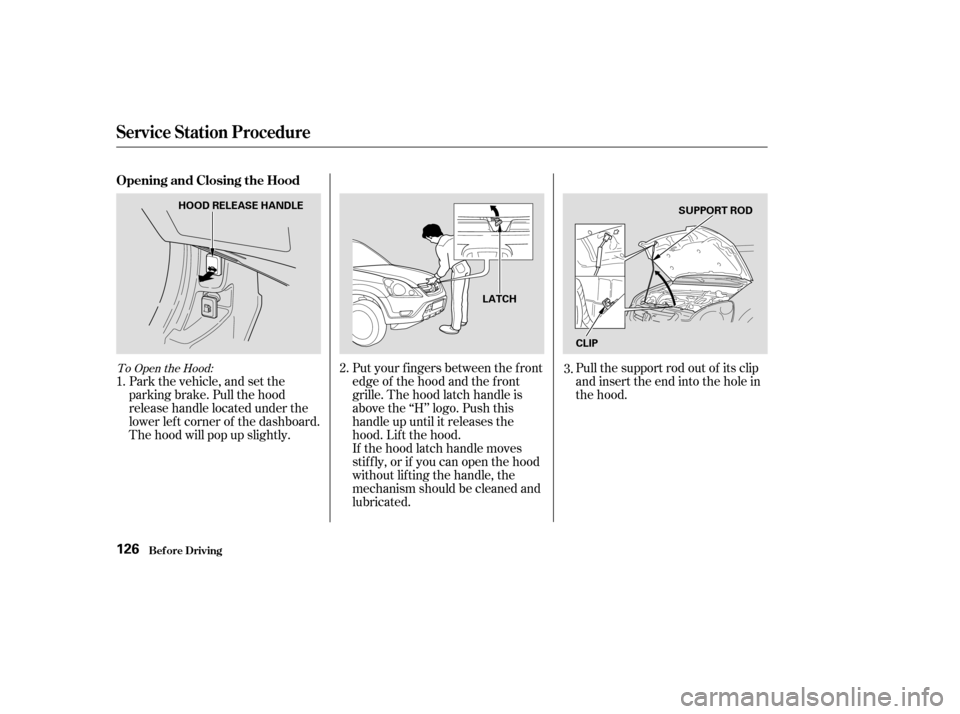
To Open the Hood:
Park the vehicle, and set the
parking brake. Pull the hood
release handle located under the
lower lef t corner of the dashboard.
The hood will pop up slightly.Put your f ingers between the f ront
edge of the hood and the f ront
grille. The hood latch handle is
above the ‘‘H’’ logo. Push this
handle up until it releases the
hood. Lif t the hood.
If the hood latch handle moves
stif f ly, or if you can open the hood
without lifting the handle, the
mechanism should be cleaned and
lubricated.Pull the support rod out of its clip
and insert the end into the hole in
the hood.
1. 2.
3.
Service Station Procedure
Bef ore Driving
Opening and Closing the Hood
126
HOOD RELEASE HANDLE
LATCHSUPPORT ROD
CLIP