HONDA CR-V 2004 RD4-RD7 / 2.G Owners Manual
Manufacturer: HONDA, Model Year: 2004, Model line: CR-V, Model: HONDA CR-V 2004 RD4-RD7 / 2.GPages: 256, PDF Size: 2.96 MB
Page 201 of 256

Fill the f uel tank.
Change the engine oil and f ilter.
Wash and dry the exterior
completely.
Cleantheinterior.Makesurethe
carpeting, floor mats, etc. are
completely dry.
Leave the parking brake off. Put
the transmission in Reverse
(5-speed manual) or Park
(automatic).Block the rear wheels.
If the vehicle is to be stored f or a
longer period, it should be
supported on jackstands so the
tires are of f the ground.
Cover the vehicle with a
‘‘breathable’’ cover, one made
f rom a porous material such as
cotton. Non-porous materials, such
as plastic sheeting, trap moisture,
which can damage the paint.
If you need to park your vehicle f or
an extended period (more than one
month), there are several things you
should do to prepare it f or storage.
Proper preparation helps prevent
deterioration and makes it easier to
get your vehicle back on the road. If
possible, store your vehicle indoors. Leave one window open slightly (if
the vehicle is being stored
indoors).
Disconnect the battery.
Support the f ront and rear wiper
blade arms with a f olded towel or
ragsotheydonottouchthe
windshield.
To minimize sticking, apply a
silicone spray lubricant to all door
and tailgate seals. Also, apply a
vehiclebodywaxtothepainted
surfaces that mate with the door
and tailgate seals.If possible, run the engine
periodically until it reaches f ull
operating temperature (the
cooling f an cycles on and of f
twice). Pref erably do this once a
month.
If you store your vehicle f or 12
months or longer, have your Honda
dealer perf orm the inspections called
f or in the 24 months maintenance
schedule (Normal Conditions) as
soon as you take it out of storage
(see page ). The replacements
called f or in the maintenance
schedule are not needed unless the
vehicle has actually reached that
time or mileage. 168
Vehicle Storage
Maint enance197
Page 202 of 256

198
Page 203 of 256

This section covers the more
common problems that motorists
experience with their vehicles. It
gives you inf ormation about how to
safely evaluate the problem and what
to do to correct it. If the problem has
stranded you on the side of the road,
you may be able to get going again.
If not, you will also f ind instructions
on getting your vehicle towed.....................
Changing a Flat Tire .200
.............
If the Engine Won’t Start . 207
................................
Jump Starting .209
..............
If the Engine Overheats . 211
.........
Low Oil Pressure Indicator . 213
..........
Charging System Indicator . 213
.......
Malf unction Indicator Lamp . 214
...............
Brake System Indicator . 215
......................
Emergency Towing .216
..................
Closing the Moonroof . 217
..............................................
Fuses .218
..............................
Fuse Locations .221
Taking Care of the Unexpected
T aking Care of t he Unexpect ed199
Page 204 of 256
If you have a f lat tire while driving,
stop in a saf e place to change it.
Drive slowly along the shoulder until
you get to an exit or an area to stop
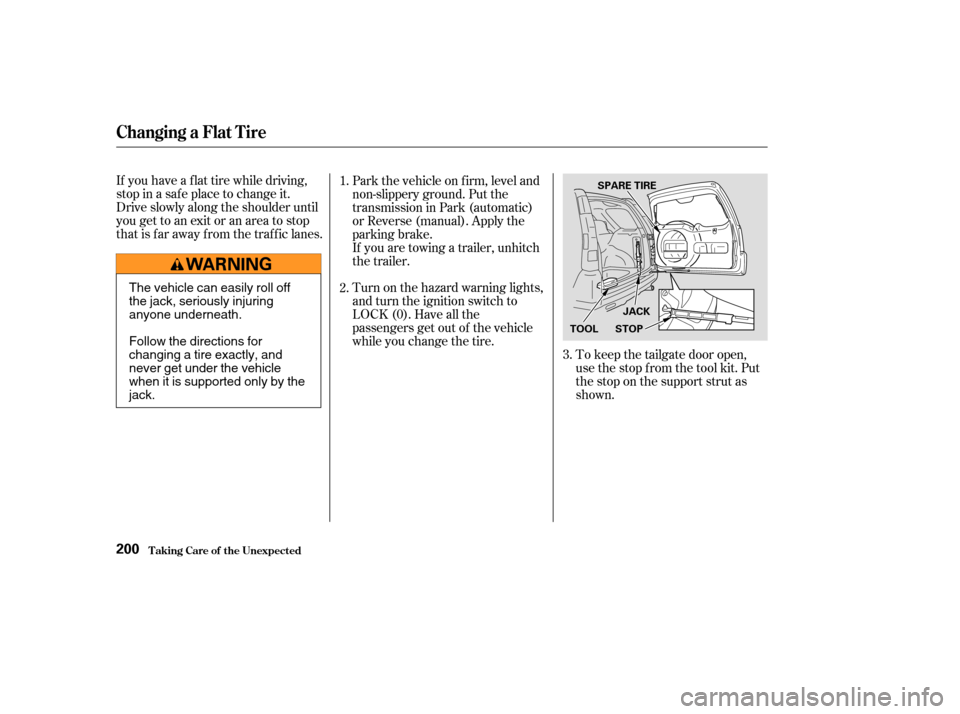
that is far away from the traffic lanes.To keep the tailgate door open,
use the stop f rom the tool kit. Put
the stop on the support strut as
shown.
Park the vehicle on f irm, level and
non-slippery ground. Put the
transmission in Park (automatic)
or Reverse (manual). Apply the
parking brake.
If you are towing a trailer, unhitch
the trailer.
Turn on the hazard warning lights,
and turn the ignition switch to
LOCK (0). Have all the
passengers get out of the vehicle
while you change the tire.
1.
2.
3.
Changing a Flat T ire
T aking Care of t he Unexpect ed200
JACK
STOP
SPARE TIRE
TOOL
The vehicle can easily roll off
the jack, seriously injuring
anyone underneath.
Follow the directions for
changing a tire exactly, and
never get under the vehicle
when it is supported only by the
jack.
Page 205 of 256
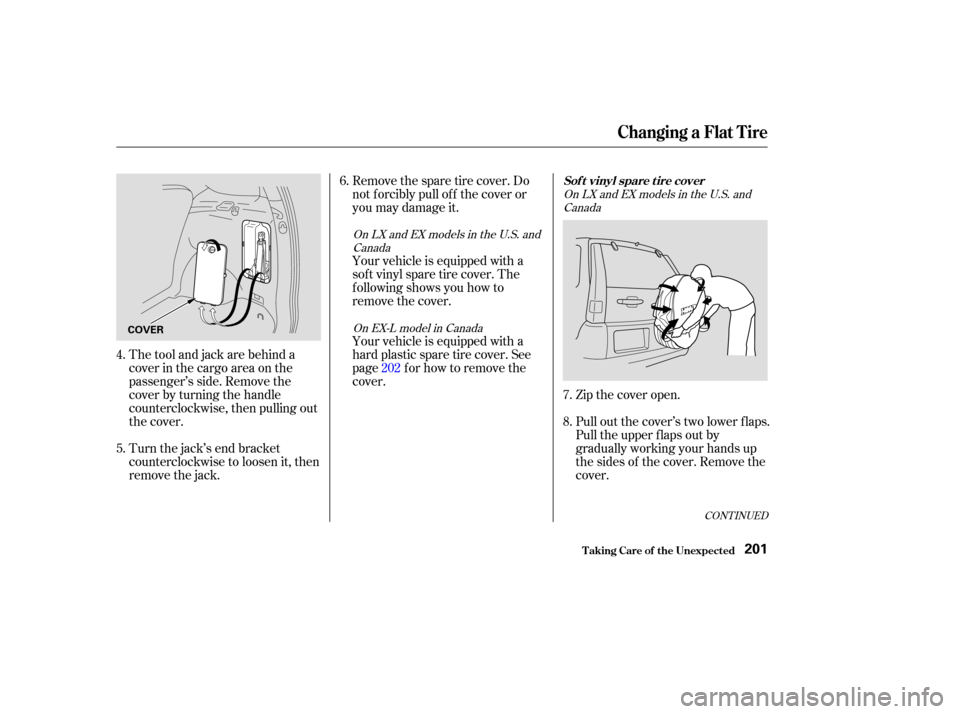
The tool and jack are behind a
cover in the cargo area on the
passenger’s side. Remove the
cover by turning the handle
counterclockwise, then pulling out
the cover.
Turn the jack’s end bracket
counterclockwise to loosen it, then
remove the jack.Remove the spare tire cover. Do
not f orcibly pull of f the cover or
you may damage it.
Your vehicle is equipped with a
sof t vinyl spare tire cover. The
f ollowing shows you how to
remove the cover.
Your vehicle is equipped with a
hard plastic spare tire cover. See
page f or how to remove the
cover.
Zip the cover open.
Pull out the cover’s two lower f laps.
Pull the upper f laps out by
gradually working your hands up
the sides of the cover. Remove the
cover.
6.
5. 4. 202
7.
8.
CONT INUED
OnLXandEXmodelsintheU.S.andCanada
On EX-L model in Canada OnLXandEXmodelsintheU.S.and
Canada
Changing a Flat T ire
T aking Care of t he Unexpect ed
Sof t vinyl spare t ire cover
201
COVER
Page 206 of 256
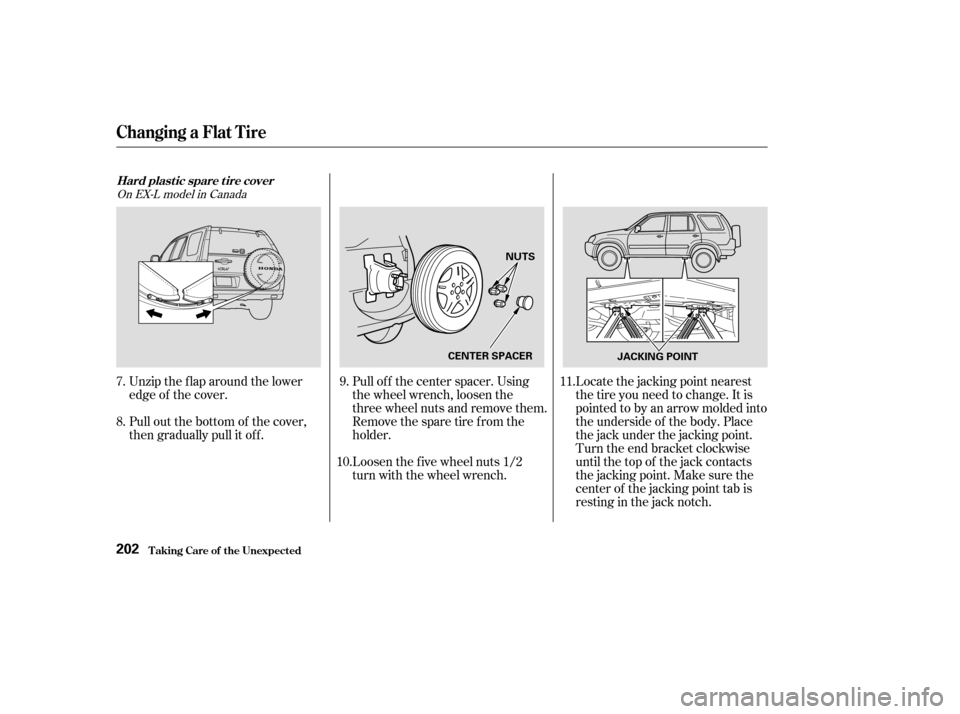
Locate the jacking point nearest
thetireyouneedtochange.Itis
pointed to by an arrow molded into
the underside of the body. Place
the jack under the jacking point.
Turn the end bracket clockwise
until the top of the jack contacts
the jacking point. Make sure the
center of the jacking point tab is
restinginthejacknotch.
Pull of f the center spacer. Using
the wheel wrench, loosen the
three wheel nuts and remove them.
Remove the spare tire from the
holder.
Loosen the f ive wheel nuts 1/2
turn with the wheel wrench.
Unzip the flap around the lower
edge of the cover.
Pull out the bottom of the cover,
then gradually pull it of f .
9.
11.
10.
7.
8.
On EX-L model in Canada
Changing a Flat T ire
T aking Care of t he Unexpect ed
Hard plastic spare tire cover
202
CENTER SPACER
JACKING POINT
NUTS
Page 207 of 256
CONT INUED
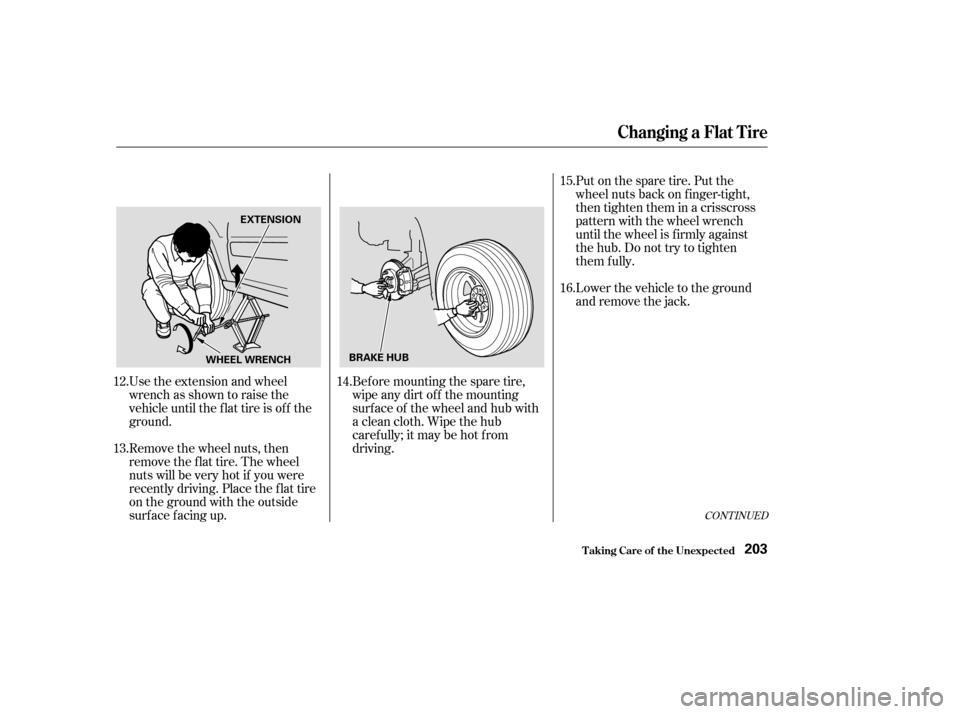
Bef ore mounting the spare tire,
wipeanydirtoff themounting
surface of the wheel and hub with
a clean cloth. Wipe the hub
carefully;itmaybehotfrom
driving.
Use the extension and wheel
wrench as shown to raise the
vehicle until the f lat tire is of f the
ground.
Remove the wheel nuts, then
remove the f lat tire. The wheel
nuts will be very hot if you were
recently driving. Place the f lat tire
on the ground with the outside
surface facing up. Put on the spare tire. Put the
wheel nuts back on f inger-tight,
then tighten them in a crisscross
pattern with the wheel wrench
until the wheel is f irmly against
the hub. Do not try to tighten
them f ully.
Lower the vehicle to the ground
and remove the jack.
14.
12.
13. 15.
16.
Changing a Flat T ire
T aking Care of t he Unexpect ed203
BRAKE HUB
WHEEL WRENCH EXTENSION
Page 208 of 256
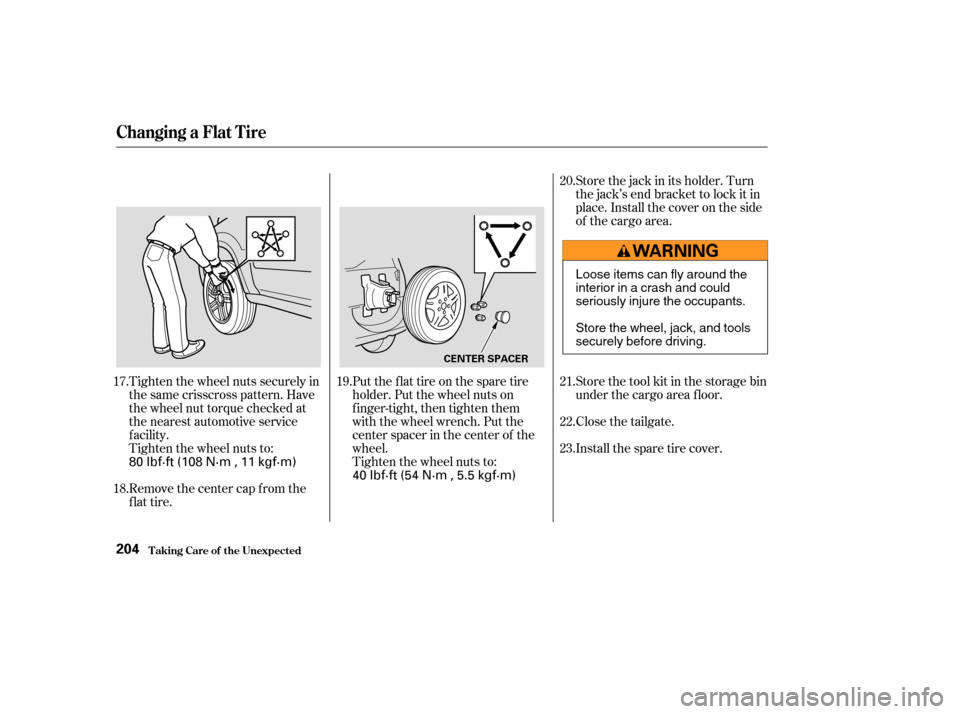
Tighten the wheel nuts securely in
the same crisscross pattern. Have
the wheel nut torque checked at
the nearest automotive service
f acility.
Tighten the wheel nuts to:
Remove the center cap from the
flat tire.Put the flat tire on the spare tire
holder. Put the wheel nuts on
finger-tight, then tighten them
with the wheel wrench. Put the
center spacer in the center of the
wheel.
Tighten the wheel nuts to:Store the jack in its holder. Turn
the jack’s end bracket to lock it in
place. Install the cover on the side
of the cargo area.
Install the spare tire cover. Close the tailgate. Store the tool kit in the storage bin
under the cargo area f loor.
17.
18. 19.20.
21.
22.
23.
Changing a Flat T ire
T aking Care of t he Unexpect ed204
CENTER SPACER
80 lbf·ft (108 N·m , 11 kgf·m)
40 lbf·ft (54 N·m , 5.5 kgf·m)Loose items can fly around the
interiorinacrashandcould
seriously injure the occupants.
Store the wheel, jack, and tools
securely before driving.
Page 209 of 256
CONT INUED
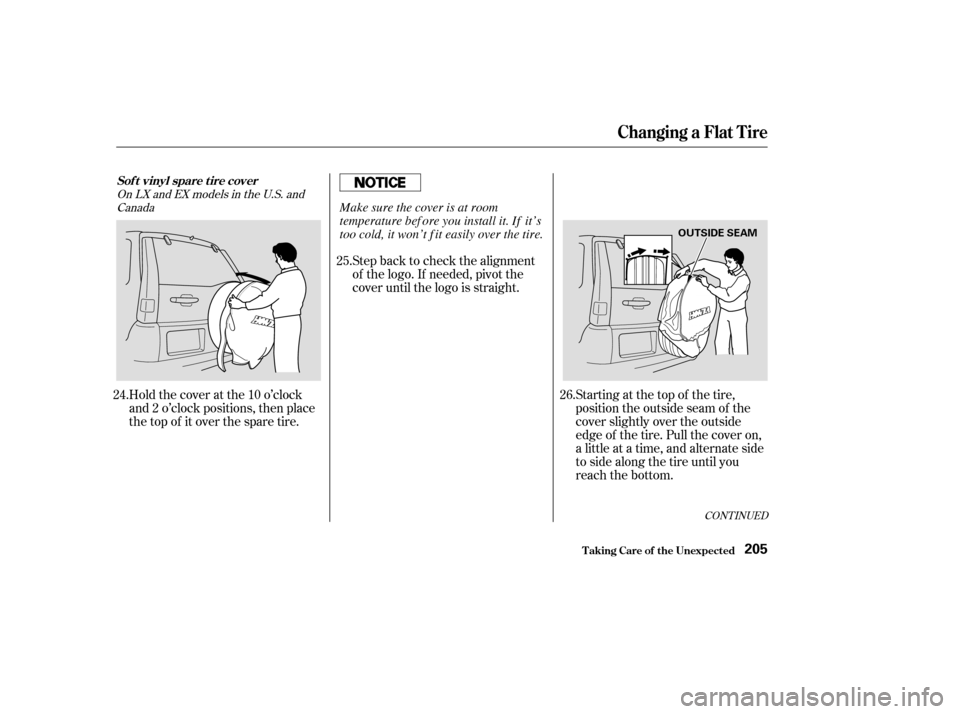
Holdthecoveratthe10o’clock
and 2 o’clock positions, then place
the top of it over the spare tire.Step back to check the alignment
of the logo. If needed, pivot the
cover until the logo is straight.
Starting at the top of the tire,
position the outside seam of the
cover slightly over the outside
edge of the tire. Pull the cover on,
a little at a time, and alternate side
to side along the tire until you
reach the bottom.
24. 25.
26.
OnLXandEXmodelsintheU.S.andCanada
Changing a Flat T ire
T aking Care of t he Unexpect ed
Sof t vinyl spare t ire cover
205
OUTSIDE SEAM
Make sure the cover is at room
temperature bef ore you install it. If it’s
too cold, it won’t f it easily over the tire.
Page 210 of 256
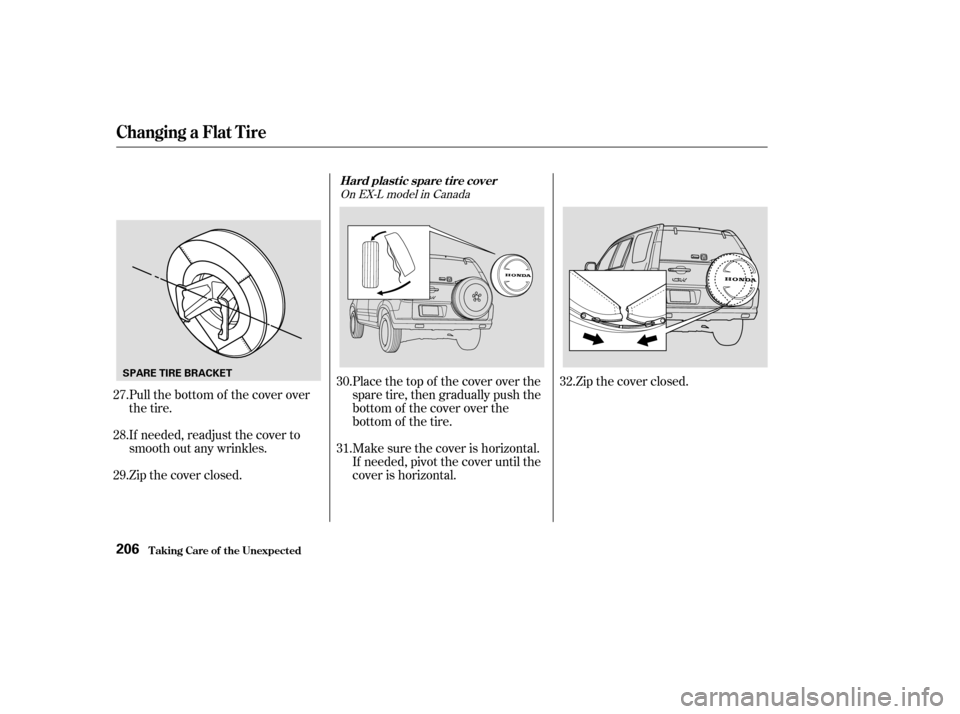
Pull the bottom of the cover over
the tire.
If needed, readjust the cover to
smooth out any wrinkles.
Zip the cover closed.Make sure the cover is horizontal.
If needed, pivot the cover until the
cover is horizontal. Place the top of the cover over the
spare tire, then gradually push the
bottom of the cover over the
bottom of the tire.Zip the cover closed.
27.
28.
29. 30.
31.
32.
On EX-L model in Canada
Changing a Flat T ire
T aking Care of t he Unexpect ed
Hard plastic spare tire cover
206
SPARE TIRE BRACKET