open HONDA CR-V 2010 RD1-RD5, RE7 / 3.G Workshop Manual
[x] Cancel search | Manufacturer: HONDA, Model Year: 2010, Model line: CR-V, Model: HONDA CR-V 2010 RD1-RD5, RE7 / 3.GPages: 441, PDF Size: 8.12 MB
Page 308 of 441
Bef ore you begin driving your
vehicle, you should know what
gasoline to use and how to check the
levels of important f luids. You also
need to know how to properly store
luggage or packages. The
inf ormation in this section will help
you. If you plan to add any
accessories to your vehicle, please
read the information in this section
first..............................Break-in Period . 294
.................
Fuel Recommendation . 294
.........
Service Station Procedures . 295
....................................
Ref ueling . 295
........
Check Fuel Cap Message . 296
Opening and Closing
................................
the Hood . 297
...................................
Oil Check . 298
.............
Engine Coolant Check . 298
...............................
Fuel Economy . 299
...
Accessories and Modif ications . 302
.............................
Carrying Cargo . 304
Bef ore Driving
Bef ore Driving
293
Page 310 of 441
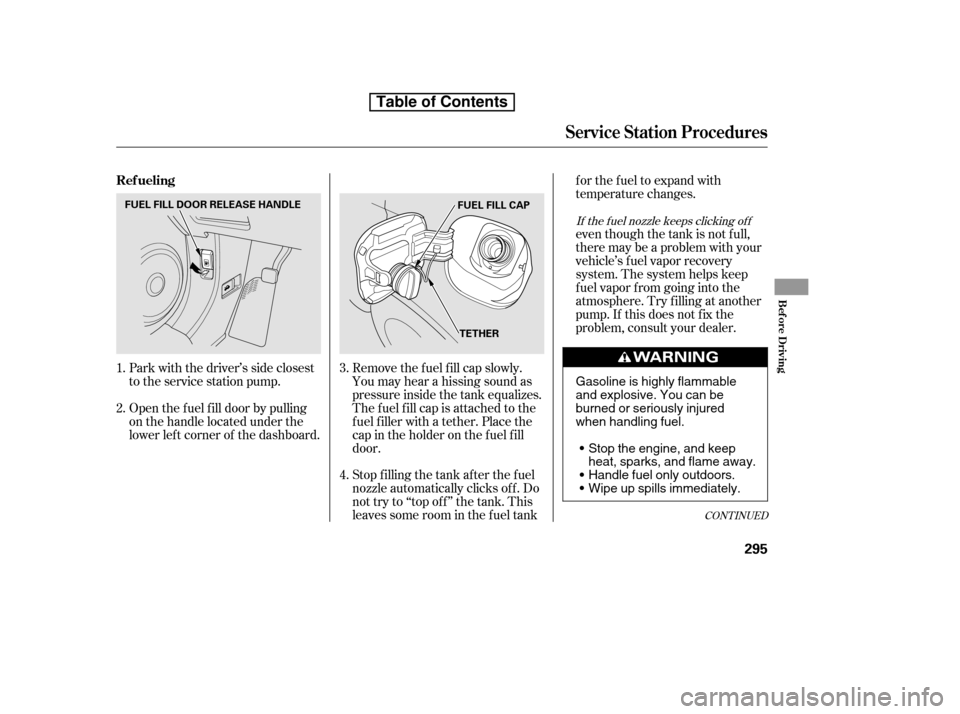
Open the f uel f ill door by pulling
on the handle located under the
lower lef t corner of the dashboard.
Park with the driver’s side closest
to the service station pump.
Remove the f uel f ill cap slowly.
You may hear a hissing sound as
pressure inside the tank equalizes.
The fuel fill cap is attached to the
f uel f iller with a tether. Place the
cap in the holder on the f uel f ill
door.
Stop f illing the tank af ter the f uel
nozzle automatically clicks of f . Do
not try to ‘‘top off’’ the tank. This
leaves some room in the f uel tankf or the f uel to expand with
temperature changes.
even though the tank is not f ull,
there may be a problem with your
vehicle’s fuel vapor recovery
system. The system helps keep
f uel vapor f rom going into the
atmosphere. Try f illing at another
pump. If this does not f ix the
problem, consult your dealer.
1. 2. 3. 4.
CONT INUED
If the f uel nozzle keeps clicking of f
Service Station Procedures
Ref ueling
Bef ore Driving
295
TETHER
FUEL FILL DOOR RELEASE HANDLE
FUEL FILL CAP
Stop the engine, and keep
heat, sparks, and flame away.
Handle fuel only outdoors.
Wipe up spills immediately.
Gasoline is highly flammable
and explosive. You can be
burned or seriously injured
when handling fuel.
Table of Contents
Page 312 of 441
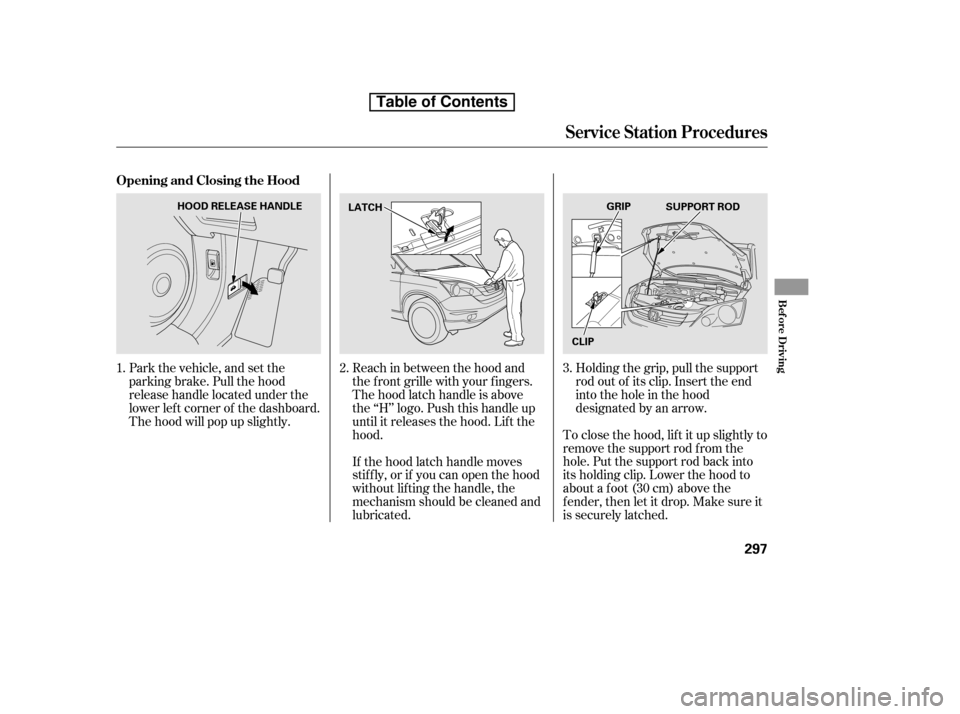
To close the hood, lif t it up slightly to
remove the support rod f rom the
hole. Put the support rod back into
its holding clip. Lower the hood to
about a f oot (30 cm) above the
f ender, then let it drop. Make sure it
is securely latched.
Park the vehicle, and set the
parking brake. Pull the hood
release handle located under the
lower lef t corner of the dashboard.
The hood will pop up slightly.
Reach in between the hood and
the f ront grille with your f ingers.
The hood latch handle is above
the ‘‘H’’ logo. Push this handle up
until it releases the hood. Lif t thehood.
If the hood latch handle moves
stif f ly, or if you can open the hood
without lifting the handle, the
mechanism should be cleaned and
lubricated.Holding the grip, pull the support
rod out of its clip. Insert the end
into the hole in the hood
designated by an arrow.
2.
1. 3.
Opening and Closing the Hood
Service Station Procedures
Bef ore Driving
297
LATCH
CLIPGRIP
SUPPORT ROD
HOOD RELEASE HANDLE
Table of Contents
Page 322 of 441
Store or secure all items that could
be thrown around and hurt
someone during a crash.
Be sure items placed on the f loor
behind the f ront seats cannot roll
underneath and interf ere with the
proper operation of the seats, the
sensors under the seats, or the
driver’s ability to operate the
pedals.
Keep the lower glove box closed
while driving. If it is open, a
passenger could injure their knees
during a crash or sudden stop.If you carry large items that
prevent you f rom closing the
tailgate, exhaust gas can enter the
passenger area. To avoid the
possibility of
, f ollow the instructions
on page .
Distribute cargo evenly on the
f loor of the cargo area, placing the
heaviest items on the bottom and
as far forward as possible. Tie
down items that could be thrown
about the vehicle during a crash or
sudden stop.
Do not stack items higher than the
back of the rear seats. They can
block your view and be thrown
around the vehicle during a crash.
If youfoldtherearseatsupor
down, tie down items that could be
thrown about the vehicle during a
crash or sudden stop. Also, keep
all cargo below the bottom of the
windows. If it is higher, it could
interf ere with the proper operation
of thesidecurtainairbags.
Do not use the dual deck cargo shelf
with any rear seat f olded up or down.
55
CONT INUED
If equipped
Carrying Cargo in the Passenger
Compartment
carbon monoxide
poisoning
Carrying Cargo in the Cargo A rea
or on a Roof Rack
Carrying Cargo
Bef ore Driving
307
Table of Contents
Page 348 of 441
Crosswinds and air turbulence
caused by passing trucks can disrupt
your steering and cause the trailer to
sway. When being passed by a large
vehicle, keep a constant speed, and
steer straight ahead. Do not try to
make quick steering or braking
corrections.
If youmuststopwhenfacinguphill,
use the f oot brake or parking brake.
Do not try to hold the vehicle in
place by pressing on the accelerator,
as this can cause the automatic
transmission to overheat.
When driving down hills, reduce
your speed and use the D3 position.
Do not ‘‘ride’’ the brakes, and
remember it will take longer to slow
downandstopwhentowingatrailer.
When climbing hills, closely watch
your temperature gauge. If it nears
the red (Hot) mark, turn the air conditioning of f , reduce speed and, if
necessary, pull to the side of the
road to let the engine cool.
Maketurnsmoreslowlyandwider
than normal. The trailer tracks a
smaller arc than your vehicle, and it
canhitorrunoversomethingthe
vehicle misses. Allow more time and
distance f or braking. Do not brake or
turn suddenly as this could cause the
trailer to jackknif e or turn over.
Drive slower than normal in all
driving situations, and obey posted
speed limits f or vehicles with trailers.
Use the D position when towing a
trailer on level roads. D is the
proper shif t lever position to use
when towing a trailer in hilly terrain.
(See ‘‘ ’’ in the
f ollowing column f or additional gear
inf ormation.)
The lights and brakes on your
vehicle and the trailer are working
properly.
Your vehicle tires and spare are
properly inf lated, and the trailer
tires and spare are inf lated as
recommended by the trailer
maker.
The added weight, length, and
height of a trailer will af f ect your
vehicle’s handling and perf ormance,
so driving with a trailer requires
some special driving skills and
techniques.
Foryoursafetyandthesafetyof
others,taketimetopracticedriving
maneuvers bef ore heading f or the
open road, and f ollow the guidelines
in this section.
3
CONT INUED
Towing a Trailer
Handling Crosswinds and Buf f et ing
Driving on Hills
Making T urns and Braking
Driving on Hills
T owing Speeds and Gears
Driving Saf ely With a T railerDriving
333
Table of Contents
Page 365 of 441
Your vehicle does not require any oil
additives. Additives may adversely
af f ect the engine or transmission
perf ormance and durability.Run the engine until it reaches
normal operating temperature,
then shut it off.
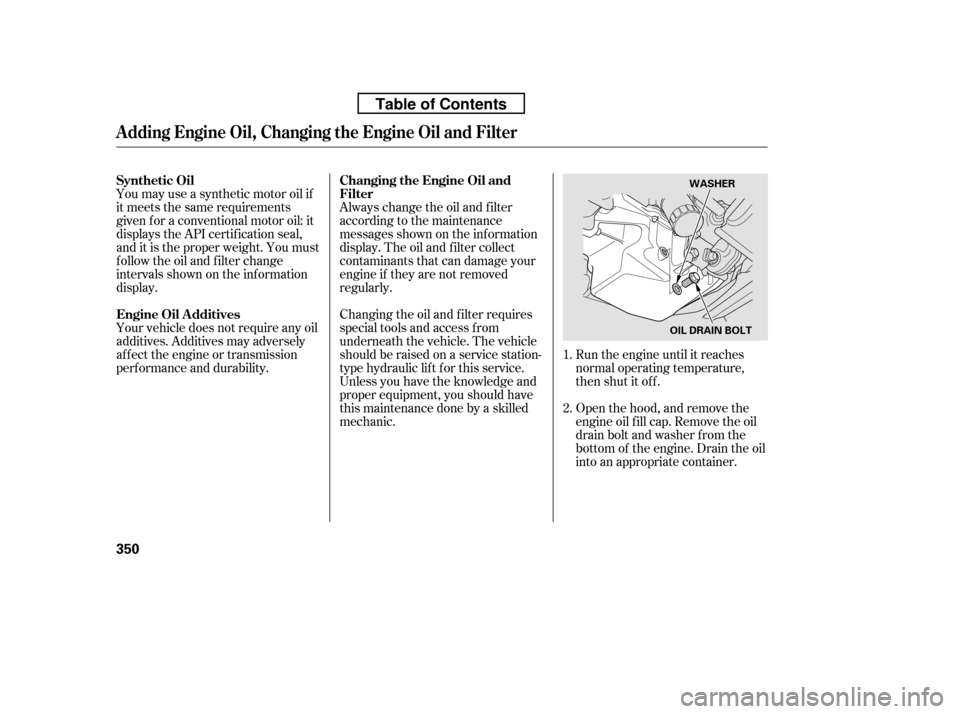
Open the hood, and remove the
engine oil f ill cap. Remove the oil
drain bolt and washer f rom the
bottom of the engine. Drain the oil
into an appropriate container.
You may use a synthetic motor oil if
it meets the same requirements
given f or a conventional motor oil: it
displays the API certif ication seal,
and it is the proper weight. You must
f ollow the oil and f ilter change
intervals shown on the information
display.
Always change the oil and f ilter
according to the maintenance
messages shown on the inf ormation
display. The oil and f ilter collect
contaminants that can damage your
engine if they are not removed
regularly.
Changing the oil and f ilter requires
special tools and access f rom
underneath the vehicle. The vehicle
should be raised on a service station-
type hydraulic lif t f or this service.
Unless you have the knowledge and
proper equipment, you should have
this maintenance done by a skilled
mechanic.
1. 2.
Synthetic Oil
Engine Oil A dditives
Changing the Engine Oil and
Filter
A dding Engine Oil, Changing the Engine Oil and Filter
350
OIL DRAIN BOLTWASHER
Table of Contents
Page 374 of 441
CONT INUED
Theheadlightswereproperlyaimed
when your vehicle was new. If you
regularly carry heavy items in the
cargo area or pull a trailer,
readjustment may be required.
Adjustmentsshouldbedonebyyour
dealer or another qualif ied
technician.Your vehicle has halogen headlight
bulbs. When replacing a bulb, handle
it by its base, and protect the glass
f rom contact with your skin or hard
objects. If you touch the glass, clean
it with denatured alcohol and a clean
cloth.
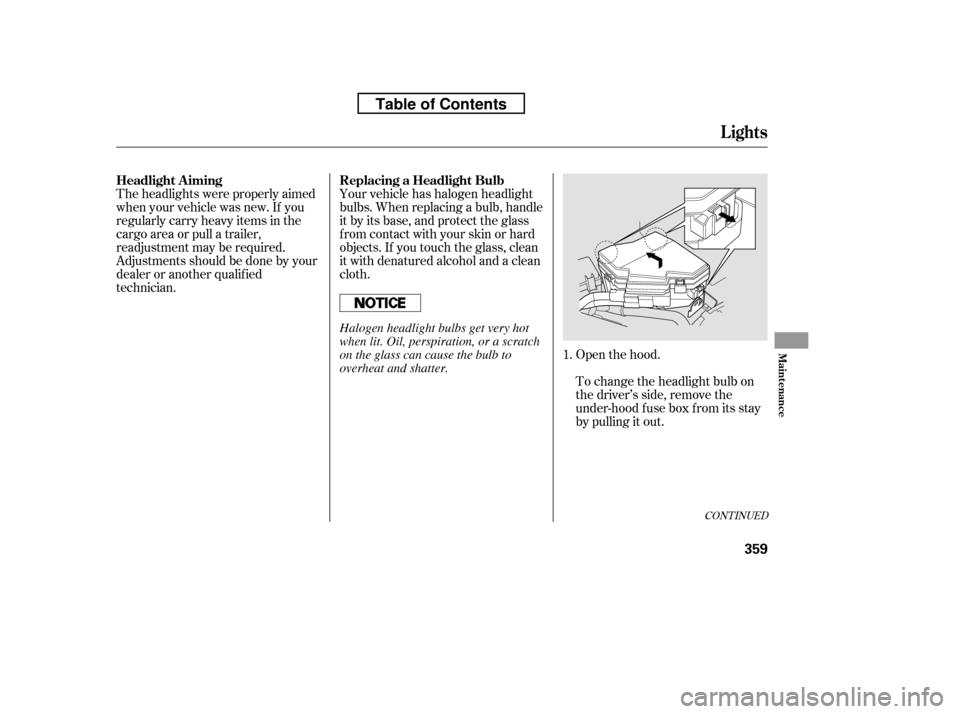
Open the hood.
To change the headlight bulb on
the driver’s side, remove the
under-hood f use box f rom its stay
by pulling it out.
1.
Headlight A iming Replacing a Headlight Bulb
Lights
Maint enance
359
Halogen headlight bulbs get very hot
when lit. Oil, perspiration, or a scratch
on the glass can cause the bulb to
overheat and shatter.
Table of Contents
Page 376 of 441
Insert the socket back into the
headlight assembly. Turn it
clockwise to lock it in place.
Turn on the lights to make sure
the new bulb is working.
(Driver’s side)
Reinstall the coolant reserve tank.
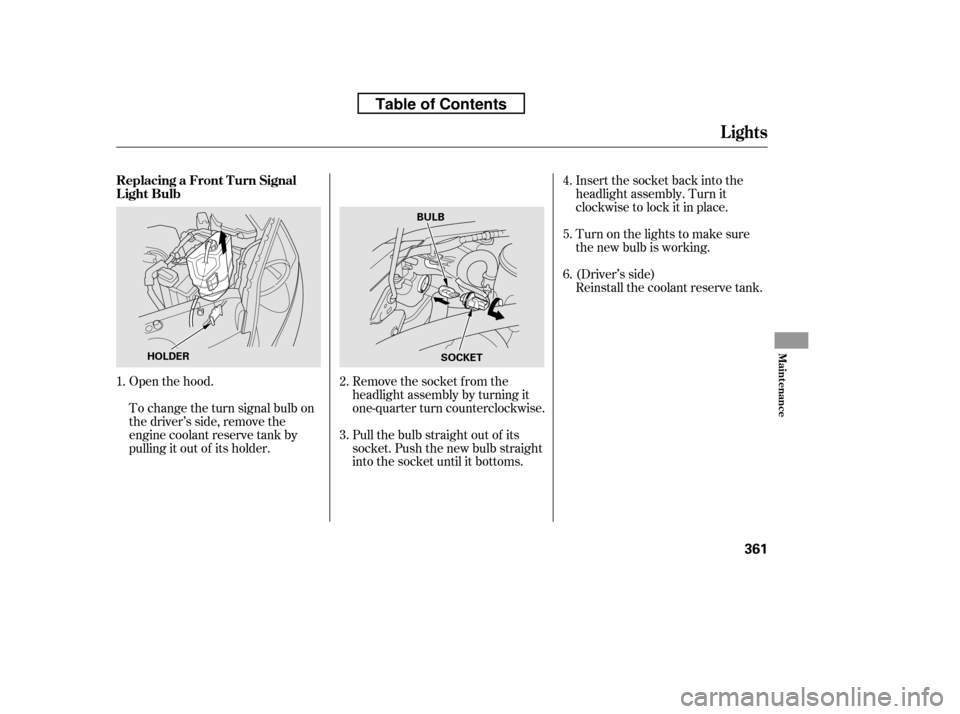
Open the hood.
To change the turn signal bulb on
the driver’s side, remove the
engine coolant reserve tank by
pulling it out of its holder. Remove the socket from the
headlight assembly by turning it
one-quarter turn counterclockwise.
Pull the bulb straight out of its
socket. Push the new bulb straight
into the socket until it bottoms.
1.
2. 3.4.5. 6.
Lights
Replacing a Front T urn Signal
Light Bulb
Maint enance
361
HOLDER
BULB
SOCKET
Table of Contents
Page 377 of 441
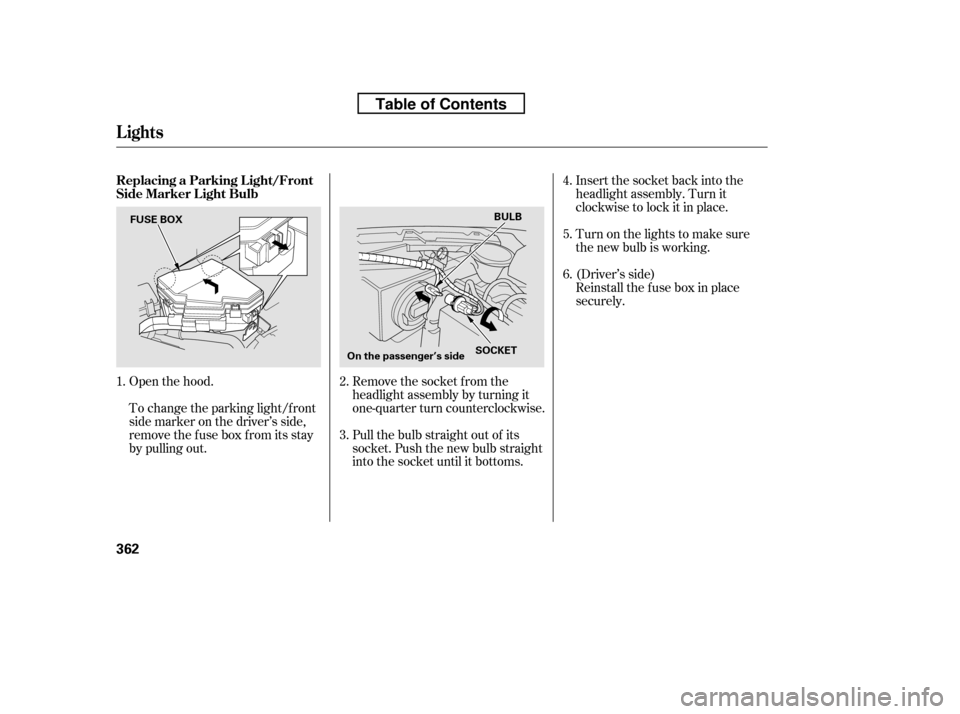
Insert the socket back into the
headlight assembly. Turn it
clockwise to lock it in place.
Turn on the lights to make sure
the new bulb is working.
Reinstall the f use box in place
securely.
(Driver’s side)
Open the hood.
To change the parking light/f ront
side marker on the driver’s side,
removethefuseboxfromitsstay
by pulling out. Remove the socket from the
headlight assembly by turning it
one-quarter turn counterclockwise.
Pull the bulb straight out of its
socket. Push the new bulb straight
into the socket until it bottoms.
1.
2. 3.4.5. 6.
Lights
Replacing a Parking L ight/Front
Side Marker L ight Bulb
362
FUSE BOX
On the passenger’s sideBULB
SOCKET
Table of Contents
Page 378 of 441
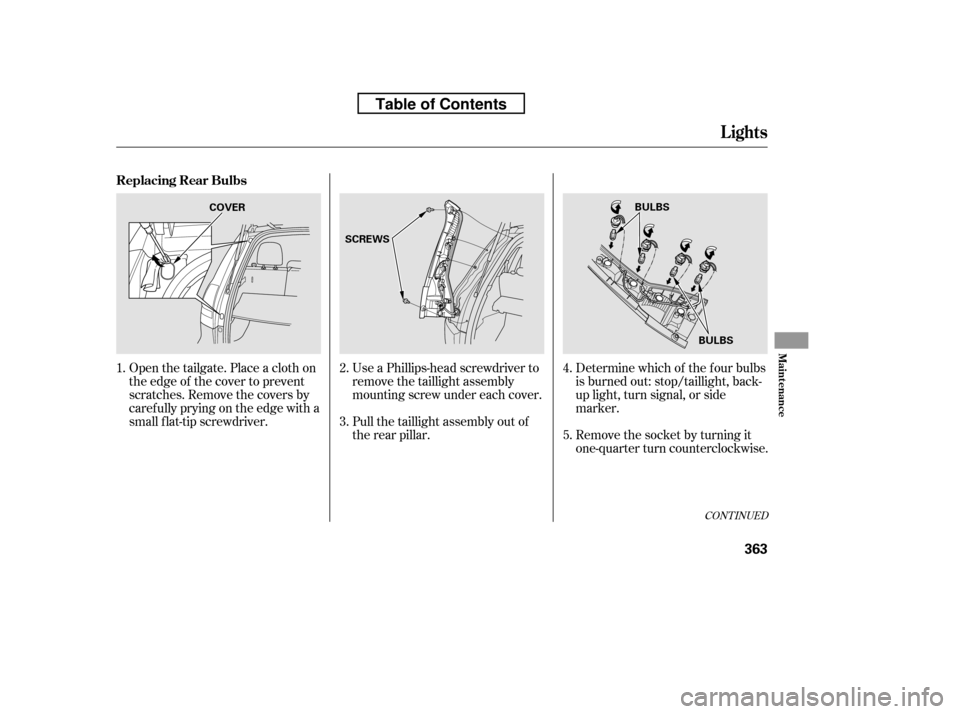
Determine which of the f our bulbs
is burned out: stop/taillight, back-
up light, turn signal, or side
marker.
Remove the socket by turning it
one-quarter turn counterclockwise.
Use a Phillips-head screwdriver to
remove the taillight assembly
mounting screw under each cover.
Pull the taillight assembly out of
the rear pillar.
Open the tailgate. Place a cloth on
the edge of the cover to prevent
scratches. Remove the covers by
caref ully prying on the edge with a
small f lat-tip screwdriver.
2. 3. 4. 5.
1.
CONT INUED
Replacing Rear Bulbs
Lights
Maint enance
363
BULBS
COVER
SCREWS
BULBS
Table of Contents