remove seats HONDA CR-V 2011 RD1-RD5, RE7 / 3.G Owners Manual
[x] Cancel search | Manufacturer: HONDA, Model Year: 2011, Model line: CR-V, Model: HONDA CR-V 2011 RD1-RD5, RE7 / 3.GPages: 445, PDF Size: 8.06 MB
Page 50 of 445
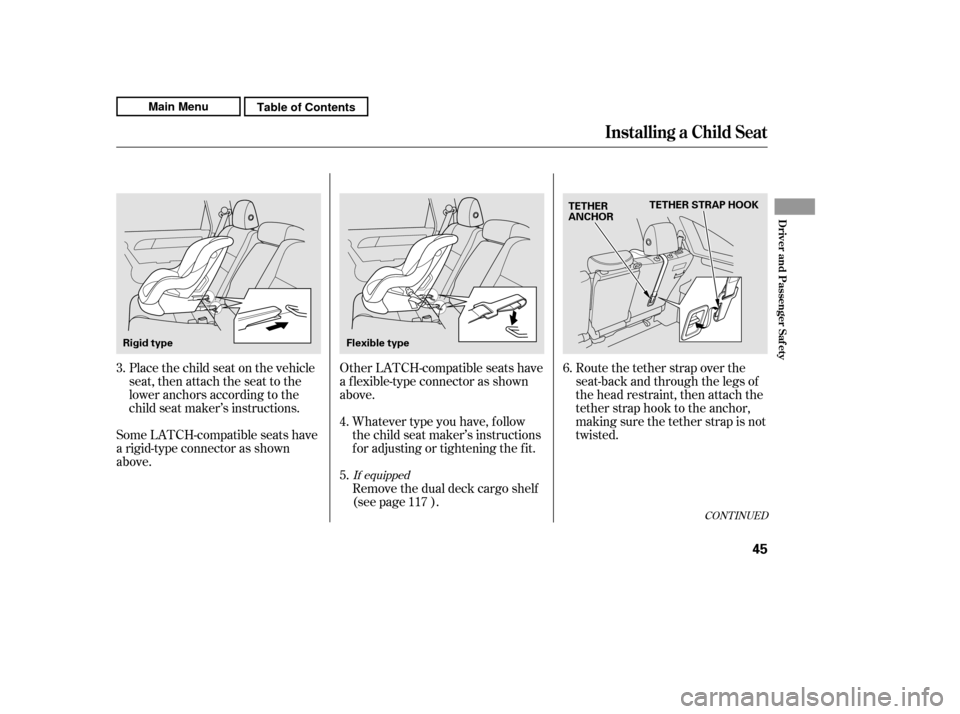
Place the child seat on the vehicle
seat, then attach the seat to the
lower anchors according to the
child seat maker’s instructions.
Some LATCH-compatible seats have
a rigid-type connector as shown
above. Whatever type you have, f ollow
the child seat maker’s instructions
f or adjusting or tightening the f it.
Remove the dual deck cargo shelf
(see page ).
Other LATCH-compatible seats have
a f lexible-type connector as shown
above.
Route the tether strap over the
seat-back and through the legs of
the head restraint, then attach the
tether strap hook to the anchor,
making sure the tether strap is not
twisted.
5.
4.
3.
6.
117
CONT INUED
If equipped
Inst alling a Child Seat
Driver and Passenger Saf ety
45
Flexible type
Rigid type TETHER
ANCHOR
TETHER STRAP HOOK
Main MenuTable of Contents
Page 52 of 445
CONT INUED
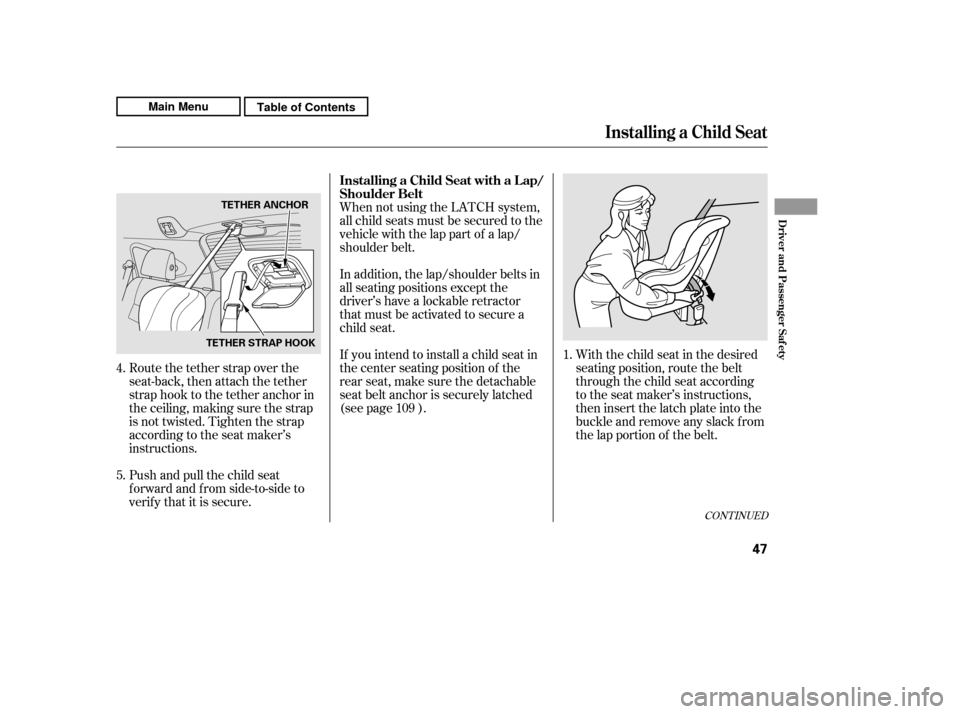
With the child seat in the desired
seating position, route the belt
through the child seat according
to the seat maker’s instructions,
then insert the latch plate into the
buckle and remove any slack f rom
the lap portion of the belt.
When not using the LATCH system,
all child seats must be secured to the
vehicle with the lap part of a lap/
shoulder belt.
In addition, the lap/shoulder belts in
all seating positions except the
driver’s have a lockable retractor
that must be activated to secure a
child seat.
If you intend to install a child seat in
the center seating position of the
rear seat, make sure the detachable
seat belt anchor is securely latched
(see page ).
Push and pull the child seat
f orward and f rom side-to-side to
verif y that it is secure.
Route the tether strap over the
seat-back, then attach the tether
strap hook to the tether anchor in
the ceiling, making sure the strap
is not twisted. Tighten the strap
according to the seat maker’s
instructions.
1.
4. 5. 109
Inst alling a Child Seat
Installing a Child Seat with a L ap/
Shoulder Belt
Driver and Passenger Saf ety
47
TETHER STRAP HOOKTETHER ANCHOR
Main MenuTable of Contents
Page 107 of 445
Make sure the removed head
restraints are securely stored.
Make sure the head restraint locks
in position when you reinstall it.
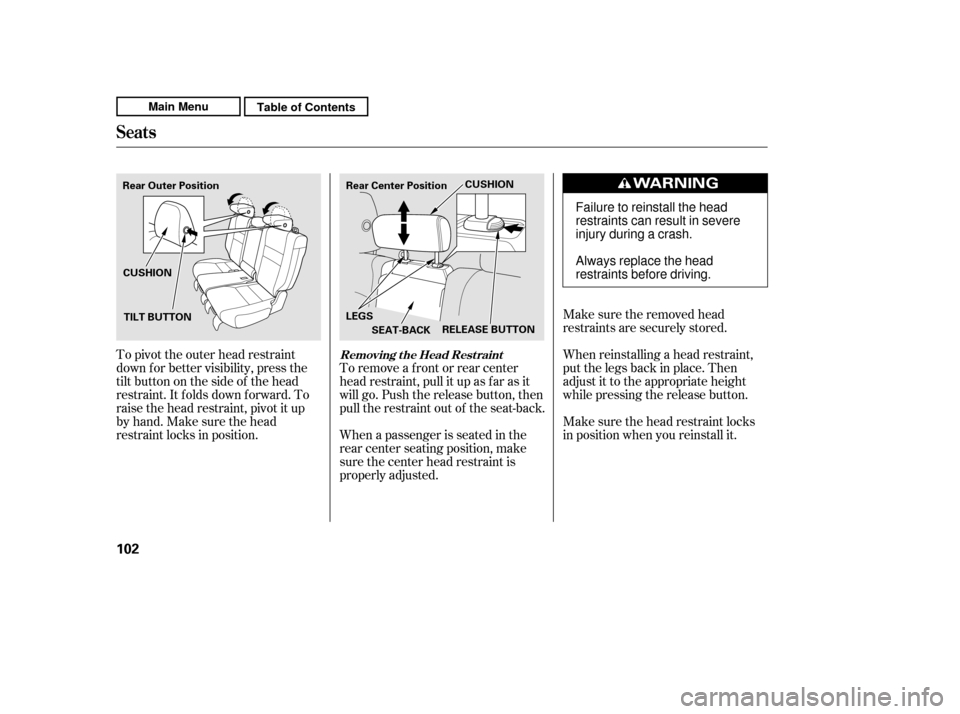
When reinstalling a head restraint,
put the legs back in place. Then
adjust it to the appropriate height
while pressing the release button.
When a passenger is seated in the
rear center seating position, make
sure the center head restraint is
properly adjusted.
To pivot the outer head restraint
down f or better visibility, press the
tilt button on the side of the head
restraint. It f olds down f orward. To
raise the head restraint, pivot it up
by hand. Make sure the head
restraint locks in position.
To remove a f ront or rear center
head restraint, pull it up as f ar as it
will go. Push the release button, then
pull the restraint out of the seat-back.
Seats
Removing t he Head Rest raint
102
RELEASE BUTTON
Rear Outer Position
LEGSSEAT-BACK
CUSHION
TILT BUTTON Rear Center Position
CUSHION
Failure to reinstall the head
restraints can result in severe
injury during a crash.
Always replace the head
restraints before driving.
Main MenuTable of Contents
Page 109 of 445
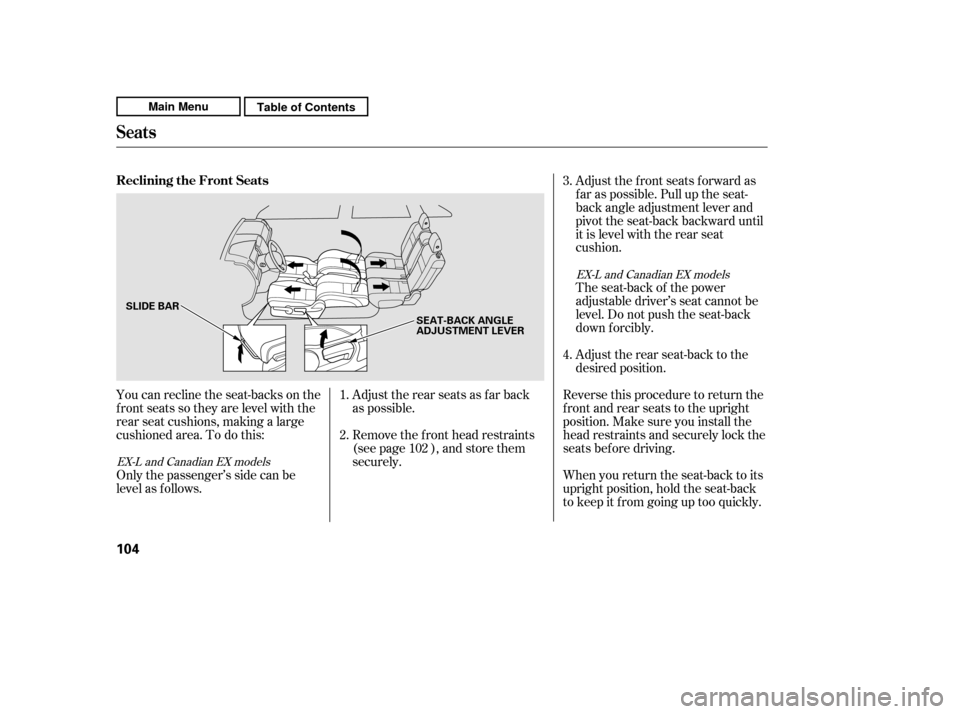
You can recline the seat-backs on the
f ront seats so they are level with the
rear seat cushions, making a large
cushioned area. To do this:Adjust the rear seats as f ar back
as possible.
Remove the f ront head restraints
(see page ), and store them
securely.
Only the passenger’s side can be
level as f ollows. Adjust the f ront seats f orward as
f ar as possible. Pull up the seat-
back angle adjustment lever and
pivot the seat-back backward until
it is level with the rear seat
cushion.
The seat-back of the power
adjustable driver’s seat cannot be
level. Do not push the seat-back
down f orcibly.
Adjust the rear seat-back to the
desired position.
Reverse this procedure to return the
f ront and rear seats to the upright
position. Make sure you install the
head restraints and securely lock the
seats before driving.
When you return the seat-back to its
upright position, hold the seat-back
to keep it f rom going up too quickly.
1. 2.
4.
3.
102
EX-L and Canadian EX models
EX-L and Canadian EX models
Reclining the Front Seats
Seats
104
SLIDE BAR SEAT-BACK ANGLE
ADJUSTMENT LEVER
Main MenuTable of Contents
Page 110 of 445
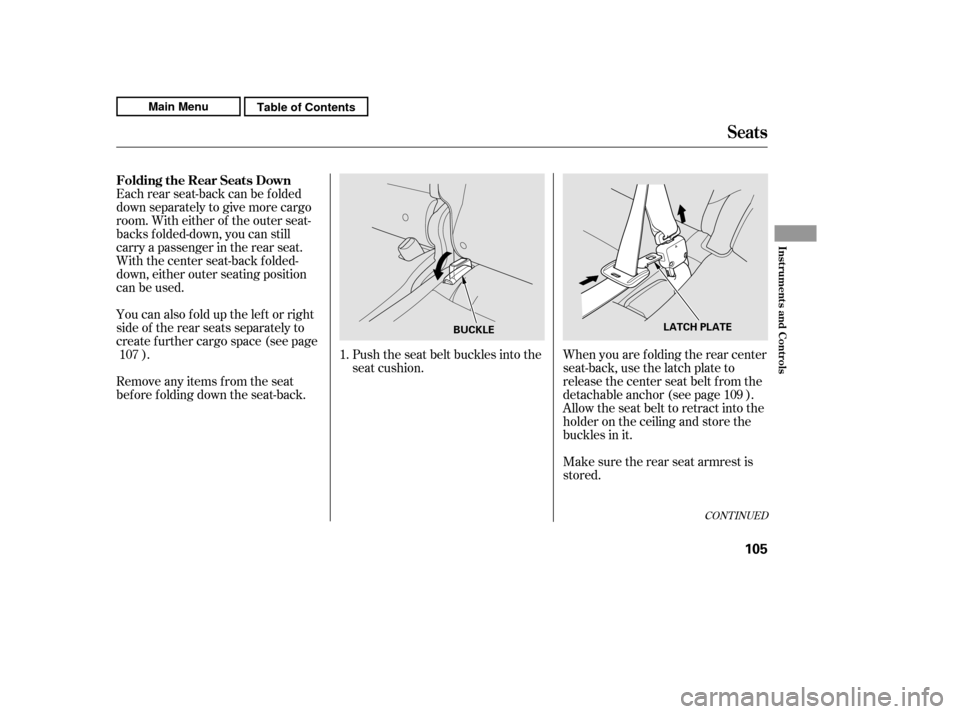
Each rear seat-back can be folded
down separately to give more cargo
room. With either of the outer seat-
backs f olded-down, you can still
carry a passenger in the rear seat.
With the center seat-back folded-
down, either outer seating position
can be used.
You can also fold up the left or right
side of the rear seats separately to
create f urther cargo space (see page).
Remove any items from the seat
before folding down the seat-back. Push the seat belt buckles into the
seat cushion.
When you are f olding the rear center
seat-back, use the latch plate to
release the center seat belt from the
detachable anchor (see page ).
Allow the seat belt to retract into the
holder on the ceiling and store the
buckles in it.
Make sure the rear seat armrest is
stored.
1.
107
109
CONT INUED
Folding the Rear Seats Down
Seats
Inst rument s and Cont rols
105
LATCH PLATE
BUCKLE
Main MenuTable of Contents
Page 112 of 445
When any seat-back is f olded down,
do not use the dual deck cargo shelf
(if equipped).
Make sure all items in the cargo area
are secured. Loose items can f ly
f orward and cause injury if you have
to brake hard (See
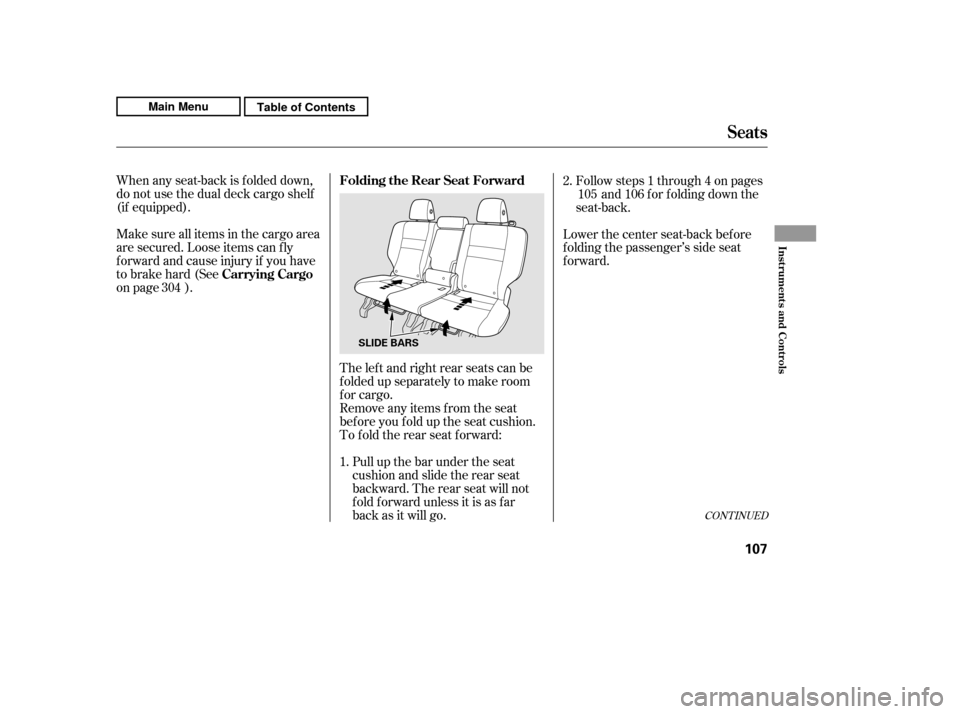
on page ).The lef t and right rear seats can be
f olded up separately to make room
for cargo.
To f old the rear seat f orward:
Remove any items from the seat
beforeyoufolduptheseatcushion.
Pull up the bar under the seat
cushion and slide the rear seat
backward. The rear seat will not
foldforwardunlessitisasfar
back as it will go. Lower the center seat-back bef ore
f olding the passenger’s side seat
forward.
Follow steps 1 through 4 on pages
and f or f olding down the
seat-back.
1. 2.
304 105 106
CONT INUED
Carrying CargoFolding the Rear Seat Forward
Seats
Inst rument s and Cont rols
107
SLIDE BARS
Main MenuTable of Contents