USB HONDA CR-V 2012 RM1, RM3, RM4 / 4.G Owners Manual
[x] Cancel search | Manufacturer: HONDA, Model Year: 2012, Model line: CR-V, Model: HONDA CR-V 2012 RM1, RM3, RM4 / 4.GPages: 361, PDF Size: 7.25 MB
Page 6 of 361
5
Quick Reference Guide
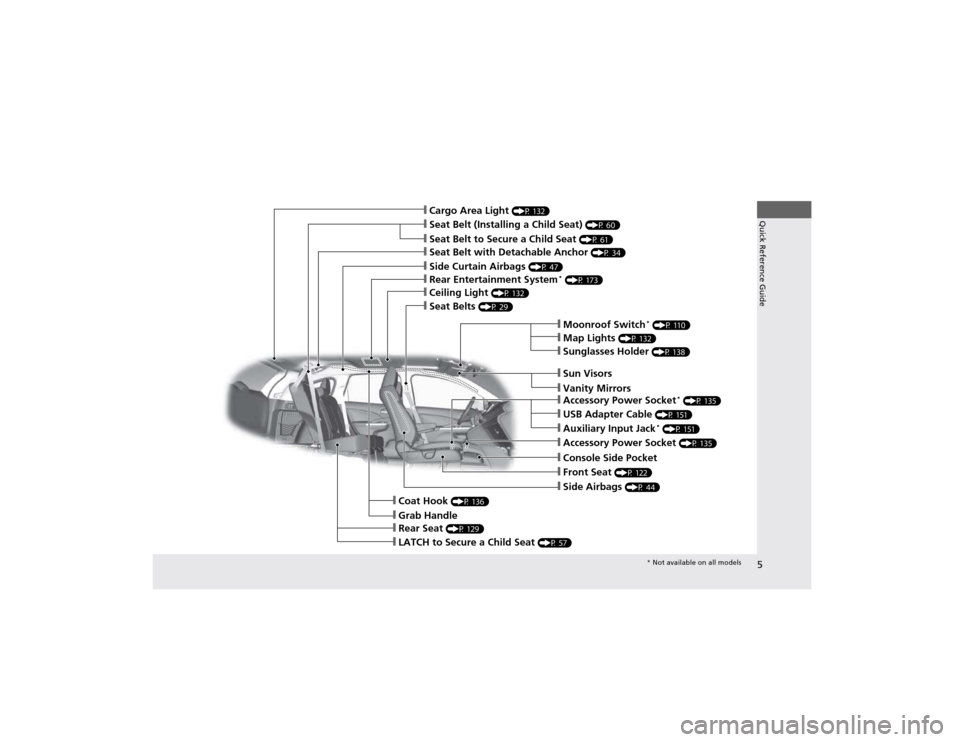
❙Seat Belt to Secure a Child Seat (P 61)
❙Seat Belt (Installing a Child Seat) (P 60)
❙Sun Visors
❙Vanity Mirrors
❙Moonroof Switch*
(P 110)
❙Map Lights (P 132)
❙Front Seat (P 122)
❙Seat Belts (P 29)
❙Side Airbags (P 44)
❙Rear Seat (P 129)
❙LATCH to Secure a Child Seat (P 57)
❙Ceiling Light (P 132)
❙Side Curtain Airbags (P 47)
❙Coat Hook (P 136)
❙Grab Handle
❙Sunglasses Holder (P 138)
❙Seat Belt with Detachable Anchor (P 34)
❙Rear Entertainment System*
(P 173)
❙Cargo Area Light (P 132)
❙Accessory Power Socket (P 135)
❙Console Side Pocket
❙USB Adapter Cable (P 151)
❙Auxiliary Input Jack *
(P 151)
❙Accessory Power Socket *
(P 135)
* Not available on all models
Page 15 of 361
14
Quick Reference Guide
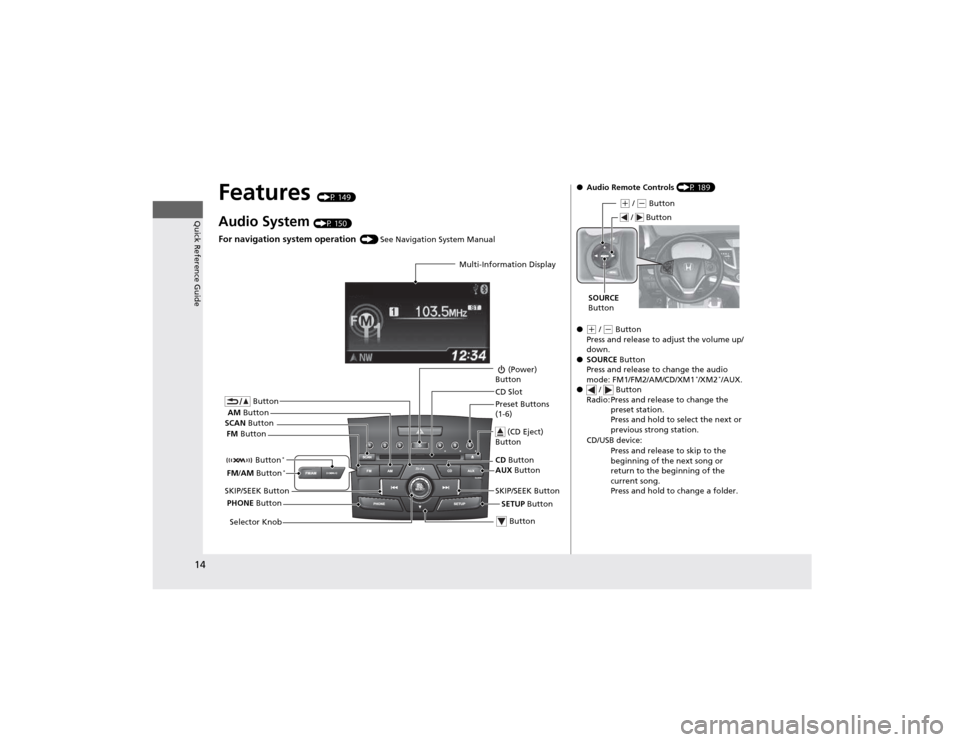
Features (P 149)
Audio System (P 150)
For navigation system operation () See Navigation System Manual
Multi-Information Display
AM Button
FM Button
SCAN
Button
SKIP/SEEK Button Selector Knob Button
(Power)
Button
CD Button
AUX Button
CD Slot
(CD Eject)
Button
Preset Buttons
(1-6)
Button
SETUP Button
SKIP/SEEK Button
PHONE Button
Button
*
FM
/AM Button *
●
Audio Remote Controls (P 189)
●
(+ / (- Button
Press and release to adjust the volume up/
down.
● SOURCE Button
Press and release to change the audio
mode: FM1/FM2/AM/CD/XM1 *
/XM2 *
/AUX.
● / Button
Radio: Press and release to change the preset station.
Press and hold to select the next or
previous strong station.
CD/USB device: Press and release to skip to the
beginning of the next song or
return to the beginning of the
current song.
Press and hold to change a folder.
(+ / (- Button
SOURCE
Button
/ Button
Page 88 of 361
87
uuGauges and DisplaysuMulti-Information Display
Continued
Instrument Panel
■List of customizable options
*1: Not available on all models
*2: Default Setting
*3: Refer to the navigation system manual for complete details. Setup Group Customizable Features Description Selectable settings
Vehicle
InformationMaintenance infoReset the Maintenance Minder
TM
.No/Yes
Adjust Clock*1Sets time display 12 hour or 24 hour and adjust the time. 12 h *2
/24 h
Customize
SettingsDisplay Setup
Select WallpaperSelect the full-size analogue clock or the wallpaper.Clock *2
/Image 1/Image 2/
Image 3
Import WallpaperImport an image file for a new wallpaper.Three images can be stored.
2Importing wallpapers
from USB P. 90
Delete WallpaperDelete an image file for a wallpaper.Image 1/Image 2/Image 3
Trip Meter
Item to
DisplaySelect an item to be displayed along with average fuel economy.Range*2
/Elapsed time/
Average speed
Welcome ScreenSelect whether the welcome screen comes on or not
when you turn the ignition switch to ON (w .On *2
/Off
Color ThemeChanges the color of the screen.Blue *2
/Red/Amber/Gray
Turn by Turn
Display *1, *3Select whether the turn-by-turn display comes on or
not during the route guidance.On*2
/Off
Language
SelectionChanges the displayed language.English *2
/Francais/Español
Page 91 of 361
uuGauges and DisplaysuMulti-Information Display
90
Instrument Panel
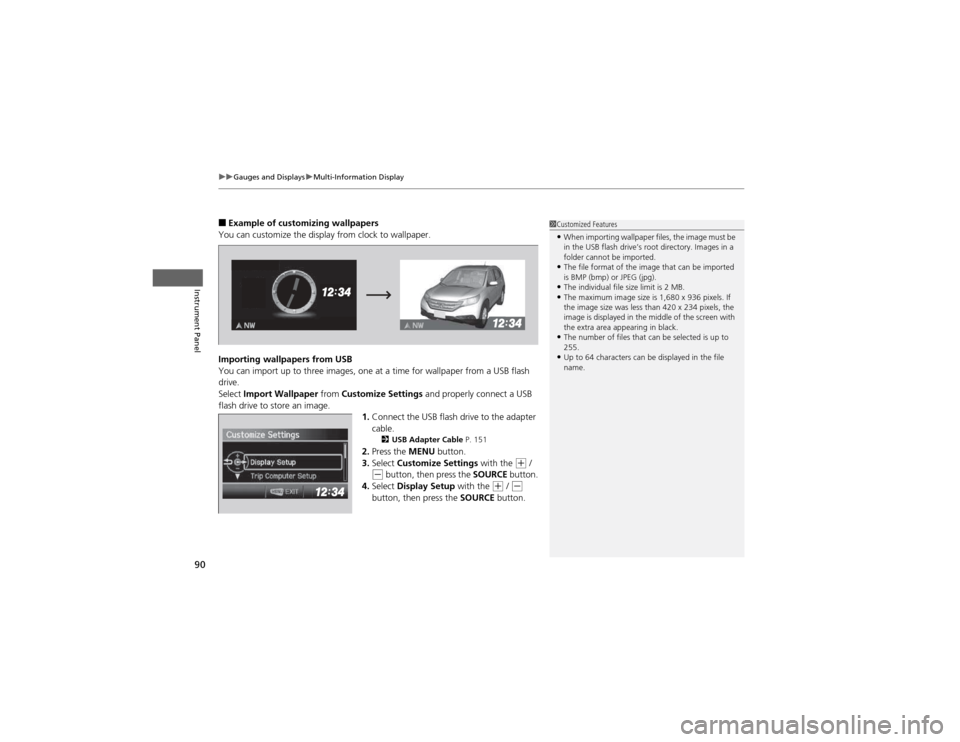
■ Example of customizing wallpapers
You can customize the display from clock to wallpaper.
Importing wallpapers from USB
You can import up to three images, one at a time for wallpaper from a USB flash
drive.Select Import Wallpaper from Customize Settings and properly connect a USB
flash drive to store an image.
1.Connect the USB flash drive to the adapter cable.
2 USB Adapter Cable P. 151
2. Press the MENU button.
3. Select Customize Settings with the
(+ / (- button, then press the SOURCE button.
4. Select Display Setup with the (+ / (-
button, then press the SOURCE button.
1Customized Features
• When importing wallpaper files, the image must be
in the USB flash drive’s root directory. Images in a
folder cannot be imported.
• The file format of the image that can be imported
is BMP (bmp) or JPEG (jpg).
• The individual file size limit is 2 MB.
• The maximum image size is 1,680 x 936 pixels. If
the image size was less than 420 x 234 pixels, the
image is displayed in the middle of the screen with
the extra area appearing in black.
• The number of files that can be selected is up to 255.
• Up to 64 characters can be displayed in the file name.
Page 150 of 361
149
Features
This chapter describes how to operate technology features on models without the navigation system.
Audio System About Your Audio System................ 150
USB Adapter Cable .......................... 151 Auxiliary Input Jack *
........................ 151
Audio Antenna ................................ 152
Audio System Theft Protection ......... 152
Audio System Basic Operation ........ 153
Adjusting the Sound ........................ 154
Playing the AM/FM Radio ................. 155
Playing the XM ® Radio *
................... 158
Playing a CD .................................... 160
Playing an iPod ®............................... 163
Playing Pandora ®............................. 166 Playing a USB Flash Drive ................. 168
Playing
Bluetooth ® Audio ................ 171
Rear Entertainment System *
........... 173
Audio Error Messages ...................... 185
Audio Remote Controls .................... 189
General Information on the Audio
System ............................................. 190
Bluetooth ® HandsFreeLink ®
Using HFL ........................................ 194
HFL Menus ...................................... 196
Compass ............................................ 223
* Not available on all models
Page 151 of 361
150
Features
Audio System
About Your Audio System
On models with navigation system, see the Navigation System Manual for operation
of the audio system, Bluetooth®HandsFreeLink ®, and voice commands for these
features.
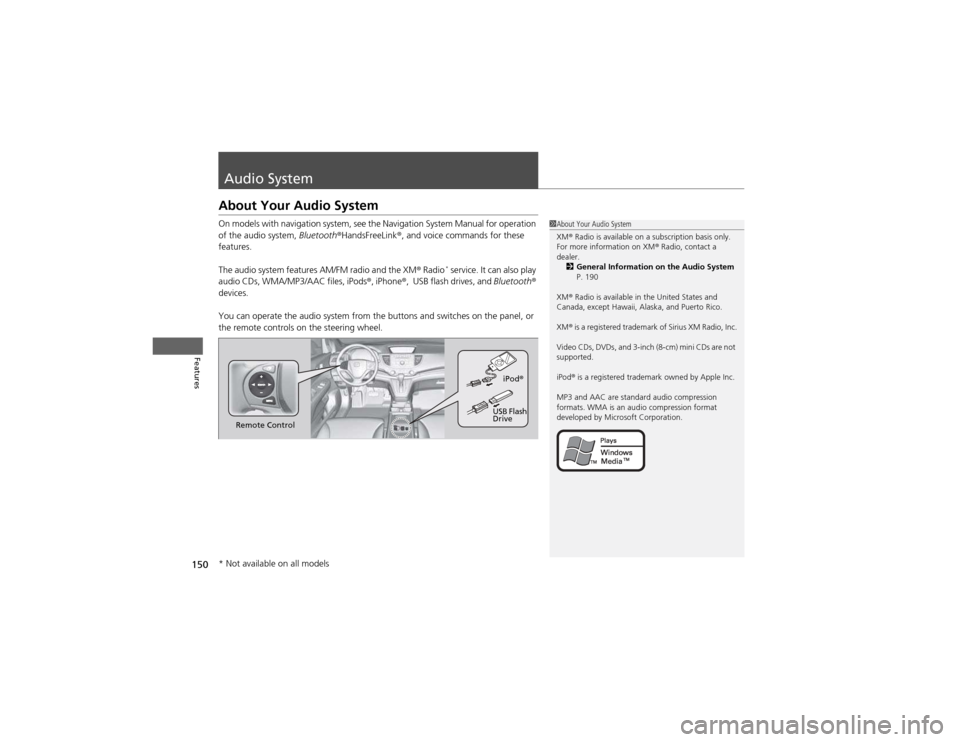
The audio system features AM/FM radio and the XM ® Radio *
service. It can also play
audio CDs, WMA/MP3/AAC files, iPods ®, iPhone ®, USB flash drives, and Bluetooth®
devices.
You can operate the audio system from the buttons and switches on the panel, or
the remote controls on the steering wheel.
1About Your Audio System XM ® Radio is available on a subscription basis only.
For more information on XM ® Radio, contact a
dealer. 2 General Information on the Audio System
P. 190
XM ® Radio is available in the United States and
Canada, except Hawaii, Alaska, and Puerto Rico. XM ® is a registered trademark of Sirius XM Radio, Inc.
Video CDs, DVDs, and 3-inch (8-cm) mini CDs are not
supported.
iPod ® is a registered trademark owned by Apple Inc.
MP3 and AAC are standard audio compression
formats. WMA is an audio compression format
developed by Microsoft Corporation.
Remote Control iPod
®
USB Flash
Drive
* Not available on all models
Page 152 of 361
151
uuAudio SystemuUSB Adapter Cable
Features
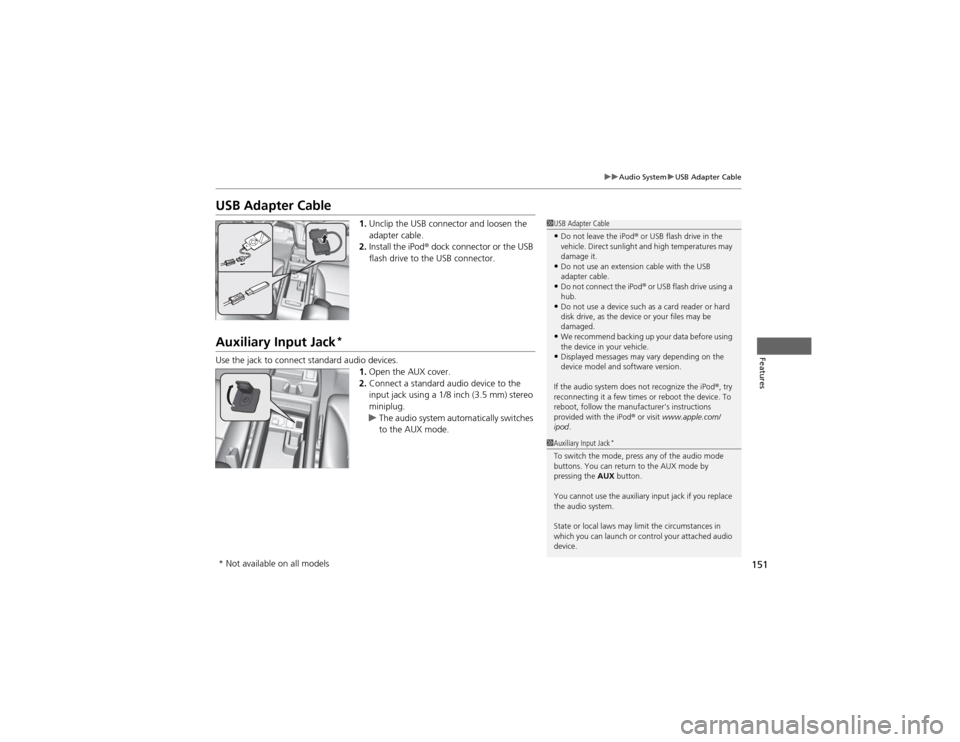
USB Adapter Cable1.Unclip the USB connector and loosen the
adapter cable.
2. Install the iPod ® dock connector or the USB
flash drive to the USB connector.
Auxiliary Input Jack *
Use the jack to connect standard audio devices. 1.Open the AUX cover.
2. Connect a standard audio device to the
input jack using a 1/8 inch (3.5 mm) stereo
miniplug.
uThe audio system automatically switches
to the AUX mode.
1USB Adapter Cable
• Do not leave the iPod ® or USB flash drive in the
vehicle. Direct sunlight and high temperatures may damage it.
• Do not use an extension cable with the USB
adapter cable.
• Do not connect the iPod ®
or USB flash drive using a
hub.
• Do not use a device such as a card reader or hard
disk drive, as the device or your files may be damaged.
• We recommend backing up your data before using
the device in your vehicle.
• Displayed messages may vary depending on the
device model and software version.
If the audio system does not recognize the iPod ®, try
reconnecting it a few times or reboot the device. To
reboot, follow the manufacturer's instructions provided with the iPod ® or visit www.apple.com/
ipod .
1Auxiliary Input Jack *
To switch the mode, press any of the audio mode
buttons. You can return to the AUX mode by
pressing the AUX button.
You cannot use the auxiliary input jack if you replace
the audio system.
State or local laws may limit the circumstances in
which you can launch or control your attached audio device.
* Not available on all models
Page 164 of 361
163
uuAudio System Basic OperationuPlaying an iPod®
Continued
Features
Playing an iPod ®
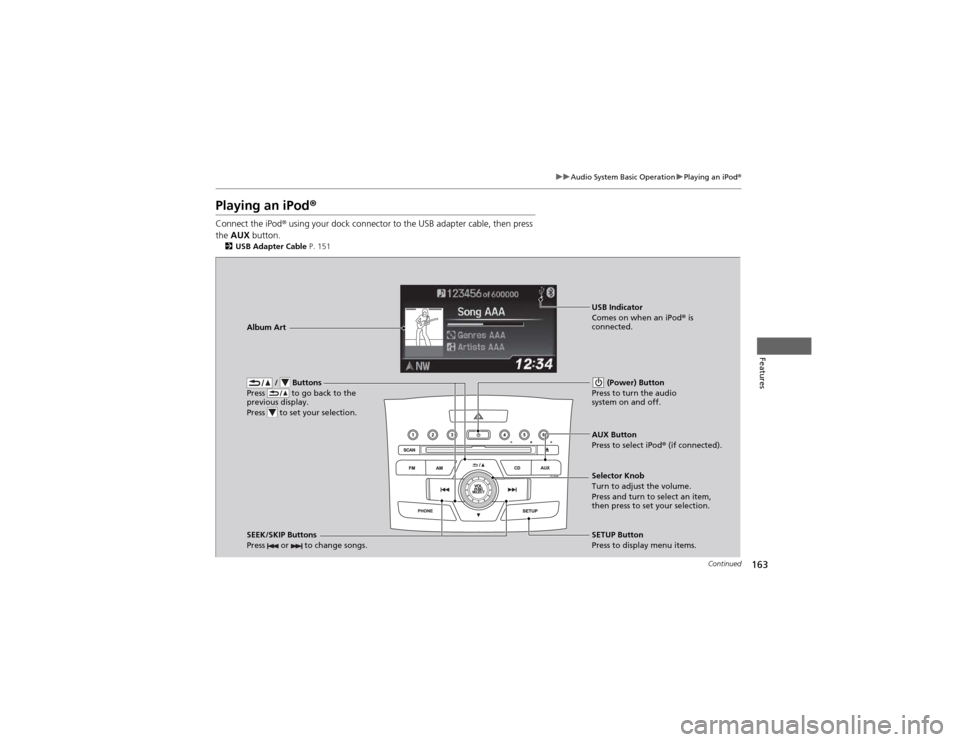
Connect the iPod ® using your dock connector to the USB adapter cable, then press
the AUX button.
2 USB Adapter Cable P. 151
/ Buttons
Press to go back to the
previous display.
Press to set your selection. (Power) Button
Press to turn the audio system on and off.
SEEK/SKIP Buttons
Press or to change songs.SETUP Button
Press to display menu items.
Selector Knob
Turn to adjust the volume.
Press and turn to select an item,
then press to set your selection.
AUX Button
Press to select iPod
® (if connected).
Album Art
USB Indicator
Comes on when an iPod
® is
connected.
Page 165 of 361
uuAudio System Basic OperationuPlaying an iPod®
164
Features
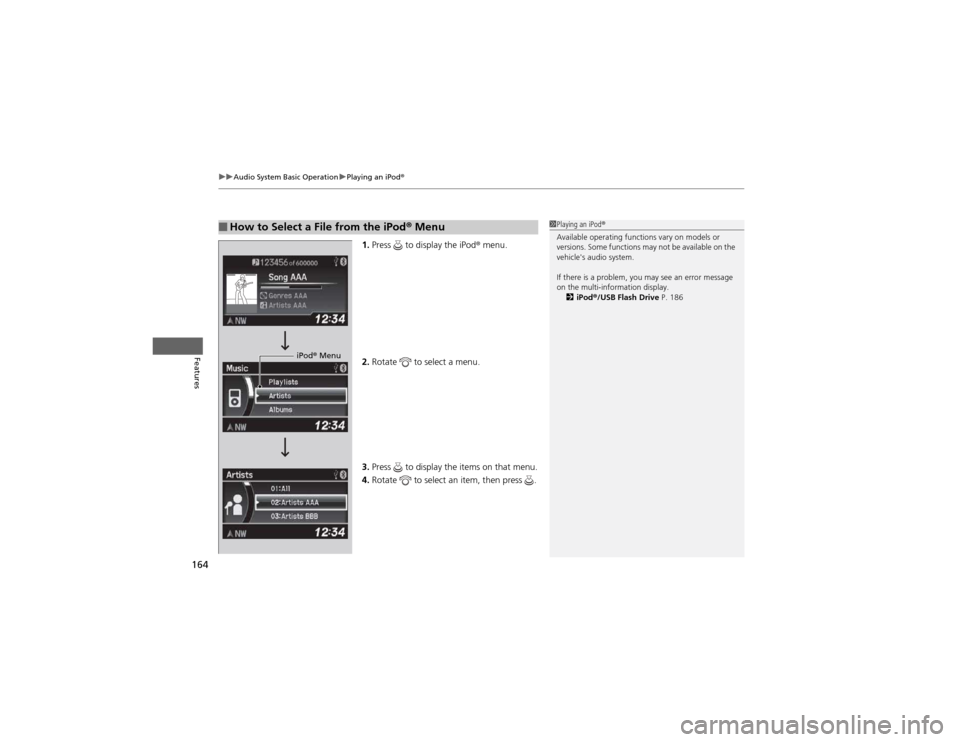
1. Press to display the iPod ® menu.
2. Rotate to select a menu.
3. Press to display the items on that menu.
4. Rotate to select an item, then press .
■How to Select a File from the iPod ® Menu1Playing an iPod ®
Available operating functions vary on models or
versions. Some functions may not be available on the
vehicle's audio system.
If there is a problem, you may see an error message
on the multi-information display. 2 iPod ®/USB Flash Drive P. 186
iPod® Menu
Page 167 of 361
166
uuAudio System Basic OperationuPlaying Pandora®
Features
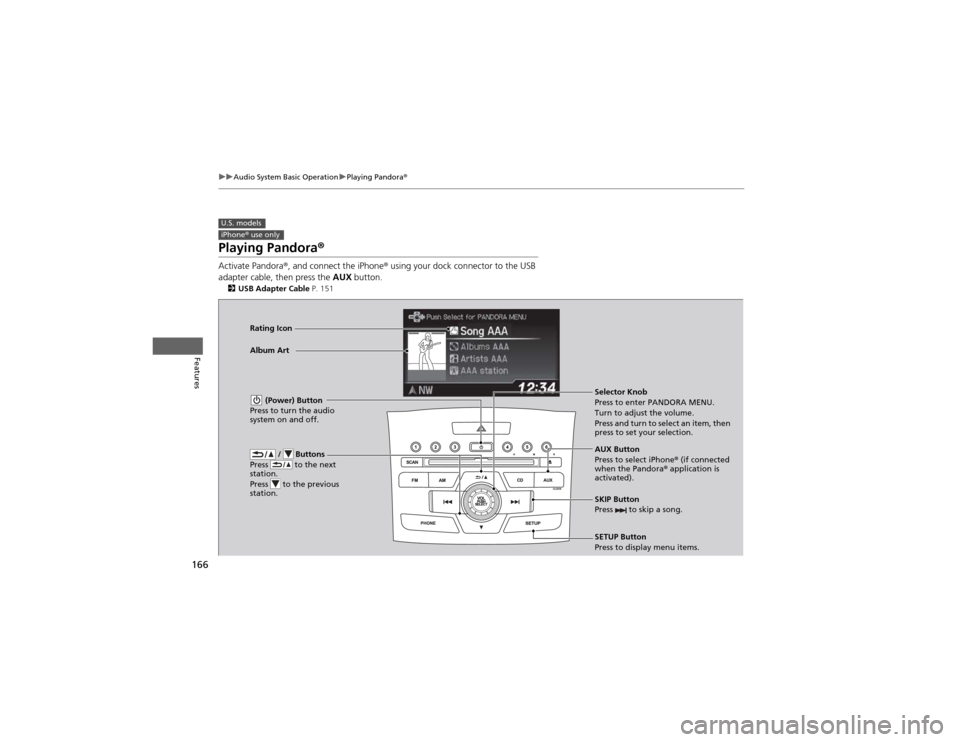
Playing Pandora ®
Activate Pandora ®, and connect the iPhone ® using your dock connector to the USB
adapter cable, then press the AUX button.
2 USB Adapter Cable P. 151
U.S. modelsiPhone® use only
/ Buttons
Press to the next
station.
Press to the previous
station.
(Power) Button
Press to turn the audio
system on and off.
SKIP Button
Press to skip a song.
SETUP Button
Press to display menu items.
Selector Knob
Press to enter PANDORA MENU.
Turn to adjust the volume.
Press and turn to select an item, then
press to set your selection.
AUX Button
Press to select iPhone
® (if connected
when the Pandora ® application is
activated).
Album Art
Rating Icon