engine coolant HONDA CR-V 2014 RM1, RM3, RM4 / 4.G Owners Manual
[x] Cancel search | Manufacturer: HONDA, Model Year: 2014, Model line: CR-V, Model: HONDA CR-V 2014 RM1, RM3, RM4 / 4.GPages: 365, PDF Size: 18.39 MB
Page 18 of 365
17
Quick Reference Guide
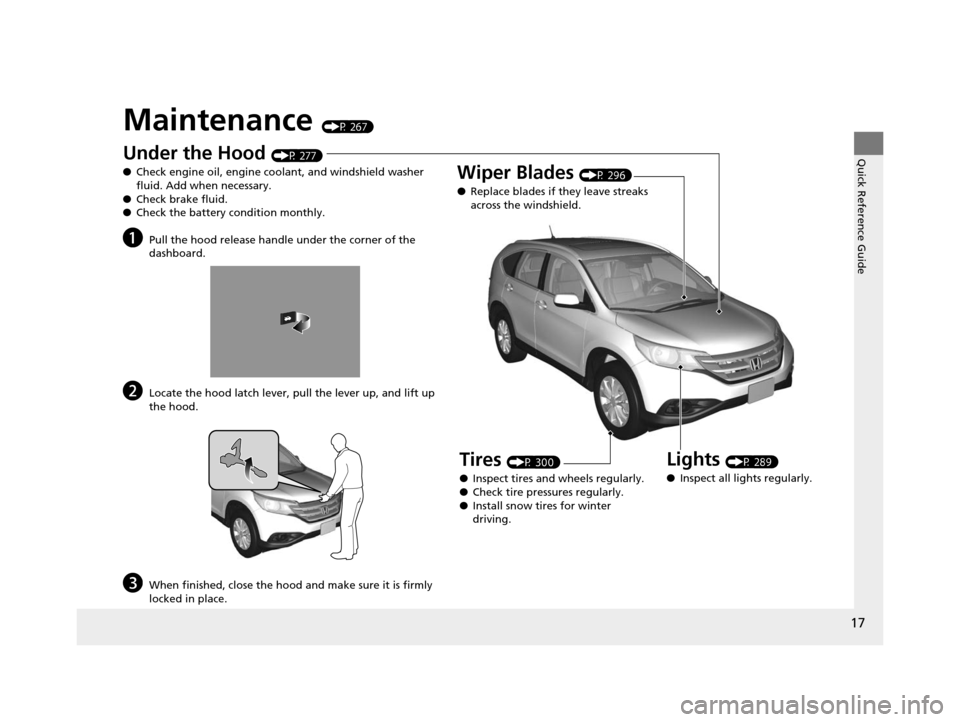
Maintenance (P 267)
Under the Hood (P 277)
● Check engine oil, engine coolant, and windshield washer
fluid. Add when necessary.
● Check brake fluid.
● Check the battery condition monthly.
aPull the hood release handle under the corner of the
dashboard.
bLocate the hood latch lever, pull the lever up, and lift up
the hood.
cWhen finished, close the hood and make sure it is firmly
locked in place.
Lights (P 289)
● Inspect all lights regularly.
Wiper Blades (P 296)
● Replace blades if they leave streaks
across the windshield.
Tires (P 300)
● Inspect tires and wheels regularly.
● Check tire pressures regularly.
● Install snow tires for winter
driving.
14 CR-V-31T0A6200.book 17 ページ 2014年2月10日 月曜日 午後7時1分
Page 78 of 365
77
Instrument Panel
Gauges and Displays
Gauges
Gauges include the speedometer, tachometer, fuel gauge, and related indicators.
They are displayed when the ignition switch is in ON
(w.
Displays your driving speed in mph (U.S.) or km/h (Canada).
Shows the number of engine revolutions per minute.
Displays the amount of fuel left in the fuel tank.
Displays the temperature of the engine coolant.
■Speedometer
■Tachometer
■Fuel Gauge
■Temperature Gauge
1 Fuel Gauge
NOTICE
You should refuel when the reading approaches .
Running out of fuel can cause the engine to misfire,
damaging the cata lytic converter.
The actual amount of remain ing fuel may differ from
the fuel gauge reading.E
1 Temperature Gauge
NOTICE
Driving with the temperat ure gauge pointer in the
upper zone can cause serious engine damage. Pull
safely to the side of th e road and allow engine
temperature to return to normal. 2 Overheating P. 331
14 CR-V-31T0A6200.book 77 ページ 2014年2月10日 月曜日 午後7時1分
Page 144 of 365
Continued143
uuHeating and Cooling System*uUsing Vents, Heating and A/C
Controls
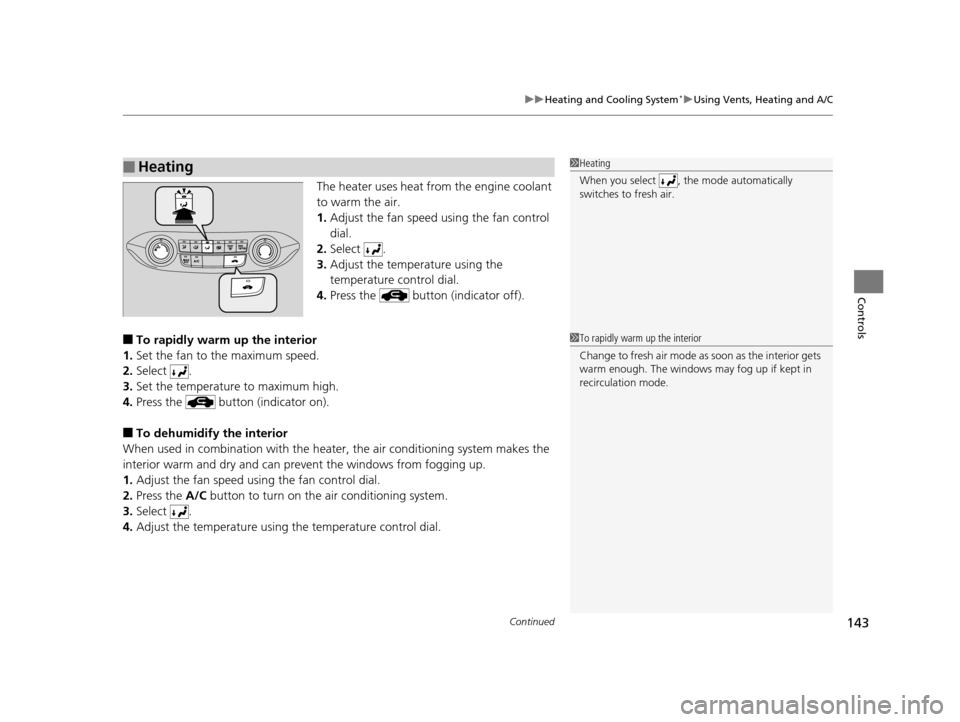
The heater uses heat from the engine coolant
to warm the air.
1. Adjust the fan speed using the fan control
dial.
2. Select .
3. Adjust the temperature using the
temperature control dial.
4. Press the button (indicator off).
■To rapidly warm up the interior
1. Set the fan to the maximum speed.
2. Select .
3. Set the temperature to maximum high.
4. Press the button (indicator on).
■To dehumidify the interior
When used in combination with the heat er, the air conditioning system makes the
interior warm and dry and can prev ent the windows from fogging up.
1. Adjust the fan speed using the fan control dial.
2. Press the A/C button to turn on the air conditioning system.
3. Select .
4. Adjust the temperature using the temperature control dial.
■Heating1Heating
When you select , th e mode automatically
switches to fresh air.
1 To rapidly warm up the interior
Change to fresh air mode as soon as the interior gets
warm enough. The windows may fog up if kept in
recirculation mode.
14 CR-V-31T0A6200.book 143 ページ 2014年2月10日 月曜日 午後7時1分
Page 240 of 365
239Continued
Driving
When Driving
Starting the Engine
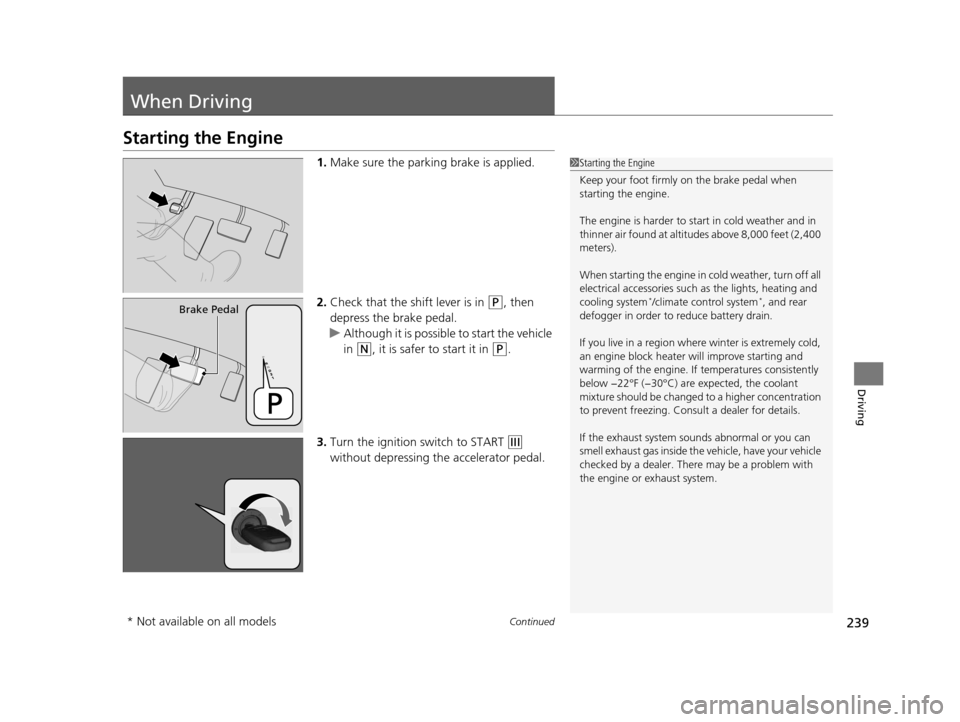
1.Make sure the parkin g brake is applied.
2. Check that the shift lever is in
(P, then
depress the brake pedal.
u Although it is possible to start the vehicle
in
(N, it is safer to start it in (P.
3. Turn the ignition switch to START
(e
without depressing the accelerator pedal.
1 Starting the Engine
Keep your foot firmly on the brake pedal when
starting the engine.
The engine is harder to st art in cold weather and in
thinner air found at altitudes above 8,000 feet (2,400
meters).
When starting the engine in cold weather, turn off all
electrical accessories such as the lights, heating and
cooling system
*/climate control system*, and rear
defogger in order to reduce battery drain.
If you live in a region where winter is extremely cold,
an engine block heater will improve starting and
warming of the engine. If temperatures consistently
below −22°F (−30°C) are expected, the coolant
mixture should be changed to a higher concentration
to prevent freezing. Cons ult a dealer for details.
If the exhaust system sounds abnormal or you can
smell exhaust gas inside the vehicle, have your vehicle
checked by a dealer. There may be a problem with
the engine or exhaust system.Brake Pedal
* Not available on all models
14 CR-V-31T0A6200.book 239 ページ 2014年2月10日 月曜日 午後7時1分
Page 268 of 365
267
Maintenance
This chapter discusses basic maintenance.
Before Performing MaintenanceInspection and Maintenance ............ 268
Safety When Performing Maintenance..... 269Parts and Fluids Used in Maintenance Service ........................................... 270
Maintenance Minder
TM..................... 271
Maintenance Under the Hood
Maintenance Items Under the Hood ..... 277Opening the Hood ........................... 278
Recommended Engine Oil ................ 279
Oil Check ......................................... 280
Adding Engine Oil ............................ 281
Changing the Engine Oil and Oil Filter ..... 282
Engine Coolant ................................ 284
Transmission Fluid ............................ 286
Brake Fluid ....................................... 287
Refilling Window Wa sher Fluid......... 288
Replacing Light Bulbs ....................... 289
Checking and Maintaining Wiper Blades.... 296Checking and Maintaining Tires
Checking Tires ................................. 300
Tire and Loading Information Label ...... 301Tire Labeling .................................... 301DOT Tire Quality Grading (U.S. Vehicles)....... 303Wear Indicators................................ 305
Tire Service Life ................................ 305 Tire and Wheel Replacement ........... 306
Tire Rotation .................................... 307
Winter Tires ..................................... 308
Battery ............................................... 309
Remote Transmitter Care Replacing the Button Battery ........... 310
Remote Control and Wireless Headphone Care
*........................... 311
Heating and Cooling System*/Climate
Control System* Maintenance ....... 313
Cleaning
Interior Care .................................... 314
Exterior Care.................................... 316
* Not available on all models
14 CR-V-31T0A6200.book 267 ページ 2014年2月10日 月曜日 午後7時1分
Page 275 of 365
274
uuMaintenance MinderTMuTo Use Maintenance MinderTM
Maintenance
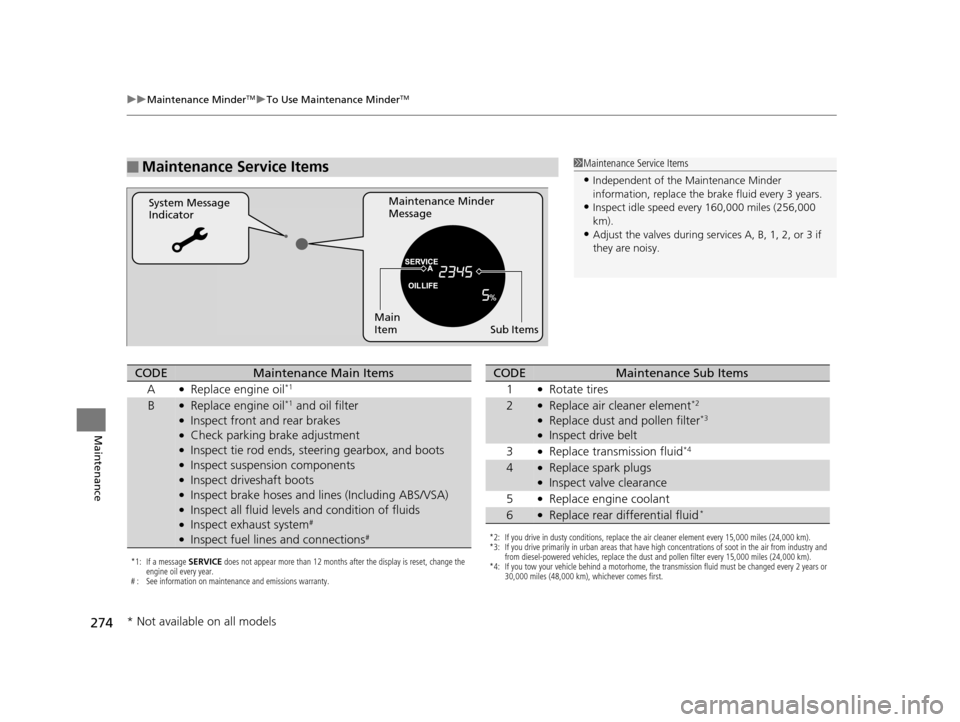
■Maintenance Service Items1Maintenance Service Items
•Independent of the Maintenance Minder
information, replace the brake fluid every 3 years.
•Inspect idle speed every 160,000 miles (256,000
km).
•Adjust the valves during services A, B, 1, 2, or 3 if
they are noisy.
Maintenance Minder
Message
System Message
Indicator
Sub Items
Main
Item
*1: If a message
SERVICE does not appear more than 12 months after the display is reset, change the
engine oil every year.
# : See information on maintenance and emissions warranty.
CODEMaintenance Main Items
A
●Replace engine oil*1
B●Replace engine oil*1 and oil filter●Inspect front and rear brakes●Check parking brake adjustment●Inspect tie rod ends, steering gearbox, and boots●Inspect suspension components●Inspect driveshaft boots●Inspect brake hoses and li nes (Including ABS/VSA)●Inspect all fluid levels and condition of fluids●Inspect exhaust system#
●Inspect fuel lines and connections#*2: If you drive in dusty conditions, replace the air cleaner element every 15,000 miles (24,000 km).
*3: If you drive primarily in urban areas that have high concentrations of soot in the air from industry and
from diesel-powered vehicles, replace the dust and pollen filter every 15,000 miles (24,000 km).
*4: If you tow your vehicle behind a motorhome, the transmission fluid must be changed every 2 years or 30,000 miles (48,000 km), whichever comes first.
CODEMaintenance Sub Items
1
●Rotate tires
2●Replace air cleaner element*2
●Replace dust and pollen filter*3
●Inspect drive belt
3
●Replace transmission fluid*4
4●Replace spark plugs●Inspect valve clearance
5
●Replace engine coolant
6●Replace rear differential fluid*
* Not available on all models
14 CR-V-31T0A6200.book 274 ページ 2014年2月10日 月曜日 午後7時1分
Page 278 of 365
277
Maintenance
Maintenance Under the Hood
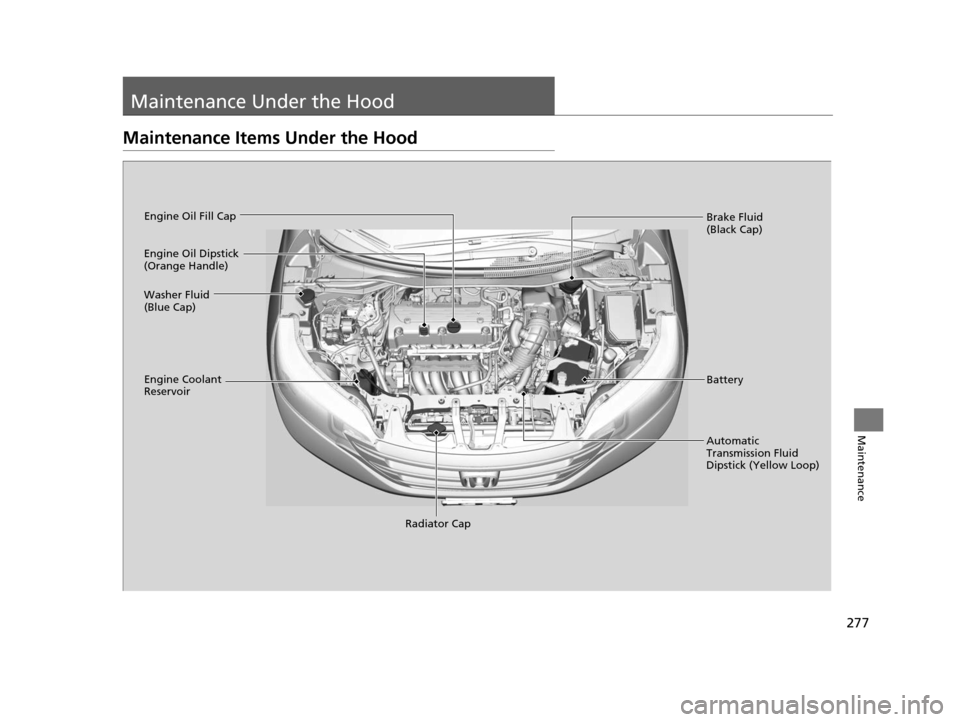
Maintenance Items Under the Hood
Brake Fluid
(Black Cap)
Engine Coolant
Reservoir Radiator Cap
Washer Fluid
(Blue Cap)
Engine Oil Dipstick
(Orange Handle)
Engine Oil Fill Cap
Automatic
Transmission Fluid
Dipstick (Yellow Loop)Battery
14 CR-V-31T0A6200.book 277 ページ 2014年2月10日 月曜日 午後7時1分
Page 285 of 365
284
uuMaintenance Under the Hood uEngine Coolant
Maintenance
Engine Coolant
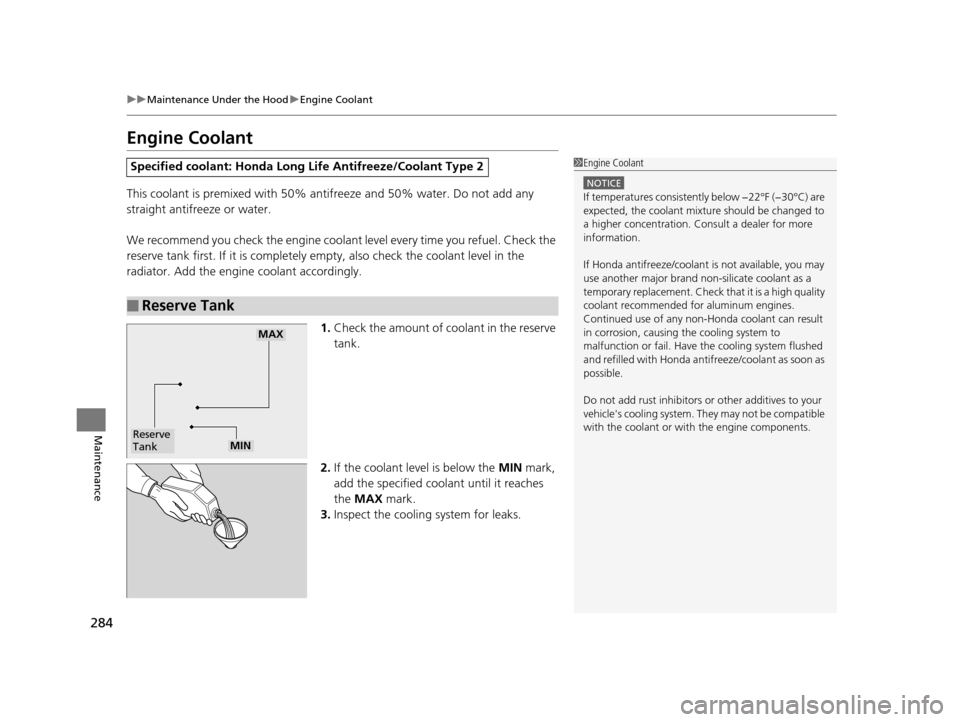
This coolant is premixed with 50% antifreeze and 50% water. Do not add any
straight antifreeze or water.
We recommend you check the engine coolant level every time you refuel. Check the
reserve tank first. If it is completely empty, also check the coolant level in the
radiator. Add the engine coolant accordingly.
1.Check the amount of coolant in the reserve
tank.
2. If the coolant level is below the MIN mark,
add the specified coolant until it reaches
the MAX mark.
3. Inspect the cooling system for leaks.
Specified coolant: Honda Long Life Antifreeze/Coolant Type 2
■Reserve Tank
1Engine Coolant
NOTICE
If temperatures c onsistently below −22°F (−30°C) are
expected, the coolant mixture should be changed to
a higher concentration. Cons ult a dealer for more
information.
If Honda antifreeze /coolant is not available, you may
use another major brand non- silicate coolant as a
temporary replacement. Check that it is a high quality
coolant recommended for aluminum engines.
Continued use of any non-Honda coolant can result
in corrosion, causing the cooling system to
malfunction or fail. Have the cooling system flushed
and refilled with Honda antifreeze/coolant as soon as
possible.
Do not add rust inhibitors or other additives to your
vehicle's cooling system. They may not be compatible
with the coolant or with the engine components.
Reserve
Tank
MAX
MIN
14 CR-V-31T0A6200.book 284 ページ 2014年2月10日 月曜日 午後7時1分
Page 286 of 365
285
uuMaintenance Under the Hood uEngine Coolant
Maintenance
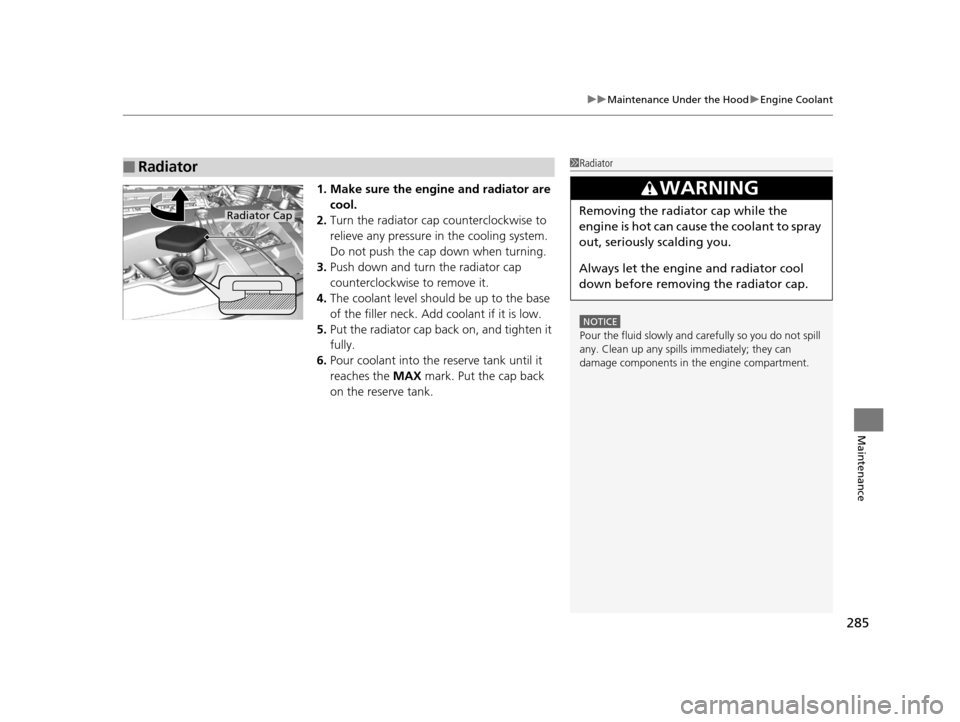
1. Make sure the engine and radiator are
cool.
2. Turn the radiator cap counterclockwise to
relieve any pressure in the cooling system.
Do not push the cap down when turning.
3. Push down and turn the radiator cap
counterclockwise to remove it.
4. The coolant level should be up to the base
of the filler neck. Add coolant if it is low.
5. Put the radiator cap back on, and tighten it
fully.
6. Pour coolant into the reserve tank until it
reaches the MAX mark. Put the cap back
on the reserve tank.
■Radiator1 Radiator
NOTICE
Pour the fluid slowly and ca refully so you do not spill
any. Clean up any spills immediately; they can
damage components in the engine compartment.
3WARNING
Removing the radiator cap while the
engine is hot can cause the coolant to spray
out, seriously scalding you.
Always let the engine and radiator cool
down before removing the radiator cap.Radiator Cap
14 CR-V-31T0A6200.book 285 ページ 2014年2月10日 月曜日 午後7時1分
Page 318 of 365
317
uuCleaning uExterior Care
Maintenance
A good coat of automotive body wax helps protect your vehicle’s paint from the
elements. Wax will wear off over time and expose your vehicle’s paint to the
elements, so reapply as necessary.
If you get gasoline, oil, engine coolant, or battery fluid on resi n coated parts, they
may be stained or the coating may peel. Prom ptly wipe it away using a soft cloth and
clean water.
Wipe using a glass cleaner.
Aluminum is susceptible to deterioration caused by salt and other road
contaminants. Use a sponge and mild detergent to wipe away promptly.
Be careful not to use harsh chemicals (including some commercial wheel cleaners) or
a stiff brush. They can damage the clear coat of the aluminum alloy wheels that
helps keep the aluminum from corroding and tarnishing.
■Applying Wax
■Maintaining the Bumpers and Other Resin Coated Parts
■Cleaning the Window
■Maintaining Aluminum Wheels*
1Applying Wax
NOTICE
Chemical solvents and st rong cleaners can damage
the paint, metal, and plasti c on your vehicle. Wipe
away spills immediately.
1 Maintaining the Bumpers an d Other Resin Coated Parts
Ask a dealer about the corr ect coating material when
you want to repair the painted surface of the parts
made of resin.
1 Cleaning the Window
Wires are mounted to the in side of the rear window.
Wipe along the same direct ion as the wires with a
soft cloth so as not to damage them.
* Not available on all models
14 CR-V-31T0A6200.book 317 ページ 2014年2月10日 月曜日 午後7時1分