wheel HONDA CR-V 2015 RM1, RM3, RM4 / 4.G Quick Guide
[x] Cancel search | Manufacturer: HONDA, Model Year: 2015, Model line: CR-V, Model: HONDA CR-V 2015 RM1, RM3, RM4 / 4.GPages: 81, PDF Size: 14.87 MB
Page 46 of 81
| 85
NAVIGATION84 |
BLUETOOTH
® HANDSFREELINK®
Models with touchscreen
HondaLink™ Assist
Automatically connect and talk to an operator who can locate your vehicl\
e and send
emergency help in the event of a collision. Visit www.hondalink.com (U.S.) or honda.
ca/hondalinkassist (Canada) for more information.
1. Make sure your phone is on and paired to Bluetooth
®
HandsFreeLink® (see page 80).
2. Select Call Now, or the system automatically connects after 10 seconds. The vehicle information
and its position are sent to the operator.
3. Select Talk Now to immediately talk to the operator.
4. When the call is complete, select Hang Up or press the Hang Up/Back button on the steering wheel.
Siri™ Eyes Free
Activate Siri through your vehicle when an iPhone® is paired to the system. Visit
handsfreelink.com (U.S.) or honda.ca/siri (Canada) to check phone compatibility.
Hang-Up/Back button: Exit Siri Eyes Free mode, or
cancel a command.
Talk button: Press and hold to activate Siri Eyes Free
mode. The Smartphone screen appears. Say your
command after you hear the Siri tone. If you only press
and release the Talk button, the standard voice recognition system is activated.
Here are some examples of Siri commands:
“Call John Smith”
“Read my new text message”
“Find a nearby sushi restaurant”
Notes:
• Any requests that include visual feedback from Siri on your phone are no\
t displayed in the vehicle.
• Certain commands rely on the iPhone’s features and existing apps.
• To hear turn-by-turn directions or songs through the vehicle, set the aud\
io source to Bluetooth
® Audio.
Siri and iPhone are trademarks of Apple, Inc.
“Remind me to pick up dinner”
“Set up a meeting today at 3 p.m.”
“Play song XYZ”
Learn how to enter a destination and operate the navigation system.
Basic Navigation Operation
A real-time navigation system uses GPS and a map database to show your c\
urrent
location and help guide you to a desired destination. You can operate the system
using voice commands or the touchscreen.
To reduce the potential for driver distraction, certain manual functions \
may be
inoperable or grayed out while the vehicle is moving. Voice commands are always
available.
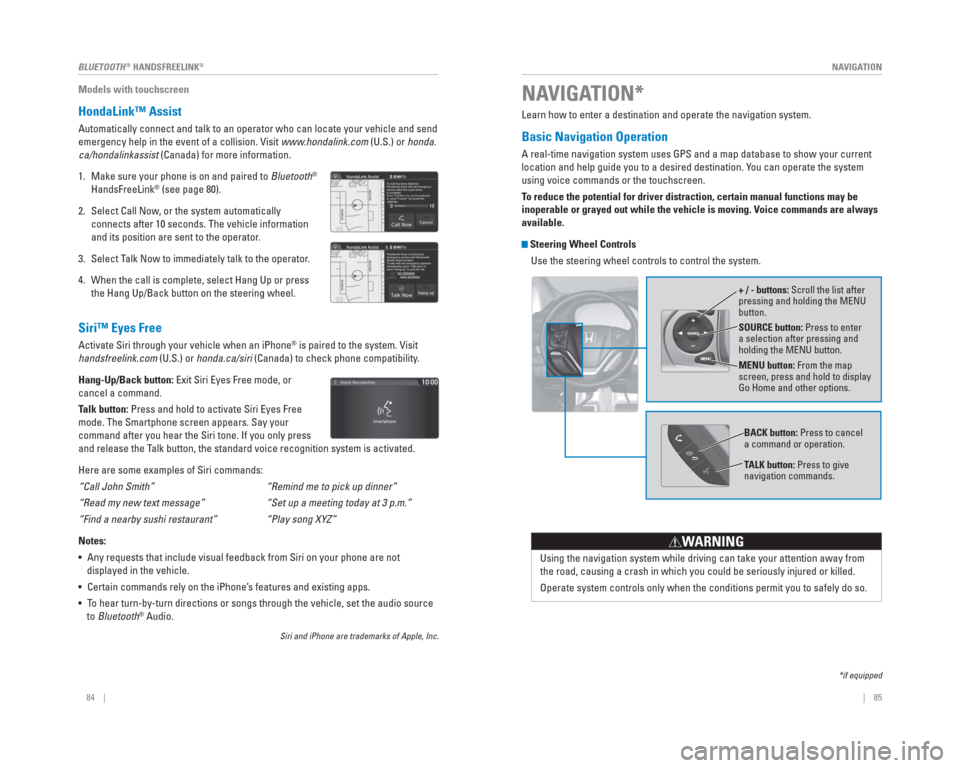
Steering Wheel Controls
Use the steering wheel controls to control the system.
NAVIGATION*
*if equipped
SOURCE button: Press to enter
a selection after pressing and
holding the MENU button.
MENU button: From the map
screen, press and hold to display
Go Home and other options. + / - buttons: Scroll the list after
pressing and holding the MENU
button.
Using the navigation system while driving can take your attention away f\
rom
the road, causing a crash in which you could be seriously injured or kil\
led.
Operate system controls only when the conditions permit you to safely do\
so.
WARNING
BACK button: Press to cancel
a command or operation.
TALK button: Press to give
navigation commands.
Page 50 of 81
92 || 93
DRIVING
DRIVING
Learn about preparation for driving, as well as other features.
Before Driving
Check the following items before you begin driving.
Exterior Checks
• Make sure there are no obstructions on the windows, door mirrors, exteri\
or lights, or other parts of the vehicle.
• Remove any frost, snow, or ice.
• Make sure the hood is securely closed.
• Heat from the engine and exhaust can ignite fl ammable materials left under the hood, causing a fi re. If you’ve parked your vehicle for an extended period,
inspect and remove any debris that may have collected, such as dried gra\
ss
and leaves that have fallen or have been carried in for use as a nest by\
a small
animal. Also check under the hood for leftover fl ammable materials after you or
someone else has performed maintenance on your vehicle.
• Make sure the tires are in good condition.
• Make sure there are no people or objects behind or around the vehicle.
Interior Checks • Store or secure all items on board properly.
• Do not pile items higher than the seat height.
• Do not place anything in the front seat footwells. Make sure to secure t\
he fl oor mats.
• If you have any animals on board, do not let them move freely around in \
the vehicle.
• Securely close and lock all doors and the tailgate.
• Adjust your seating position, mirrors, and steering wheel properly.
• Make sure items placed on the fl oor behind the front seats cannot roll under the seats.
• Everyone in the vehicle must fasten their seat belt.
• Make sure that the indicators in the instrument panel come on when you s\
tart the vehicle, and go off soon after.
DRIVING
If the doors are frozen shut, use warm water around the door edges to me\
lt any
ice. Do not try to force them open, as this can damage the rubber trim a\
round the
doors. When done, wipe dry to avoid further freezing.
NOTICE Improper accessories or modifi cations can affect your vehicle’s handling, and
stability, and performance, and cause a crash in which you can be seriously hurt \
or killed.
Follow all instructions in the vehicle owner’s manual regarding accessories and
modifi cations.
WARNING
In addition:
• During the fi rst 600 miles (1,000 km) of operation, avoid sudden acceleration or full throttle operation so as not to damage the engine or powertrain.
• Avoid hard braking for the fi rst 200 miles (300 km). You should also follow this when the brake pads are replaced.
Your vehicle has been designed primarily for use on pavement; however, its higher
ground clearance allows you to occasionally travel on unpaved roads. It \
is not
designed for trail-blazing or other challenging off-road activities.
If you decide to drive on unpaved roads, you will fi nd that it requires somewhat
different driving skills and that your vehicle will handle somewhat diff\
erently than
it does on pavement. Pay attention to the precautions and tips in this s\
ection, and
get acquainted with your vehicle before leaving the pavement.
Improperly operating this vehicle on or off pavement can cause a crash o\
r
rollover in which you and your passengers can be seriously hurt or kille\
d.
Follow all instructions and guidelines in this guide.
Keep your speed low, and don’t drive faster than conditions permit.
WARNING
Page 53 of 81
98 || 99
DRIVING
DRIVING
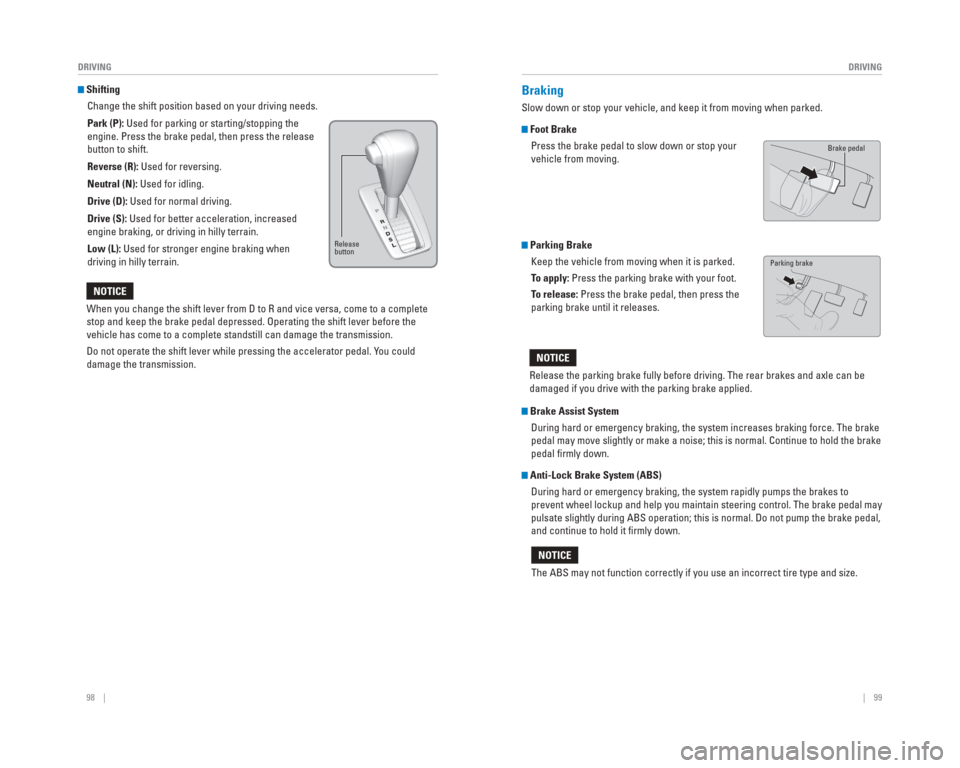
Shifting
Change the shift position based on your driving needs.
Park (P): Used for parking or starting/stopping the
engine. Press the brake pedal, then press the release
button to shift.
Reverse (R): Used for reversing.
Neutral (N): Used for idling.
Drive (D): Used for normal driving.
Drive (S): Used for better acceleration, increased
engine braking, or driving in hilly terrain.
Low (L): Used for stronger engine braking when
driving in hilly terrain.
When you change the shift lever from D to R and vice versa, come to a co\
mplete
stop and keep the brake pedal depressed. Operating the shift lever befor\
e the
vehicle has come to a complete standstill can damage the transmission.
Do not operate the shift lever while pressing the accelerator pedal. You could
damage the transmission.
NOTICE
Release
button
Braking
Slow down or stop your vehicle, and keep it from moving when parked.
Foot Brake Press the brake pedal to slow down or stop your
vehicle from moving.
Parking Brake Keep the vehicle from moving when it is parked.
To apply: Press the parking brake with your foot.
To release: Press the brake pedal, then press the
parking brake until it releases.
Brake Assist System During hard or emergency braking, the system increases braking force. Th\
e brake
pedal may move slightly or make a noise; this is normal. Continue to hol\
d the brake
pedal fi rmly down.
Anti-Lock Brake System (ABS) During hard or emergency braking, the system rapidly pumps the brakes to\
prevent wheel lockup and help you maintain steering control. The brake p\
edal may
pulsate slightly during ABS operation; this is normal. Do not pump the b\
rake pedal,
and continue to hold it fi rmly down.
Release the parking brake fully before driving. The rear brakes and axle\
can be
damaged if you drive with the parking brake applied.
NOTICE
The ABS may not function correctly if you use an incorrect tire type and\
size.
NOTICE
Brake pedal
Parking brake
Page 56 of 81
104 || 105
DRIVING
DRIVING
Lane Departure Warning ( LDW)*
A camera mounted between the windshield and the rearview mirror determin\
es if
your vehicle begins to move away from the center of a detected lane whil\
e driving
between 40–90 mph (64–145 km/h).
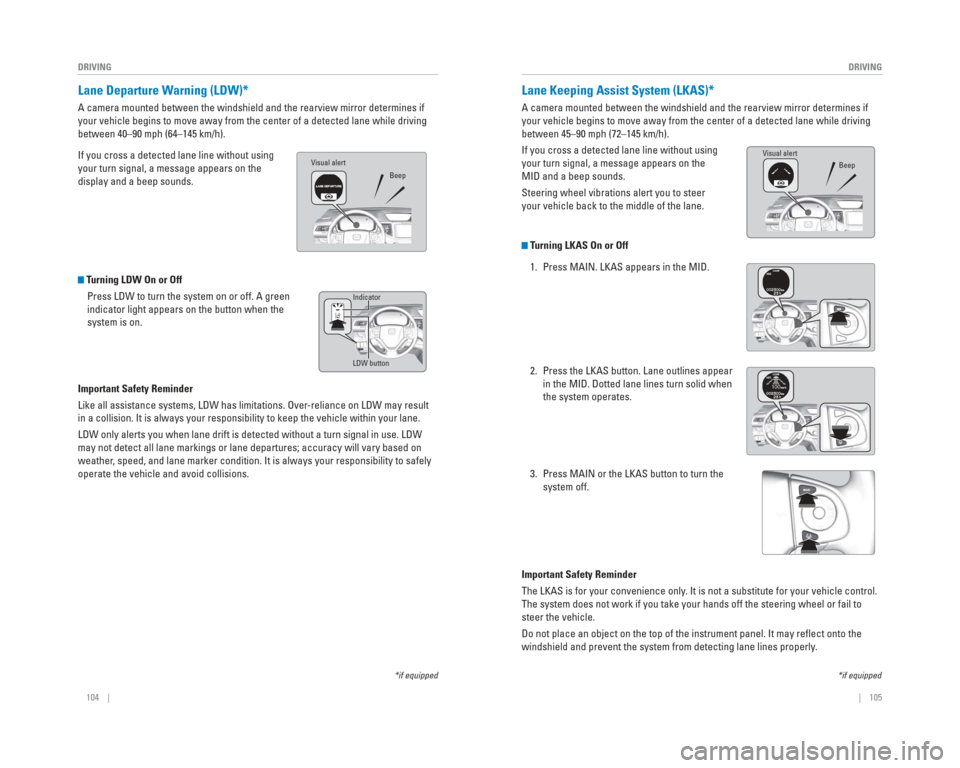
If you cross a detected lane line without using
your turn signal, a message appears on the
display and a beep sounds.
Turning LDW On or Off
Press LDW to turn the system on or off. A green
indicator light appears on the button when the
system is on.
Important Safety Reminder
Like all assistance systems, LDW has limitations. Over-reliance on LDW may result
in a collision. It is always your responsibility to keep the vehicle wit\
hin your lane.
LDW only alerts you when lane drift is detected without a turn signal in\
use. LDW
may not detect all lane markings or lane departures; accuracy will vary \
based on
weather, speed, and lane marker condition. It is always your responsibility to \
safely
operate the vehicle and avoid collisions.
*if equipped
LDW button Indicator
Beep
Visual alert
*if equipped
Lane Keeping Assist System (
LKAS)*
A camera mounted between the windshield and the rearview mirror determin\
es if
your vehicle begins to move away from the center of a detected lane whil\
e driving
between 45–90 mph (72–145 km/h).
If you cross a detected lane line without using
your turn signal, a message appears on the
MID and a beep sounds.
Steering wheel vibrations alert you to steer
your vehicle back to the middle of the lane.
Turning LKAS On or Off
1. Press MAIN. LKAS appears in the MID.
2. Press the LKAS button. Lane outlines appear in the MID. Dotted lane lines turn solid when
the system operates.
3. Press MAIN or the LKAS button to turn the system off.
Important Safety Reminder
The LKAS is for your convenience only. It is not a substitute for your vehicle control.
The system does not work if you take your hands off the steering wheel o\
r fail to
steer the vehicle.
Do not place an object on the top of the instrument panel. It may refl\
ect onto the
windshield and prevent the system from detecting lane lines properly.
Visual alert Beep
Page 57 of 81
106 || 107
DRIVING
DRIVING
*if equipped
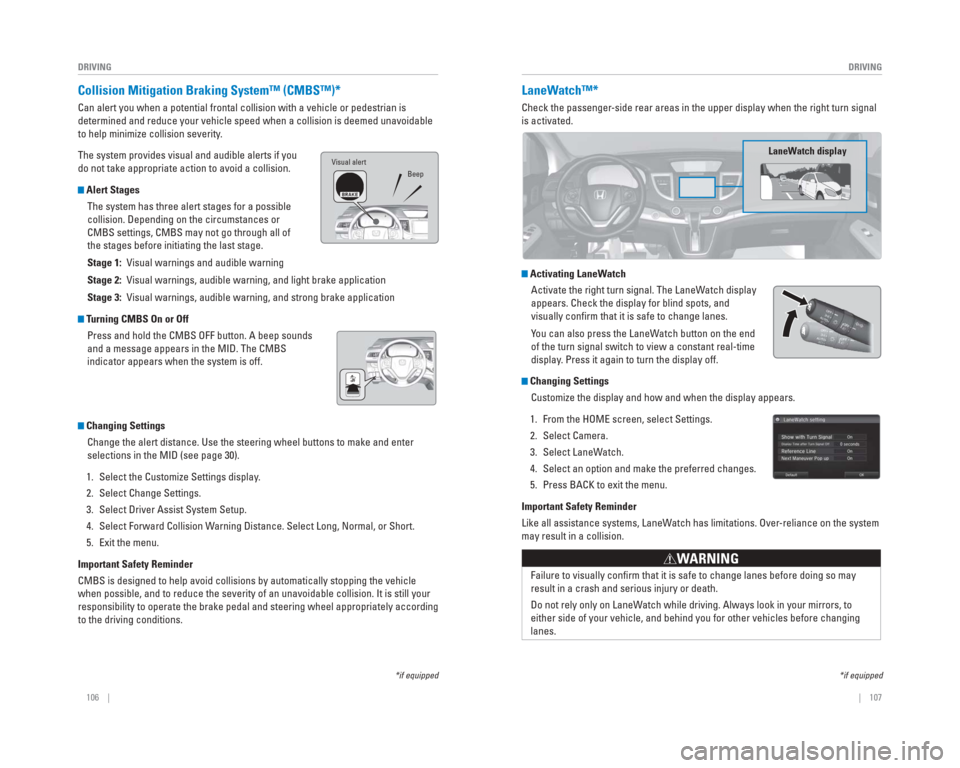
Collision Mitigation Braking System™ ( CMBS™)*
Can alert you when a potential frontal collision with a vehicle or pedes\
trian is
determined and reduce your vehicle speed when a collision is deemed unav\
oidable
to help minimize collision severity.
The system provides visual and audible alerts if you
do not take appropriate action to avoid a collision.
Alert Stages
The system has three alert stages for a possible
collision. Depending on the circumstances or
CMBS settings, CMBS may not go through all of
the stages before initiating the last stage.
Stage 1: Visual warnings and audible warning
Stage 2: Visual warnings, audible warning, and light brake application
Stage 3: Visual warnings, audible warning, and strong brake application
Turning CMBS On or OffPress and hold the CMBS OFF button. A beep sounds
and a message appears in the MID. The CMBS
indicator appears when the system is off.
Changing SettingsChange the alert distance. Use the steering wheel buttons to make and en\
ter
selections in the MID (see page 30).
1. Select the Customize Settings display.
2. Select Change Settings.
3. Select Driver Assist System Setup.
4. Select Forward Collision Warning Distance. Select Long, Normal, or Short.
5. Exit the menu.
Important Safety Reminder
CMBS is designed to help avoid collisions by automatically stopping the \
vehicle
when possible, and to reduce the severity of an unavoidable collision. I\
t is still your
responsibility to operate the brake pedal and steering wheel appropriate\
ly according
to the driving conditions.
Visual alert Beep
LaneWatch™*
Check the passenger -side rear areas in the upper display when the right turn signal
is activated.
LaneW atch display
Activating LaneWatch
Activate the right turn signal. The LaneWatch display
appears. Check the display for blind spots, and
visually confi rm that it is safe to change lanes.
You can also press the LaneWatch button on the end
of the turn signal switch to view a constant real-time
display. Press it again to turn the display off.
Changing SettingsCustomize the display and how and when the display appears.
1. From the HOME screen, select Settings.
2. Select Camera.
3. Select LaneWatch.
4. Select an option and make the preferred changes.
5. Press BACK to exit the menu.
Important Safety Reminder
Like all assistance systems, LaneWatch has limitations. Over-reliance on the system
may result in a collision.
Failure to visually confi rm that it is safe to change lanes before doing so may
result in a crash and serious injury or death.
Do not rely only on LaneW atch while driving. Always look in your mirrors, to
either side of your vehicle, and behind you for other vehicles before ch\
anging
lanes.
W ARNING
*if equipped
Page 58 of 81
108 || 109
DRIVING
DRIVING
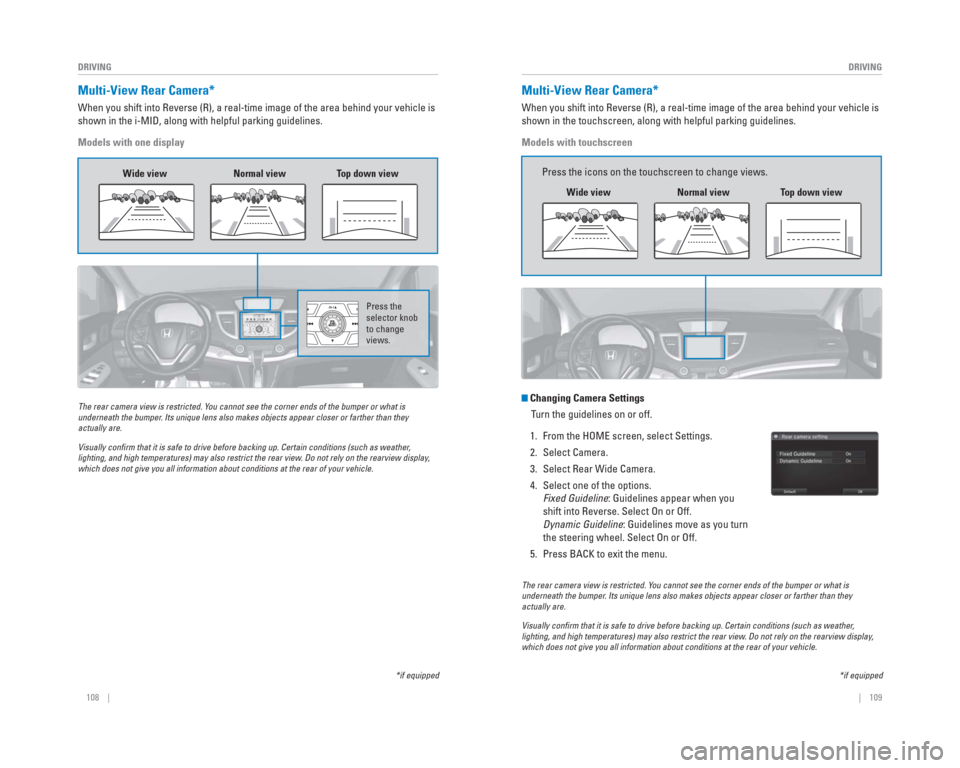
Multi-View Rear Camera*
When you shift into Reverse (R), a real-time image of the area behind \
your vehicle is
shown in the i-MID, along with helpful parking guidelines.
Models with one display
The rear camera view is restricted. You cannot see the corner ends of the bumper or what is
underneath the bumper. Its unique lens also makes objects appear closer or farther than they \
actually are.
Visually con� rm that it is safe to drive before backing up. Certain conditions (such\
as weather,
lighting, and high temperatures) may also restrict the rear view. Do not rely on the rearview display,
which does not give you all information about conditions at the rear of \
your vehicle.
Wide view Normal viewTop down view
Press the
selector knob
to change
views.
*if equipped
The rear camera view is restricted. Y ou cannot see the corner ends of the bumper or what is
underneath the bumper . Its unique lens also makes objects appear closer or farther than they \
actually are.
Visually con� rm that it is safe to drive before backing up. Certain conditions (such\
as weather ,
lighting, and high temperatures) may also restrict the rear view . Do not rely on the rearview display,
which does not give you all information about conditions at the rear of \
your vehicle.
Changing Camera Settings
Turn the guidelines on or off.
1. From the HOME screen, select Settings.
2. Select Camera.
3. Select Rear Wide Camera.
4. Select one of the options. Fixed Guideline: Guidelines appear when you
shift into Reverse. Select On or Off.
Dynamic Guideline: Guidelines move as you turn
the steering wheel. Select On or Off.
5. Press BACK to exit the menu.
*if equipped
Multi-View Rear Camera*
When you shift into Reverse (R), a real-time image of the area behind \
your vehicle is
shown in the touchscreen, along with helpful parking guidelines.
Models with touchscreen
Wide view Normal viewTop down view
Press the icons on the touchscreen to change views.
Page 61 of 81
114 || 115
HANDLING THE UNEXPECTED
HANDLING THE UNEXPECTED
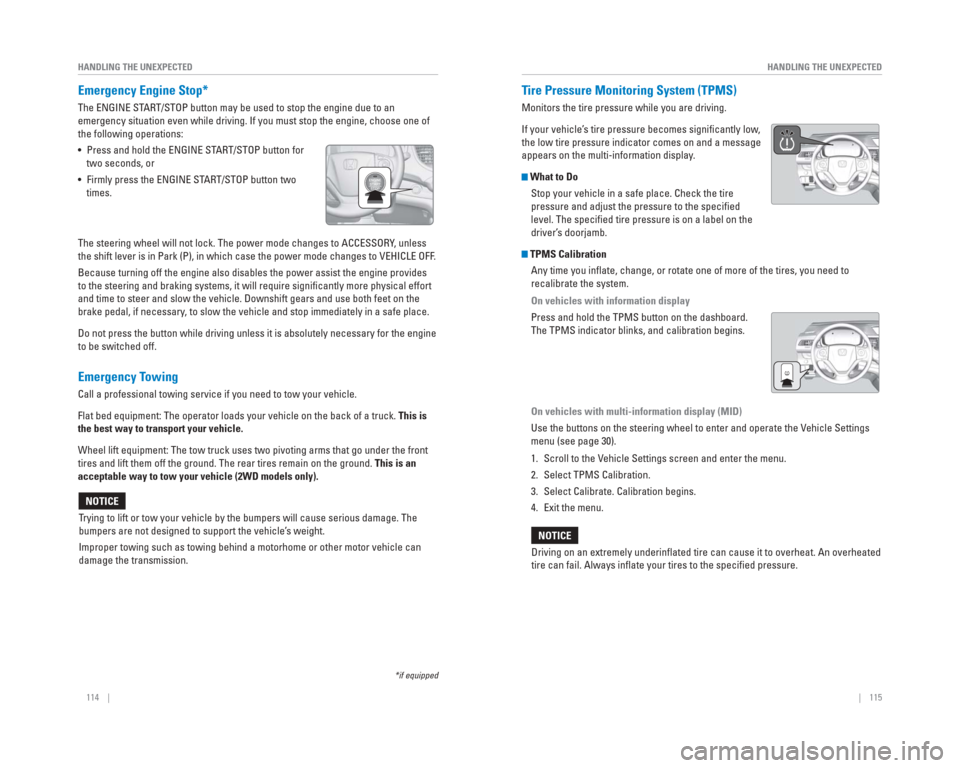
Emergency Engine Stop*
The ENGINE START/STOP button may be used to stop the engine due to an
emergency situation even while driving. If you must stop the engine, cho\
ose one of
the following operations:
• Press and hold the ENGINE START/STOP button for
two seconds, or
• Firmly press the ENGINE START/STOP button two times.
The steering wheel will not lock. The power mode changes to ACCESSORY, unless
the shift lever is in Park (P), in which case the power mode changes t\
o VEHICLE OFF.
Because turning off the engine also disables the power assist the engine\
provides
to the steering and braking systems, it will require signifi cantly more physical effort
and time to steer and slow the vehicle. Downshift gears and use both fee\
t on the
brake pedal, if necessary, to slow the vehicle and stop immediately in a safe place.
Do not press the button while driving unless it is absolutely necessary \
for the engine
to be switched off.
Emergency Towing
Call a professional towing service if you need to tow your vehicle.
Flat bed equipment: The operator loads your vehicle on the back of a tru\
ck. This is
the best way to transport your vehicle.
Wheel lift equipment: The tow truck uses two pivoting arms that go under\
the front
tires and lift them off the ground. The rear tires remain on the ground.\
This is an
acceptable way to tow your vehicle (2WD models only).
Trying to lift or tow your vehicle by the bumpers will cause serious dama\
ge. The
bumpers are not designed to support the vehicle’s weight.
Improper towing such as towing behind a motorhome or other motor vehicle\
can
damage the transmission.
NOTICE
*if equipped
Tire Pressure Monitoring System ( TPMS)
Monitors the tire pressure while you are driving.
If your vehicle’s tire pressure becomes signifi cantly low,
the low tire pressure indicator comes on and a message
appears on the multi-information display.
What to Do Stop your vehicle in a safe place. Check the tire
pressure and adjust the pressure to the specifi ed
level. The specifi ed tire pressure is on a label on the
driver’s doorjamb.
TPMS CalibrationAny time you infl ate, change, or rotate one of more of the tires, you need to
recalibrate the system.
On vehicles with information display
Press and hold the TPMS button on the dashboard.
The TPMS indicator blinks, and calibration begins.
On vehicles with multi-information display (MID)
Use the buttons on the steering wheel to enter and operate the Vehicle Settings
menu (see page 30).
1. Scroll to the Vehicle Settings screen and enter the menu.
2. Select TPMS Calibration.
3. Select Calibrate. Calibration begins.
4. Exit the menu.
Driving on an extremely underinfl ated tire can cause it to overheat. An overheated
tire can fail. Always infl ate your tires to the specifi ed pressure.
NOTICE
Page 62 of 81
116 || 117
HANDLING THE UNEXPECTED
HANDLING THE UNEXPECTED
Changing a Flat Tire
If a tire goes fl at while driving, grasp the steering wheel fi rmly, and brake gradually
to reduce speed. Then, stop in a safe place. Replace the fl at tire with the compact
spare tire. Go to a dealer as soon as possible to have the full-size tir\
e repaired or
replaced.
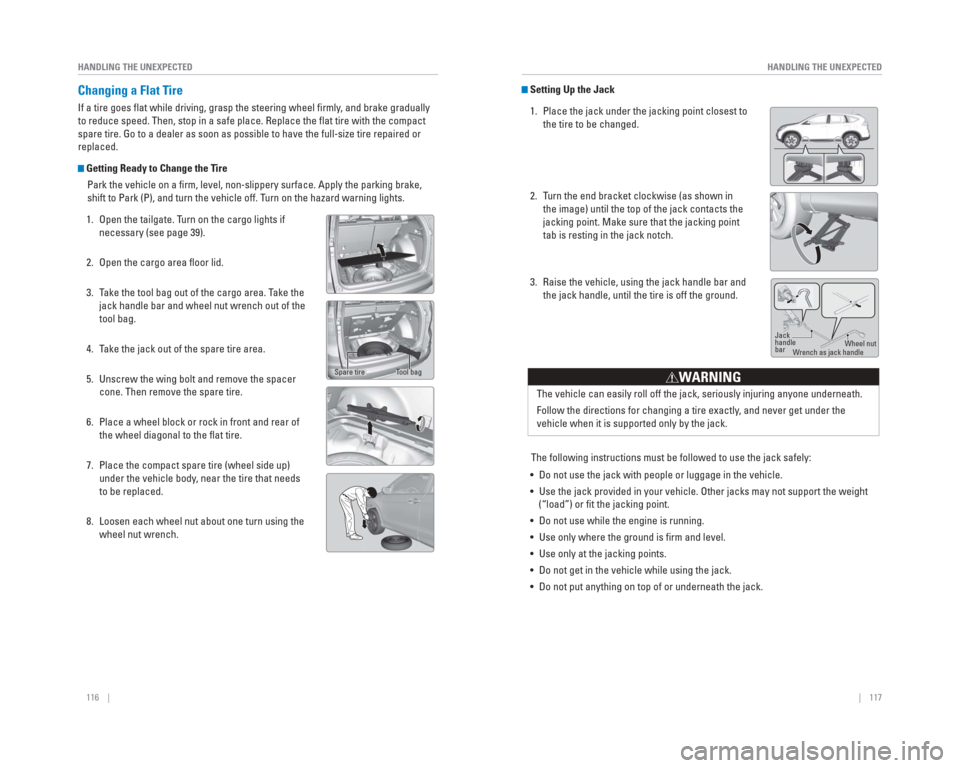
Getting Ready to Change the Tire
Park the vehicle on a fi rm, level, non-slippery surface. Apply the parking brake,
shift to Park (P), and turn the vehicle off. Turn on the hazard warning lights.
1. Open the tailgate. Turn on the cargo lights if necessary (see page 39).
2. Open the cargo area fl oor lid.
3. Take the tool bag out of the cargo area. Take the jack handle bar and wheel nut wrench out of the
tool bag.
4. Take the jack out of the spare tire area.
5. Unscrew the wing bolt and remove the spacer cone. Then remove the spare tire.
6. Place a wheel block or rock in front and rear of the wheel diagonal to the fl at tire.
7. Place the compact spare tire (wheel side up) under the vehicle body, near the tire that needs
to be replaced.
8. Loosen each wheel nut about one turn using the wheel nut wrench.
Tool bagSpare tire
Setting Up the Jack
1. Place the jack under the jacking point closest to the tire to be changed.
2. Turn the end bracket clockwise (as shown in the image) until the top of the jack contacts the
jacking point. Make sure that the jacking point
tab is resting in the jack notch.
3. Raise the vehicle, using the jack handle bar and the jack handle, until the tire is off the ground.
The following instructions must be followed to use the jack safely:
• Do not use the jack with people or luggage in the vehicle.
• Use the jack provided in your vehicle. Other jacks may not support the w\
eight (“load”) or fi t the jacking point.
• Do not use while the engine is running.
• Use only where the ground is fi rm and level.
• Use only at the jacking points.
• Do not get in the vehicle while using the jack.
• Do not put anything on top of or underneath the jack.
Jack
handle
bar Wheel nut
W rench as jack handle
The vehicle can easily roll off the jack, seriously injuring anyone unde\
rneath.
Follow the directions for changing a tire exactly , and never get under the
vehicle when it is supported only by the jack.
W ARNING
Page 63 of 81
118 || 119
HANDLING THE UNEXPECTED
HANDLING THE UNEXPECTED
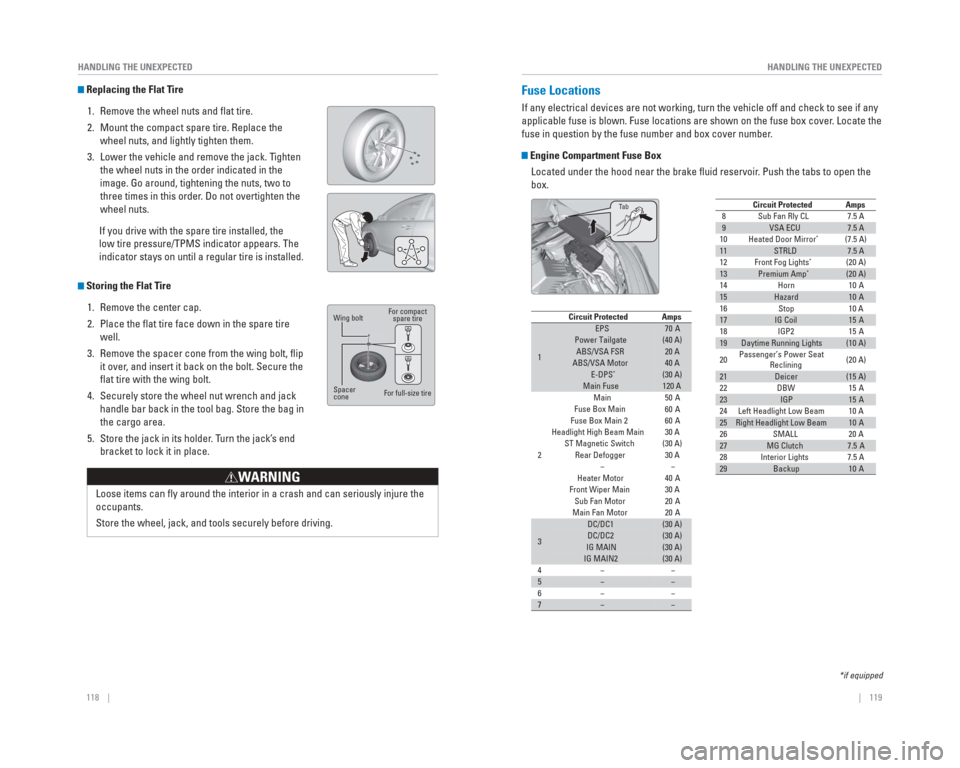
Replacing the Flat Tire
1. Remove the wheel nuts and fl at tire.
2. Mount the compact spare tire. Replace the wheel nuts, and lightly tighten them.
3. Lower the vehicle and remove the jack. Tighten the wheel nuts in the order indicated in the
image. Go around, tightening the nuts, two to
three times in this order. Do not overtighten the
wheel nuts.
If you drive with the spare tire installed, the
low tire pressure/TPMS indicator appears. The
indicator stays on until a regular tire is installed.
Storing the Flat Tire 1. Remove the center cap.
2. Place the fl at tire face down in the spare tire well.
3. Remove the spacer cone from the wing bolt, fl ip it over, and insert it back on the bolt. Secure the
fl at tire with the wing bolt.
4. Securely store the wheel nut wrench and jack handle bar back in the tool bag. Store the bag in
the cargo area.
5. Store the jack in its holder. Turn the jack’s end bracket to lock it in place.
Wing bolt
Spacer
cone For compact
spare tire
For full-size tire
Loose items can fl y around the interior in a crash and can seriously injure the
occupants.
Store the wheel, jack, and tools securely before driving.
WARNING
Fuse Locations
If any electrical devices are not working, turn the vehicle off and chec\
k to see if any
applicable fuse is blown. Fuse locations are shown on the fuse box cover\
. Locate the
fuse in question by the fuse number and box cover number.
Engine Compartment Fuse Box Located under the hood near the brake fl uid reservoir. Push the tabs to open the
box.
89VSA ECU7.5 A
10 (7.5 A)
11STRLD7.5 A
12 (20 A)
13Premium Amp*(20 A)
14
15Hazard10 A
16
17IG Coil15 A
18
19Daytime Running Lights(10 A)
20 Passenger’s Power Seat
Reclining (20 A)
21Deicer(15 A)
22
23IGP15 A
24
25Right Headlight Low Beam10 A
26
27MG Clutch7.5 A
28
29Backup10 A
Circuit ProtectedAmps7.5 A
10 A10 A
15 A
15 A
10 A
20 A
7.5 A
Sub Fan Rly CL
HornStop
IGP2
DBW
Left Headlight Low Beam SMALL
Interior Lights
Heated Door Mirror
*
Front Fog Lights*
Circuit ProtectedAmps
1
EPS70 APower Tailgate(40 A)ABS/VSA FSR20 AABS/VSA Motor40 AE-DPS*(30 A)Main Fuse120 A
2
Main50 A
Fuse Box Main
Fuse Box Main 260 A
Headlight High Beam Main
ST Magnetic Switch(30 A)
Rear Defogger −
Heater Motor
Front Wiper Main Sub Fan Motor
Main Fan Motor
3
DC/DC1(30 A)DC/DC2(30 A)IG MAIN(30 A)IG MAIN2(30 A)
4
5−−
6
7−−
60 A
30 A
30 A −
40 A
30 A 20 A
20 A
−
−
−
−
*if equipped
Ta
b
Page 65 of 81
122 || 123
MAINTENANCE
MAINTENANCE
Safety Precautions
Some of the most important safety precautions are listed below; however, we cannot
warn you of every conceivable hazard that can arise in performing mainte\
nance.
Only you can decide whether or not you should perform a given task.
Maintenance Safety
• To reduce the possibility of fi re or explosion, keep cigarettes, sparks, and fl ames away from the battery and all fuel-related parts.
• Never leave rags, towels, or other fl ammable objects under the hood.
• To clean parts, use a commercially available degreaser or parts cleaner, not gasoline.
• Wear eye protection and protective clothing when working with the battery\
or compressed air.
• Do not run the engine in confi ned spaces where carbon monoxide gas can accumulate.
Vehicle Safety
• The vehicle must be stationary, and parked on level ground with the parking brake set and the engine off.
• Be aware that hot parts can burn you.
• Be aware that moving parts can injure you.
Improperly maintaining this vehicle or failing to correct a problem befo\
re driving
can cause a crash in which you can be seriously hurt or killed.
Always follow the inspection and maintenance recommendations according t\
o
the schedules in this guide.
WARNING
Failure to properly follow maintenance instructions and precautions can \
cause
you to be seriously hurt or killed.
Always follow the procedures and precautions in this guide.
WARNING
Learn about basic maintenance that you can perform on the vehicle yourse\
lf, as well
as information about how to best maintain the vehicle.
MAINTENANCE
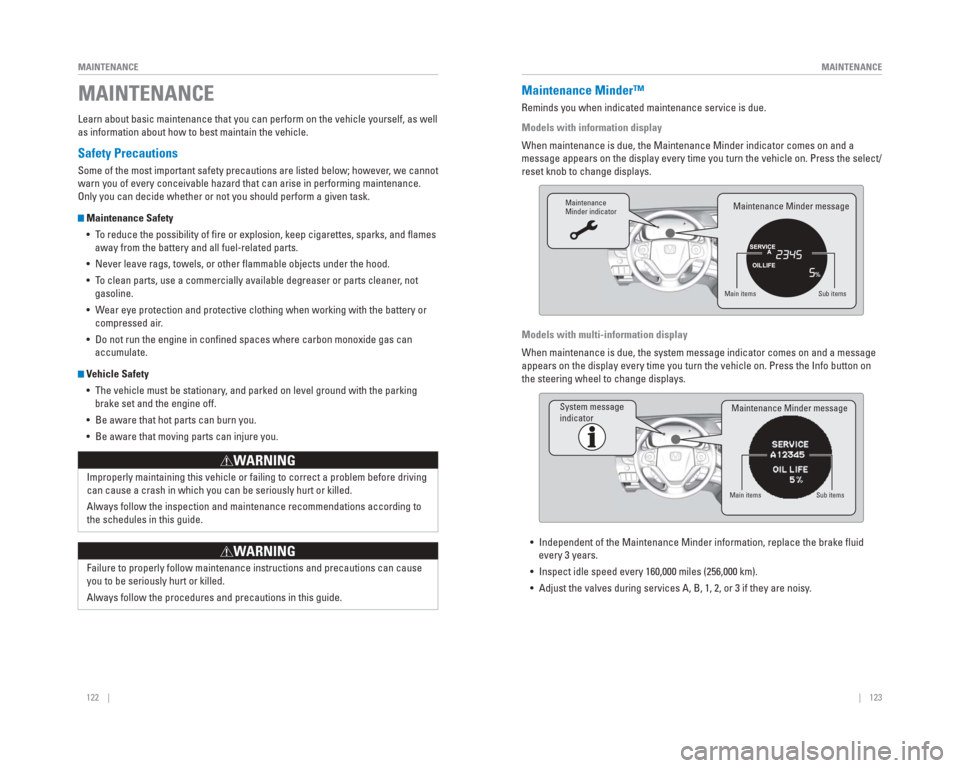
When maintenance is due, the Maintenance Minder indicator comes on and a\
message appears on the display every time you turn the vehicle on. Press\
the select/
reset knob to change displays.
Maintenance Minder™
Reminds you when indicated maintenance service is due.
Models with information display
Maintenance
Minder indicator
Main items Sub items
Maintenance Minder message
When maintenance is due, the system message indicator comes on and a mes\
sage
appears on the display every time you turn the vehicle on. Press the Inf\
o button on
the steering wheel to change displays. Models with multi-information display
System message
indicator
Main itemsSub items
Maintenance Minder message
• Independent of the Maintenance Minder information, replace the brake fl\
uid
every 3 years.
• Inspect idle speed every 160,000 miles (256,000 km).
• Adjust the valves during services A, B, 1, 2, or 3 if they are noisy .