buttons HONDA CR-V 2015 RM1, RM3, RM4 / 4.G Quick Guide
[x] Cancel search | Manufacturer: HONDA, Model Year: 2015, Model line: CR-V, Model: HONDA CR-V 2015 RM1, RM3, RM4 / 4.GPages: 81, PDF Size: 14.87 MB
Page 4 of 81
| 1
VISUAL INDEX
Quickly locate items in the vehicle’s interior.
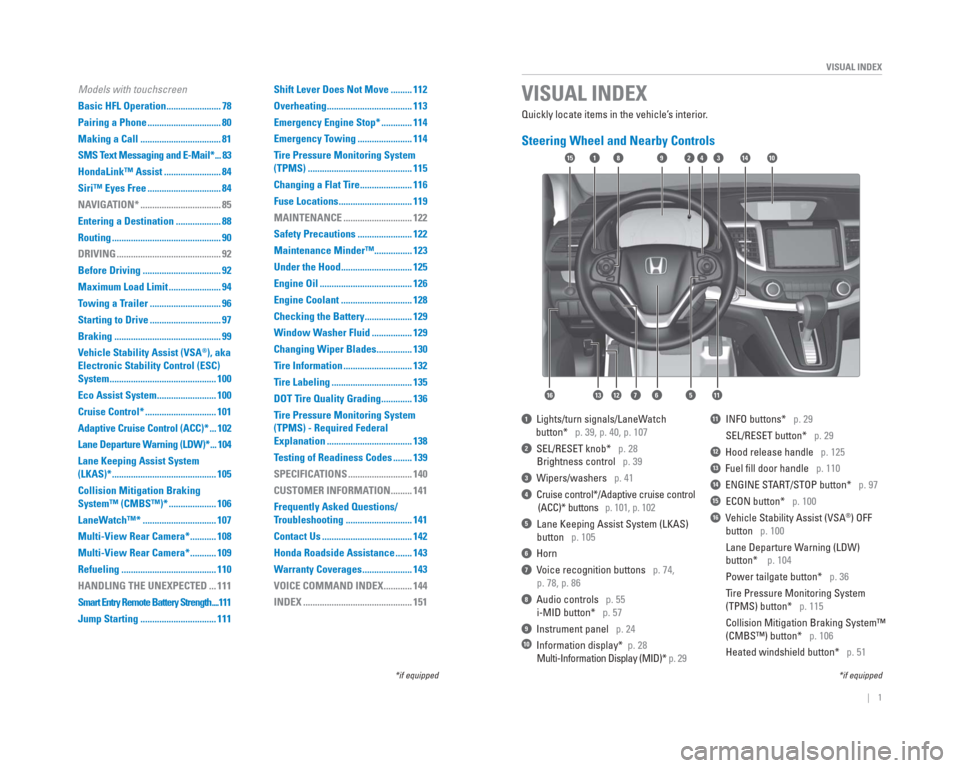
Steering Wheel and Nearby Controls
1 Lights/turn signals/LaneWatch
button* p. 39, p. 40, p. 107
2 SEL/RESET knob* p. 28
Brightness control p. 39
3 Wipers/washers p. 41
4 Cruise control*/Adaptive cruise control
(ACC)* buttons p. 101, p. 102
5 Lane Keeping Assist System (LKAS)
button p. 105
6 Horn
7 Voice recognition buttons p. 74,
p. 78, p. 86
8 Audio controls p. 55
i-MID button* p. 57
9 Instrument panel p. 24
10 Information display* p. 28
Multi-Information Display (MID)* p. 29
11 INFO buttons* p. 29
SEL/RESET button* p. 29
12 Hood release handle p. 125
13 Fuel fi ll door handle p. 110
14 ENGINE START/STOP button* p. 97
15 ECON button* p. 100
16 Vehicle Stability Assist (VSA®) OFF
button p. 100
Lane Departure Warning (LDW)
button* p. 104
Power tailgate button* p. 36
Tire Pressure Monitoring System
(TPMS) button* p. 115
Collision Mitigation Braking System™
(CMBS™) button* p. 106
Heated windshield button* p. 51
VISUAL INDEX
*if equipped
*if equipped
92
567111213
1815341014
16
Models with touchscreen
Basic HFL Operation ....................... 78
Pairing a Phone ............................... 80
Making a Call .................................. 81
SMS Text Messaging and E-Mail* ... 83
HondaLink™ Assist ........................ 84
Siri™ Eyes Free ............................... 84
NAVIGATION* .................................. 85
Entering a Destination ................... 88
Routing .............................................. 90
DRIVING ............................................ 92
Before Driving ................................. 92
Maximum Load Limit ...................... 94
Towing a Trailer .............................. 96
Starting to Drive .............................. 97
Braking ............................................. 99
Vehicle Stability Assist (VSA
®), aka
Electronic Stability Control (ESC)
System ............................................. 100
Eco Assist System ......................... 100
Cruise Control* .............................. 101
Adaptive Cruise Control (ACC)* ... 102
Lane Departure Warning (LDW)* ... 104
Lane Keeping Assist System
(LKAS)* ............................................ 105
Collision Mitigation Braking
System™ (CMBS™)* .................... 106
LaneWatch™* ............................... 107
Multi-View Rear Camera* ........... 108
Multi-View Rear Camera* ........... 109
Refueling ........................................ 110
HANDLING THE UNEXPECTED ... 111
Smart Entry Remote Battery Strength ....111
Jump Starting ................................ 111 Shift Lever Does Not Move ......... 112
Overheating .................................... 113
Emergency Engine Stop* ............. 114
Emergency Towing ....................... 114
Tire Pressure Monitoring System
(TPMS) ............................................ 115
Changing a Flat Tire ...................... 116
Fuse Locations ............................... 119
MAINTENANCE ............................. 122
Safety Precautions ....................... 122
Maintenance Minder™................ 123
Under the Hood .............................. 125
Engine Oil ....................................... 126
Engine Coolant .............................. 128
Checking the Battery .................... 129
Window Washer Fluid ................. 129
Changing Wiper Blades ............... 130
Tire Information ............................. 132
Tire Labeling .................................. 135
DOT Tire Quality Grading ............. 136
Tire Pressure Monitoring System
(TPMS) - Required Federal
Explanation .................................... 138
Testing of Readiness Codes ........ 139
SPECIFICATIONS ........................... 140
CUSTOMER INFORMATION ......... 141
Frequently Asked Questions/
Troubleshooting ............................ 141
Contact Us ...................................... 142
Honda Roadside Assistance ....... 143
Warranty Coverages ..................... 143
VOICE COMMAND INDEX ............ 144
INDEX .............................................. 151
Page 5 of 81
2 || 3
SAFETY
VISUAL INDEX
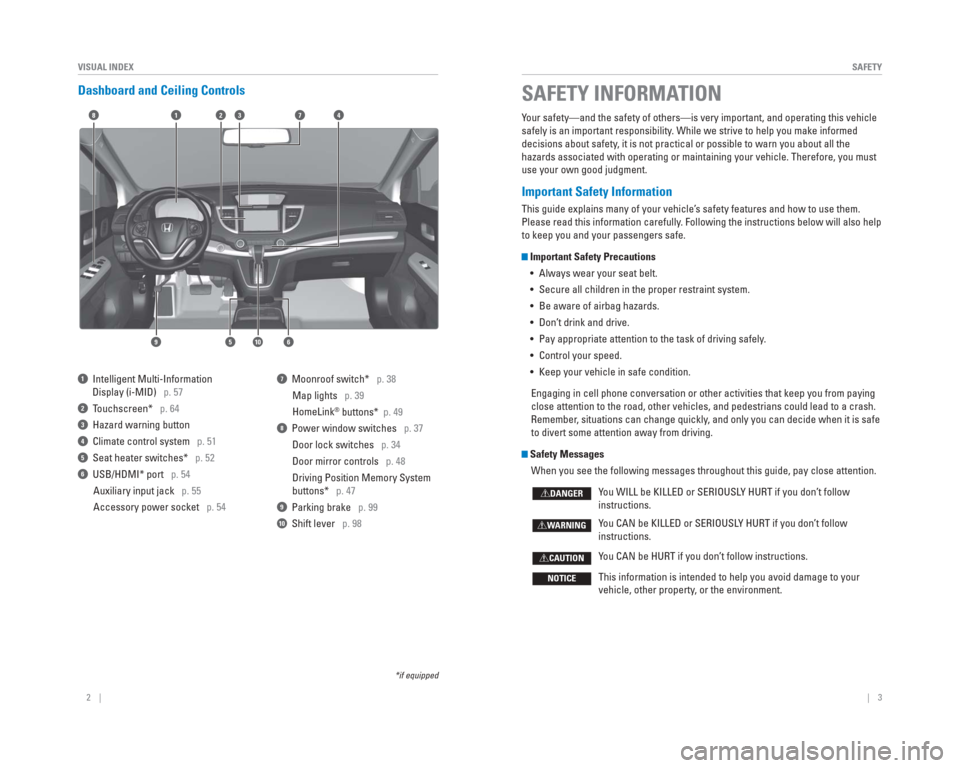
Dashboard and Ceiling Controls
1 Intelligent Multi-Information
Display (i-MID) p. 57
2 Touchscreen* p. 64
3 Hazard warning button
4 Climate control system p. 51
5 Seat heater switches* p. 52
6 USB/HDMI* port p. 54
Auxiliary input jack p. 55
Accessory power socket p. 54
7 Moonroof switch* p. 38Map lights p. 39
HomeLink
® buttons* p. 49
8 Power window switches p. 37
Door lock switches p. 34
Door mirror controls p. 48
Driving Position Memory System
buttons* p. 47
9 Parking brake p. 99
10 Shift lever p. 98
*if equipped
Your safety—and the safety of others—is very important, and operati\
ng this vehicle
safely is an important responsibility. While we strive to help you make informed
decisions about safety, it is not practical or possible to warn you about all the
hazards associated with operating or maintaining your vehicle. Therefore\
, you must
use your own good judgment.
Important Safety Information
This guide explains many of your vehicle’s safety features and how to use them.
Please read this information carefully. Following the instructions below will also help
to keep you and your passengers safe.
Important Safety Precautions
• Always wear your seat belt.
• Secure all children in the proper restraint system.
• Be aware of airbag hazards.
• Don’t drink and drive.
• Pay appropriate attention to the task of driving safely.
• Control your speed.
• Keep your vehicle in safe condition.
Engaging in cell phone conversation or other activities that keep you fr\
om paying
close attention to the road, other vehicles, and pedestrians could lead \
to a crash.
Remember, situations can change quickly, and only you can decide when it is safe
to divert some attention away from driving.
Safety Messages When you see the following messages throughout this guide, pay close att\
ention.
You WILL be KILLED or SERIOUSLY HURT if you don’t follow
instructions.
You CAN be KILLED or SERIOUSLY HURT if you don’t follow
instructions.
You CAN be HURT if you don’t follow instructions.
This information is intended to help you avoid damage to your
vehicle, other property, or the environment.
DANGER
WARNING
CAUTION
NOTICE
SAFETY INFORMATION
18
56
4732
910
Page 7 of 81
6 || 7
SAFETY
SAFETY
Seat Belt Inspection
Regularly check the condition of your seat belts as follows:
• Pull each belt out fully, and look for frays, cuts, burns, and wear.
• Check that the latches work smoothly and the belts retract easily. If a belt does not retract easily, cleaning the belt may correct the problem. Use only mild soap
and warm water. Do not use bleach or cleaning solvents. Make sure the belt is
completely dry before allowing it to retract.
Any belt that is not in good condition or working properly will not prov\
ide proper
protection and should be replaced as soon as possible.
A belt that has been worn during a crash may not provide the same level \
of
protection in a subsequent crash. Have your seat belts inspected by a de\
aler after
any collision.
Not checking or maintaining seat belts can result in serious injury or d\
eath if
the seat belts do not work properly when needed.
Check your seat belts regularly and have any problem corrected as soon a\
s
possible.
WARNING
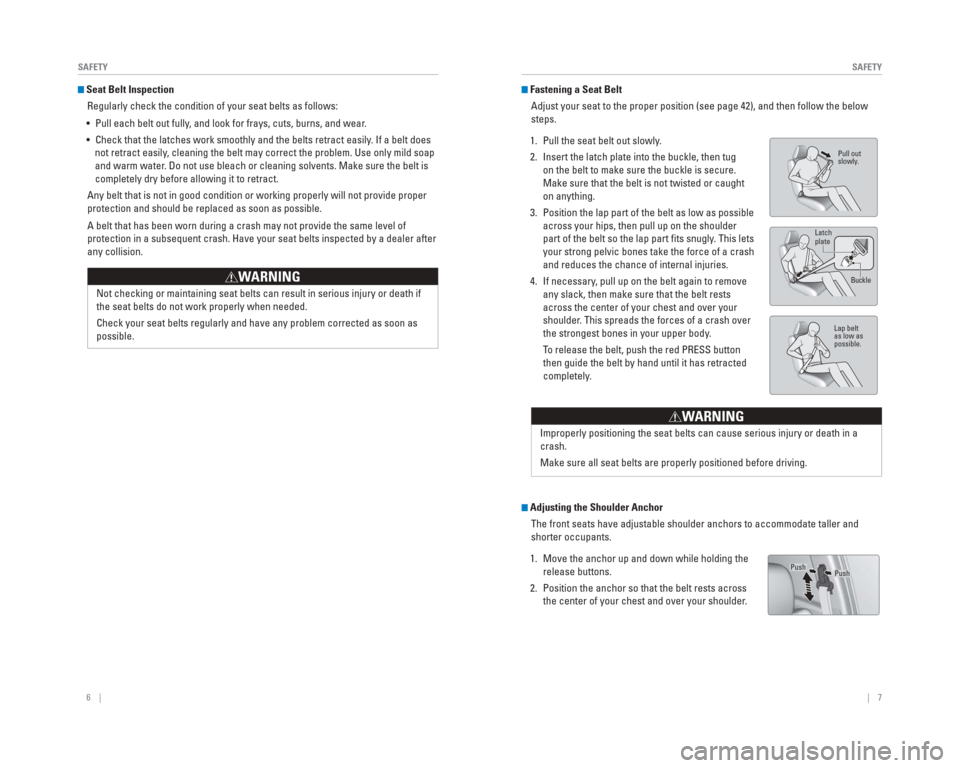
Fastening a Seat BeltAdjust your seat to the proper position (see page 42), and then follow\
the below
steps.
1. Pull the seat belt out slowly.
2. Insert the latch plate into the buckle, then tug on the belt to make sure the buckle is secure.
Make sure that the belt is not twisted or caught
on anything.
3. Position the lap part of the belt as low as possible across your hips, then pull up on the shoulder
part of the belt so the lap part fi ts snugly. This lets
your strong pelvic bones take the force of a crash
and reduces the chance of internal injuries.
4. If necessary, pull up on the belt again to remove any slack, then make sure that the belt rests
across the center of your chest and over your
shoulder. This spreads the forces of a crash over
the strongest bones in your upper body.
To release the belt, push the red PRESS button then guide the belt by hand until it has retracted
completely.
Adjusting the Shoulder Anchor
The front seats have adjustable shoulder anchors to accommodate taller a\
nd
shorter occupants.
1. Move the anchor up and down while holding the release buttons.
2. Position the anchor so that the belt rests across the center of your chest and over your shoulder.
Pull out
slowly .
Lap belt
as low as
possible.
Latch
plate
Buckle
Improperly positioning the seat belts can cause serious injury or death \
in a
crash.
Make sure all seat belts are properly positioned before driving.
W ARNING
PushPush
Page 18 of 81
28 || 29
INSTRUMENT PANEL
INSTRUMENT PANEL
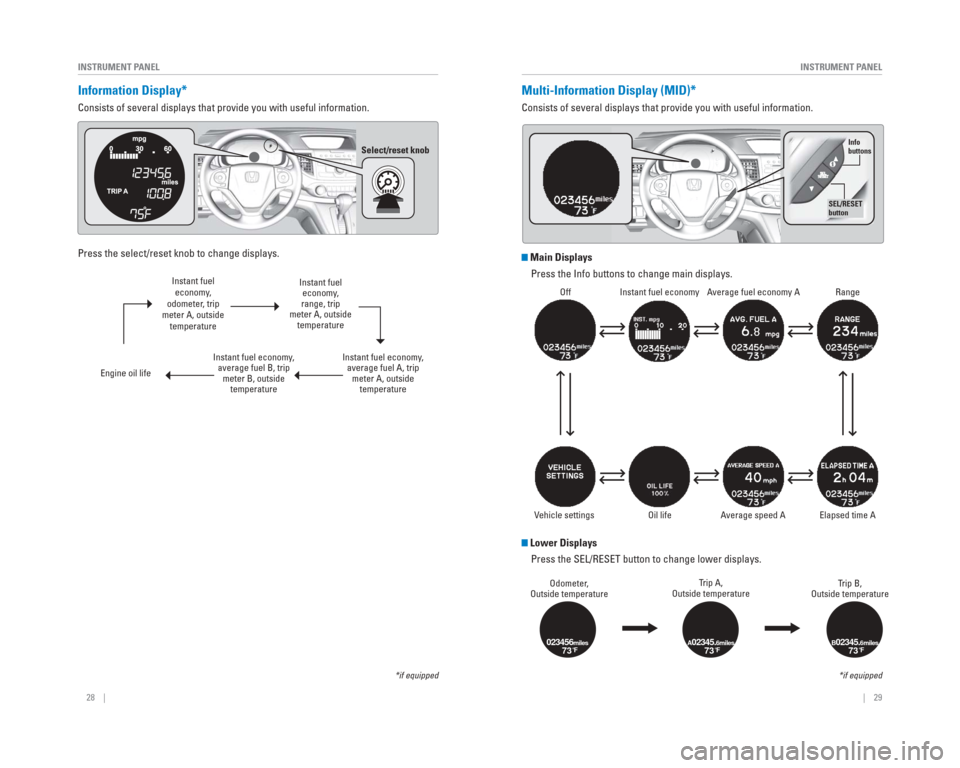
Information Display*
Consists of several displays that provide you with useful information.
Information Displays
Press the select/reset knob to change displays.
Instant fuel economy,
odometer, trip
meter A, outside temperature
Engine oil life Instant fuel economy,
average fuel B, trip meter B, outside temperature Instant fuel
economy,
range, trip
meter A, outside temperature
Instant fuel economy, average fuel A, trip meter A, outside temperature
*if equipped
Multi-Information Display (MID)*
Consists of several displays that provide you with useful information.
Main Displays
Press the Info buttons to change main displays.
Lower DisplaysPress the SEL/RESET button to change lower displays.
Odometer,
Outside temperature Trip A,
Outside temperature Trip B,
Outside temperature
023456miles73°FA02345.6miles73°FB02345.6miles73°F
*if equipped
Select/reset knob
Off Instant fuel economy Average fuel economy A Range
Elapsed time A
A verage speed A
V ehicle settings
Info
buttons
SEL/RESET
button
Oil life
Page 19 of 81
30 || 31
INSTRUMENT PANEL
INSTRUMENT PANEL
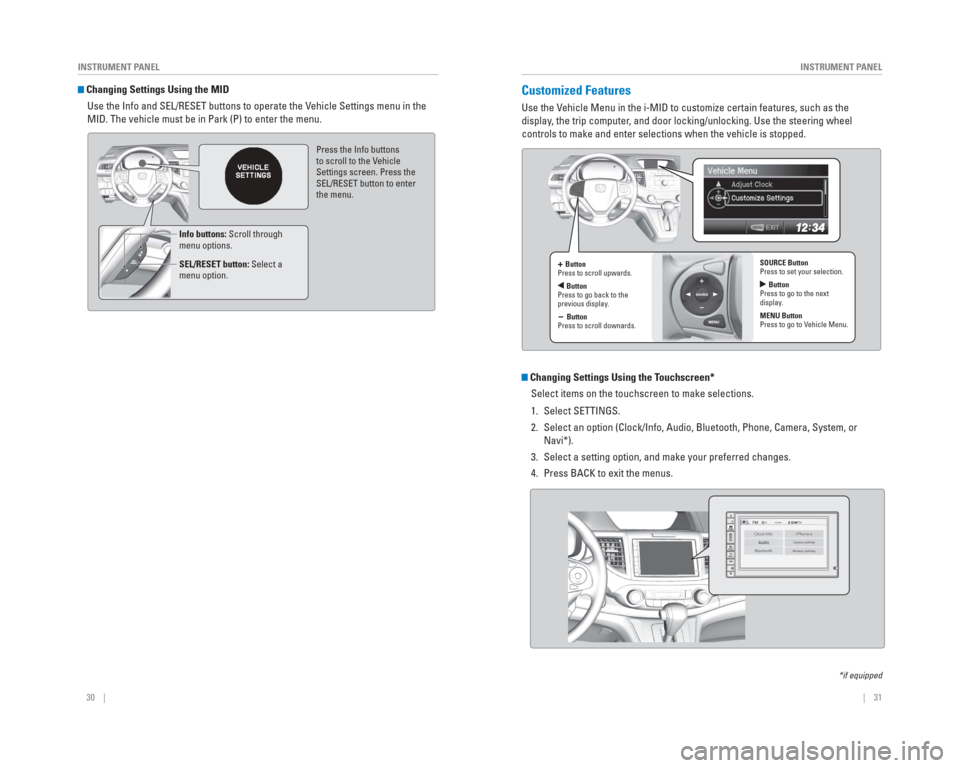
Changing Settings Using the MID
Use the Info and SEL/RESET buttons to operate the Vehicle Settings menu in the
MID. The vehicle must be in Park (P) to enter the menu.
Press the Info buttons
to scroll to the V ehicle
Settings screen. Press the
SEL/RESET button to enter
the menu.
Info buttons: Scroll through
menu options.
SEL/RESET button: Select a
menu option.
Customized Features
Use the Vehicle Menu in the i-MID to customize certain features, such as the
display , the trip computer , and door locking/unlocking. Use the steering wheel
controls to make and enter selections when the vehicle is stopped.
Changing Settings Using the Touchscreen*
Select items on the touchscreen to make selections.
1. Select SETTINGS.
2. Select an option (Clock/Info, Audio, Bluetooth, Phone, Camera, System, \
or Navi*).
3. Select a setting option, and make your preferred changes.
4. Press BACK to exit the menus.
*if equipped
+ Button
Press to scroll upwards.
Button
Press to go back to the
previous display .
- Button
Press to scroll downards. SOURCE Button
Press to set your selection.
Button
Press to go to the next
display .
MENU Button
Press to go to V ehicle Menu.
Page 27 of 81
46 || 47
VEHICLE CONTROLS
VEHICLE CONTROLS
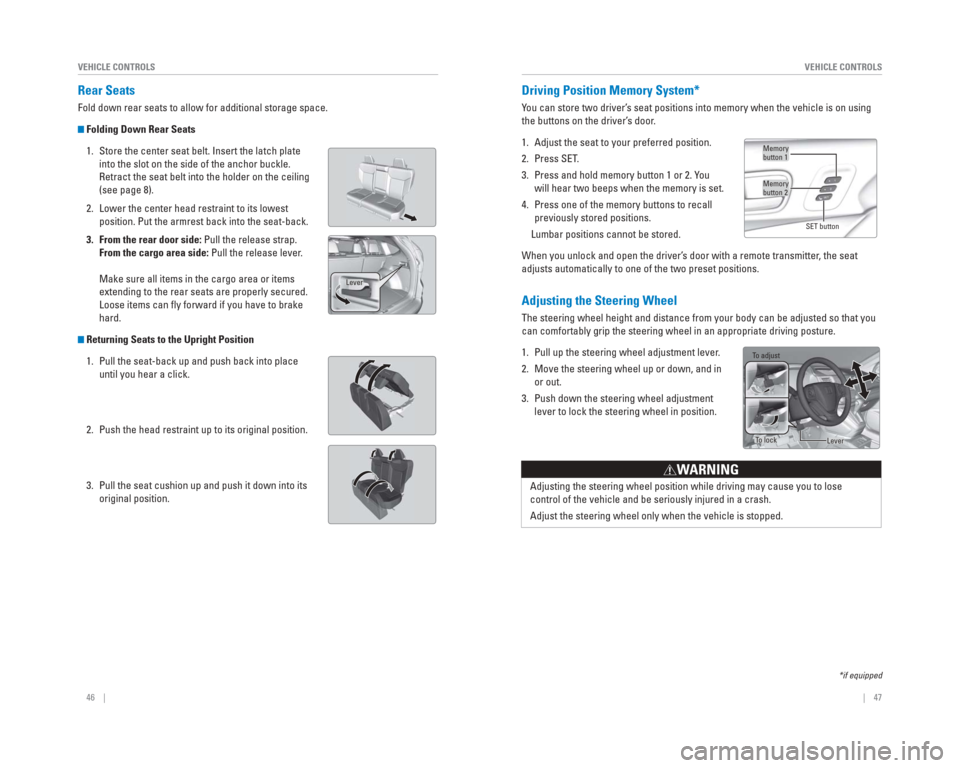
Adjusting the Steering Wheel
The steering wheel height and distance from your body can be adjusted so\
that you
can comfortably grip the steering wheel in an appropriate driving postur\
e.
1. Pull up the steering wheel adjustment lever.
2. Move the steering wheel up or down, and in
or out.
3. Push down the steering wheel adjustment lever to lock the steering wheel in position.
Adjusting the steering wheel position while driving may cause you to los\
e
control of the vehicle and be seriously injured in a crash.
Adjust the steering wheel only when the vehicle is stopped.
WARNING
Driving Position Memory System*
You can store two driver’s seat positions into memory when the vehicle is on using
the buttons on the driver’s door.
1. Adjust the seat to your preferred position.
2. Press SET.
3. Press and hold memory button 1 or 2. You will hear two beeps when the memory is set.
4. Press one of the memory buttons to recall previously stored positions.
Lumbar positions cannot be stored.
When you unlock and open the driver’s door with a remote transmitter, the seat
adjusts automatically to one of the two preset positions.
Memory
button 1
Memory
button 2
SET button
*if equipped
Rear Seats
Fold down rear seats to allow for additional storage space.
Folding Down Rear Seats1. Store the center seat belt. Insert the latch plate into the slot on the side of the anchor buckle.
Retract the seat belt into the holder on the ceiling
(see page 8).
2. Lower the center head restraint to its lowest position. Put the armrest back into the seat-back.
3. From the rear door side: Pull the release strap. From the cargo area side: Pull the release lever.
Make sure all items in the cargo area or items
extending to the rear seats are properly secured.
Loose items can fl y forward if you have to brake
hard.
Returning Seats to the Upright Position
1. Pull the seat-back up and push back into place until you hear a click.
2. Push the head restraint up to its original position.
3. Pull the seat cushion up and push it down into its original position.
Lever
To adjust
To lockLever
Page 28 of 81
48 || 49
VEHICLE CONTROLS
VEHICLE CONTROLS
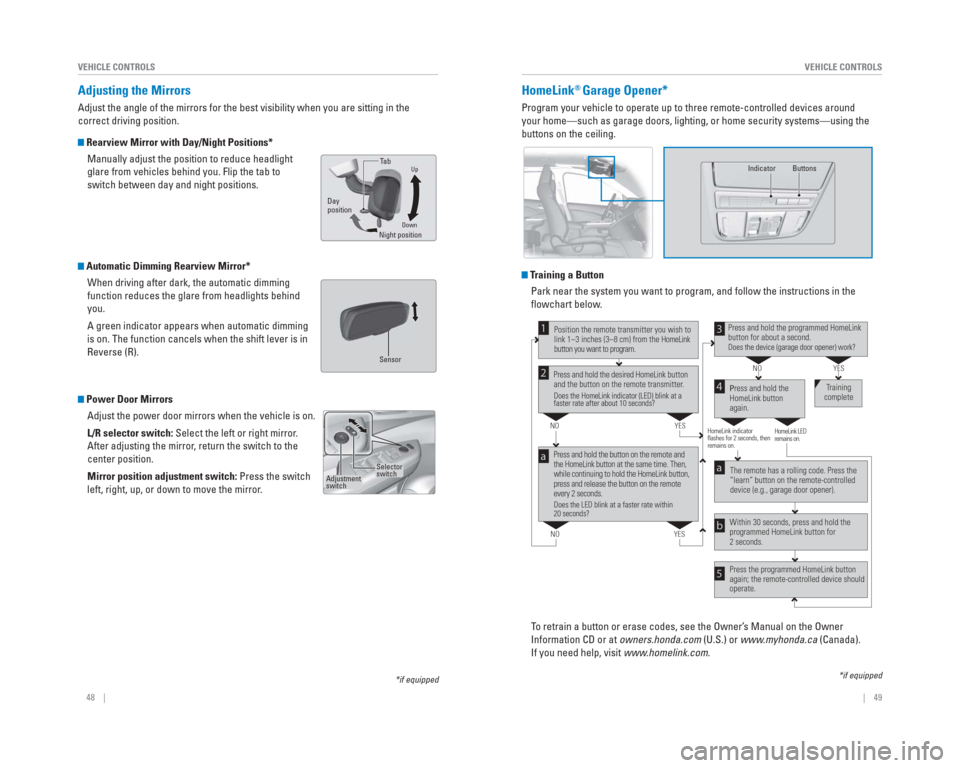
HomeLink® Garage Opener*
Program your vehicle to operate up to three remote-controlled devices ar\
ound
your home—such as garage doors, lighting, or home security systems—\
using the
buttons on the ceiling.
Training a Button
Park near the system you want to program, and follow the instructions in\
the
fl owchart below.
To retrain a button or erase codes, see the Owner’s Manual on the Owner
Information CD or at owners.honda.com (U.S.) or www.myhonda.ca (Canada).
If you need help, visit www.homelink.com.
Press and hold the button on the remote and
the HomeLink button at the same time. Then,
while continuing to hold the HomeLink button,
press and release the button on the remote
every 2 seconds.
Does the LED blink at a faster rate within
20 seconds?
Press and hold the
HomeLink button
again. Training
complete
YES
NO
HomeLink indicator
flashes for 2 seconds, then
remains on. HomeLink LED
remains on.YES
NO
YES
NO
Position the remote transmitter you wish to
link 1–3 inches (3–8 cm) from the HomeLink
button you want to program.1
Press and hold the desired HomeLink button
and the button on the remote transmitter.
Does the HomeLink indicator (LED) blink at a
faster rate after about 10 seconds?
2
a
The remote has a rolling code. Press the
“learn” button on the remote-controlled
device (e.g., garage door opener).
Press the programmed HomeLink button
again; the remote-controlled device should
operate. Within 30 seconds, press and hold the
programmed HomeLink button for
2 seconds.a
Press and hold the programmed HomeLink
button for about a second.
Does the device (garage door opener) work?
3
b
4
5
*if equipped
Indicator Buttons
*if equipped
Adjusting the Mirrors
Adjust the angle of the mirrors for the best visibility when you are sit\
ting in the
correct driving position.
Rearview Mirror with Day/Night Positions*
Manually adjust the position to reduce headlight
glare from vehicles behind you. Flip the tab to
switch between day and night positions.
Automatic Dimming Rearview Mirror*When driving after dark, the automatic dimming
function reduces the glare from headlights behind
you.
A green indicator appears when automatic dimming
is on. The function cancels when the shift lever is in
Reverse (R).
Power Door MirrorsAdjust the power door mirrors when the vehicle is on.
L/R selector switch: Select the left or right mirror.
After adjusting the mirror, return the switch to the
center position.
Mirror position adjustment switch: Press the switch
left, right, up, or down to move the mirror.
DownNight positionTa
b
Day
position
Up
Sensor
Adjustment
switch
Selector
switch
Page 29 of 81
50 || 51
VEHICLE CONTROLS
VEHICLE CONTROLS
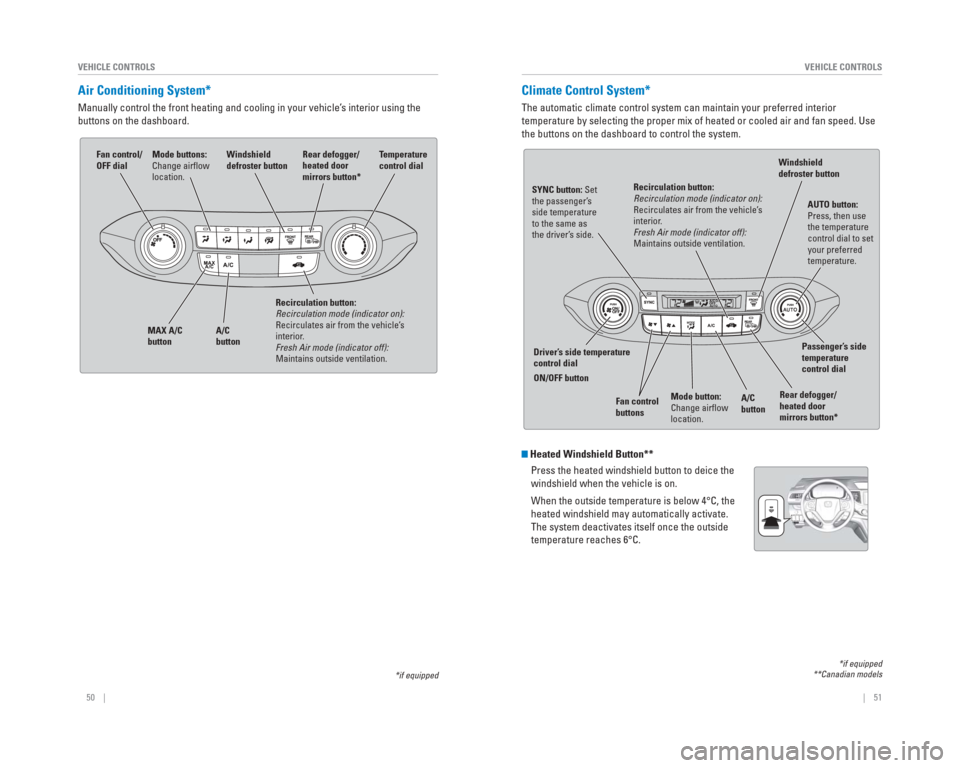
Climate Control System*
The automatic climate control system can maintain your preferred interio\
r
temperature by selecting the proper mix of heated or cooled air and fan \
speed. Use
the buttons on the dashboard to control the system.
Heated Windshield Button**
Press the heated windshield button to deice the
windshield when the vehicle is on.
When the outside temperature is below 4°C, the
heated windshield may automatically activate.
The system deactivates itself once the outside
temperature reaches 6°C.
*if equipped
**Canadian models
AUTO button:
Press, then use
the temperature
control dial to set
your preferred
temperature.
SYNC button: Set
the passenger’
s
side temperature
to the same as
the driver’ s side.
Driver’ s side temperature
control dial
ON/OFF button
A/C
buttonPassenger’
s side
temperature
control dial
Recirculation button:
Recirculation mode (indicator on):
Recirculates air from the vehicle’
s
interior .
Fresh Air mode (indicator off):
Maintains outside ventilation.
Rear defogger/
heated door
mirrors button*
Windshield
defroster button
Fan control
buttons
Mode button:
Change airfl ow
location.
Air Conditioning System*
Manually control the front heating and cooling in your vehicle’s interior using the
buttons on the dashboard.
Fan control/
OFF dial
A/C
button
MAX A/C
button Windshield
defroster button
Temperature
control dial
Recirculation button:
Recirculation mode (indicator on):
Recirculates air from the vehicle’s
interior.
Fresh Air mode (indicator off):
Maintains outside ventilation. Rear defogger/
heated door
mirrors button*Mode buttons:
Change airfl
ow
location.
*if equipped
Page 31 of 81
54 || 55
AUDIO AND CONNECTIVITY
AUDIO AND CONNECTIVITY
Learn how to operate the vehicle’s audio system.
Basic Audio Operation
Connect audio devices and operate buttons and displays for the audio sys\
tem.
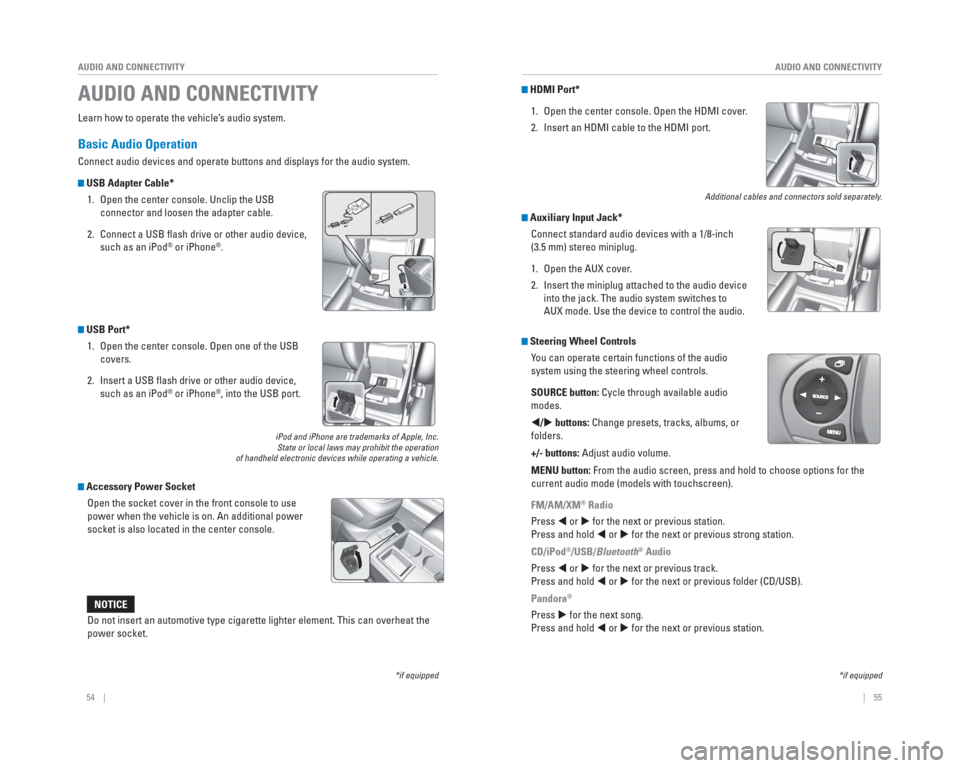
USB Adapter Cable*
1. Open the center console. Unclip the USB connector and loosen the adapter cable.
2. Connect a USB fl ash drive or other audio device, such as an iPod
® or iPhone®.
USB Port* 1. Open the center console. Open one of the USB covers.
2. Insert a USB fl ash drive or other audio device, such as an iPod
® or iPhone®, into the USB port.
iPod and iPhone are trademarks of Apple, Inc.State or local laws may prohibit the operation
of handheld electronic devices while operating a vehicle.
Accessory Power Socket
Open the socket cover in the front console to use
power when the vehicle is on. An additional power
socket is also located in the center console.
AUDIO AND CONNECTIVITY
*if equipped*if equipped
HDMI Port*
1. Open the center console. Open the HDMI cover.
2. Insert an HDMI cable to the HDMI port.
Additional cables and connectors sold separately.
Auxiliary Input Jack*Connect standard audio devices with a 1/8-inch
(3.5 mm) stereo miniplug.
1. Open the AUX cover.
2. Insert the miniplug attached to the audio device into the jack. The audio system switches to
AUX mode. Use the device to control the audio.
Steering Wheel Controls You can operate certain functions of the audio
system using the steering wheel controls.
SOURCE button: Cycle through available audio
modes.
/ buttons: Change presets, tracks, albums, or
folders.
+/- buttons: Adjust audio volume.
MENU button: From the audio screen, press and hold to choose options for the
current audio mode (models with touchscreen).
FM/AM/XM
® Radio
Press or for the next or previous station.
Press and hold or for the next or previous strong station.
CD/iPod
®/USB/Bluetooth® Audio
Press or for the next or previous track.
Press and hold or for the next or previous folder (CD/USB).
Pandora
®
Press for the next song.
Press and hold or for the next or previous station.Do not insert an automotive type cigarette lighter element. This can ove\
rheat the
power socket.
NOTICE
Page 32 of 81
56 || 57
AUDIO AND CONNECTIVITY
AUDIO AND CONNECTIVITY
*if equipped
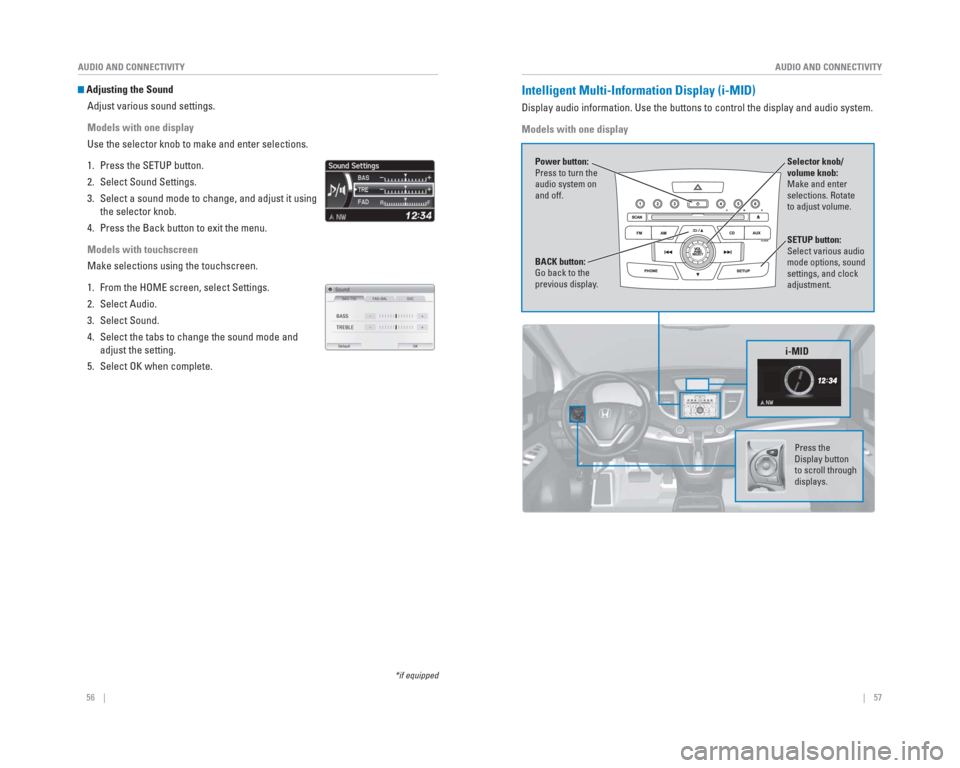
Adjusting the Sound
Adjust various sound settings.
Models with one display
Use the selector knob to make and enter selections.
1. Press the SETUP button.
2. Select Sound Settings.
3. Select a sound mode to change, and adjust it using the selector knob.
4. Press the Back button to exit the menu.
Models with touchscreen
Make selections using the touchscreen.
1. From the HOME screen, select Settings.
2. Select Audio.
3. Select Sound.
4. Select the tabs to change the sound mode and adjust the setting.
5. Select OK when complete. Intelligent Multi-Information Display ( i-MID)
Display audio information. Use the buttons to control the display and au\
dio system.
Models with one display
Selector knob/
volume knob:
Make and enter
selections. Rotate
to adjust volume.
Power button:
Press to turn the
audio system on
and off.
SETUP button:
Select various audio
mode options, sound
settings, and clock
adjustment.
BACK button:
Go back to the
previous display
.
i-MID
Press the
Display button
to scroll through
displays.