display HONDA CR-V 2016 RM1, RM3, RM4 / 4.G Repair Manual
[x] Cancel search | Manufacturer: HONDA, Model Year: 2016, Model line: CR-V, Model: HONDA CR-V 2016 RM1, RM3, RM4 / 4.GPages: 532, PDF Size: 22.94 MB
Page 207 of 532
206
Features
Audio System
About Your Audio System
See the Navigation System Manual for operation of the audio system, Bluetooth®
HandsFreeLink ®, and voice commands for these features.
The audio system features AM/FM radio and the SiriusXM ® Radio
* service. It can also
play audio CDs, WMA/MP3/AAC files, USB flash drives, and iPod, iPhone, and
Bluetooth ® devices.
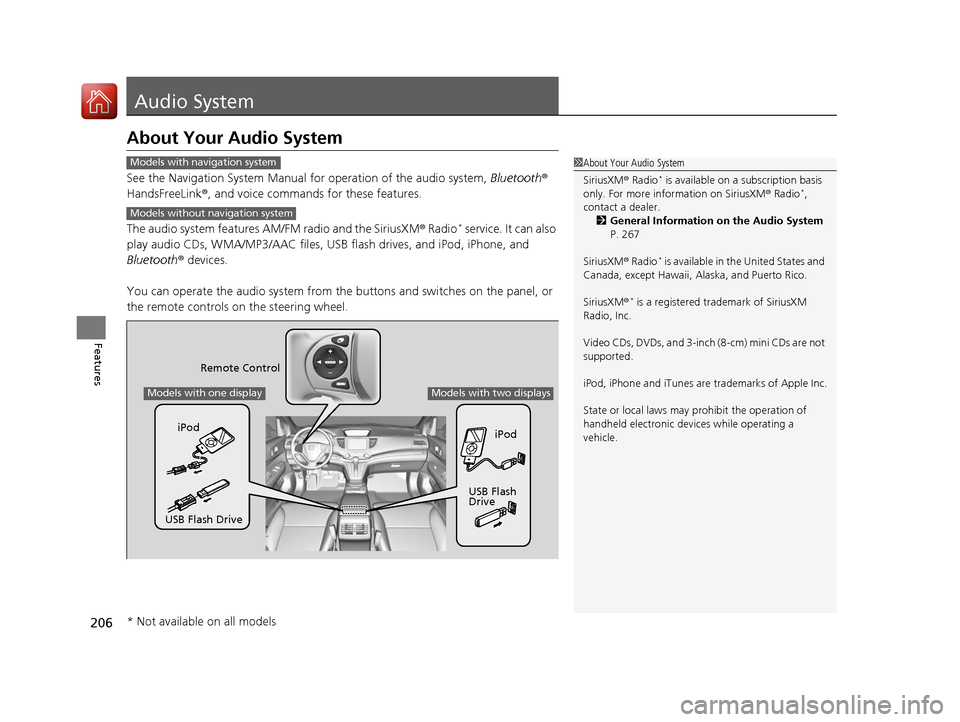
You can operate the audio system from the buttons and switches on the panel, or
the remote controls on the steering wheel.
1About Your Audio System
SiriusXM ® Radio
* is available on a subscription basis
only. For more information on SiriusXM ® Radio*,
contact a dealer.
2 General Information on the Audio System
P. 267
SiriusXM ® Radio
* is available in the United States and
Canada, except Ha waii, Alaska, and Puerto Rico.
SiriusXM ®
* is a registered trademark of SiriusXM
Radio, Inc.
Video CDs, DVDs, and 3-inch (8-cm) mini CDs are not
supported.
iPod, iPhone and iTunes are trademarks of Apple Inc.
State or local laws may pr ohibit the operation of
handheld electronic devi ces while operating a
vehicle.
Models with navigation system
Models without navigation system
Remote Control
iPod
USB Flash
Drive
iPod
USB Flash Drive
Models with one displayModels with two displays
* Not available on all models
15 CR-V-31T0A6300.book 206 ページ 2015年2月2日 月曜日 午前10時35分
Page 208 of 532
207
uuAudio System uAuxiliary Input Jack*
Features
Auxiliary Input Jack*
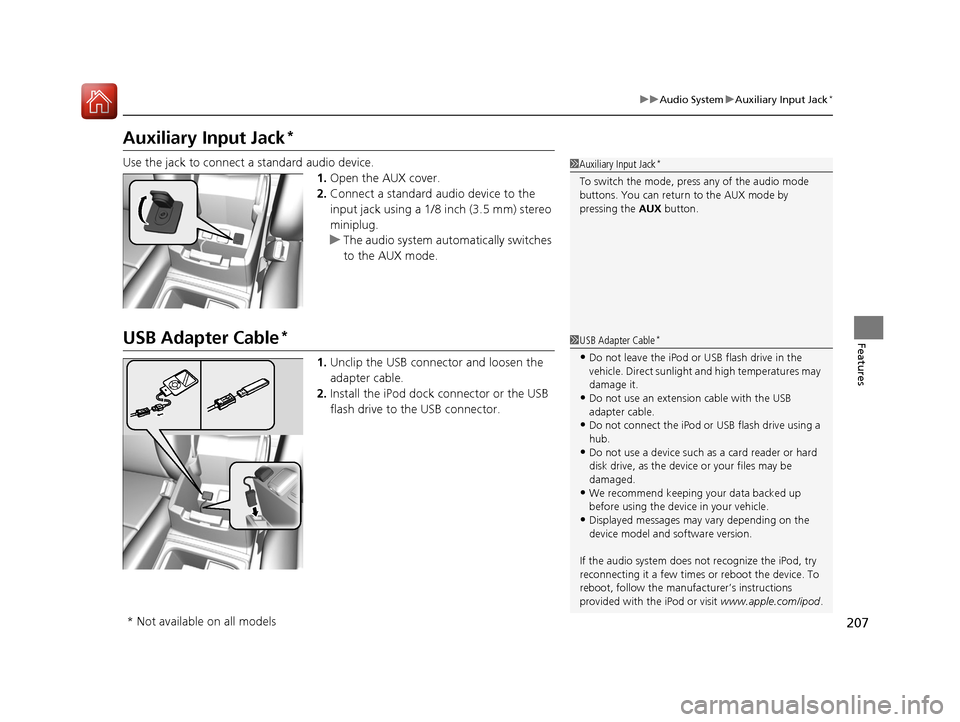
Use the jack to connect a standard audio device.
1.Open the AUX cover.
2. Connect a standard audio device to the
input jack using a 1/8 inch (3.5 mm) stereo
miniplug.
u The audio system auto matically switches
to the AUX mode.
USB Adapter Cable*
1. Unclip the USB connec tor and loosen the
adapter cable.
2. Install the iPod dock connector or the USB
flash drive to the USB connector.
1Auxiliary Input Jack*
To switch the mode, pres s any of the audio mode
buttons. You can return to the AUX mode by
pressing the AUX button.
1USB Adapter Cable*
•Do not leave the iPod or USB flash drive in the
vehicle. Direct sunlight and high temperatures may
damage it.
•Do not use an extension cable with the USB
adapter cable.
•Do not connect the iPod or USB flash drive using a
hub.
•Do not use a device such as a card reader or hard
disk drive, as the device or your files may be
damaged.
•We recommend keeping y our data backed up
before using the device in your vehicle.
•Displayed messages may vary depending on the
device model and software version.
If the audio system does not recognize the iPod, try
reconnecting it a few times or reboot the device. To
reboot, follow the manufac turer’s instructions
provided with the iPod or visit www.apple.com/ipod.
* Not available on all models
15 CR-V-31T0A6300.book 207 ページ 2015年2月2日 月曜日 午前10時35分
Page 209 of 532
208
uuAudio System uUSB Port(s)*
Features
USB Port(s)*
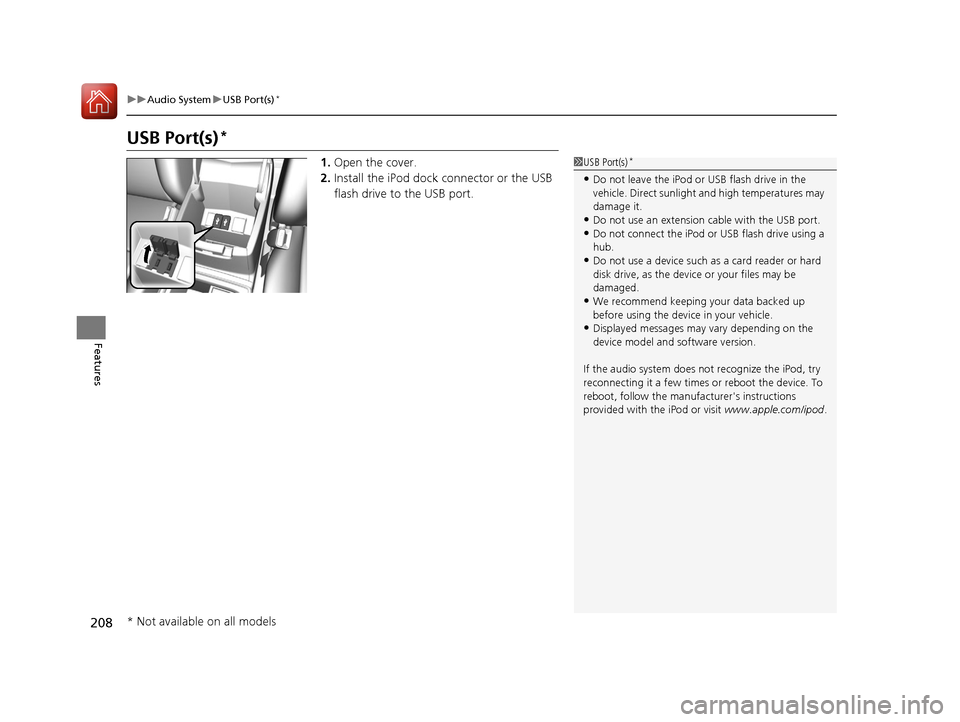
1. Open the cover.
2. Install the iPod dock connector or the USB
flash drive to the USB port.1USB Port(s)*
•Do not leave the iPod or USB flash drive in the
vehicle. Direct sunlight and high temperatures may
damage it.
•Do not use an extension cable with the USB port.•Do not connect the iPod or USB flash drive using a
hub.
•Do not use a device such as a card reader or hard
disk drive, as the device or your files may be
damaged.
•We recommend keeping y our data backed up
before using the device in your vehicle.
•Displayed messages may vary depending on the
device model and software version.
If the audio system does not recognize the iPod, try
reconnecting it a few times or reboot the device. To
reboot, follow the manufac turer's instructions
provided with the iPod or visit www.apple.com/ipod.
* Not available on all models
15 CR-V-31T0A6300.book 208 ページ 2015年2月2日 月曜日 午前10時35分
Page 210 of 532
209
uuAudio System uHDMI ® Port*
Features
HDMI ® Port*
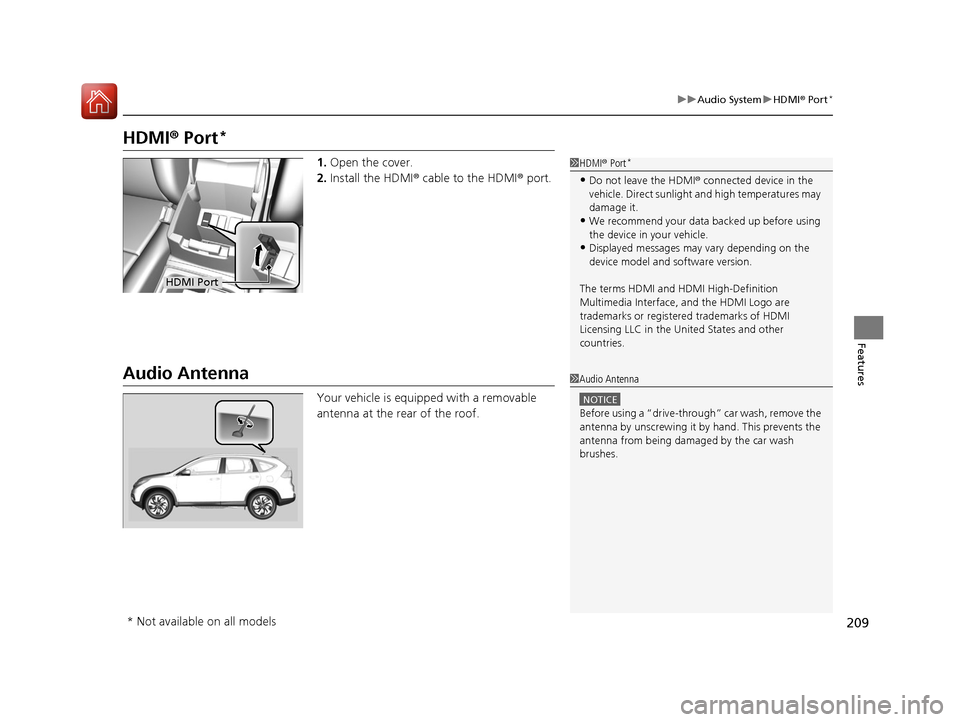
1. Open the cover.
2. Install the HDMI ® cable to the HDMI ® port.
Audio Antenna
Your vehicle is equipped with a removable
antenna at the rear of the roof.
1HDMI ® Port*
•Do not leave the HDMI ® connected device in the
vehicle. Direct sunlight and high temperatures may
damage it.
•We recommend your data backed up before using
the device in your vehicle.
•Displayed messages may vary depending on the
device model and software version.
The terms HDMI and HDMI High-Definition
Multimedia Interface, and the HDMI Logo are
trademarks or registered trademarks of HDMI
Licensing LLC in the United States and other
countries.
HDMI Port
1 Audio Antenna
NOTICE
Before using a
Page 211 of 532
210
uuAudio System uAudio System Theft Protection
Features
Audio System Theft Protection
The audio system is disabled when it is di sconnected from the power source, such as
when the battery is disconnected or goes dead. In certain conditions, the system
may display ENTER CODE
*1/Enter Code*2.
■Reactivating the audio system
1. Turn the ignition switch to ON
(w*3.
2. Turn on the audio system.
3. Press and hold the audio system power button for more than two seconds.
u The audio system is reac tivated when the audio co ntrol unit establishes a
connection with the vehicle control unit. If the control unit fails to recognize
the audio unit, you must go to a dealer and have the audio unit checked.
*1: Models with one display
*2: Models with two displays
*3: Models with the smart entry system have an ENGINE START/STOP button
instead of an ignition switch.
15 CR-V-31T0A6300.book 210 ページ 2015年2月2日 月曜日 午前10時35分
Page 212 of 532
211
uuAudio System uAudio Remote Controls
Continued
Features
Audio Remote Controls
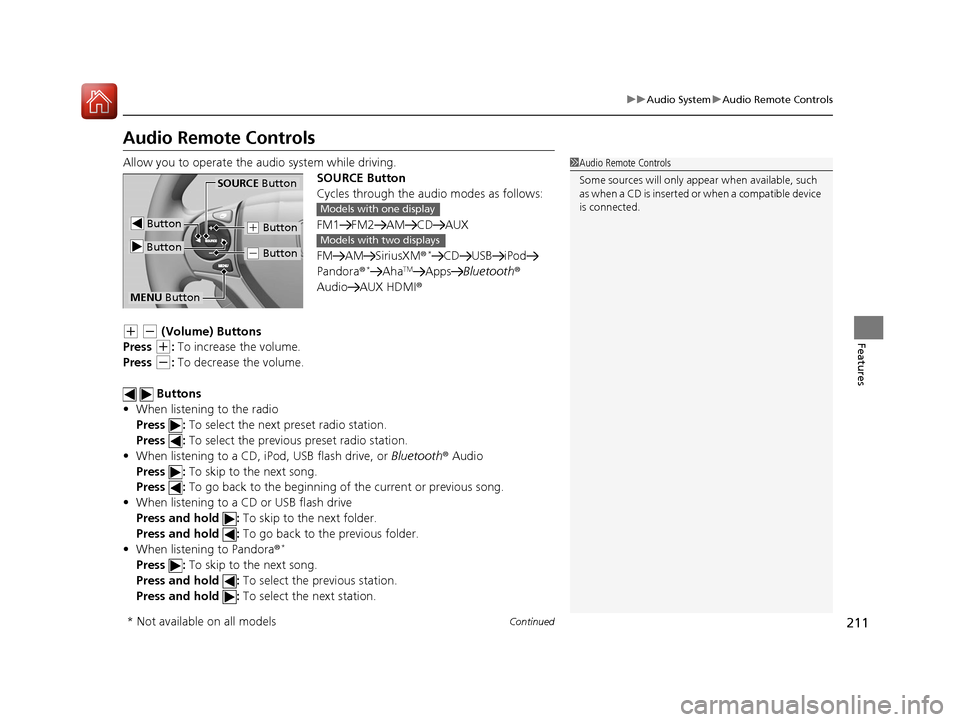
Allow you to operate the au dio system while driving.
SOURCE Button
Cycles through the audio modes as follows:
FM1 FM2 AM CD AUX
FM AM SiriusXM ®
*CD USB iPod
Pandora®*AhaTMApps Bluetooth ®
Audio AUX HDMI ®
(+ (- (Volume) Buttons
Press
(+: To increase the volume.
Press
(-: To decrease the volume.
Buttons
• When listening to the radio
Press : To select the next preset radio station.
Press : To select the previous preset radio station.
• When listening to a CD, iPod, USB flash drive, or Bluetooth® Audio
Press : To skip to the next song.
Press : To go back to the beginning of the current or previous song.
• When listening to a CD or USB flash drive
Press and hold : To skip to the next folder.
Press and hold : To go back to the previous folder.
• When listening to Pandora ®
*
Press : To skip to the next song.
Press and hold : To select the previous station.
Press and hold : To select the next station.
1Audio Remote Controls
Some sources will only appe ar when available, such
a s w h e n a C D i s i n s e r t e d o r w h e n a c o m p a t i b l e d e v i c e
is connected.
Button
SOURCE Button
Button
(+ Button
(- Button
MENU Button
Models with one display
Models with two displays
* Not available on all models
15 CR-V-31T0A6300.book 211 ページ 2015年2月2日 月曜日 午前10時35分
Page 213 of 532
uuAudio System uAudio Remote Controls
212
Features
Steering Wheel MENU Button
• When listening to the radio
Press and hold the MENU button: To select the radio station by Scan, Save
Preset, or Seek.
• When listening to the SiriusXM® radio
*
Press and hold the MENU button: To select Scan, Save Preset , Channel , or
Category.
• When listening to a CD or USB flash drive
Press and hold the MENU button: To select the song by Scan, Repeat , or
Random .
• When listening to an iPod
Press and hold the MENU button: To select the song by Repeat or Shuffle.
• When listening to Internet radio
*
Press and hold the MENU button: To select Bookmark , or Play/Pause.
• When listening to a Bluetooth® Audio
Press and hold the MENU button: To select Pause or Play for the song.
1Audio Remote Controls
The MENU button is available only when the audio
mode is FM, AM, CD, USB, iPod, Pandora ®
*, AhaTM,
or Bluetooth ® Audio.
Models with two displays
* Not available on all models
15 CR-V-31T0A6300.book 212 ページ 2015年2月2日 月曜日 午前10時35分
Page 214 of 532
213
Features
Audio System Basic Operation
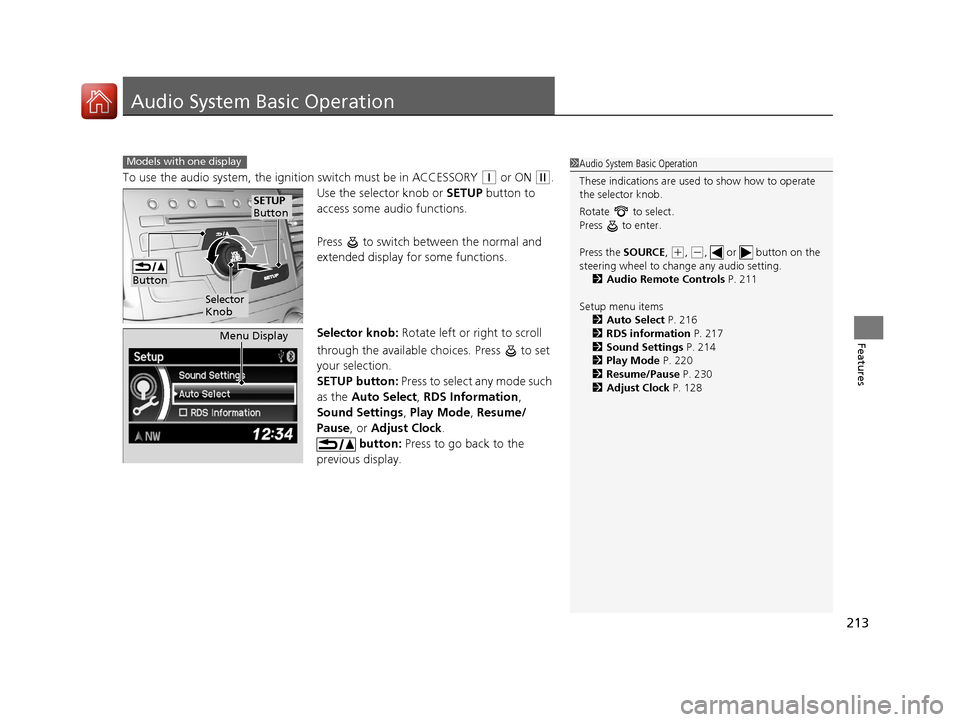
To use the audio system, the ignition switch must be in ACCESSORY (q or ON (w.
Use the selector knob or SETUP button to
access some audio functions.
Press to switch between the normal and
extended display fo r some functions.
Selector knob: Rotate left or right to scroll
through the available ch oices. Press to set
your selection.
SETUP button: Press to select any mode such
as the Auto Select , RDS Information ,
Sound Settings , Play Mode , Resume/
Pause , or Adjust Clock .
button: Press to go back to the
previous display.
Models with one display1 Audio System Basic Operation
These indications are used to show how to operate
the selector knob.
Rotate to select.
Press to enter.
Press the SOURCE ,
(+, ( -, or button on the
steering wheel to cha nge any audio setting.
2 Audio Remote Controls P. 211
Setup menu items 2 Auto Select P. 216
2 RDS information P. 217
2 Sound Settings P. 214
2 Play Mode P. 220
2 Resume/Pause P. 230
2 Adjust Clock P. 128
Button
Selector
Knob
SETUP
Button
Menu Display
15 CR-V-31T0A6300.book 213 ページ 2015年2月2日 月曜日 午前10時35分
Page 216 of 532
215
uuAudio System Basic Operation uPlaying AM/FM Radio
Continued
Features
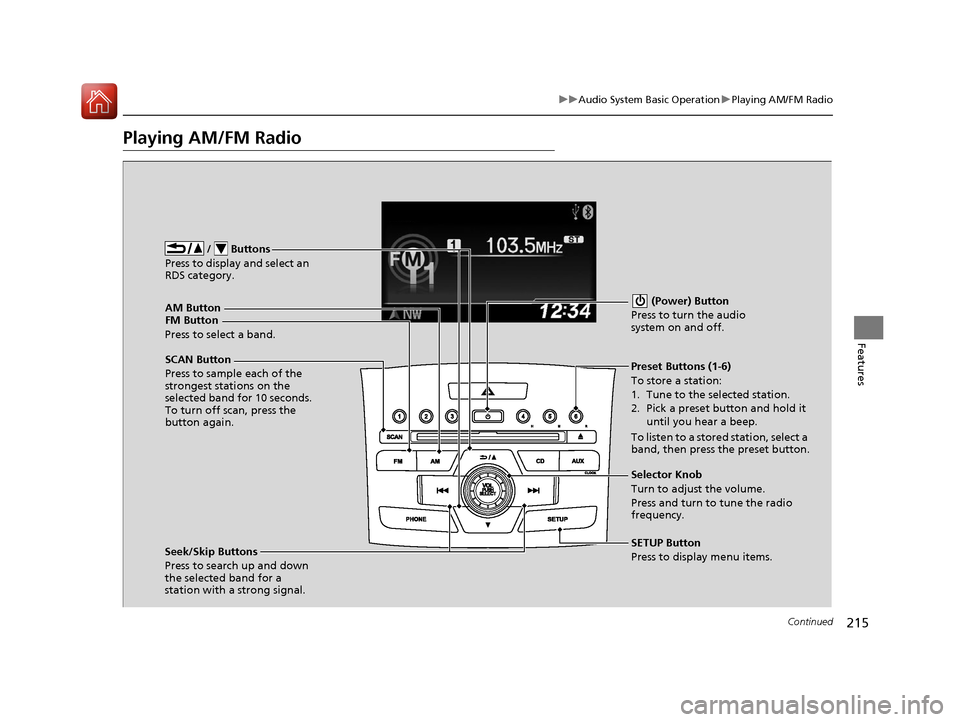
Playing AM/FM Radio
FM Button / Buttons
Press to display and select an
RDS category.
SCAN Button
Press to sample each of the
strongest stations on the
selected band for 10 seconds.
To turn off scan, press the
button again. (Power) Button
Press to turn the audio
system on and off.Preset Buttons (1-6)
To store a station:
1. Tune to the selected station.
2. Pick a preset button and hold it until you hear a beep.
To listen to a stored station, select a
band, then press the preset button.
Seek/Skip Buttons
Press to search up and down
the selected band for a
station with a strong signal. SETUP Button
Press to display menu items. Selector Knob
Turn to adjust the volume.
Press and turn to tune the radio
frequency.
AM Button
Press to select a band.
15 CR-V-31T0A6300.book 215 ページ 2015年2月2日 月曜日 午前10時35分
Page 217 of 532
uuAudio System Basic Operation uPlaying AM/FM Radio
216
Features
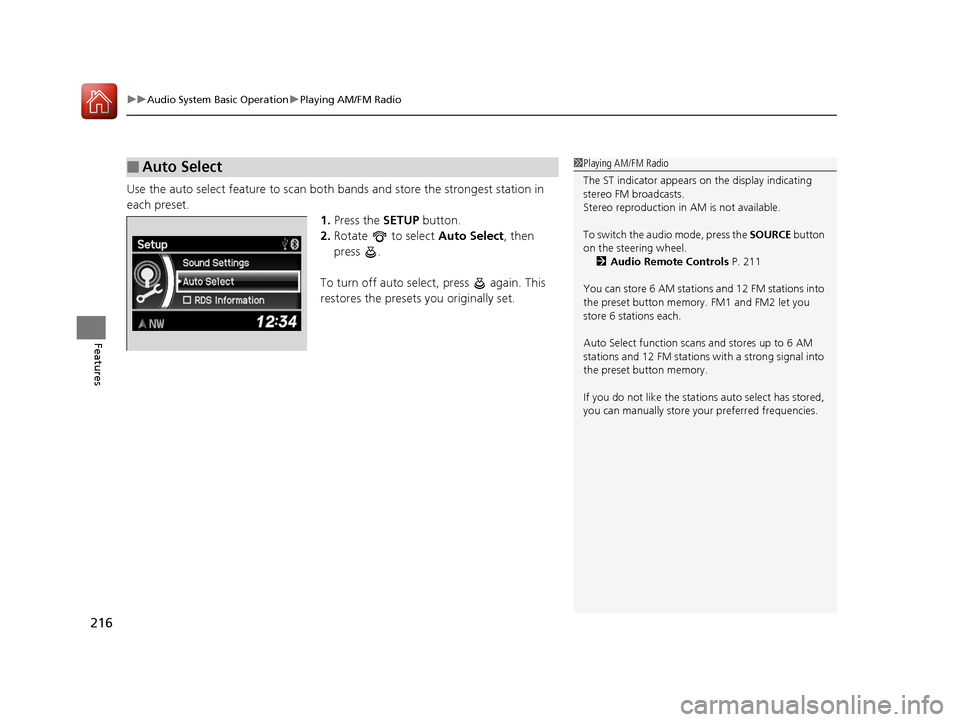
Use the auto select feature to scan both bands and store the strongest station in
each preset. 1.Press the SETUP button.
2. Rotate to select Auto Select, then
press .
To turn off auto select , press again. This
restores the presets you originally set.
■Auto Select1 Playing AM/FM Radio
The ST indicator appears on the display indicating
stereo FM broadcasts.
Stereo reproduction in AM is not available.
To switch the audio mode, press the SOURCE button
on the steering wheel. 2 Audio Remote Controls P. 211
You can store 6 AM stations and 12 FM stations into
the preset button memory. FM1 and FM2 let you
store 6 stations each.
Auto Select function scans and stores up to 6 AM
stations and 12 FM stations with a strong signal into
the preset button memory.
If you do not like the stati ons auto select has stored,
you can manually store your preferred frequencies.
15 CR-V-31T0A6300.book 216 ページ 2015年2月2日 月曜日 午前10時35分