trip computer HONDA CR-V 2016 RM1, RM3, RM4 / 4.G Quick Guide
[x] Cancel search | Manufacturer: HONDA, Model Year: 2016, Model line: CR-V, Model: HONDA CR-V 2016 RM1, RM3, RM4 / 4.GPages: 80, PDF Size: 7.99 MB
Page 19 of 80

30 || 31
I
NSTRUMENT PANELINSTRUMENT PANEL
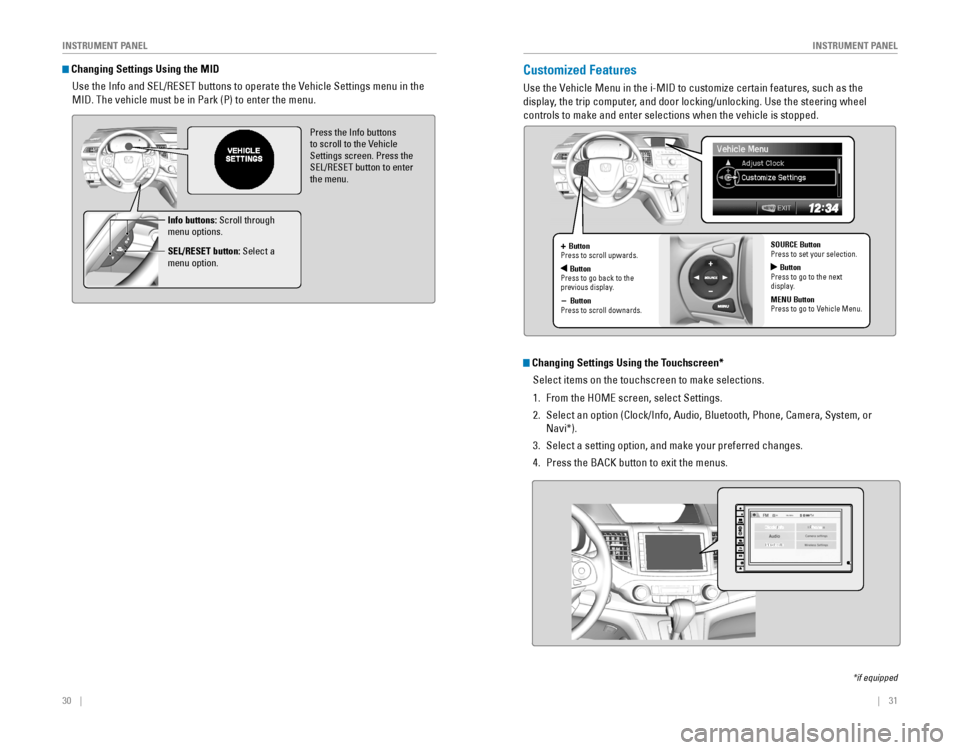
Changing Settings Using the MID
Use the Info and SEL/RESET buttons to operate the Vehicle Settings menu in the
MID. The vehicle must be in Park (P) to enter the menu.
Press the Info buttons to scroll to the Vehicle
Settings screen. Press the
SEL/RESET button to enter the menu.
Info buttons: Scroll through
menu options.
SEL/RESET button: Select a
menu option.
Customized Features
Use the Vehicle Menu in the i-MID to customize certain features, such as the
display, the trip computer, and door locking/unlocking. Use the steering wheel
controls to make and enter selections when the vehicle is stopped.
*if equipped
+ Button
Press to scroll upwards.
ButtonPress to go back to the previous display.
- Button
Press to scroll downards. SOURCE Button
Press to set your selection.
Button
Press to go to the next
display.
MENU Button
Press to go to Vehicle Menu.
Changing Settings Using the Touchscreen*
Select items on the touchscreen to make selections.
1. From the HOME screen, select Settings.
2. Select an option (Clock/Info, Audio, Bluetooth, Phone, Camera, System, or
Navi*).
3. Select a setting option, and make your preferred changes.
4. Press the BACK button to exit the menus.
Page 47 of 80

86 || 87
NAVIGATION
NAVIGATION
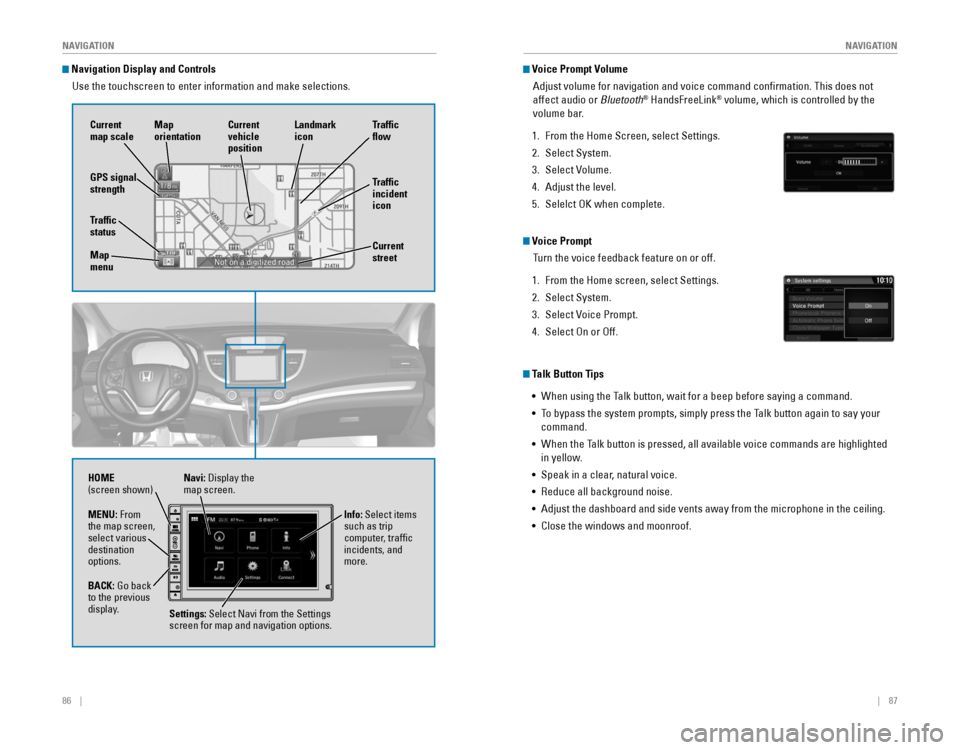
Navigation Display and Controls
Use the touchscreen to enter information and make selections.
Navi: Display the map screen.
HOME
(screen shown)
Info: Select items
such as trip
computer, traffic
incidents, and
more.
BACK:
Go back to the previous
display. Settings: Select Navi from the Settings
screen for map and navigation options.
MENU: From
the map screen,
select various
destination
options.
GPS signal
strength
Traffic
incident
icon Traffic
flow
Current
map scale Current
vehicle
position
Map
orientation
Current
street
Traffic
status
Map
menu Landmark
icon
Voice Prompt Volume
Adjust volume for navigation and voice command confirmation. This does\
not
affect audio or Bluetooth
® HandsFreeLink® volume, which is controlled by the
volume bar.
1. From the Home Screen, select Settings.
2. Select System.
3. Select Volume.
4. Adjust the level.
5. Selelct OK when complete.
Voice Prompt
Turn the voice feedback feature on or off.
1. From the Home screen, select Settings.
2. Select System.
3. Select Voice Prompt.
4. Select On or Off.
Talk Button Tips
•
When using the Talk button, wait for a beep before saying a command.
• To bypass the system prompts, simply press the Talk button again to say your
command.
•
When the Talk button is pressed, all available voice commands are highlighted
in yellow.
• Speak in a clear, natural voice.
•
Reduce all background noise.
• Adjust the dashboard and side vents away from the microphone in the ceiling.
• Close the windows and moonroof.
Page 78 of 80

148 || 149
VOICE COMMAND INDEX
VOICE COMMAND INDEX
Audio Commands
The system accepts these commands on most screens. Audio volume levels
cannot be controlled using voice commands.
FM/AM Radio Commands
•
Audio on*
• Audio off*
• Radio on*
• Radio off*
• Radio select FM
• Radio select AM
•
Radio tune to # FM (#: frequency,
e.g., 95.5)
•
Radio tune to # AM (#: frequency,
e.g., 1020)
• Radio seek up
• Radio seek down
• Radio next station
• Radio preset # (#: 1 to 12)
• Radio FM preset # (#: 1 to 12)
• Radio AM preset # (#: 1 to 6)
•
Radio scan*
SiriusXM® Radio Commands
• Radio select XM
• XM channel # (#: 0 to 255)
• XM channel up
• XM channel down
• XM category up
• XM category down
• XM preset # (#: 1 to 12)
•
XM scan*
• XM category mode
• XM channel mode Disc Commands
•
Disc play
• Disc play track # (#: 1 to 30)
• Disc skip forward
• Disc skip back
• Disc track random*
• Disc track repeat*
• Disc track scan*
• Disc folder up
• Disc folder down
• Disc folder random*
• Disc folder repeat*
• Disc folder scan*
• Disc normal play
*These commands toggle the function on and off, so the command may not match your intended action.
Audio Commands (continued)
USB Commands
• USB play
• USB play track # (#: 1 to 30)
• USB skip forward
•
USB skip back
• USB track random*
• USB track repeat*
• USB track scan*
• USB folder up
• USB folder down
•
USB folder random*
• USB folder repeat*
• USB folder scan*
• USB normal play
Pandora
® Commands
•
Pandora play*
• Pandora skip forward
• Pandora station up
• Pandora station down
•
Pandora pause*
• Pandora resume*
• Pandora like this song
• Pandora dislike this song
*These commands toggle the function on and off, so the command may not match your intended action.
iPod® Commands
• Music search
• iPod play
• iPod play track # (#: 1-30)
• iPod skip forward
•
iPod skip back
• iPod track shuffle*
• iPod album shuffle*
• iPod track repeat*
• iPod normal play
•
What/Who am I listening to?
• Who is this?
• What’s playing?
• Who’s playing?
•
What album is this?
Bluetooth® Audio Commands
• Bluetooth audio play
• Bluetooth audio skip forward
•
Bluetooth audio skip back
• Bluetooth audio pause
• Bluetooth audio resume
• Bluetooth audio group up
• Bluetooth audio group down
Commands may not work on some
phones or devices.
AUX Commands
• Auxiliary play
Phone Commands
The system accepts these commands on most screens.
• Dial/call by number • Dial/call by voice tag
Info Commands
The system accepts these commands on most screens.
• Trip computer
• Display
traffic list
• Display
traffic on my route • Display
clock
• Display
wallpaper
On-screen Commands
The system accepts these commands on any screen where applicable. All
available commands are highlighted in yellow when you press the Talk button.
• Next (or Down)
• Previous (or Up)
• Return
• OK (excluding Startup Confirmation screen)
• Delete