warning light HONDA CR-V 2016 RM1, RM3, RM4 / 4.G Quick Guide
[x] Cancel search | Manufacturer: HONDA, Model Year: 2016, Model line: CR-V, Model: HONDA CR-V 2016 RM1, RM3, RM4 / 4.GPages: 80, PDF Size: 7.99 MB
Page 4 of 80
| 1
VISUAL INDEX
Quickly locate items in the vehicle’s interior.
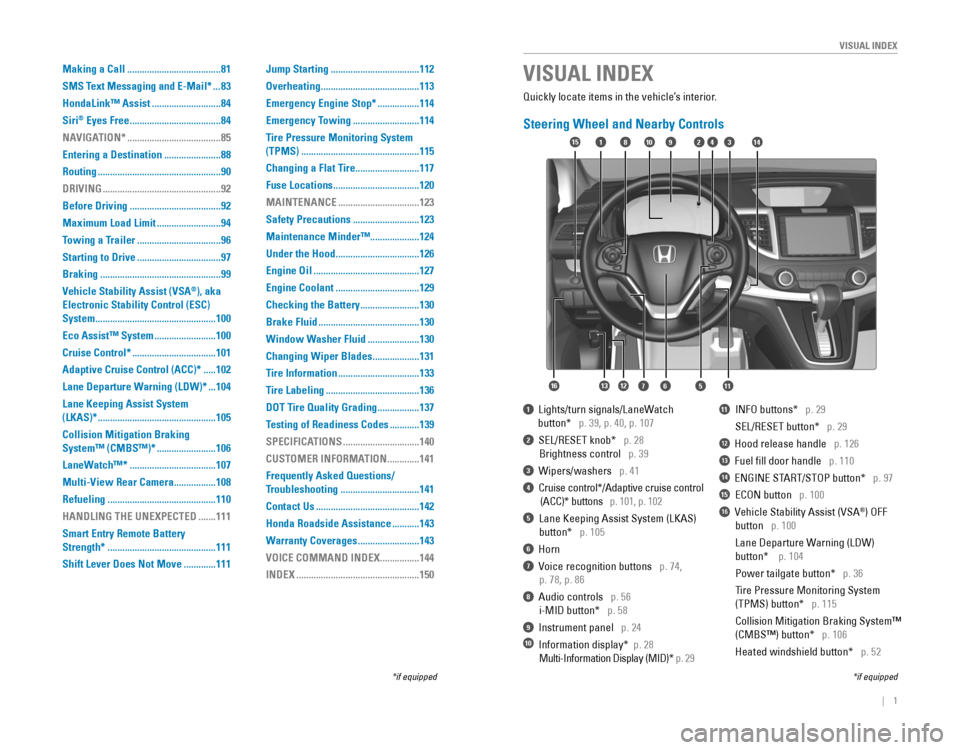
Steering Wheel and Nearby Controls
1‚ÄÇ‚ÄÇLights/turn‚ÄÇsignals/LaneWatch
‚ÄÇ‚ÄÇ‚ÄÇ‚ÄÇ‚ÄÇ‚ÄÇbutton*‚ÄÇ‚ÄÇ‚ÄÇp.‚ÄÇ39,‚ÄÇp.‚ÄÇ40,‚ÄÇp.‚ÄÇ107
2‚ÄÇ‚ÄÇSEL/RESET‚ÄÇknob*‚ÄÇ‚ÄÇ‚ÄÇp. 28
Brightness control p. 39
3‚ÄÇ‚ÄÇWipers/washers‚ÄÇ‚ÄÇ‚ÄÇp.‚ÄÇ41
4‚ÄÇ‚ÄÇCruise‚ÄÇcontrol*/Adaptive‚ÄÇcruise‚ÄÇcontrol‚ÄÇ‚ÄÇ
‚ÄÇ(ACC)*‚ÄÇbuttons‚ÄÇ‚ÄÇ‚ÄÇp. 101, p. 102
5 Lane Keeping Assist System (LKAS)
‚ÄÇbutton* p. 105
6 Horn
7‚ÄÇ‚ÄÇVoice‚ÄÇrecognition‚ÄÇbuttons‚ÄÇ‚ÄÇ‚ÄÇp.‚ÄÇ74,
‚ÄÇp.‚ÄÇ78,‚ÄÇp.‚ÄÇ86
8 Audio controls p. 56
i-MID‚ÄÇbutton*‚ÄÇ‚ÄÇ‚ÄÇp. 58
9‚ÄÇ‚ÄÇInstrument‚ÄÇpanel‚ÄÇ‚ÄÇ‚ÄÇp.‚ÄÇ24
10‚ÄÇ‚ÄÇInformation‚ÄÇdisplay*‚ÄÇ‚ÄÇp. 28
‚ÄÇMulti-Information‚ÄÇDisplay‚ÄÇ(MID)*‚ÄÇp. 29
11‚ÄÇ‚ÄÇ‚ÄÇINFO‚ÄÇbuttons*‚ÄÇ‚ÄÇ‚ÄÇp. 29
SEL/RESET‚ÄÇbutton*‚ÄÇ‚ÄÇ‚ÄÇp. 29
12 Hood release handle p. 126
13 Fuel fill door handle p. 110
14‚ÄÇ‚ÄÇENGINE‚ÄÇSTART/STOP‚ÄÇbutton*‚ÄÇ‚ÄÇ‚ÄÇp.‚ÄÇ97
15 ECON‚ÄÇbutton p. 100
16  Vehicle Stability Assist (VSA®) OFF
‚ÄÇbutton‚ÄÇ‚ÄÇ‚ÄÇp. 100
‚ÄÇLane‚ÄÇDeparture‚ÄÇWarning‚ÄÇ(LDW)‚ÄÇ‚ÄÇ ‚ÄÇ
‚ÄÇbutton*‚ÄÇ‚ÄÇ‚ÄÇ‚ÄÇp.‚ÄÇ104
‚ÄÇPower‚ÄÇtailgate‚ÄÇbutton*‚ÄÇ‚ÄÇ‚ÄÇp. 36
Tire Pressure Monitoring System
‚ÄÇ(TPMS)‚ÄÇbutton*‚ÄÇ‚ÄÇ‚ÄÇp. 115
Collision Mitigation Braking System‚Ñ¢
‚ÄÇ(CMBS‚Ñ¢)‚ÄÇbutton*‚ÄÇ‚ÄÇ‚ÄÇp. 106
‚ÄÇHeated‚ÄÇwindshield‚ÄÇbutton*‚ÄÇ‚ÄÇ‚ÄÇp. 52
VISUAL INDEX
*if‚ÄÇequipped*if‚ÄÇequipped
92
567111213
1815341014
16
Making a Call ......................................81
SMS Text Messaging and E-Mail*
...83
HondaLink‚Ñ¢ Assist
............................84
Siri
® Eyes Free .....................................84
NAVIGATION*
......................................85
Entering a Destination
.......................88
Routing
..................................................90
DRIVING
................................................92
Before Driving
.....................................92
Maximum Load Limit
..........................94
Towing a Trailer
..................................96
Starting to Drive
..................................97
Braking
.................................................99
Vehicle Stability Assist (VSA
®), aka
Electronic Stability Control (ESC)
System
.................................................100
Eco Assist‚Ñ¢ System
.........................100
Cruise Control*
..................................101
Adaptive Cruise Control (ACC)*
.....102
Lane Departure Warning (LDW)*
...104
Lane Keeping Assist System
(LKAS)*
................................................105
Collision Mitigation Braking
System‚Ñ¢ (CMBS‚Ñ¢)*
........................106
LaneWatch‚Ñ¢*
...................................107
Multi-View Rear Camera
.................108
Refueling
............................................110
HANDLING THE UNEXPECTED
.......111
Smart Entry Remote Battery
Strength*
............................................111
Shift Lever Does Not Move
.............111 Jump Starting
....................................112
Overheating
........................................113
Emergency Engine Stop*
.................114
Emergency Towing
...........................114
Tire Pressure Monitoring System
(TPMS)
................................................115
Changing a Flat Tire
..........................117
Fuse Locations
...................................120
MAINTENANCE
.................................123
Safety Precautions
...........................123
Maintenance Minder‚Ñ¢ ....................124
Under the Hood
..................................126
Engine Oil
...........................................127
Engine Coolant
..................................129
Checking the Battery
........................130
Brake Fluid
.........................................130
Window Washer Fluid
.....................130
Changing Wiper Blades
...................131
Tire Information
.................................133
Tire Labeling
......................................136
DOT Tire Quality Grading
.................137
Testing of Readiness Codes
............139
SPECIFICATIONS
...............................140
CUSTOMER INFORMATION
.............141
Frequently Asked Questions/
Troubleshooting
................................141
Contact Us
..........................................142
Honda Roadside Assistance
...........143
Warranty Coverages
.........................143
VOICE COMMAND INDEX
................144
INDEX
..................................................150
Page 9 of 80
10 || 11
S
AFETYSAFETY
Side Airbags
The‚ÄÇside‚ÄÇairbags‚ÄÇhelp‚ÄÇprotect‚ÄÇthe‚ÄÇupper‚ÄÇtorso‚ÄÇand‚ÄÇpelvis‚ÄÇof‚ÄÇthe‚ÄÇdriver‚ÄÇor‚ÄÇa‚ÄÇfront‚ÄÇ
passenger during a moderate-to-severe side impact. They are housed in th\
e
outside edge of the driver’s and front passenger’s seat-backs. Both are marked 
SIDE AIRBAG.
Side Curtain Airbags
Side‚ÄÇcurtain‚ÄÇairbags‚ÄÇhelp‚ÄÇprotect‚ÄÇthe‚ÄÇhead‚ÄÇand‚ÄÇtorso‚ÄÇof‚ÄÇthe‚ÄÇdriver‚ÄÇand‚ÄÇpassengers‚ÄÇ
in outer seating positions during a moderate-to-severe side impact. The \
side
curtain‚ÄÇairbags‚ÄÇequipped‚ÄÇin‚ÄÇthis‚ÄÇvehicle‚ÄÇare‚ÄÇalso‚ÄÇdesigned‚ÄÇto‚ÄÇhelp‚ÄÇreduce‚ÄÇthe‚ÄÇ
likelihood of partial and complete ejection of vehicle occupants through\
side
windows in crashes, particularly rollover crashes.
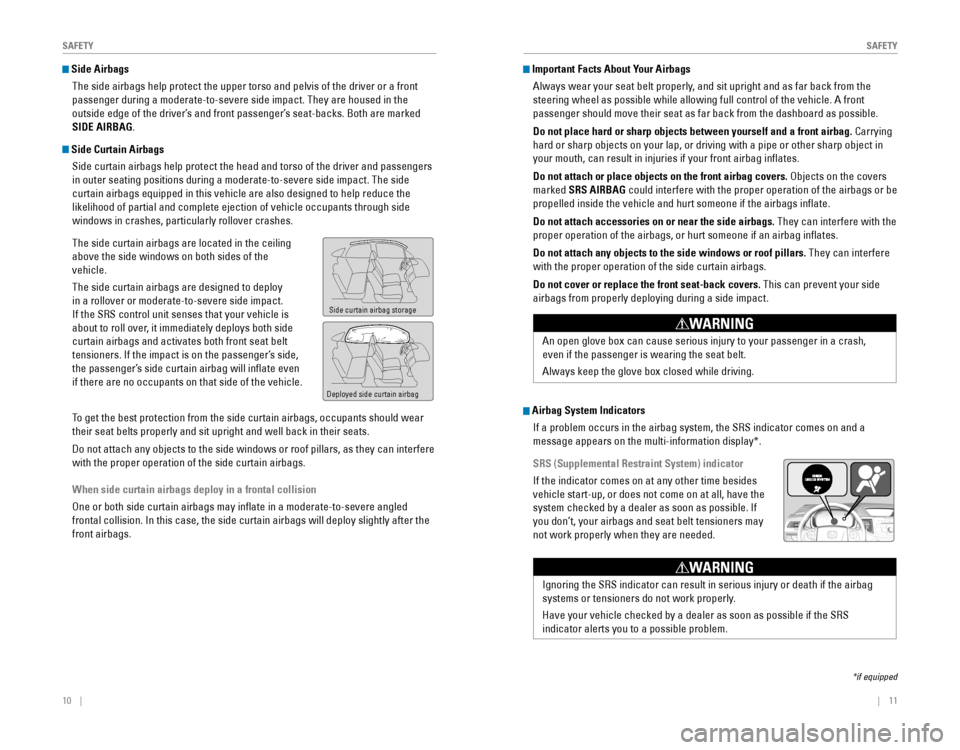
The‚ÄÇside‚ÄÇcurtain‚ÄÇairbags‚ÄÇare‚ÄÇlocated‚ÄÇin‚ÄÇthe‚ÄÇceiling‚ÄÇ
above‚ÄÇthe‚ÄÇside‚ÄÇwindows‚ÄÇon‚ÄÇboth‚ÄÇsides‚ÄÇof‚ÄÇthe‚ÄÇ
vehicle.
The‚ÄÇside‚ÄÇcurtain‚ÄÇairbags‚ÄÇare‚ÄÇdesigned‚ÄÇto‚ÄÇdeploy‚ÄÇ
in a rollover or moderate-to-severe side impact.
If‚ÄÇthe‚ÄÇSRS‚ÄÇcontrol‚ÄÇunit‚ÄÇsenses‚ÄÇthat‚ÄÇyour‚ÄÇvehicle‚ÄÇis‚ÄÇ
about‚ÄÇto‚ÄÇroll‚ÄÇover,‚ÄÇit‚ÄÇimmediately‚ÄÇdeploys‚ÄÇboth‚ÄÇside‚ÄÇ
curtain‚ÄÇairbags‚ÄÇand‚ÄÇactivates‚ÄÇboth‚ÄÇfront‚ÄÇseat‚ÄÇbelt‚ÄÇ
tensioners. If the impact is on the passenger’s side, 
the passenger’s side curtain airbag will inflate even 
if there are no occupants on that side of the vehicle.
To‚ÄÇget‚ÄÇthe‚ÄÇbest‚ÄÇprotection‚ÄÇfrom‚ÄÇthe‚ÄÇside‚ÄÇcurtain‚ÄÇairbags,‚ÄÇoccupants‚ÄÇshould‚ÄÇwear‚ÄÇ
their‚ÄÇseat‚ÄÇbelts‚ÄÇproperly‚ÄÇand‚ÄÇsit‚ÄÇupright‚ÄÇand‚ÄÇwell‚ÄÇback‚ÄÇin‚ÄÇtheir‚ÄÇseats.
Do‚ÄÇnot‚ÄÇattach‚ÄÇany‚ÄÇobjects‚ÄÇto‚ÄÇthe‚ÄÇside‚ÄÇwindows‚ÄÇor‚ÄÇroof‚ÄÇpillars,‚ÄÇas‚ÄÇthey‚ÄÇcan‚ÄÇinterfere‚ÄÇ
with‚ÄÇthe‚ÄÇproper‚ÄÇoperation‚ÄÇof‚ÄÇthe‚ÄÇside‚ÄÇcurtain‚ÄÇairbags.
When side curtain airbags deploy in a frontal collision
One‚ÄÇor‚ÄÇboth‚ÄÇside‚ÄÇcurtain‚ÄÇairbags‚ÄÇmay‚ÄÇinflate‚ÄÇin‚ÄÇa‚ÄÇmoderate-to-severe‚ÄÇangled‚ÄÇ
frontal‚ÄÇcollision.‚ÄÇIn‚ÄÇthis‚ÄÇcase,‚ÄÇthe‚ÄÇside‚ÄÇcurtain‚ÄÇairbags‚ÄÇwill‚ÄÇdeploy‚ÄÇslightly‚ÄÇafter‚ÄÇthe‚ÄÇ
front‚ÄÇairbags.
Side‚ÄÇcurtain‚ÄÇairbag‚ÄÇstorage
Deployed‚ÄÇside‚ÄÇcurtain‚ÄÇairbag
Important Facts About Your Airbags
Always‚ÄÇwear‚ÄÇyour‚ÄÇseat‚ÄÇbelt‚ÄÇproperly,‚ÄÇand‚ÄÇsit‚ÄÇupright‚ÄÇand‚ÄÇas‚ÄÇfar‚ÄÇback‚ÄÇfrom‚ÄÇthe‚ÄÇ
steering‚ÄÇwheel‚ÄÇas‚ÄÇpossible‚ÄÇwhile‚ÄÇallowing‚ÄÇfull‚ÄÇcontrol‚ÄÇof‚ÄÇthe‚ÄÇvehicle.‚ÄÇA‚ÄÇfront‚ÄÇ
passenger‚ÄÇshould‚ÄÇmove‚ÄÇtheir‚ÄÇseat‚ÄÇas‚ÄÇfar‚ÄÇback‚ÄÇfrom‚ÄÇthe‚ÄÇdashboard‚ÄÇas‚ÄÇpossible.‚ÄÇ
Do not place hard or sharp objects between yourself and a front airbag. Carrying
hard‚ÄÇor‚ÄÇsharp‚ÄÇobjects‚ÄÇon‚ÄÇyour‚ÄÇlap,‚ÄÇor‚ÄÇdriving‚ÄÇwith‚ÄÇa‚ÄÇpipe‚ÄÇor‚ÄÇother‚ÄÇsharp‚ÄÇobject‚ÄÇin‚ÄÇ
your‚ÄÇmouth,‚ÄÇcan‚ÄÇresult‚ÄÇin‚ÄÇinjuries‚ÄÇif‚ÄÇyour‚ÄÇfront‚ÄÇairbag‚ÄÇinflates.
Do not attach or place objects on the front airbag covers.‚ÄÇObjects‚ÄÇon‚ÄÇthe‚ÄÇcovers‚ÄÇ
marked SRS AIRBAG‚ÄÇcould‚ÄÇinterfere‚ÄÇwith‚ÄÇthe‚ÄÇproper‚ÄÇoperation‚ÄÇof‚ÄÇthe‚ÄÇairbags‚ÄÇor‚ÄÇbe‚ÄÇ
propelled‚ÄÇinside‚ÄÇthe‚ÄÇvehicle‚ÄÇand‚ÄÇhurt‚ÄÇsomeone‚ÄÇif‚ÄÇthe‚ÄÇairbags‚ÄÇinflate.
Do not attach accessories on or near the side airbags. They can interfere with the
proper‚ÄÇoperation‚ÄÇof‚ÄÇthe‚ÄÇairbags,‚ÄÇor‚ÄÇhurt‚ÄÇsomeone‚ÄÇif‚ÄÇan‚ÄÇairbag‚ÄÇinflates.
Do not attach any objects to the side windows or roof pillars. They can interfere
with‚ÄÇthe‚ÄÇproper‚ÄÇoperation‚ÄÇof‚ÄÇthe‚ÄÇside‚ÄÇcurtain‚ÄÇairbags.
Do not cover or replace the front seat-back covers. This can prevent your side
airbags‚ÄÇfrom‚ÄÇproperly‚ÄÇdeploying‚ÄÇduring‚ÄÇa‚ÄÇside‚ÄÇimpact.‚ÄÇ
Airbag System Indicators
If‚ÄÇa‚ÄÇproblem‚ÄÇoccurs‚ÄÇin‚ÄÇthe‚ÄÇairbag‚ÄÇsystem,‚ÄÇthe‚ÄÇSRS‚ÄÇindicator‚ÄÇcomes‚ÄÇon‚ÄÇand‚ÄÇa‚ÄÇ
message‚ÄÇappears‚ÄÇon‚ÄÇthe‚ÄÇmulti-information‚ÄÇdisplay*.
SRS (Supplemental Restraint System) indicator
If‚ÄÇthe‚ÄÇindicator‚ÄÇcomes‚ÄÇon‚ÄÇat‚ÄÇany‚ÄÇother‚ÄÇtime‚ÄÇbesides‚ÄÇ
vehicle start-up, or does not come on at all, have the
system‚ÄÇchecked‚ÄÇby‚ÄÇa‚ÄÇdealer‚ÄÇas‚ÄÇsoon‚ÄÇas‚ÄÇpossible.‚ÄÇIf‚ÄÇ
you don’t, your airbags and seat belt tensioners may 
not work properly when they are needed.
*if‚ÄÇequipped
An‚ÄÇopen‚ÄÇglove‚ÄÇbox‚ÄÇcan‚ÄÇcause‚ÄÇserious‚ÄÇinjury‚ÄÇto‚ÄÇyour‚ÄÇpassenger‚ÄÇin‚ÄÇa‚ÄÇcrash,‚ÄÇ
even‚ÄÇif‚ÄÇthe‚ÄÇpassenger‚ÄÇis‚ÄÇwearing‚ÄÇthe‚ÄÇseat‚ÄÇbelt.
Always‚ÄÇkeep‚ÄÇthe‚ÄÇglove‚ÄÇbox‚ÄÇclosed‚ÄÇwhile‚ÄÇdriving.
WARNING
Ignoring‚ÄÇthe‚ÄÇSRS‚ÄÇindicator‚ÄÇcan‚ÄÇresult‚ÄÇin‚ÄÇserious‚ÄÇinjury‚ÄÇor‚ÄÇdeath‚ÄÇif‚ÄÇthe‚ÄÇairbag‚ÄÇ
systems or tensioners do not work properly.
Have‚ÄÇyour‚ÄÇvehicle‚ÄÇchecked‚ÄÇby‚ÄÇa‚ÄÇdealer‚ÄÇas‚ÄÇsoon‚ÄÇas‚ÄÇpossible‚ÄÇif‚ÄÇthe‚ÄÇSRS‚ÄÇ
indicator‚ÄÇalerts‚ÄÇyou‚ÄÇto‚ÄÇa‚ÄÇpossible‚ÄÇproblem.
WARNING
Page 16 of 80
24‚ÄÇ‚ÄÇ‚ÄÇ‚ÄÇ|| 25
I
NSTRUMENT PANELINSTRUMENT PANEL
Smart Entry system*
There‚ÄÇis‚ÄÇa‚ÄÇproblem‚ÄÇwith‚ÄÇthe‚ÄÇsmart‚ÄÇentry‚ÄÇsystem.
Malfunction indicator lamp (check engine light)
• The emissions control system may have a problem, or the fuel cap is loose  
or missing.
• (Blinks) A misfire in the engine’s cylinders is detected. Stop in a safe place, 
and wait for the engine to cool down.
Anti-lock Brake System (ABS)
There‚ÄÇis‚ÄÇa‚ÄÇproblem‚ÄÇwith‚ÄÇthe‚ÄÇanti-lock‚ÄÇbrake‚ÄÇsystem.‚ÄÇYour‚ÄÇvehicle‚ÄÇstill‚ÄÇhas‚ÄÇ
normal‚ÄÇbraking‚ÄÇability,‚ÄÇbut‚ÄÇno‚ÄÇanti-lock‚ÄÇfunction.‚ÄÇ
Tire Pressure Monitoring System (TPMS)*
There‚ÄÇis‚ÄÇa‚ÄÇproblem‚ÄÇwith‚ÄÇthe‚ÄÇtire‚ÄÇpressure‚ÄÇmonitoring‚ÄÇsystem,‚ÄÇor‚ÄÇthe‚ÄÇvehicle‚ÄÇis‚ÄÇ
fitted with the compact spare tire.
Collision Mitigation Braking System‚Ñ¢ (CMBS‚Ñ¢)*
There‚ÄÇis‚ÄÇa‚ÄÇproblem‚ÄÇwith‚ÄÇsystem,‚ÄÇthe‚ÄÇradar‚ÄÇsensor‚ÄÇis‚ÄÇblocked,‚ÄÇor‚ÄÇthe‚ÄÇ
temperature is too high.
Lane Departure Warning (LDW)*
There‚ÄÇis‚ÄÇa‚ÄÇproblem‚ÄÇwith‚ÄÇthe‚ÄÇsystem,‚ÄÇthe‚ÄÇcamera‚ÄÇis‚ÄÇblocked,‚ÄÇor‚ÄÇthe‚ÄÇ
temperature is too high.
Lane Keeping Assist System (LKAS)*
There‚ÄÇis‚ÄÇa‚ÄÇproblem‚ÄÇwith‚ÄÇthe‚ÄÇsystem,‚ÄÇthe‚ÄÇcamera‚ÄÇis‚ÄÇblocked,‚ÄÇor‚ÄÇthe‚ÄÇ
temperature is too high.
Vehicle Stability Assist (VSA
®)
There‚ÄÇis‚ÄÇa‚ÄÇproblem‚ÄÇwith‚ÄÇthe‚ÄÇVSA‚ÄÇsystem‚ÄÇor‚ÄÇhill‚ÄÇstart‚ÄÇassist‚ÄÇsystem.
Adaptive Cruise Control (ACC)*
There‚ÄÇis‚ÄÇa‚ÄÇproblem‚ÄÇwith‚ÄÇthe‚ÄÇsystem,‚ÄÇthe‚ÄÇradar‚ÄÇsensor‚ÄÇis‚ÄÇblocked,‚ÄÇor‚ÄÇthe‚ÄÇ
temperature is too high.
Electric Power Steering (EPS)
There‚ÄÇis‚ÄÇa‚ÄÇproblem‚ÄÇwith‚ÄÇthe‚ÄÇEPS‚ÄÇsystem.‚ÄÇStop‚ÄÇin‚ÄÇa‚ÄÇsafe‚ÄÇplace,‚ÄÇand‚ÄÇrestart‚ÄÇthe‚ÄÇ
vehicle.
Starter system*
There‚ÄÇis‚ÄÇa‚ÄÇproblem‚ÄÇwith‚ÄÇthe‚ÄÇstarter‚ÄÇsystem.‚ÄÇPress‚ÄÇand‚ÄÇhold‚ÄÇthe‚ÄÇENGINE‚ÄÇ
START/STOP‚ÄÇbutton‚ÄÇfor‚ÄÇup‚ÄÇto‚ÄÇ15‚ÄÇseconds‚ÄÇwhile‚ÄÇpressing‚ÄÇthe‚ÄÇbrake‚ÄÇpedal‚ÄÇand‚ÄÇ
manually start the engine.
All Wheel Drive (AWD)*
There‚ÄÇis‚ÄÇa‚ÄÇproblem‚ÄÇwith‚ÄÇthe‚ÄÇAWD‚ÄÇsystem.‚ÄÇIf‚ÄÇthe‚ÄÇindicator‚ÄÇblinks,‚ÄÇthe‚ÄÇsystem‚ÄÇ
is overheated and inactive. Stop in a safe place, and idle until the ind\
icator
goes off.
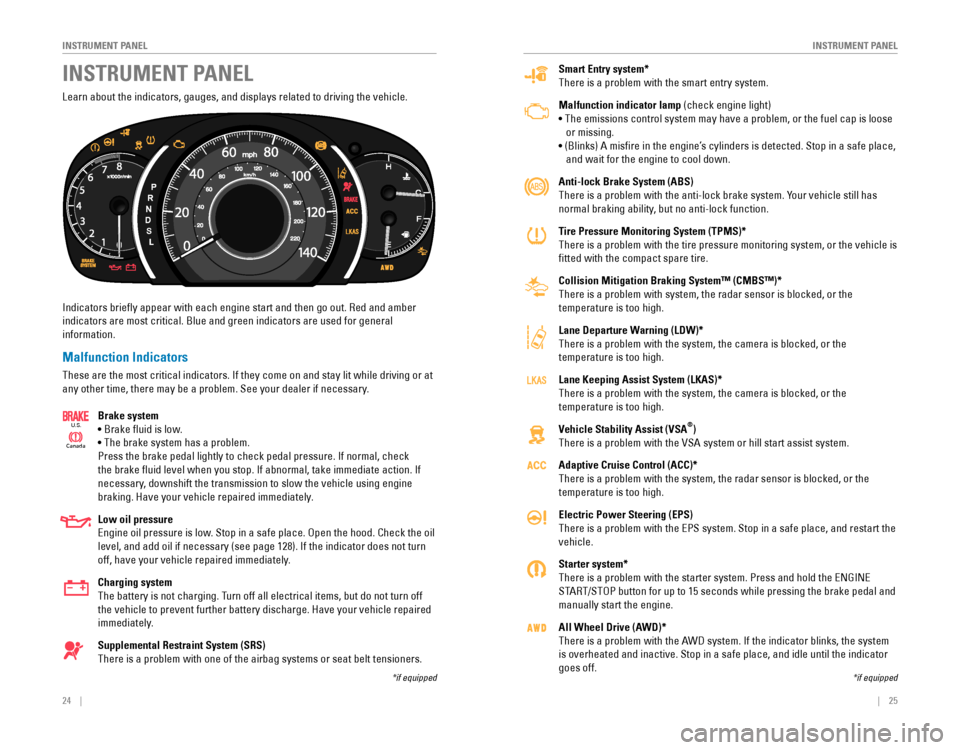
Learn‚ÄÇabout‚ÄÇthe‚ÄÇindicators,‚ÄÇgauges,‚ÄÇand‚ÄÇdisplays‚ÄÇrelated‚ÄÇto‚ÄÇdriving‚ÄÇthe‚ÄÇvehicle.
Indicators‚ÄÇbriefly‚ÄÇappear‚ÄÇwith‚ÄÇeach‚ÄÇengine‚ÄÇstart‚ÄÇand‚ÄÇthen‚ÄÇgo‚ÄÇout.‚ÄÇRed‚ÄÇand‚ÄÇamber‚ÄÇ
indicators are most critical. Blue and green indicators are used for general?
information.
Malfunction Indicators
These‚ÄÇare‚ÄÇthe‚ÄÇmost‚ÄÇcritical‚ÄÇindicators.‚ÄÇIf‚ÄÇthey‚ÄÇcome‚ÄÇon‚ÄÇand‚ÄÇstay‚ÄÇlit‚ÄÇwhile‚ÄÇdriving‚ÄÇor‚ÄÇat‚ÄÇ
any‚ÄÇother‚ÄÇtime,‚ÄÇthere‚ÄÇmay‚ÄÇbe‚ÄÇa‚ÄÇproblem.‚ÄÇSee‚ÄÇyour‚ÄÇdealer‚ÄÇif‚ÄÇnecessary.
Brake system
• Brake fluid is low.
• The brake system has a problem.
Press‚ÄÇthe‚ÄÇbrake‚ÄÇpedal‚ÄÇlightly‚ÄÇto‚ÄÇcheck‚ÄÇpedal‚ÄÇpressure.‚ÄÇIf‚ÄÇnormal,‚ÄÇcheck‚ÄÇ
the‚ÄÇbrake‚ÄÇfluid‚ÄÇlevel‚ÄÇwhen‚ÄÇyou‚ÄÇstop.‚ÄÇIf‚ÄÇabnormal,‚ÄÇtake‚ÄÇimmediate‚ÄÇaction.‚ÄÇIf‚ÄÇ
necessary, downshift the transmission to slow the vehicle using engine
braking.‚ÄÇHave‚ÄÇyour‚ÄÇvehicle‚ÄÇrepaired‚ÄÇimmediately.
Low oil pressure
Engine‚ÄÇoil‚ÄÇpressure‚ÄÇis‚ÄÇlow.‚ÄÇStop‚ÄÇin‚ÄÇa‚ÄÇsafe‚ÄÇplace.‚ÄÇOpen‚ÄÇthe‚ÄÇhood.‚ÄÇCheck‚ÄÇthe‚ÄÇoil‚ÄÇ
level,‚ÄÇand‚ÄÇadd‚ÄÇoil‚ÄÇif‚ÄÇnecessary‚ÄÇ(see‚ÄÇpage‚ÄÇ128).‚ÄÇIf‚ÄÇthe‚ÄÇindicator‚ÄÇdoes‚ÄÇnot‚ÄÇturn‚ÄÇ
off, have your vehicle repaired immediately.
Charging system
The‚ÄÇbattery‚ÄÇis‚ÄÇnot‚ÄÇcharging.‚ÄÇTurn‚ÄÇoff‚ÄÇall‚ÄÇelectrical‚ÄÇitems,‚ÄÇbut‚ÄÇdo‚ÄÇnot‚ÄÇturn‚ÄÇoff‚ÄÇ
the‚ÄÇvehicle‚ÄÇto‚ÄÇprevent‚ÄÇfurther‚ÄÇbattery‚ÄÇdischarge.‚ÄÇHave‚ÄÇyour‚ÄÇvehicle‚ÄÇrepaired‚ÄÇ
immediately.
Supplemental Restraint System (SRS)
There‚ÄÇis‚ÄÇa‚ÄÇproblem‚ÄÇwith‚ÄÇone‚ÄÇof‚ÄÇthe‚ÄÇairbag‚ÄÇsystems‚ÄÇor‚ÄÇseat‚ÄÇbelt‚ÄÇtensioners.‚ÄÇ
Ca nada
U.S.
INSTRUMENT PANEL
*if‚ÄÇequipped*if‚ÄÇequipped
Page 22 of 80
36 ||‚ÄÇ‚ÄÇ‚ÄÇ‚ÄÇ37
V
EHICLE CONTROLSVEHICLE CONTROLS
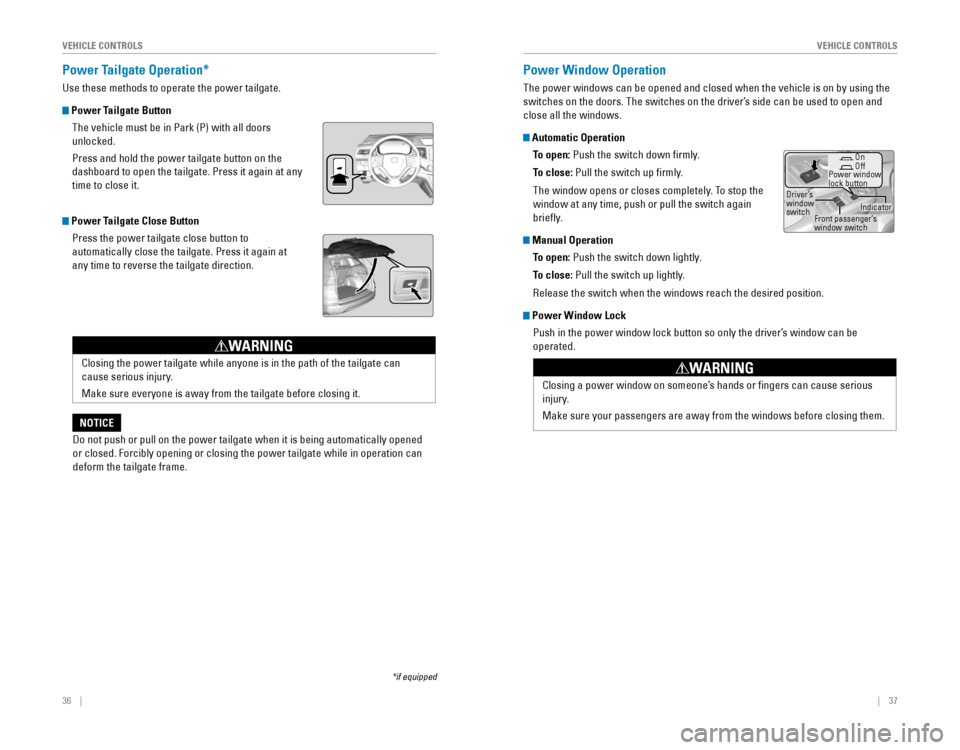
Power Tailgate Operation*
Use these methods to operate the power tailgate.
Power Tailgate Button
The‚ÄÇvehicle‚ÄÇmust‚ÄÇbe‚ÄÇin‚ÄÇPark‚ÄÇ(P)‚ÄÇwith‚ÄÇall‚ÄÇdoors‚ÄÇ
unlocked.
Press‚ÄÇand‚ÄÇhold‚ÄÇthe‚ÄÇpower‚ÄÇtailgate‚ÄÇbutton‚ÄÇon‚ÄÇthe‚ÄÇ
dashboard‚ÄÇto‚ÄÇopen‚ÄÇthe‚ÄÇtailgate.‚ÄÇPress‚ÄÇit‚ÄÇagain‚ÄÇat‚ÄÇany‚ÄÇ
time to close it.
Power Tailgate Close Button
Press‚ÄÇthe‚ÄÇpower‚ÄÇtailgate‚ÄÇclose‚ÄÇbutton‚ÄÇto‚ÄÇ
automatically close the tailgate. Press it again at
any time to reverse the tailgate direction.
*if‚ÄÇequipped
Power Window Operation
The‚ÄÇpower‚ÄÇwindows‚ÄÇcan‚ÄÇbe‚ÄÇopened‚ÄÇand‚ÄÇclosed‚ÄÇwhen‚ÄÇthe‚ÄÇvehicle‚ÄÇis‚ÄÇon‚ÄÇby‚ÄÇusing‚ÄÇthe‚ÄÇ
switches on the doors. The switches on the driver’s side can be used to open and 
close all the windows.
Automatic Operation
To open: Push the switch down firmly.
To close: Pull the switch up firmly.
The window opens or closes completely. To stop the
window at any time, push or pull the switch again
briefly.
Manual OperationTo open: Push the switch down lightly.
To close: Pull the switch up lightly.
Release the switch when the windows reach the desired position.
Power Window Lock
Push in the power window lock button so only the driver’s window can be 
operated.
Closing the power tailgate while anyone is in the path of the tailgate c\
an
cause serious injury.
Make‚ÄÇsure‚ÄÇeveryone‚ÄÇis‚ÄÇaway‚ÄÇfrom‚ÄÇthe‚ÄÇtailgate‚ÄÇbefore‚ÄÇclosing‚ÄÇit.‚ÄÇ
WARNING
Do‚ÄÇnot‚ÄÇpush‚ÄÇor‚ÄÇpull‚ÄÇon‚ÄÇthe‚ÄÇpower‚ÄÇtailgate‚ÄÇwhen‚ÄÇit‚ÄÇis‚ÄÇbeing‚ÄÇautomatically‚ÄÇopened‚ÄÇ
or‚ÄÇclosed.‚ÄÇForcibly‚ÄÇopening‚ÄÇor‚ÄÇclosing‚ÄÇthe‚ÄÇpower‚ÄÇtailgate‚ÄÇwhile‚ÄÇin‚ÄÇoperation‚ÄÇcan‚ÄÇ
deform the tailgate frame.
NOTICE Closing a power window on someone’s hands or fingers can cause serious
injury.Make‚ÄÇsure‚ÄÇyour‚ÄÇpassengers‚ÄÇare‚ÄÇaway‚ÄÇfrom‚ÄÇthe‚ÄÇwindows‚ÄÇbefore‚ÄÇclosing‚ÄÇthem.
WARNING
Off
Power window
lock buttonDriver’s window
switch OnIndicatorFront passenger’s
window switch
Page 23 of 80
38 || 39
V
EHICLE CONTROLSVEHICLE CONTROLS
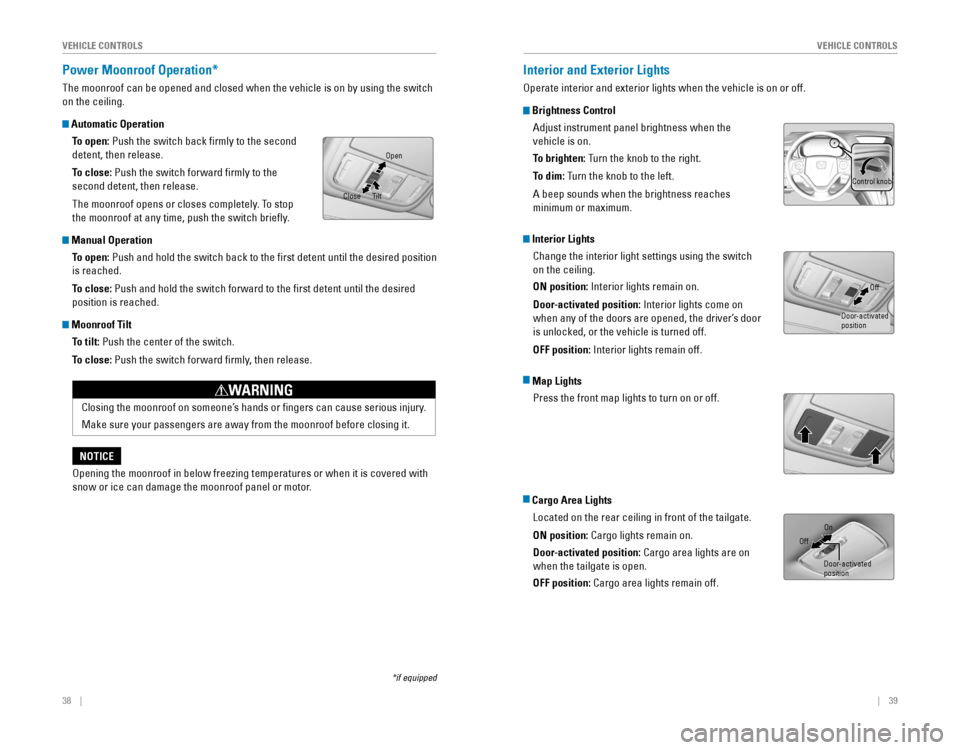
Power Moonroof Operation*
The‚ÄÇmoonroof‚ÄÇcan‚ÄÇbe‚ÄÇopened‚ÄÇand‚ÄÇclosed‚ÄÇwhen‚ÄÇthe‚ÄÇvehicle‚ÄÇis‚ÄÇon‚ÄÇby‚ÄÇusing‚ÄÇthe‚ÄÇswitch‚ÄÇ
on the ceiling.
Automatic Operation
To open:
‚ÄÇPush‚ÄÇthe‚ÄÇswitch‚ÄÇback‚ÄÇfirmly‚ÄÇto‚ÄÇthe‚ÄÇsecond‚ÄÇ
detent, then release.
To close: Push the switch forward firmly to the
second detent, then release.
The moonroof opens or closes completely. To stop
the‚ÄÇmoonroof‚ÄÇat‚ÄÇany‚ÄÇtime,‚ÄÇpush‚ÄÇthe‚ÄÇswitch‚ÄÇbriefly.
Manual OperationTo open:
‚ÄÇPush‚ÄÇand‚ÄÇhold‚ÄÇthe‚ÄÇswitch‚ÄÇback‚ÄÇto‚ÄÇthe‚ÄÇfirst‚ÄÇdetent‚ÄÇuntil‚ÄÇthe‚ÄÇdesired‚ÄÇposition‚ÄÇ
is reached.
To close: Push and hold the switch forward to the first detent until the desire\
d
position is reached.
Moonroof TiltTo tilt: Push the center of the switch.
To close: Push the switch forward firmly, then release.
*if‚ÄÇequipped
Interior and Exterior Lights
Operate interior and exterior lights when the vehicle is on or off.
Brightness Control
Adjust‚ÄÇinstrument‚ÄÇpanel‚ÄÇbrightness‚ÄÇwhen‚ÄÇthe‚ÄÇ
vehicle is on.
To brighten:
‚ÄÇTurn‚ÄÇthe‚ÄÇknob‚ÄÇto‚ÄÇthe‚ÄÇright.
To dim:‚ÄÇTurn‚ÄÇthe‚ÄÇknob‚ÄÇto‚ÄÇthe‚ÄÇleft.
A‚ÄÇbeep‚ÄÇsounds‚ÄÇwhen‚ÄÇthe‚ÄÇbrightness‚ÄÇreaches‚ÄÇ
minimum or maximum.
Interior LightsChange the interior light settings using the switch
on the ceiling.
ON position:
‚ÄÇInterior‚ÄÇlights‚ÄÇremain‚ÄÇon.
Door-activated position:‚ÄÇInterior‚ÄÇlights‚ÄÇcome‚ÄÇon‚ÄÇ
when any of the doors are opened, the driver’s door
is unlocked, or the vehicle is turned off.
OFF position:
‚ÄÇInterior‚ÄÇlights‚ÄÇremain‚ÄÇoff.
Map LightsPress the front map lights to turn on or off.
Cargo Area LightsLocated on the rear ceiling in front of the tailgate.
ON position: Cargo lights remain on.
Door-activated position: Cargo area lights are on
when the tailgate is open.
OFF position: Cargo area lights remain off.
Close Open
Tilt
Closing the moonroof on someone’s hands or fingers can cause serious injury.
Make‚ÄÇsure‚ÄÇyour‚ÄÇpassengers‚ÄÇare‚ÄÇaway‚ÄÇfrom‚ÄÇthe‚ÄÇmoonroof‚ÄÇbefore‚ÄÇclosing‚ÄÇit.
WARNING
Opening‚ÄÇthe‚ÄÇmoonroof‚ÄÇin‚ÄÇbelow‚ÄÇfreezing‚ÄÇtemperatures‚ÄÇor‚ÄÇwhen‚ÄÇit‚ÄÇis‚ÄÇcovered‚ÄÇwith‚ÄÇ
snow or ice can damage the moonroof panel or motor.
NOTICE
Control‚ÄÇknob
Off
Door-activated
position
Door-activated
position On
Off
Page 28 of 80
48‚ÄÇ‚ÄÇ‚ÄÇ‚ÄÇ||‚ÄÇ‚ÄÇ‚ÄÇ‚ÄÇ49
V
EHICLE CONTROLSVEHICLE CONTROLS
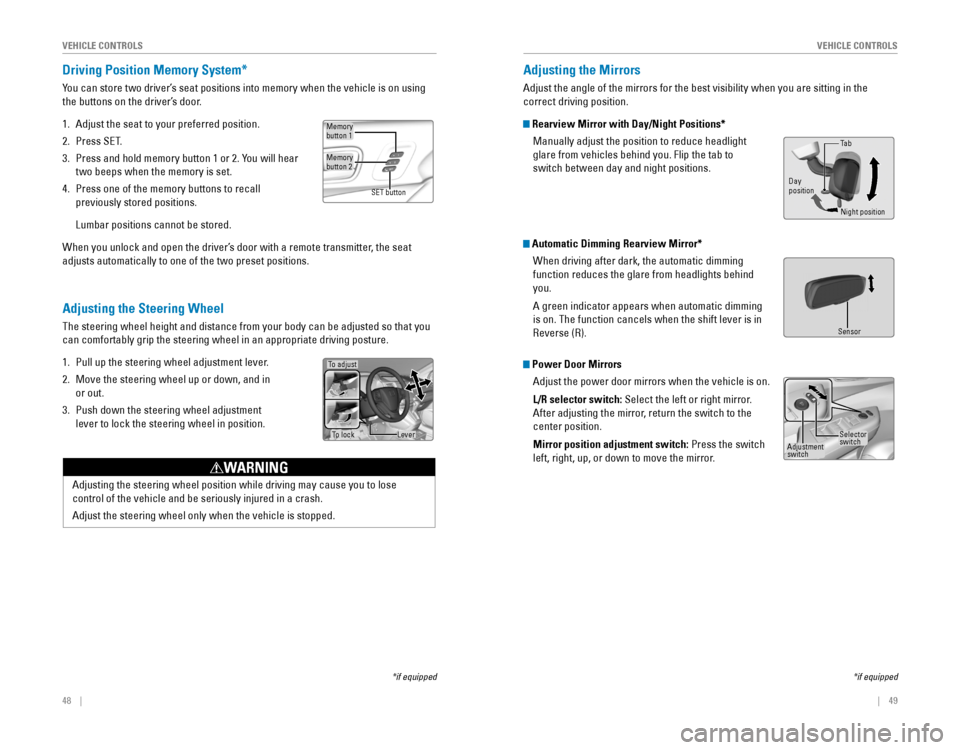
Adjusting the Steering Wheel
The‚ÄÇsteering‚ÄÇwheel‚ÄÇheight‚ÄÇand‚ÄÇdistance‚ÄÇfrom‚ÄÇyour‚ÄÇbody‚ÄÇcan‚ÄÇbe‚ÄÇadjusted‚ÄÇso‚ÄÇthat‚ÄÇyou‚ÄÇ
can‚ÄÇcomfortably‚ÄÇgrip‚ÄÇthe‚ÄÇsteering‚ÄÇwheel‚ÄÇin‚ÄÇan‚ÄÇappropriate‚ÄÇdriving‚ÄÇposture.
1. Pull up the steering wheel adjustment lever.
2. Move the steering wheel up or down, and in
or out.
3. Push down the steering wheel adjustment
lever to lock the steering wheel in position.
Driving Position Memory System*
You can store two driver’s seat positions into memory when the vehicle is on using
the buttons on the driver’s door.
1. Adjust the seat to your preferred position.
2. Press‚ÄÇSET.
3. Press‚ÄÇand‚ÄÇhold‚ÄÇmemory‚ÄÇbutton‚ÄÇ1‚ÄÇor‚ÄÇ2.‚ÄÇYou‚ÄÇwill‚ÄÇhear‚ÄÇ
two‚ÄÇbeeps‚ÄÇwhen‚ÄÇthe‚ÄÇmemory‚ÄÇis‚ÄÇset.
4.‚ÄÇPress‚ÄÇone‚ÄÇof‚ÄÇthe‚ÄÇmemory‚ÄÇbuttons‚ÄÇto‚ÄÇrecall‚ÄÇ
previously stored positions.
Lumbar‚ÄÇpositions‚ÄÇcannot‚ÄÇbe‚ÄÇstored.
When you unlock and open the driver’s door with a remote transmitter, the seat
adjusts automatically to one of the two preset positions.
*if‚ÄÇequipped
To adjust
To lockLever
*if‚ÄÇequipped
Adjusting the Mirrors
Adjust‚ÄÇthe‚ÄÇangle‚ÄÇof‚ÄÇthe‚ÄÇmirrors‚ÄÇfor‚ÄÇthe‚ÄÇbest‚ÄÇvisibility‚ÄÇwhen‚ÄÇyou‚ÄÇare‚ÄÇsitting‚ÄÇin‚ÄÇthe‚ÄÇ
correct driving position.
Rearview Mirror with Day/Night Positions*
Manually adjust the position to reduce headlight
glare‚ÄÇfrom‚ÄÇvehicles‚ÄÇbehind‚ÄÇyou.‚ÄÇFlip‚ÄÇthe‚ÄÇtab‚ÄÇto‚ÄÇ
switch‚ÄÇbetween‚ÄÇday‚ÄÇand‚ÄÇnight‚ÄÇpositions.
Automatic Dimming Rearview Mirror*When driving after dark, the automatic dimming
function‚ÄÇreduces‚ÄÇthe‚ÄÇglare‚ÄÇfrom‚ÄÇheadlights‚ÄÇbehind‚ÄÇ
you.
A green indicator appears when automatic dimming
is on. The function cancels when the shift lever is in
Reverse (R).
Power Door MirrorsAdjust the power door mirrors when the vehicle is on.
L/R selector switch: Select the left or right mirror.
After adjusting the mirror, return the switch to the
center position.
Mirror position adjustment switch: Press the switch
left, right, up, or down to move the mirror.
Memorybutton‚ÄÇ1
Memorybutton‚ÄÇ2
SET‚ÄÇbutton
Adjusting the steering wheel position while driving may cause you to los\
e
control‚ÄÇof‚ÄÇthe‚ÄÇvehicle‚ÄÇand‚ÄÇbe‚ÄÇseriously‚ÄÇinjured‚ÄÇin‚ÄÇa‚ÄÇcrash.
Adjust the steering wheel only when the vehicle is stopped.
WARNING
Night position
Ta b
Day
position
Sensor
Adjustment
switch
Selector
switch
Page 50 of 80
92 || 93
DRIVING
DRIVING
Learn‚ÄÇabout‚ÄÇpreparation‚ÄÇfor‚ÄÇdriving,‚ÄÇas‚ÄÇwell‚ÄÇas‚ÄÇother‚ÄÇfeatures.
Before Driving
Check‚ÄÇthe‚ÄÇfollowing‚ÄÇitems‚ÄÇbefore‚ÄÇyou‚ÄÇbegin‚ÄÇdriving.
Exterior Checks
• 
Make‚ÄÇsure‚ÄÇthere‚ÄÇare‚ÄÇno‚ÄÇobstructions‚ÄÇon‚ÄÇthe‚ÄÇwindows,‚ÄÇdoor‚ÄÇmirrors,‚ÄÇexterior‚ÄÇ
lights, or other parts of the vehicle.
•  Remove any frost, snow, or ice.
•  Make sure the hood is securely closed.
• 
Heat‚ÄÇfrom‚ÄÇthe‚ÄÇengine‚ÄÇand‚ÄÇexhaust‚ÄÇcan‚ÄÇignite‚ÄÇflammable‚ÄÇmaterials‚ÄÇleft‚ÄÇunder‚ÄÇ
the hood, causing a fire. If you’ve parked your vehicle for an extended period, 
inspect‚ÄÇand‚ÄÇremove‚ÄÇany‚ÄÇdebris‚ÄÇthat‚ÄÇmay‚ÄÇhave‚ÄÇcollected,‚ÄÇsuch‚ÄÇas‚ÄÇdried‚ÄÇgrass‚ÄÇ
and‚ÄÇleaves‚ÄÇthat‚ÄÇhave‚ÄÇfallen‚ÄÇor‚ÄÇhave‚ÄÇbeen‚ÄÇcarried‚ÄÇin‚ÄÇfor‚ÄÇuse‚ÄÇas‚ÄÇa‚ÄÇnest‚ÄÇby‚ÄÇa‚ÄÇsmall‚ÄÇ
animal.‚ÄÇAlso‚ÄÇcheck‚ÄÇunder‚ÄÇthe‚ÄÇhood‚ÄÇfor‚ÄÇleftover‚ÄÇflammable‚ÄÇmaterials‚ÄÇafter‚ÄÇyou‚ÄÇor‚ÄÇ
someone else has performed maintenance on your vehicle.
•  Make sure the tires are in good condition.
• 
Make‚ÄÇsure‚ÄÇthere‚ÄÇare‚ÄÇno‚ÄÇpeople‚ÄÇor‚ÄÇobjects‚ÄÇbehind‚ÄÇor‚ÄÇaround‚ÄÇthe‚ÄÇvehicle.
DRIVING
If‚ÄÇthe‚ÄÇdoors‚ÄÇare‚ÄÇfrozen‚ÄÇshut,‚ÄÇuse‚ÄÇwarm‚ÄÇwater‚ÄÇaround‚ÄÇthe‚ÄÇdoor‚ÄÇedges‚ÄÇto‚ÄÇmelt‚ÄÇany‚ÄÇ
ice.‚ÄÇDo‚ÄÇnot‚ÄÇtry‚ÄÇto‚ÄÇforce‚ÄÇthem‚ÄÇopen,‚ÄÇas‚ÄÇthis‚ÄÇcan‚ÄÇdamage‚ÄÇthe‚ÄÇrubber‚ÄÇtrim‚ÄÇaround‚ÄÇthe‚ÄÇ
doors.‚ÄÇWhen‚ÄÇdone,‚ÄÇwipe‚ÄÇdry‚ÄÇto‚ÄÇavoid‚ÄÇfurther‚ÄÇfreezing.
NOTICE
Improper accessories or modifications can affect your vehicle’s handling, and 
stability,‚ÄÇand‚ÄÇperformance,‚ÄÇand‚ÄÇcause‚ÄÇa‚ÄÇcrash‚ÄÇin‚ÄÇwhich‚ÄÇyou‚ÄÇcan‚ÄÇbe‚ÄÇseriously‚ÄÇ
hurt or killed.
Follow all instructions in the vehicle owner’s manual regarding accessories
and modifications.
WARNING
In‚ÄÇaddition:
• During the first 600 miles (1,000 km) of operation, avoid sudden acceleration or 
full throttle operation so as not to damage the engine or powertrain.
• 
Avoid‚ÄÇhard‚ÄÇbraking‚ÄÇfor‚ÄÇthe‚ÄÇfirst‚ÄÇ200‚ÄÇmiles‚ÄÇ(300‚ÄÇkm).‚ÄÇYou‚ÄÇshould‚ÄÇalso‚ÄÇfollow‚ÄÇthis‚ÄÇ
when‚ÄÇthe‚ÄÇbrake‚ÄÇpads‚ÄÇare‚ÄÇreplaced.
Your‚ÄÇvehicle‚ÄÇhas‚ÄÇbeen‚ÄÇdesigned‚ÄÇprimarily‚ÄÇfor‚ÄÇuse‚ÄÇon‚ÄÇpavement;‚ÄÇhowever,‚ÄÇits‚ÄÇhigher‚ÄÇ
ground‚ÄÇclearance‚ÄÇallows‚ÄÇyou‚ÄÇto‚ÄÇoccasionally‚ÄÇtravel‚ÄÇon‚ÄÇunpaved‚ÄÇroads.‚ÄÇIt‚ÄÇis‚ÄÇnot‚ÄÇ
designed‚ÄÇfor‚ÄÇtrail-blazing‚ÄÇor‚ÄÇother‚ÄÇchallenging‚ÄÇoff-road‚ÄÇactivities.
If‚ÄÇyou‚ÄÇdecide‚ÄÇto‚ÄÇdrive‚ÄÇon‚ÄÇunpaved‚ÄÇroads,‚ÄÇyou‚ÄÇwill‚ÄÇfind‚ÄÇthat‚ÄÇit‚ÄÇrequires‚ÄÇsomewhat‚ÄÇ
different driving skills and that your vehicle will handle somewhat diff\
erently than
it does on pavement. Pay attention to the precautions and tips in this s\
ection, and
get‚ÄÇacquainted‚ÄÇwith‚ÄÇyour‚ÄÇvehicle‚ÄÇbefore‚ÄÇleaving‚ÄÇthe‚ÄÇpavement.
Improperly‚ÄÇoperating‚ÄÇthis‚ÄÇvehicle‚ÄÇon‚ÄÇor‚ÄÇoff‚ÄÇpavement‚ÄÇcan‚ÄÇcause‚ÄÇa‚ÄÇcrash‚ÄÇor‚ÄÇ
rollover‚ÄÇin‚ÄÇwhich‚ÄÇyou‚ÄÇand‚ÄÇyour‚ÄÇpassengers‚ÄÇcan‚ÄÇbe‚ÄÇseriously‚ÄÇhurt‚ÄÇor‚ÄÇkilled.
Follow all instructions and guidelines in this guide.
Keep your speed low, and don’t drive faster than conditions permit.
WARNING
Interior Checks • 
Store‚ÄÇor‚ÄÇsecure‚ÄÇall‚ÄÇitems‚ÄÇon‚ÄÇboard‚ÄÇproperly.
• Do not pile items higher than the seat height.
• Do not place anything in the front seat footwells. Make sure to secure the floor 
mats.
• 
If‚ÄÇyou‚ÄÇhave‚ÄÇany‚ÄÇanimals‚ÄÇon‚ÄÇboard,‚ÄÇdo‚ÄÇnot‚ÄÇlet‚ÄÇthem‚ÄÇmove‚ÄÇfreely‚ÄÇaround‚ÄÇin‚ÄÇthe‚ÄÇ
vehicle.
•  Securely close and lock all doors and the tailgate.
•  Adjust your seating position, mirrors, and steering wheel properly.
• 
Make‚ÄÇsure‚ÄÇitems‚ÄÇplaced‚ÄÇon‚ÄÇthe‚ÄÇfloor‚ÄÇbehind‚ÄÇthe‚ÄÇfront‚ÄÇseats‚ÄÇcannot‚ÄÇroll‚ÄÇunder‚ÄÇthe‚ÄÇ
seats.
• 
Everyone‚ÄÇin‚ÄÇthe‚ÄÇvehicle‚ÄÇmust‚ÄÇfasten‚ÄÇtheir‚ÄÇseat‚ÄÇbelt.
•  Make sure that the indicators in the instrument panel come on when you s\
tart
the vehicle, and go off soon after.
Page 52 of 80
96 ||‚ÄÇ‚ÄÇ‚ÄÇ‚ÄÇ97
DRIVING
DRIVING
Exceeding‚ÄÇany‚ÄÇload‚ÄÇlimit‚ÄÇor‚ÄÇimproperly‚ÄÇloading‚ÄÇyour‚ÄÇvehicle‚ÄÇand‚ÄÇtrailer‚ÄÇcan‚ÄÇ
cause‚ÄÇa‚ÄÇcrash‚ÄÇin‚ÄÇwhich‚ÄÇyou‚ÄÇcan‚ÄÇbe‚ÄÇseriously‚ÄÇhurt‚ÄÇor‚ÄÇkilled.
Check‚ÄÇthe‚ÄÇloading‚ÄÇof‚ÄÇyour‚ÄÇvehicle‚ÄÇand‚ÄÇtrailer‚ÄÇcarefully‚ÄÇbefore‚ÄÇstarting‚ÄÇto‚ÄÇdrive.
WARNING
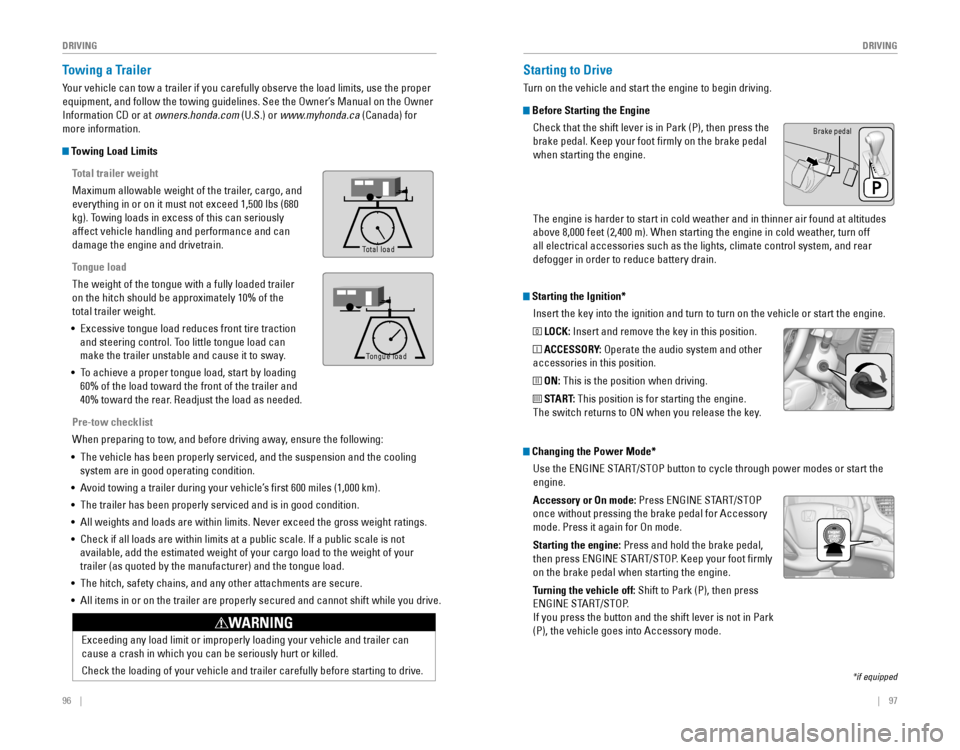
Towing a Trailer
Your‚ÄÇvehicle‚ÄÇcan‚ÄÇtow‚ÄÇa‚ÄÇtrailer‚ÄÇif‚ÄÇyou‚ÄÇcarefully‚ÄÇobserve‚ÄÇthe‚ÄÇload‚ÄÇlimits,‚ÄÇuse‚ÄÇthe‚ÄÇproper‚ÄÇ
equipment, and follow the towing guidelines. See the Owner’s Manual on the Owner 
Information‚ÄÇCD‚ÄÇor‚ÄÇat‚ÄÇowners.honda.com (U.S.) or www.myhonda.ca (Canada) for
more information.
Towing Load Limits
Total trailer weight
Maximum‚ÄÇallowable‚ÄÇweight‚ÄÇof‚ÄÇthe‚ÄÇtrailer,‚ÄÇcargo,‚ÄÇand‚ÄÇ
everything‚ÄÇin‚ÄÇor‚ÄÇon‚ÄÇit‚ÄÇmust‚ÄÇnot‚ÄÇexceed‚ÄÇ1,500‚ÄÇlbs‚ÄÇ(680‚ÄÇ
kg). Towing loads in excess of this can seriously
affect vehicle handling and performance and can
damage the engine and drivetrain.
Tongue load
The weight of the tongue with a fully loaded trailer
on‚ÄÇthe‚ÄÇhitch‚ÄÇshould‚ÄÇbe‚ÄÇapproximately‚ÄÇ10%‚ÄÇof‚ÄÇthe‚ÄÇ
total trailer weight.
• 
Excessive‚ÄÇtongue‚ÄÇload‚ÄÇreduces‚ÄÇfront‚ÄÇtire‚ÄÇtraction‚ÄÇ
and steering control. Too little tongue load can
make‚ÄÇthe‚ÄÇtrailer‚ÄÇunstable‚ÄÇand‚ÄÇcause‚ÄÇit‚ÄÇto‚ÄÇsway.
• To achieve a proper tongue load, start by loading 
60%‚ÄÇof‚ÄÇthe‚ÄÇload‚ÄÇtoward‚ÄÇthe‚ÄÇfront‚ÄÇof‚ÄÇthe‚ÄÇtrailer‚ÄÇand‚ÄÇ
40%‚ÄÇtoward‚ÄÇthe‚ÄÇrear.‚ÄÇReadjust‚ÄÇthe‚ÄÇload‚ÄÇas‚ÄÇneeded.
Pre-tow checklist
When‚ÄÇpreparing‚ÄÇto‚ÄÇtow,‚ÄÇand‚ÄÇbefore‚ÄÇdriving‚ÄÇaway,‚ÄÇensure‚ÄÇthe‚ÄÇfollowing:
• The vehicle has been properly serviced, and the suspension and the cooling 
system are in good operating condition.
•  Avoid towing a trailer during your vehicle’s first 600 miles (1,000 km).
• 
The‚ÄÇtrailer‚ÄÇhas‚ÄÇbeen‚ÄÇproperly‚ÄÇserviced‚ÄÇand‚ÄÇis‚ÄÇin‚ÄÇgood‚ÄÇcondition.
•  All weights and loads are within limits. Never exceed the gross weight r\
atings.
• 
Check‚ÄÇif‚ÄÇall‚ÄÇloads‚ÄÇare‚ÄÇwithin‚ÄÇlimits‚ÄÇat‚ÄÇa‚ÄÇpublic‚ÄÇscale.‚ÄÇIf‚ÄÇa‚ÄÇpublic‚ÄÇscale‚ÄÇis‚ÄÇnot‚ÄÇ
available,‚ÄÇadd‚ÄÇthe‚ÄÇestimated‚ÄÇweight‚ÄÇof‚ÄÇyour‚ÄÇcargo‚ÄÇload‚ÄÇto‚ÄÇthe‚ÄÇweight‚ÄÇof‚ÄÇyour‚ÄÇ
trailer‚ÄÇ(as‚ÄÇquoted‚ÄÇby‚ÄÇthe‚ÄÇmanufacturer)‚ÄÇand‚ÄÇthe‚ÄÇtongue‚ÄÇload.
•  The hitch, safety chains, and any other attachments are secure.
•  All items in or on the trailer are properly secured and cannot shift whi\
le you drive.
To ng ue Loa d
Tong ue Loa d
Total load
Tongue load
Starting the Ignition*
Insert‚ÄÇthe‚ÄÇkey‚ÄÇinto‚ÄÇthe‚ÄÇignition‚ÄÇand‚ÄÇturn‚ÄÇto‚ÄÇturn‚ÄÇon‚ÄÇthe‚ÄÇvehicle‚ÄÇor‚ÄÇstart‚ÄÇthe‚ÄÇengine.
0 LOCK: Insert‚ÄÇand‚ÄÇremove‚ÄÇthe‚ÄÇkey‚ÄÇin‚ÄÇthis‚ÄÇposition.
I ACCESSORY: Operate the audio system and other
accessories in this position.
II ON: This is the position when driving.
III START: This position is for starting the engine.
The switch returns to ON when you release the key.
Starting to Drive
Turn‚ÄÇon‚ÄÇthe‚ÄÇvehicle‚ÄÇand‚ÄÇstart‚ÄÇthe‚ÄÇengine‚ÄÇto‚ÄÇbegin‚ÄÇdriving.
Before Starting the Engine
Check that the shift lever is in Park (P), then press the
brake‚ÄÇpedal.‚ÄÇKeep‚ÄÇyour‚ÄÇfoot‚ÄÇfirmly‚ÄÇon‚ÄÇthe‚ÄÇbrake‚ÄÇpedal‚ÄÇ
when starting the engine.
Brake pedal
The engine is harder to start in cold weather and in thinner air found a\
t altitudes
above‚ÄÇ8,000‚ÄÇfeet‚ÄÇ(2,400‚ÄÇm).‚ÄÇWhen‚ÄÇstarting‚ÄÇthe‚ÄÇengine‚ÄÇin‚ÄÇcold‚ÄÇweather,‚ÄÇturn‚ÄÇoff‚ÄÇ
all electrical accessories such as the lights, climate control system, a\
nd rear
defogger‚ÄÇin‚ÄÇorder‚ÄÇto‚ÄÇreduce‚ÄÇbattery‚ÄÇdrain.
*if‚ÄÇequipped
Changing the Power Mode*Use the
ENGINE‚ÄÇSTART/STOP‚ÄÇbutton‚ÄÇto‚ÄÇcycle‚ÄÇthrough‚ÄÇpower‚ÄÇmodes‚ÄÇor‚ÄÇstart‚ÄÇthe‚ÄÇ
engine.
Accessory or On mode:
Press‚ÄÇENGINE‚ÄÇSTART/STOP‚ÄÇ
once‚ÄÇwithout‚ÄÇpressing‚ÄÇthe‚ÄÇbrake‚ÄÇpedal‚ÄÇfor‚ÄÇAccessory‚ÄÇ
mode. Press it again for On mode.
Starting the engine:
Press‚ÄÇand‚ÄÇhold‚ÄÇthe‚ÄÇbrake‚ÄÇpedal,‚ÄÇ
then‚ÄÇpress‚ÄÇENGINE‚ÄÇSTART/STOP.‚ÄÇKeep‚ÄÇyour‚ÄÇfoot‚ÄÇfirmly‚ÄÇ
on‚ÄÇthe‚ÄÇbrake‚ÄÇpedal‚ÄÇwhen‚ÄÇstarting‚ÄÇthe‚ÄÇengine.
Turning the vehicle off: Shift to Park (P), then press
ENGINE‚ÄÇSTART/STOP.
If‚ÄÇyou‚ÄÇpress‚ÄÇthe‚ÄÇbutton‚ÄÇand‚ÄÇthe‚ÄÇshift‚ÄÇlever‚ÄÇis‚ÄÇnot‚ÄÇin‚ÄÇPark‚ÄÇ
(P), the vehicle goes into Accessory mode.
Page 54 of 80
100 || 101
DRIVING
DRIVING
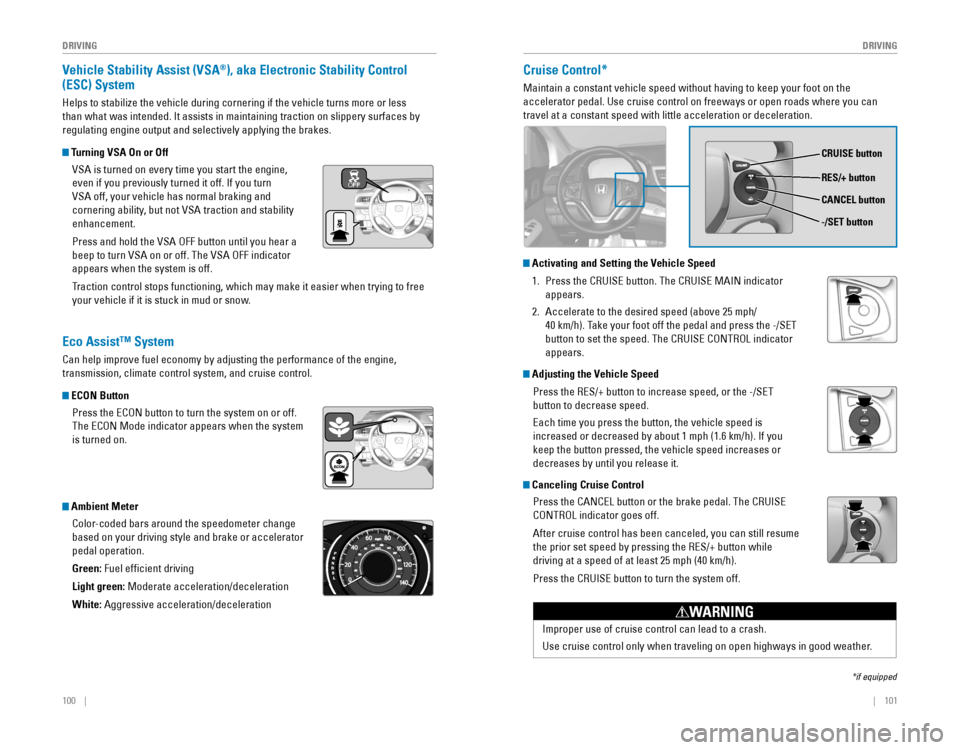
Vehicle Stability Assist (VSA®), aka Electronic Stability Control
(ESC) System
Helps‚ÄÇto‚ÄÇstabilize‚ÄÇthe‚ÄÇvehicle‚ÄÇduring‚ÄÇcornering‚ÄÇif‚ÄÇthe‚ÄÇvehicle‚ÄÇturns‚ÄÇmore‚ÄÇor‚ÄÇless‚ÄÇ
than‚ÄÇwhat‚ÄÇwas‚ÄÇintended.‚ÄÇIt‚ÄÇassists‚ÄÇin‚ÄÇmaintaining‚ÄÇtraction‚ÄÇon‚ÄÇslippery‚ÄÇsurfaces‚ÄÇby‚ÄÇ
regulating‚ÄÇengine‚ÄÇoutput‚ÄÇand‚ÄÇselectively‚ÄÇapplying‚ÄÇthe‚ÄÇbrakes.
Turning VSA On or Off
VSA is turned on every time you start the engine,
even‚ÄÇif‚ÄÇyou‚ÄÇpreviously‚ÄÇturned‚ÄÇit‚ÄÇoff.‚ÄÇIf‚ÄÇyou‚ÄÇturn‚ÄÇ
VSA‚ÄÇoff,‚ÄÇyour‚ÄÇvehicle‚ÄÇhas‚ÄÇnormal‚ÄÇbraking‚ÄÇand‚ÄÇ
cornering‚ÄÇability,‚ÄÇbut‚ÄÇnot‚ÄÇVSA‚ÄÇtraction‚ÄÇand‚ÄÇstability‚ÄÇ
enhancement.
Press‚ÄÇand‚ÄÇhold‚ÄÇthe‚ÄÇVSA‚ÄÇOFF‚ÄÇbutton‚ÄÇuntil‚ÄÇyou‚ÄÇhear‚ÄÇa‚ÄÇ
beep‚ÄÇto‚ÄÇturn‚ÄÇVSA‚ÄÇon‚ÄÇor‚ÄÇoff.‚ÄÇThe‚ÄÇVSA‚ÄÇOFF‚ÄÇindicator‚ÄÇ
appears when the system is off.
Traction control stops functioning, which may make it easier when trying to free
your vehicle if it is stuck in mud or snow.
Cruise Control*
Maintain a constant vehicle speed without having to keep your foot on th\
e
accelerator pedal. Use cruise control on freeways or open roads where yo\
u can
travel at a constant speed with little acceleration or deceleration.
*if‚ÄÇequipped
Eco Assist‚Ñ¢ System
Can‚ÄÇhelp‚ÄÇimprove‚ÄÇfuel‚ÄÇeconomy‚ÄÇby‚ÄÇadjusting‚ÄÇthe‚ÄÇperformance‚ÄÇof‚ÄÇthe‚ÄÇengine,‚ÄÇ
transmission, climate control system, and cruise control.
ECON Button
Press‚ÄÇthe‚ÄÇECON‚ÄÇbutton‚ÄÇto‚ÄÇturn‚ÄÇthe‚ÄÇsystem‚ÄÇon‚ÄÇor‚ÄÇoff.‚ÄÇ
The‚ÄÇECON‚ÄÇMode‚ÄÇindicator‚ÄÇappears‚ÄÇwhen‚ÄÇthe‚ÄÇsystem‚ÄÇ
is turned on.
Ambient Meter
Color-coded‚ÄÇbars‚ÄÇaround‚ÄÇthe‚ÄÇspeedometer‚ÄÇchange‚ÄÇ
based‚ÄÇon‚ÄÇyour‚ÄÇdriving‚ÄÇstyle‚ÄÇand‚ÄÇbrake‚ÄÇor‚ÄÇaccelerator‚ÄÇ
pedal operation.
Green: Fuel efficient driving
Light green:
‚ÄÇModerate‚ÄÇacceleration/deceleration
White:‚ÄÇAggressive‚ÄÇacceleration/deceleration
CRUISE button
RES/+ button
-/SET button CANCEL button
Improper‚ÄÇuse‚ÄÇof‚ÄÇcruise‚ÄÇcontrol‚ÄÇcan‚ÄÇlead‚ÄÇto‚ÄÇa‚ÄÇcrash.
Use cruise control only when traveling on open highways in good weather.
WARNING
Activating and Setting the Vehicle Speed
1. Press‚ÄÇthe‚ÄÇCRUISE‚ÄÇbutton.‚ÄÇThe‚ÄÇCRUISE‚ÄÇMAIN‚ÄÇindicator‚ÄÇ
appears.
2. Accelerate‚ÄÇto‚ÄÇthe‚ÄÇdesired‚ÄÇspeed‚ÄÇ(above‚ÄÇ25‚ÄÇmph/
40‚ÄÇkm/h).‚ÄÇTake‚ÄÇyour‚ÄÇfoot‚ÄÇoff‚ÄÇthe‚ÄÇpedal‚ÄÇand‚ÄÇpress‚ÄÇthe‚ÄÇ-/SET‚ÄÇ
button‚ÄÇto‚ÄÇset‚ÄÇthe‚ÄÇspeed.‚ÄÇThe‚ÄÇCRUISE‚ÄÇCONTROL‚ÄÇindicator‚ÄÇ
appears.
Adjusting the Vehicle Speed
Press‚ÄÇthe‚ÄÇRES/+‚ÄÇbutton‚ÄÇto‚ÄÇincrease‚ÄÇspeed,‚ÄÇor‚ÄÇthe‚ÄÇ-/SET‚ÄÇ
button‚ÄÇto‚ÄÇdecrease‚ÄÇspeed.
Each‚ÄÇtime‚ÄÇyou‚ÄÇpress‚ÄÇthe‚ÄÇbutton,‚ÄÇthe‚ÄÇvehicle‚ÄÇspeed‚ÄÇis‚ÄÇ
increased‚ÄÇor‚ÄÇdecreased‚ÄÇby‚ÄÇabout‚ÄÇ1‚ÄÇmph‚ÄÇ(1.6‚ÄÇkm/h).‚ÄÇIf‚ÄÇyou‚ÄÇ
keep‚ÄÇthe‚ÄÇbutton‚ÄÇpressed,‚ÄÇthe‚ÄÇvehicle‚ÄÇspeed‚ÄÇincreases‚ÄÇor‚ÄÇ
decreases‚ÄÇby‚ÄÇuntil‚ÄÇyou‚ÄÇrelease‚ÄÇit.
Canceling Cruise Control
Press‚ÄÇthe‚ÄÇCANCEL‚ÄÇbutton‚ÄÇor‚ÄÇthe‚ÄÇbrake‚ÄÇpedal.‚ÄÇThe‚ÄÇCRUISE‚ÄÇ
CONTROL indicator goes off.
After‚ÄÇcruise‚ÄÇcontrol‚ÄÇhas‚ÄÇbeen‚ÄÇcanceled,‚ÄÇyou‚ÄÇcan‚ÄÇstill‚ÄÇresume‚ÄÇ
the‚ÄÇprior‚ÄÇset‚ÄÇspeed‚ÄÇby‚ÄÇpressing‚ÄÇthe‚ÄÇRES/+‚ÄÇbutton‚ÄÇwhile‚ÄÇ
driving‚ÄÇat‚ÄÇa‚ÄÇspeed‚ÄÇof‚ÄÇat‚ÄÇleast‚ÄÇ25‚ÄÇmph‚ÄÇ(40‚ÄÇkm/h).
Press‚ÄÇthe‚ÄÇCRUISE‚ÄÇbutton‚ÄÇto‚ÄÇturn‚ÄÇthe‚ÄÇsystem‚ÄÇoff.
Page 56 of 80
104‚ÄÇ‚ÄÇ‚ÄÇ‚ÄÇ|| 105
DRIVING
DRIVING
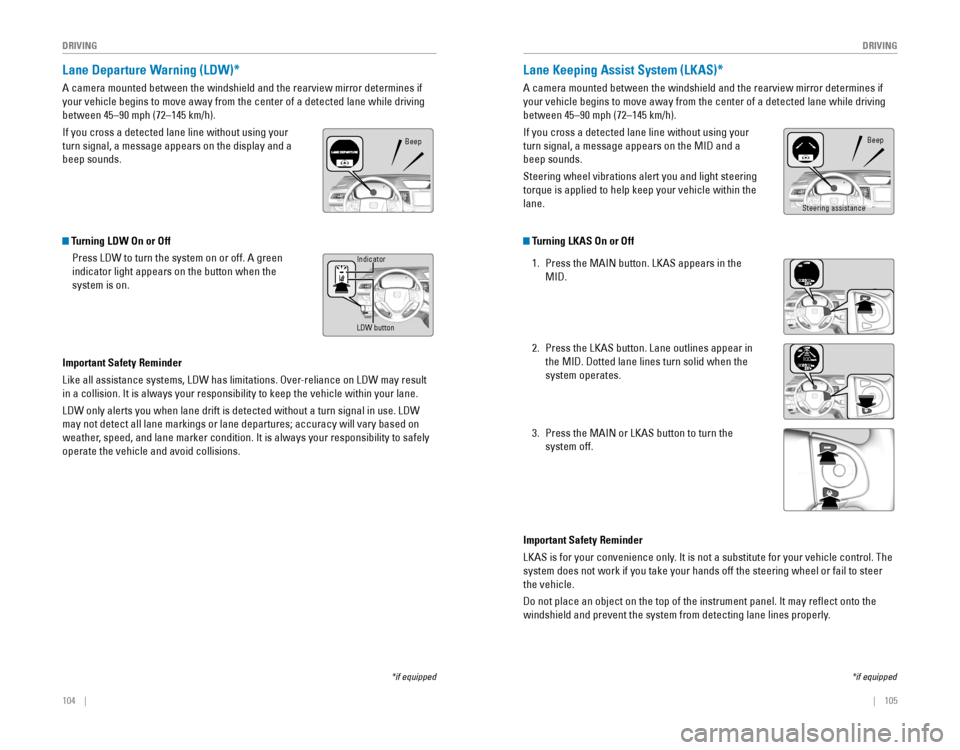
Lane Departure Warning (LDW)*
A‚ÄÇcamera‚ÄÇmounted‚ÄÇbetween‚ÄÇthe‚ÄÇwindshield‚ÄÇand‚ÄÇthe‚ÄÇrearview‚ÄÇmirror‚ÄÇdetermines‚ÄÇif‚ÄÇ
your‚ÄÇvehicle‚ÄÇbegins‚ÄÇto‚ÄÇmove‚ÄÇaway‚ÄÇfrom‚ÄÇthe‚ÄÇcenter‚ÄÇof‚ÄÇa‚ÄÇdetected‚ÄÇlane‚ÄÇwhile‚ÄÇdriving‚ÄÇ
between 45–90 mph (72–145 km/h).
If‚ÄÇyou‚ÄÇcross‚ÄÇa‚ÄÇdetected‚ÄÇlane‚ÄÇline‚ÄÇwithout‚ÄÇusing‚ÄÇyour‚ÄÇ
turn signal, a message appears on the display and a
beep‚ÄÇsounds.
*if‚ÄÇequipped
Beep
*if‚ÄÇequipped
Lane Keeping Assist System (LKAS)*
A‚ÄÇcamera‚ÄÇmounted‚ÄÇbetween‚ÄÇthe‚ÄÇwindshield‚ÄÇand‚ÄÇthe‚ÄÇrearview‚ÄÇmirror‚ÄÇdetermines‚ÄÇif‚ÄÇ
your‚ÄÇvehicle‚ÄÇbegins‚ÄÇto‚ÄÇmove‚ÄÇaway‚ÄÇfrom‚ÄÇthe‚ÄÇcenter‚ÄÇof‚ÄÇa‚ÄÇdetected‚ÄÇlane‚ÄÇwhile‚ÄÇdriving‚ÄÇ
between 45–90 mph (72–145 km/h).
If‚ÄÇyou‚ÄÇcross‚ÄÇa‚ÄÇdetected‚ÄÇlane‚ÄÇline‚ÄÇwithout‚ÄÇusing‚ÄÇyour‚ÄÇ
turn‚ÄÇsignal,‚ÄÇa‚ÄÇmessage‚ÄÇappears‚ÄÇon‚ÄÇthe‚ÄÇMID‚ÄÇand‚ÄÇa‚ÄÇ
beep‚ÄÇsounds.
Steering‚ÄÇwheel‚ÄÇvibrations‚ÄÇalert‚ÄÇyou‚ÄÇand‚ÄÇlight‚ÄÇsteering‚ÄÇ
torque‚ÄÇis‚ÄÇapplied‚ÄÇto‚ÄÇhelp‚ÄÇkeep‚ÄÇyour‚ÄÇvehicle‚ÄÇwithin‚ÄÇthe‚ÄÇ
lane.
Beep
Steering assistance
Turning LDW On or Off
Press‚ÄÇLDW‚ÄÇto‚ÄÇturn‚ÄÇthe‚ÄÇsystem‚ÄÇon‚ÄÇor‚ÄÇoff.‚ÄÇA‚ÄÇgreen‚ÄÇ
indicator‚ÄÇlight‚ÄÇappears‚ÄÇon‚ÄÇthe‚ÄÇbutton‚ÄÇwhen‚ÄÇthe‚ÄÇ
system is on.
Important Safety Reminder
Like‚ÄÇall‚ÄÇassistance‚ÄÇsystems,‚ÄÇLDW‚ÄÇhas‚ÄÇlimitations.‚ÄÇOver-reliance‚ÄÇon‚ÄÇLDW‚ÄÇmay‚ÄÇresult‚ÄÇ
in‚ÄÇa‚ÄÇcollision.‚ÄÇIt‚ÄÇis‚ÄÇalways‚ÄÇyour‚ÄÇresponsibility‚ÄÇto‚ÄÇkeep‚ÄÇthe‚ÄÇvehicle‚ÄÇwithin‚ÄÇyour‚ÄÇlane.‚ÄÇ
LDW‚ÄÇonly‚ÄÇalerts‚ÄÇyou‚ÄÇwhen‚ÄÇlane‚ÄÇdrift‚ÄÇis‚ÄÇdetected‚ÄÇwithout‚ÄÇa‚ÄÇturn‚ÄÇsignal‚ÄÇin‚ÄÇuse.‚ÄÇLDW‚ÄÇ
may‚ÄÇnot‚ÄÇdetect‚ÄÇall‚ÄÇlane‚ÄÇmarkings‚ÄÇor‚ÄÇlane‚ÄÇdepartures;‚ÄÇaccuracy‚ÄÇwill‚ÄÇvary‚ÄÇbased‚ÄÇon‚ÄÇ
weather,‚ÄÇspeed,‚ÄÇand‚ÄÇlane‚ÄÇmarker‚ÄÇcondition.‚ÄÇIt‚ÄÇis‚ÄÇalways‚ÄÇyour‚ÄÇresponsibility‚ÄÇto‚ÄÇsafely‚ÄÇ
operate the vehicle and avoid collisions.
LDW‚ÄÇbutton
Indicator
Turning LKAS On or Off
1. Press‚ÄÇthe‚ÄÇMAIN‚ÄÇbutton.‚ÄÇLKAS‚ÄÇappears‚ÄÇin‚ÄÇthe‚ÄÇ
MID.
2. Press‚ÄÇthe‚ÄÇLKAS‚ÄÇbutton.‚ÄÇLane‚ÄÇoutlines‚ÄÇappear‚ÄÇin‚ÄÇ
the‚ÄÇMID.‚ÄÇDotted‚ÄÇlane‚ÄÇlines‚ÄÇturn‚ÄÇsolid‚ÄÇwhen‚ÄÇthe‚ÄÇ
system operates.
3. Press‚ÄÇthe‚ÄÇMAIN‚ÄÇor‚ÄÇLKAS‚ÄÇbutton‚ÄÇto‚ÄÇturn‚ÄÇthe‚ÄÇ
system off.
Important Safety Reminder
LKAS‚ÄÇis‚ÄÇfor‚ÄÇyour‚ÄÇconvenience‚ÄÇonly.‚ÄÇIt‚ÄÇis‚ÄÇnot‚ÄÇa‚ÄÇsubstitute‚ÄÇfor‚ÄÇyour‚ÄÇvehicle‚ÄÇcontrol.‚ÄÇThe‚ÄÇ
system does not work if you take your hands off the steering wheel or fa\
il to steer
the vehicle.
Do‚ÄÇnot‚ÄÇplace‚ÄÇan‚ÄÇobject‚ÄÇon‚ÄÇthe‚ÄÇtop‚ÄÇof‚ÄÇthe‚ÄÇinstrument‚ÄÇpanel.‚ÄÇIt‚ÄÇmay‚ÄÇreflect‚ÄÇonto‚ÄÇthe‚ÄÇ
windshield and prevent the system from detecting lane lines properly.