stop start HONDA CR-V 2018 (in English) Owners Manual
[x] Cancel search | Manufacturer: HONDA, Model Year: 2018, Model line: CR-V, Model: HONDA CR-V 2018Pages: 679, PDF Size: 23.22 MB
Page 629 of 679
627
uuEngine Does Not Start uIf the Smart Entry Remote Battery is Weak
Handling the Unexpected
If the Smart Entry Remote Battery is Weak
If the beeper sounds and the To Start, Hold Remote Near Start Button message
appears on the driver information interface; and the ENGINE START/STOP button
flashes and the engine will not st art. Start the engine as follows:
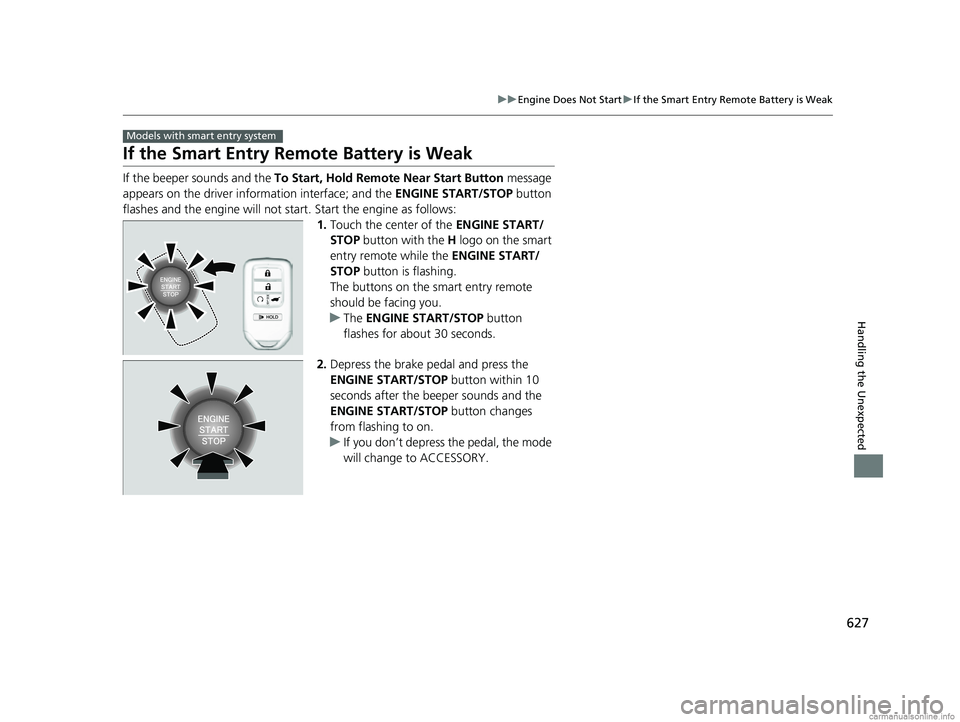
1.Touch the center of the ENGINE START/
STOP button with the H logo on the smart
entry remote while the ENGINE START/
STOP button is flashing.
The buttons on the smart entry remote
should be facing you.
u The ENGINE START/STOP button
flashes for about 30 seconds.
2. Depress the brake pedal and press the
ENGINE START/STOP button within 10
seconds after the beeper sounds and the
ENGINE START/STOP button changes
from flashing to on.
u If you don’t depress the pedal, the mode
will change to ACCESSORY.
Models with smart entry system
18 CR-V-31TLA6100.book 627 ページ 2017年9月7日 木曜日 午後3時56分
Page 630 of 679
628
uuEngine Does Not StartuEmergency Engine Stop
Handling the Unexpected
Emergency Engine Stop
The ENGINE START/STOP button may be used to st op the engine due to an
emergency situation even while driving. If you must stop the engine, do either of the
following operations:
• Press and hold the ENGINE START/STOP button for about two seconds.
• Firmly press the ENGINE START/STOP button three times.
The steering wheel will not lock. However, because turning off the engine disables
the power assist the engine provides to the steering and braking systems, it will
require significantly more physical effort an d time to steer and slow the vehicle. Use
both feet on the brake pedal to slow down the vehicle and stop immediately in a
safe place.
The power mode is in ACCESSORY when the engine is stopped.
To change the mode to VEHICLE OFF, change the shift lever to
(P after the vehicle
comes to a complete stop.
Then press the ENGINE START/STOP button twice without depressing the brake
pedal.
Models with smart entry system
1 Emergency Engine Stop
Do not press the button while driving unless it is
absolutely necessary for th e engine to be switched
off.
Canadian models
18 CR-V-31TLA6100.book 628 ページ 2017年9月7日 木曜日 午後3時56分
Page 633 of 679
631
uuJump Starting u
Handling the Unexpected
Once your vehicle's engine has started, re move the jumper cables in the following
order:
1. Disconnect the jumper cable from your vehicle's ground.
2. Disconnect the other end of the jump er cable from the booster battery -
terminal.
3. Disconnect the jumper cable from your vehicle's battery + terminal.
4. Disconnect the other end of the jump er cable from the booster battery +
terminal.
Have your vehicle inspected by a n earby service station or a dealer.
*1: Models with the smart entry system have an ENGINE START/STOP button instead of an
ignition switch.
■What to Do After the Engine Starts1 What to Do After the Engine Starts
The indicators for the Adaptive Cruise Control (ACC)
with Low Speed Follow (LSF)
*, Road Departure
Mitigation (RDM)*, Vehicle Stability Assist (VSA ®)
system, Vehicle Stability Assist (VSA ®) OFF, Collision
Mitigation Braking System
TM (CMBSTM)*, low tire
pressure/Tire Pressure Monitoring System (TPMS),
and Parking Brake and Br ake System (Amber) may
come on along with a message in the Driver
Information Interface
* when you turn the ignition
switch to ON
( w*1 after reconnect ing the battery.
Drive a short distance at more than 12 mph (20 km/
h). The indicator should go of f. If it does not, have
your vehicle checked by a dealer.
* Not available on all models
18 CR-V-31TLA6100.book 631 ページ 2017年9月7日 木曜日 午後3時56分
Page 637 of 679
Continued635
uuOverheating uHow to Handle Overheating
Handling the Unexpected
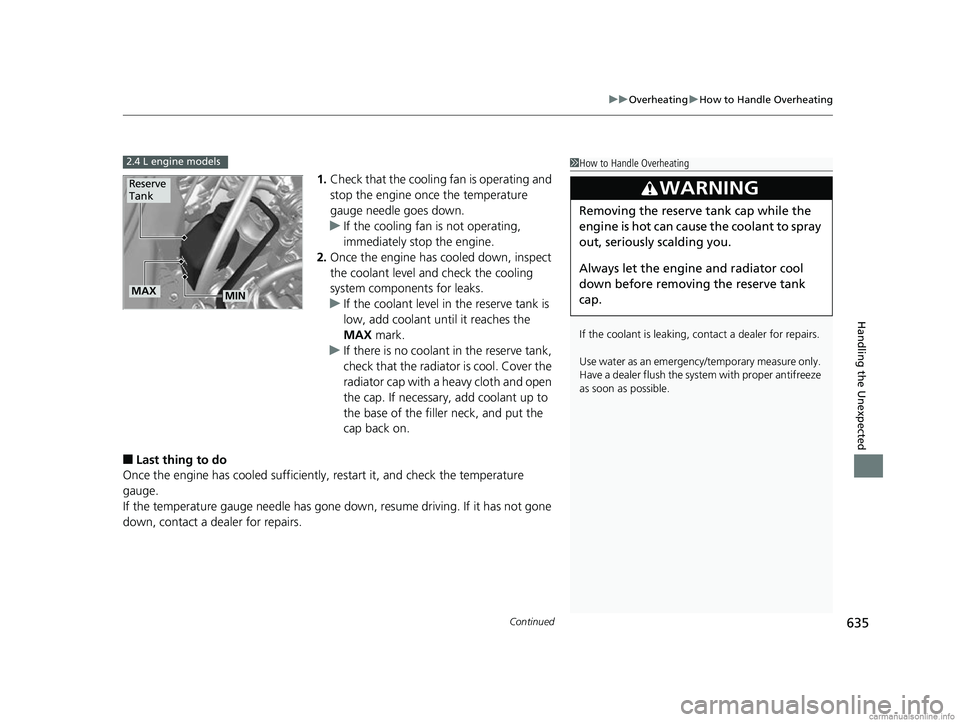
1. Check that the cooling fan is operating and
stop the engine once the temperature
gauge needle goes down.
u If the cooling fan is not operating,
immediately stop the engine.
2. Once the engine has cooled down, inspect
the coolant level and check the cooling
system components for leaks.
u If the coolant level in the reserve tank is
low, add coolant until it reaches the
MAX mark.
u If there is no coolant in the reserve tank,
check that the radiator is cool. Cover the
radiator cap with a heavy cloth and open
the cap. If necessary, add coolant up to
the base of the filler neck, and put the
cap back on.
■Last thing to do
Once the engine has cooled sufficiently, restart it, and check the temperature
gauge.
If the temperature gauge needle has gone dow n, resume driving. If it has not gone
down, contact a dealer for repairs.
1 How to Handle Overheating
If the coolant is leaking, contact a dealer for repairs.
Use water as an emergency/temporary measure only.
Have a dealer flush the system with proper antifreeze
as soon as possible.
3WARNING
Removing the reserve tank cap while the
engine is hot can cause the coolant to spray
out, seriously scalding you.
Always let the engine and radiator cool
down before removing the reserve tank
cap.
2.4 L engine models
Reserve
Tank
MAXMIN
18 CR-V-31TLA6100.book 635 ページ 2017年9月7日 木曜日 午後3時56分
Page 639 of 679
637
Handling the Unexpected
Indicator, Coming On/Blinking
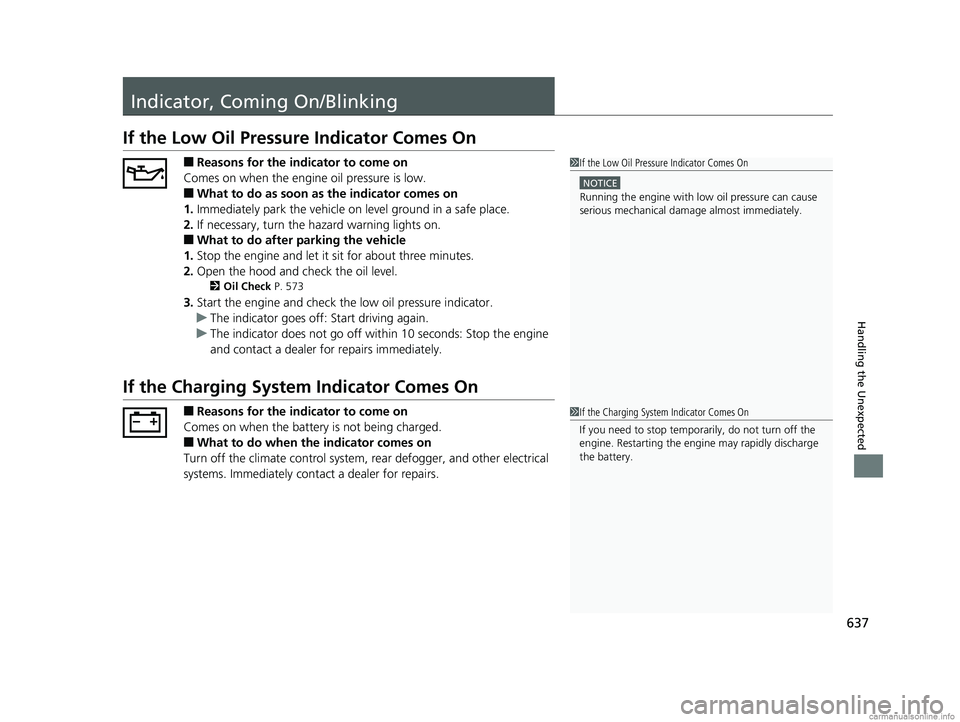
If the Low Oil Pressure Indicator Comes On
■Reasons for the indicator to come on
Comes on when the engine oil pressure is low.
■What to do as soon as the indicator comes on
1. Immediately park the vehicle on level ground in a safe place.
2. If necessary, turn the hazard warning lights on.
■What to do after parking the vehicle
1. Stop the engine and let it sit for about three minutes.
2. Open the hood and check the oil level.
2 Oil Check P. 573
3.Start the engine and check th e low oil pressure indicator.
u The indicator goes off: Start driving again.
u The indicator does not go off with in 10 seconds: Stop the engine
and contact a dealer for repairs immediately.
If the Charging System Indicator Comes On
■Reasons for the indicator to come on
Comes on when the battery is not being charged.
■What to do when th e indicator comes on
Turn off the climate control system, rear defogger, and other electrical
systems. Immediately cont act a dealer for repairs.
1If the Low Oil Pressure Indicator Comes On
NOTICE
Running the engine with low oil pressure can cause
serious mechanical damage almost immediately.
1If the Charging System Indicator Comes On
If you need to stop temporarily, do not turn off the
engine. Restarting the engi ne may rapidly discharge
the battery.
18 CR-V-31TLA6100.book 637 ページ 2017年9月7日 木曜日 午後3時56分
Page 640 of 679
638
uuIndicator, Coming On/BlinkinguIf the Malfunction Indicator Lamp Comes On or Blinks
Handling the Unexpected
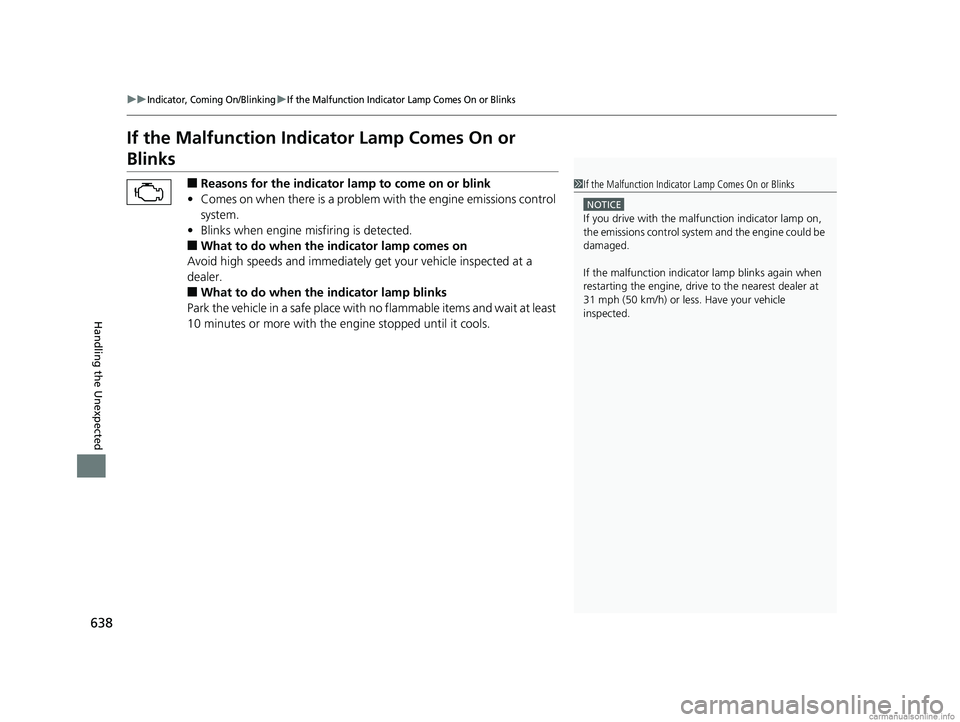
If the Malfunction Indicator Lamp Comes On or
Blinks
■Reasons for the indicator lamp to come on or blink
• Comes on when there is a problem with the engine emissions control
system.
• Blinks when engine misfiring is detected.
■What to do when the indicator lamp comes on
Avoid high speeds and immediately get your vehicle inspected at a
dealer.
■What to do when the indicator lamp blinks
Park the vehicle in a safe place with no flammable items and wait at least
10 minutes or more with the engine stopped until it cools.
1 If the Malfunction Indicato r Lamp Comes On or Blinks
NOTICE
If you drive with the malf unction indicator lamp on,
the emissions control system and the engine could be
damaged.
If the malfunction indicator lamp blinks again when
restarting the engine, drive to the nearest dealer at
31 mph (50 km/h) or less. Have your vehicle
inspected.
18 CR-V-31TLA6100.book 638 ページ 2017年9月7日 木曜日 午後3時56分
Page 644 of 679
642
uuIndicator, Coming On/Blinking uIf the Electric Power Steering (EPS) System Indicator Comes On
Handling the Unexpected
■What to do when the indicator comes on
Stop the vehicle in a safe place and restart the engine.
If the indicator comes on and stays on, immediately have your vehicle
inspected by a dealer.
• If the Adaptive Cruise Control ( ACC) with Low Speed Follow (LSF)
*,
Road Departure Mitigation (RDM)*, Vehicle Stability Assist (VSA ®)
system, Vehicle Stability Assist (VSA ®) OFF, Collision Mitigation
Braking System
TM (CMBSTM)*, low tire pressure/Tire Pressure
Monitoring System (TPMS), and Parking Brake and Brake System
(Amber) indicators come on alon g with a message in the Driver
Information Interface
*, you need to calibrate the VSA ® and EPS
systems.
Drive at a speed of more than 12 mph (20 km/h) for less than 10
seconds to calibrate the VSA ® and EPS systems.
If the indicators come on and stay on, park your vehicle in a safe
place, turn off and restart the engine, then repeat the above
operation.
If the indicators still come on and stay on, immediately have your
vehicle inspected by a dealer.
* Not available on all models
18 CR-V-31TLA6100.book 642 ページ 2017年9月7日 木曜日 午後3時56分
Page 646 of 679
644
Handling the Unexpected
Fuses
Fuse Locations
If any electrical devices are not working,
turn the ignition switch to LOCK
(0*1 and
check to see if any appl icable fuse is blown.
Fuse locations are shown on the fuse box
cover. Locate the fuse in question by the
fuse number and box cover number.
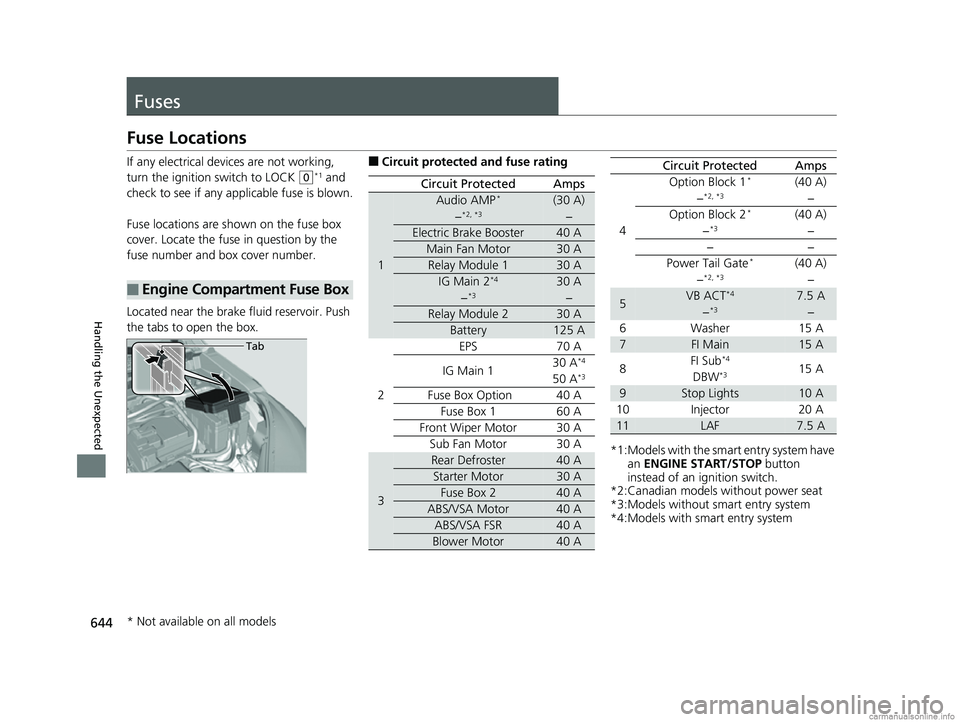
Located near the brake fluid reservoir. Push
the tabs to open the box.
■Engine Compartment Fuse Box
Tab
■Circuit protected and fuse rating
Circuit ProtectedAmps
1
Audio AMP*(30 A)
−*2, *3−
Electric Brake Booster40 A
Main Fan Motor30 A
Relay Module 130 A
IG Main 2*430 A
−*3−
Relay Module 230 A
Battery125 A
2
EPS70 A
IG Main 130 A*4
50 A*3
Fuse Box Option40 A
Fuse Box 160 A
Front Wiper Motor30 A
Sub Fan Motor30 A
3
Rear Defroster40 A
Starter Motor30 A
Fuse Box 240 A
ABS/VSA Motor40 A
ABS/VSA FSR40 A
Blower Motor40 A
*1:Models with the sma rt entry system have
an ENGINE START/STOP button
instead of an ignition switch.
*2:Canadian models without power seat
*3:Models without smart entry system
*4:Models with smart entry system
4
Option Block 1*(40 A)
−*2, *3−
Option Block 2*(40 A)
−*3−
−−
Power Tail Gate*(40 A)
−*2, *3−
5VB ACT*47.5 A
−*3−
6Washer15 A
7FI Main15 A
8FI Sub*415 ADBW*3
9Stop Lights10 A
10Injector20 A
11LAF7.5 A
Circuit ProtectedAmps
* Not available on all models
18 CR-V-31TLA6100.book 644 ページ 2017年9月7日 木曜日 午後3時56分
Page 649 of 679
647
uuFuses uInspecting and Changing Fuses
Handling the Unexpected
Inspecting and Changing Fuses
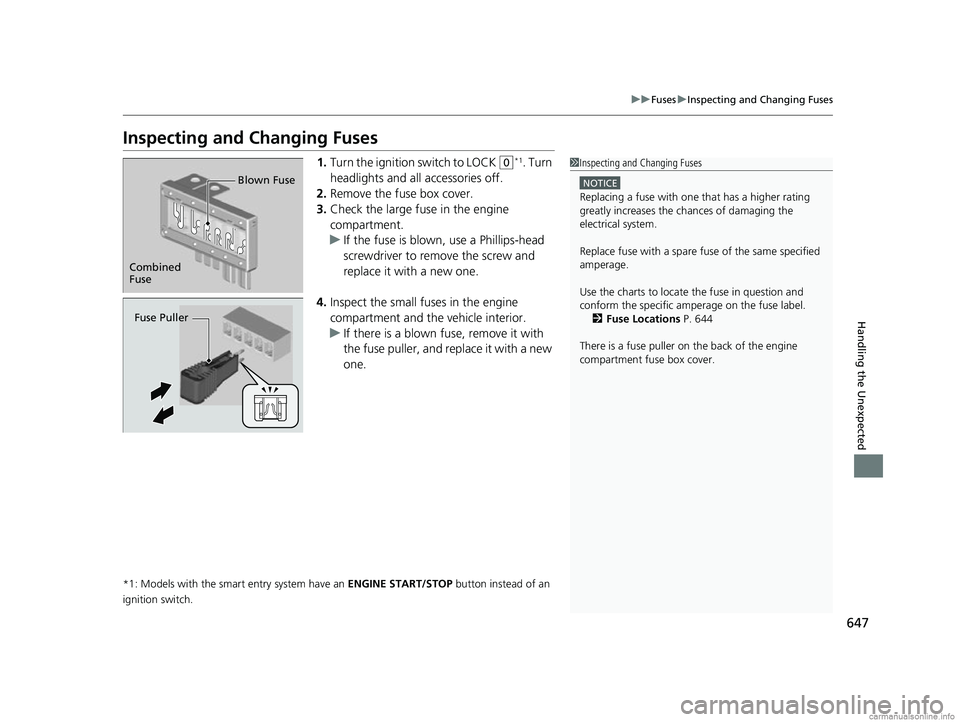
1. Turn the ignition switch to LOCK (0*1. Turn
headlights and all accessories off.
2. Remove the fuse box cover.
3. Check the large fuse in the engine
compartment.
u If the fuse is blown, use a Phillips-head
screwdriver to remove the screw and
replace it with a new one.
4. Inspect the small fu ses in the engine
compartment and the vehicle interior.
u If there is a blown fuse, remove it with
the fuse puller, and replace it with a new
one.
*1: Models with the smart entry system have an ENGINE START/STOP button instead of an
ignition switch.
1 Inspecting and Changing Fuses
NOTICE
Replacing a fuse with on e that has a higher rating
greatly increases the chances of damaging the
electrical system.
Replace fuse with a spare fuse of the same specified
amperage.
Use the charts to locate the fuse in question and
conform the specific amperage on the fuse label. 2 Fuse Locations P. 644
There is a fuse puller on the back of the engine
compartment fuse box cover.
Combined
Fuse Blown Fuse
Fuse Puller
18 CR-V-31TLA6100.book 647 ページ 2017年9月7日 木曜日 午後3時56分
Page 660 of 679
658
Information
Emissions Testing
Testing of Readiness Codes
Your vehicle has readiness code as part of the onboard self diagnostic system.
Some States use these codes for testing to verify whether your vehicle's emissions
components are working properly.
The codes may not be read properly if testing is performed just after the battery has
gone dead or been disconnected.
To check if they are set, turn the ignition switch to ON
(w*1, without starting the
engine. The malfunction indicator lamp will come on for several seconds. If it then
goes off, the readiness codes are set. If it blinks five times, the readiness codes are
not set.
If you are required to have your vehicle te sted before the readiness codes are ready,
prepare the vehicle for retesting by doing the following:
1. Fill the gas tank to approximately 3/4 full.
2. Park the vehicle and leave the engine off for 6 hours or more.
3. Make sure the ambient temperature is between 40°F and 95°F (4°C and 35°C).
4. Start the engine without touching the accelerator pedal, and let it idle for 20
seconds.
5. Keep the vehicle in
(P. Increase the engine speed to 2,000 rpm, and hold it there
for about 3 minutes.
6. Let the engine idle with your foot off the accelerator for 20 seconds.
*1: Models with the smart entry system have an ENGINE START/STOP button
instead of an ignition switch.
1 Testing of Readiness Codes
The readiness codes are erased when the battery is
disconnected, and set again only after several days of
driving under a variety of conditions.
If a testing facility determines that the readiness
codes are not set, you may be requested to return at
a later date to complete the test.
If the testing facility determines the readiness codes
are still not set, see a dealer.
18 CR-V-31TLA6100.book 658 ページ 2017年9月7日 木曜日 午後3時56分