Auto push HONDA CR-V 2020 (in English) User Guide
[x] Cancel search | Manufacturer: HONDA, Model Year: 2020, Model line: CR-V, Model: HONDA CR-V 2020Pages: 671, PDF Size: 33.11 MB
Page 171 of 671
169
uuPanoramic Roof*1uOpening/Closing the Panoramic Roof
Controls
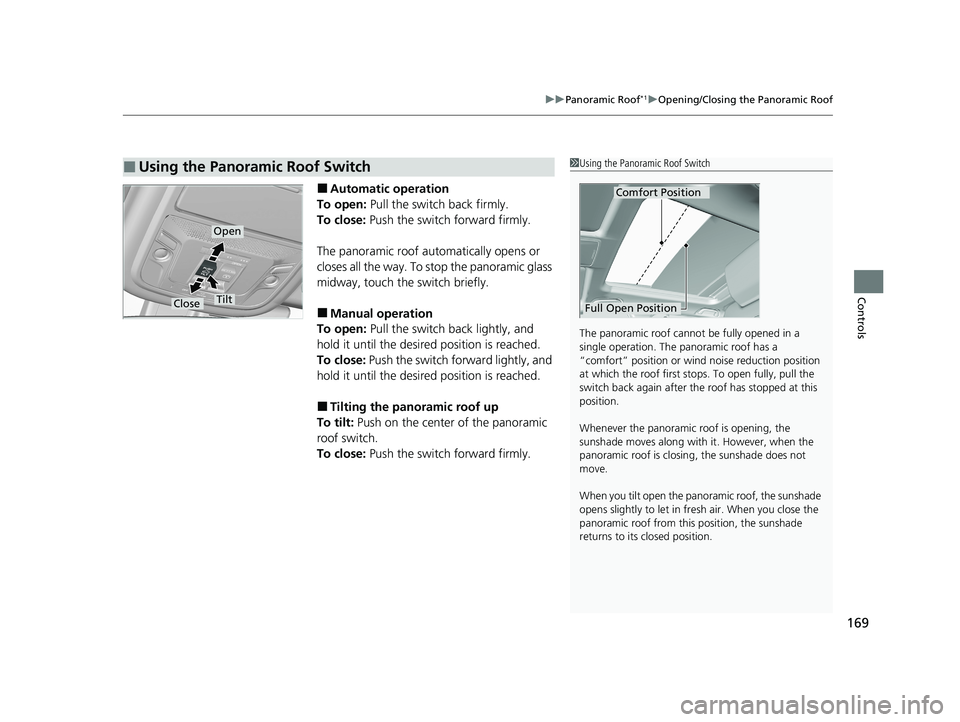
■Automatic operation
To open: Pull the switch back firmly.
To close: Push the switch forward firmly.
The panoramic roof automatically opens or
closes all the way. To stop the panoramic glass
midway, touch the switch briefly.
■Manual operation
To open: Pull the switch back lightly, and
hold it until the desired position is reached.
To close: Push the switch forward lightly, and
hold it until the desired position is reached.
■Tilting the panoramic roof up
To tilt: Push on the center of the panoramic
roof switch.
To close: Push the switch forward firmly.
■Using the Panoramic Roof Switch1Using the Panoramic Roof Switch
The panoramic roof cannot be fully opened in a
single operation. The pa noramic roof has a
“comfort” position or wind noise reduction position
at which the roof first stops. To open fully, pull the
switch back again after the roof has stopped at this
position.
Whenever the panoramic roof is opening, the
sunshade moves along with it. However, when the
panoramic roof is closin g, the sunshade does not
move.
When you tilt open the panoramic roof, the sunshade
opens slightly to let in fr esh air. When you close the
panoramic roof from this position, the sunshade
returns to its closed position.
Comfort Position
Full Open Position
Open
CloseTilt
20 CR-V PET ELP_MAP_HMIN_HCM_J-31TLA6310.book 169 ページ 2019年10月3日 木曜日 午後4時55分
Page 178 of 671
176
uuOperating the Switches Around the Steering Wheel uLight Switches
Controls
Light Switches
Rotating the light switch turns the lights on
and off, regardless of the power mode setting
or position of the ignition switch.
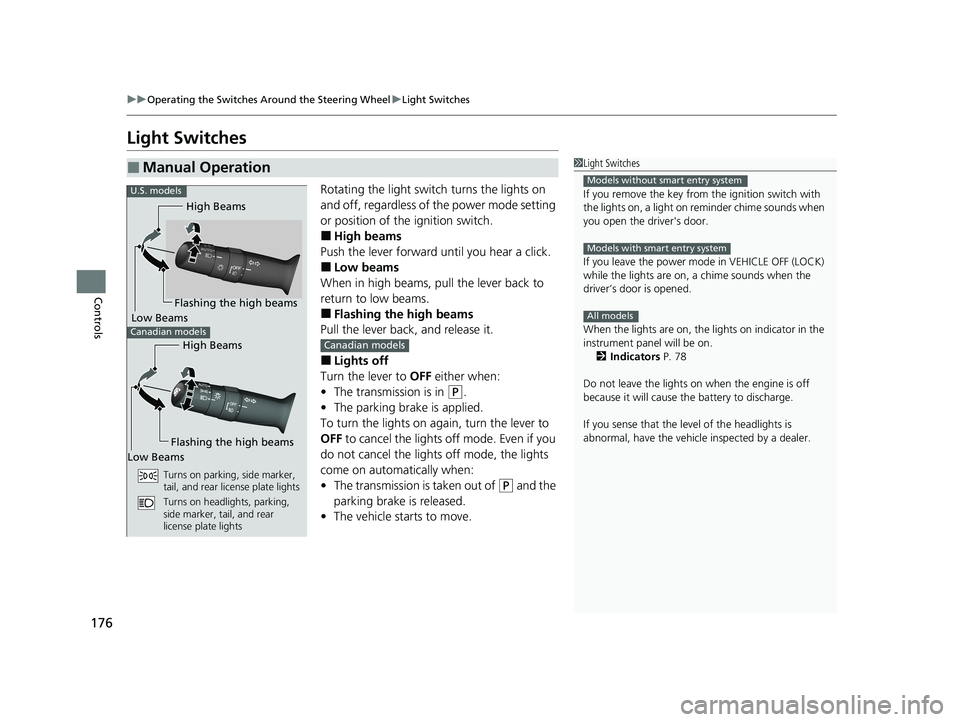
■High beams
Push the lever forward until you hear a click.
■Low beams
When in high beams, pull the lever back to
return to low beams.
■Flashing the high beams
Pull the lever back, and release it.
■Lights off
Turn the lever to OFF either when:
• The transmission is in
(P.
• The parking brake is applied.
To turn the lights on again, turn the lever to
OFF to cancel the lights off mode. Even if you
do not cancel the lights off mode, the lights
come on automatically when:
• The transmission is taken out of
(P and the
parking brake is released.
• The vehicle starts to move.
■Manual Operation1Light Switches
If you remove the key from the ignition switch with
the lights on, a light on reminder chime sounds when
you open the driver's door.
If you leave the power mode in VEHICLE OFF (LOCK)
while the lights are on, a chime sounds when the
driver’s door is opened.
When the lights are on, the lights on indicator in the
instrument pane l will be on.
2 Indicators P. 78
Do not leave the lights on when the engine is off
because it will cause the battery to discharge.
If you sense that the le vel of the headlights is
abnormal, have the vehicl e inspected by a dealer.
Models without smart entry system
Models with smart entry system
All models
U.S. models
High Beams
Flashing the high beams
Low Beams
Turns on parking, side marker,
tail, and rear license plate lights
Turns on headlights, parking,
side marker, tail, and rear
license plate lights
Canadian models
High Beams
Flashing the high beams
Low BeamsCanadian models
20 CR-V PET ELP_MAP_HMIN_HCM_J-31TLA6310.book 176 ページ 2019年10月3日 木曜日 午後4時55分
Page 189 of 671
Continued187
uuOperating the Switches Around the Steering Wheel uWipers and Washers
Controls
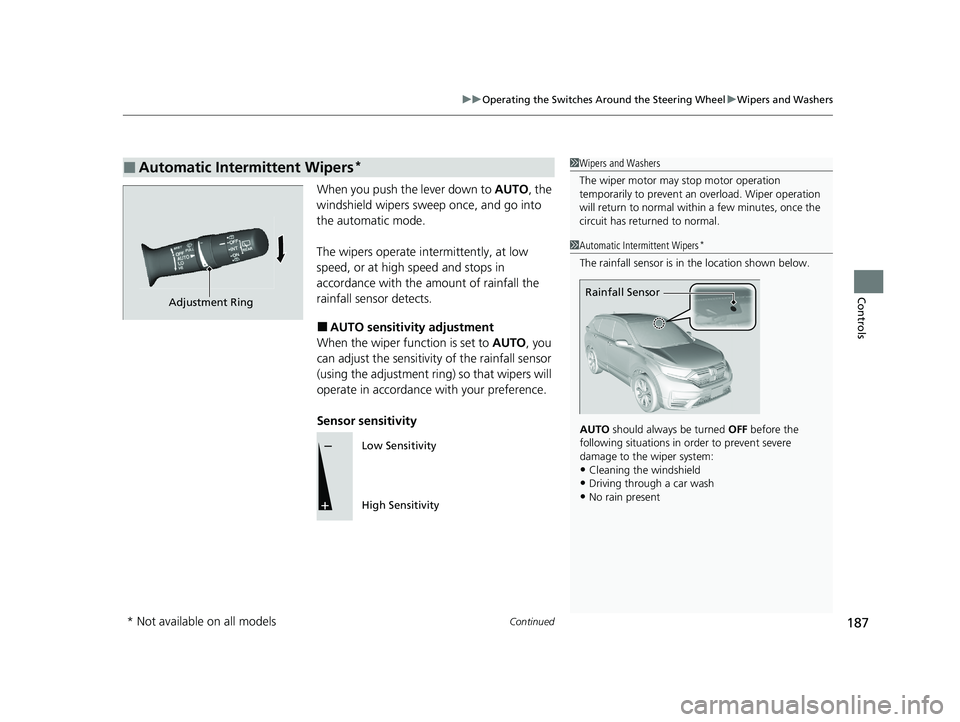
When you push the lever down to AUTO, the
windshield wipers sweep once, and go into
the automatic mode.
The wipers operate intermittently, at low
speed, or at high speed and stops in
accordance with the amount of rainfall the
rainfall sensor detects.
■AUTO sensitivity adjustment
When the wiper function is set to AUTO, you
can adjust the sensitivity of the rainfall sensor
(using the adjustment ring) so that wipers will
operate in accordance with your preference.
Sensor sensitivity
■Automatic Intermittent Wipers*1 Wipers and Washers
The wiper motor may stop motor operation
temporarily to prevent an overload. Wiper operation
will return to normal within a few minutes, once the
circuit has returned to normal.
Adjustment Ring
1 Automatic Intermittent Wipers*
The rainfall sensor is in the location shown below.
AUTO should always be turned OFF before the
following situations in order to prevent severe
damage to the wiper system:
•Cleaning the windshield•Driving through a car wash
•No rain present
Rainfall Sensor
Low Sensitivity
High Sensitivity
* Not available on all models
20 CR-V PET ELP_MAP_HMIN_HCM_J-31TLA6310.book 187 ページ 2019年10月3日 木曜日 午後4時55分
Page 386 of 671
384
uuCustomized Features u
Features
*1:Default SettingSetup
Group Customizable Features Desc
ription Selectable Settings
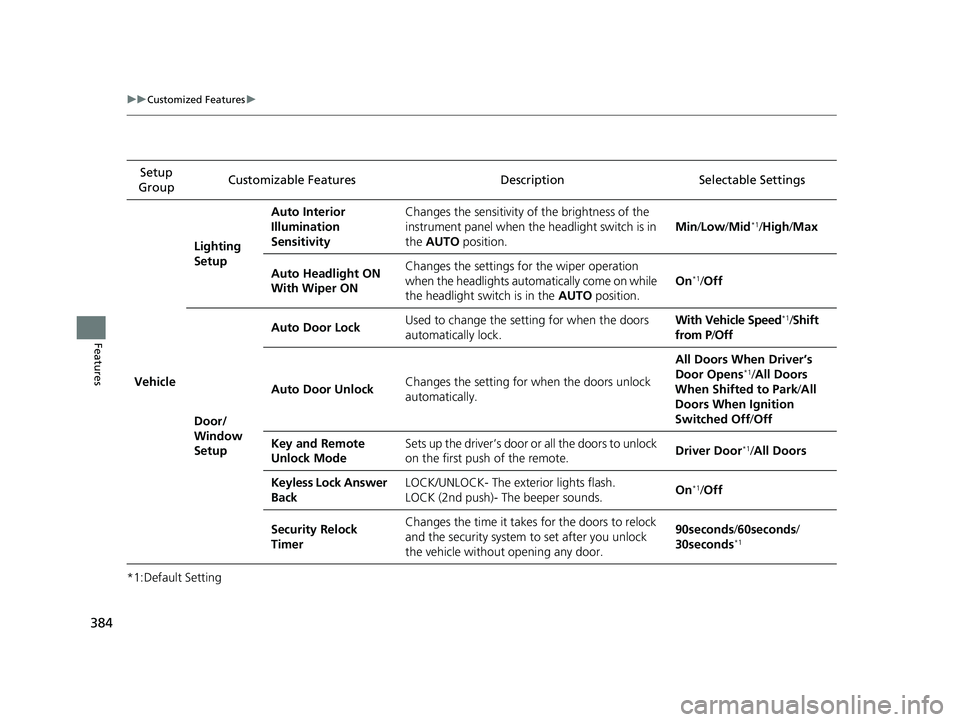
Vehicle
Lighting
Setup
Auto Interior
Illumination
SensitivityChanges the sensitivity of the brightness of the
instrument panel when the headlight switch is in
the AUTO position.
Min/Low /Mid*1/ High /Max
Auto Headlight ON
With Wiper ONChanges the settings fo r the wiper operation
when the headlights auto matically come on while
the headlight switch is in the AUTO position.
On*1/Off
Door/
Window
Setup
Auto Door LockUsed to change the setting for when the doors
automatically lock.With Vehicle Speed*1/Shift
from P /Off
Auto Door UnlockChanges the setting for when the doors unlock
automatically.
All Doors When Driver’s
Door Opens*1/ All Doors
When Shifted to Park /All
Doors When Ignition
Switched Off /Off
Key and Remote
Unlock ModeSets up the driver’s door or all the doors to unlock
on the first push of the remote.Driver Door*1/All Doors
Keyless Lock Answer
BackLOCK/UNLOCK- The exterior lights flash.
LOCK (2nd push)- The beeper sounds.On*1/Off
Security Relock
TimerChanges the time it takes for the doors to relock
and the security system to set after you unlock
the vehicle without opening any door.90seconds /60seconds /
30seconds*1
20 CR-V PET ELP_MAP_HMIN_HCM_J-31TLA6310.book 384 ページ 2019年10月3日 木曜日 午後4時55分
Page 532 of 671
uuBraking uBrake System
530
Driving
■Activating and deactivating the au tomatic parking brake feature
With the ignition switch is in ON
(w*1, carry out the following steps to either activate
or deactivate the automatic parking brake feature.
1. Shift the select lever to
(P.
2. Without depressing the brake pedal, pull up and release the parking brake switch.
u Check that the parking brake and br ake system indicator has come on.
3. Pull up and hold the parking brake swit ch. When you hear a beeping sound,
release the switch and wi thin 3 seconds pull up and hold the switch again.
4. When you hear a sound indicating that the procedure is completed, release the
switch.
u Two beeps indicates that the feature has been activated.
u One beep indicates that the feature has been deactivated.
u When you have completed activating the feature, the parking brake will
remain applied after you turn off the engine.
u To confirm that the parking brake is ap plied, check if the parking brake and
brake system indicator is on.
If you need to tem porarily deactivate the feature for when putting your vehicle
through a conveyor type car wash or when having your vehicle towed. You can
follow the procedure explained below.
1. Depress the brake pedal and bring the vehicle to a stop.
2. Turn the ignition switch to LOCK
(0*1 and then within 2 seconds push down the
parking brake switch.
u Activation and deactivation settings fo r the feature will not be affected.
u Before temporarily deactivating the feat ure, make sure to first turn off both
ACC with Low Speed Follow and th e automatic brake hold system.
u To confirm that the parking brake is ap plied, check if the parking brake and
brake system indicator is on.
*1: Models with the smart entry system have an ENGINE START/STOP button instead of an
ignition switch.
1 Parking brake system
In cold climates, the parking brake may freeze in
place if applied.
When parking the vehicle, chock the wheels and
make sure the automatic parking brake feature is
deactivated.
Also, when putting your vehicle through a conveyor-
type car wash or when ha ving your vehicle towed,
deactivate the automatic parking brake feature and
leave the parking brake released.
20 CR-V PET ELP_MAP_HMIN_HCM_J-31TLA6310.book 530 ページ 2019年10月3日 木曜日 午後4時55分
Page 572 of 671
570
uuMaintenance Under the Hood uOpening the Hood
Maintenance
Opening the Hood
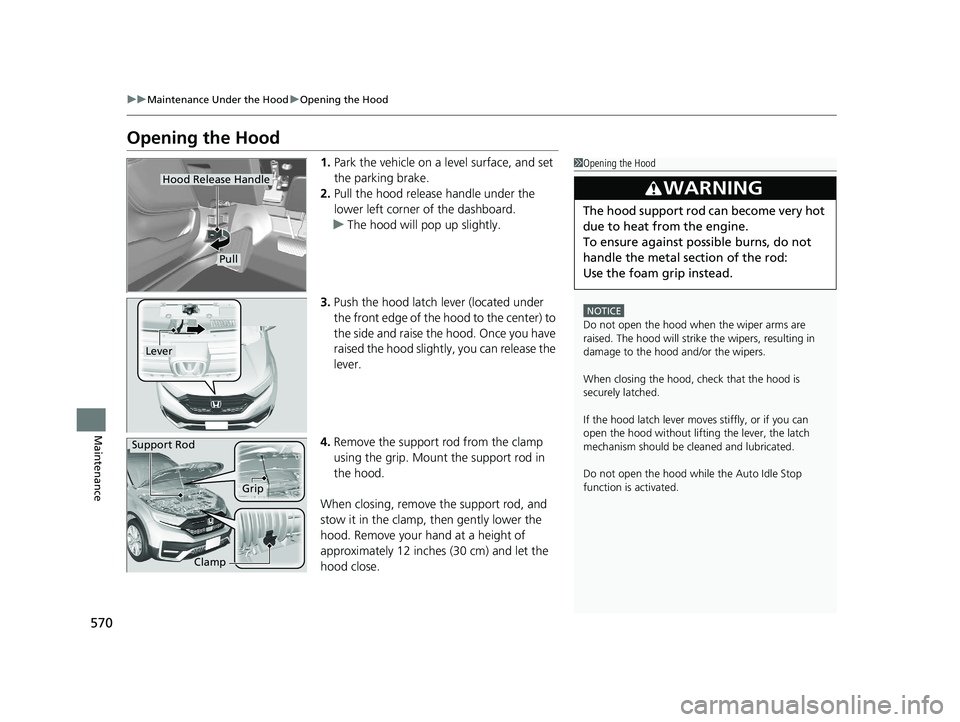
1. Park the vehicle on a level surface, and set
the parking brake.
2. Pull the hood release handle under the
lower left corner of the dashboard.
u The hood will pop up slightly.
3. Push the hood latch lever (located under
the front edge of the hood to the center) to
the side and raise the hood. Once you have
raised the hood slightly, you can release the
lever.
4. Remove the support rod from the clamp
using the grip. Mount the support rod in
the hood.
When closing, remove the support rod, and
stow it in the clamp, then gently lower the
hood. Remove your hand at a height of
approximately 12 inches (30 cm) and let the
hood close.1 Opening the Hood
NOTICE
Do not open the hood when the wiper arms are
raised. The hood will strike the wipers, resulting in
damage to the hood and/or the wipers.
When closing the hood, check that the hood is
securely latched.
If the hood latch lever moves stiffly, or if you can
open the hood without lifti ng the lever, the latch
mechanism should be cl eaned and lubricated.
Do not open the hood while the Auto Idle Stop
function is activated.
3WARNING
The hood support rod can become very hot
due to heat fr om the engine.
To ensure against po ssible burns, do not
handle the metal section of the rod:
Use the foam grip instead.
Hood Release Handle
Pull
Lever
Support Rod
Grip
Clamp
20 CR-V PET ELP_MAP_HMIN_HCM_J-31TLA6310.book 570 ページ 2019年10月3日 木曜日 午後4時55分