replace HONDA CR-V 2021 (in English) Owner's Guide
[x] Cancel search | Manufacturer: HONDA, Model Year: 2021, Model line: CR-V, Model: HONDA CR-V 2021Pages: 690, PDF Size: 42.09 MB
Page 592 of 690
591
uuMaintenance Under the Hood uCooling System
Continued
Maintenance
Cooling System
This coolant is premixed with 50% an tifreeze and 50% water. Do not add any
straight antifreeze or water.
We recommend you check the engine coolant level every time you refuel. Check the
reserve tank first. If it is completely empty, also check the coolant level in the
radiator. Add the engine coolant accordingly.
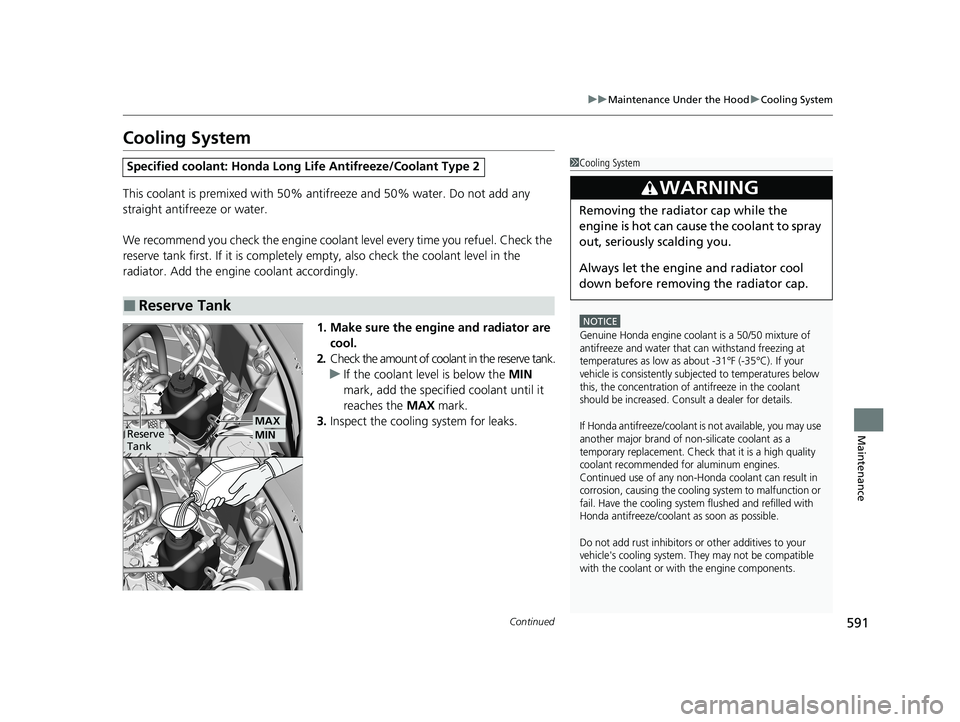
1. Make sure the engine and radiator are cool.
2. Check the amount of cool ant in the reserve tank.
u If the coolant level is below the MIN
mark, add the specified coolant until it
reaches the MAX mark.
3. Inspect the cooling system for leaks.
Specified coolant: Ho nda Long Life Antifreeze/Coolant Type 2
■Reserve Tank
1Cooling System
NOTICE
Genuine Honda engine coolant is a 50/50 mixture of
antifreeze and water that can withstand freezing at
temperatures as low as about -31°F (-35°C). If your
vehicle is consistently subjected to temperatures below
this, the concentration of antifreeze in the coolant
should be increased. Consult a dealer for details.
If Honda antifreeze/coolant is not available, you may use
another major brand of non-silicate coolant as a
temporary replacement. Check that it is a high quality
coolant recommended for aluminum engines.
Continued use of any non-Honda coolant can result in
corrosion, causing the cooling system to malfunction or
fail. Have the cooling system flushed and refilled with
Honda antifreeze/coolant as soon as possible.
Do not add rust inhibitors or other additives to your
vehicle's cooling system. They may not be compatible
with the coolant or with the engine components.
3WARNING
Removing the radiator cap while the
engine is hot can cause the coolant to spray
out, seriously scalding you.
Always let the engine and radiator cool
down before removing the radiator cap.
Reserve
TankMAX
MIN
21 CR-V HYBRID HMIN-31TPG6100.book 591 ページ 2020年9月14日 月曜日 午前11時36分
Page 594 of 690
593
uuMaintenance Under the Hood uTransmission Fluid
Maintenance
Transmission Fluid
Have a dealer check the fluid level and replace if necessary.
Do not attempt to check or change the transmission fluid yourself.
Specified fluid: Honda ATF DW-11Transmission Fluid
NOTICE
Do not mix Honda ATF DW-1 with other
transmission fluids.
Using a transmission fluid other than Honda ATF DW-1
may adversely affect the op eration and durability of
your vehicle’s transmission, and damage the
transmission.
Any damage caused by using a transmission fluid that
is not equivalent to Honda ATF DW-1 is not covered
by Honda’s new vehicle limited warranty.
21 CR-V HYBRID HMIN-31TPG6100.book 593 ページ 2020年9月14日 月曜日 午前11時36分
Page 595 of 690
594
uuMaintenance Under the Hood uBrake Fluid
Maintenance
Brake Fluid
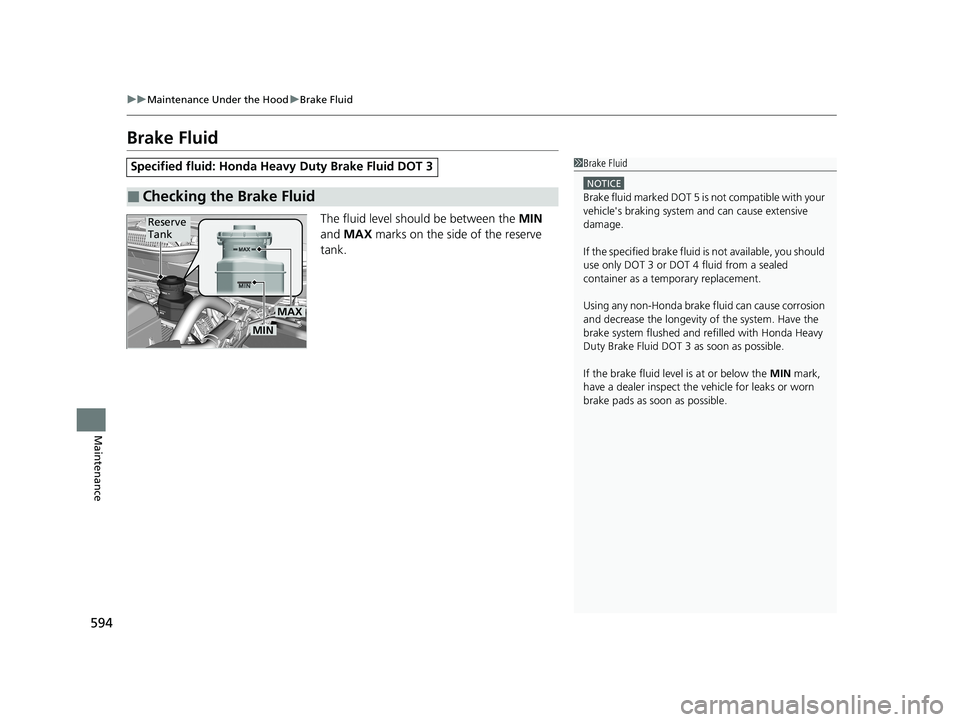
The fluid level should be between the MIN
and MAX marks on the side of the reserve
tank.
Specified fluid: Honda Heavy Duty Brake Fluid DOT 3
■Checking the Brake Fluid
1Brake Fluid
NOTICE
Brake fluid marked DOT 5 is not compatible with your
vehicle's braking system and can cause extensive
damage.
If the specified br ake fluid is not av ailable, you should
use only DOT 3 or DOT 4 fluid from a sealed
container as a temporary replacement.
Using any non-Honda brake fluid can cause corrosion
and decrease the longevity of the system. Have the
brake system flushed and re filled with Honda Heavy
Duty Brake Fluid DOT 3 as soon as possible.
If the brake fluid level is at or below the MIN mark,
have a dealer inspect the vehicle for leaks or worn
brake pads as soon as possible.
Reserve
Tank
MIN
MAX
21 CR-V HYBRID HMIN-31TPG6100.book 594 ページ 2020年9月14日 月曜日 午前11時36分
Page 597 of 690
596
Maintenance
Replacing Light Bulbs
Headlights
Headlights are LED type. Have an authorized Honda dealer inspect and replace the
light assembly.
Fog Lights*
Fog lights are LED type. Have an authoriz ed Honda dealer inspect and replace the
light assembly.
Parking/Daytime Running Lights
Parking/daytime running lights are LED type . Have an authorized Honda dealer
inspect and replace the light assembly.
Front Turn Signal/Front Side Marker Lights
Front turn signal lights/front side marker lights are LED type. Have an authorized
Honda dealer inspect and re place the light assembly.
Side Turn Signal/Emergency Indicator Lights*
Door mirror side turn signal lights are LE D type. Have an authorized Honda dealer
inspect and replace the light assembly.
Brake/Taillights, Rear Turn Signal Lights and Rear
Side Marker Lights
Brake/taillights, rear turn sign al lights and rear side marker lights are LED type. Have
an authorized Honda dealer inspec t and replace the light assembly.
1Headlights
The headlight aim is set by the factory, and does not
need to be adjusted. Howeve r, if you regularly carry
heavy items in the cargo area or tow a trailer, have
the aiming readjusted at a dealer or by a qualified
technician.
* Not available on all models
21 CR-V HYBRID HMIN-31TPG6100.book 596 ページ 2020年9月14日 月曜日 午前11時36分
Page 598 of 690
597
uuReplacing Light Bulbs uTaillights and Back-Up Light Bulbs
Maintenance
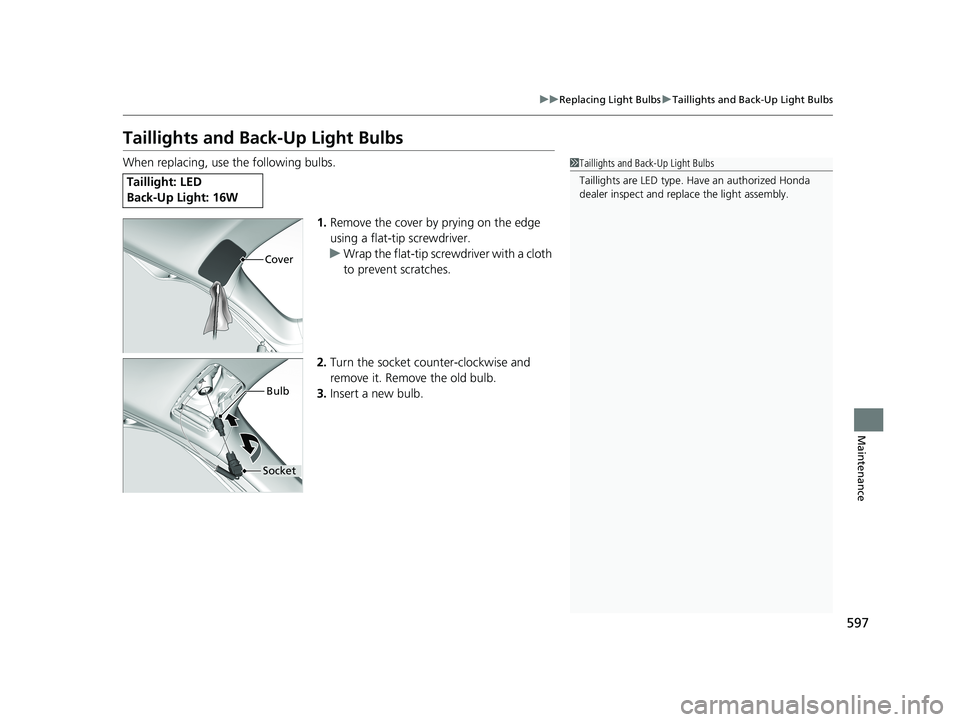
Taillights and Back-Up Light Bulbs
When replacing, use the following bulbs.
1.Remove the cover by prying on the edge
using a flat-tip screwdriver.
u Wrap the flat-tip screwdriver with a cloth
to prevent scratches.
2. Turn the socket counter-clockwise and
remove it. Remove the old bulb.
3. Insert a new bulb.
Taillight: LED
Back-Up Light: 16W
1Taillights and Back-Up Light Bulbs
Taillights are LED type. Ha ve an authorized Honda
dealer inspect and replace the light assembly.
Cover
Bulb
Socket
21 CR-V HYBRID HMIN-31TPG6100.book 597 ページ 2020年9月14日 月曜日 午前11時36分
Page 599 of 690
598
uuReplacing Light Bulbs uRear License Plate Light
Maintenance
Rear License Plate Light
Rear license plate light is LED type. Have an authorized Honda dealer inspect and
replace the light assembly.
High-Mount Brake Light
High-mount brake light is LED type. Have an authorized Honda dealer inspect and
replace the light assembly.
21 CR-V HYBRID HMIN-31TPG6100.book 598 ページ 2020年9月14日 月曜日 午前11時36分
Page 605 of 690
604
Maintenance
Checking and Maintaining Tires
Checking Tires
To safely operate your vehicle, your tires must be of the proper type and size, in
good condition with adequate tread, and properly inflated.
■Inflation guidelines
Properly inflated tires provide the best combination of handling, tread life, and comfort.
Refer to the driver’s doorjamb label or spec ifications page for the specified pressure.
Underinflated tires wear unevenly, adversely affect handling and fuel economy, and
are more likely to fail from overheating.
Overinflated tires make your vehicle ride harshly, are more prone to road hazards,
and wear unevenly.
Every day before you drive, look at each of the tires. If one looks lower than the
others, check the pressure with a tire gauge.
At least once a month or before long trips, use a gauge to measure the pressure in
all tires. Even tires in good condition can lose 1–2 psi
(10–20 kPa, 0.1–0.2 kgf/cm
2) per month.
■Inspection guidelines
Every time you check inflation, also examine the tires and valve stems.
Look for:
• Bumps or bulges on the side or in the tread. Replace the tire if you find any cuts,
splits, or cracks in the si de of the tire. Replace it if you see fabric or cord.
• Remove any foreign objects and inspect for air leaks.
• Uneven tread wear. Have a deal er check the wheel alignment.
• Excessive tread wear.
2 Wear Indicators P. 609
•Cracks or other damage around valve stem.
1Checking Tires
Measure the air pressure when tires are cold. This
means the vehicle has been parked for at least three
hours, or driven less than 1 mile (1.6 km). If
necessary, add or releas e air until the specified
pressure is reached.
If checked when hot, tire pressure can be as much as
4–6 psi (30–40 kPa, 0.3–0.4 kgf/cm
2) higher than if
checked when cold.
Whenever tire pressure is adjusted, you must
calibrate the TPMS.
2 Tire Pressure Monitoring System (TPMS)
P. 491
Have a dealer check the tires if you feel a consistent
vibration while driving. Ne w tires and any that have
been removed and reinst alled should be properly
balanced.
3WARNING
Using tires that are excessively worn or
improperly inflated can cause a crash in
which you can be seriously hurt or killed.
Follow all instruction s in this owner’s
manual regarding ti re inflation and
maintenance.
21 CR-V HYBRID HMIN-31TPG6100.book 604 ページ 2020年9月14日 月曜日 午前11時36分
Page 606 of 690
605
uuChecking and Maintaining Tires uTire and Loading Information Label
Continued
Maintenance
Tire and Loading Information Label
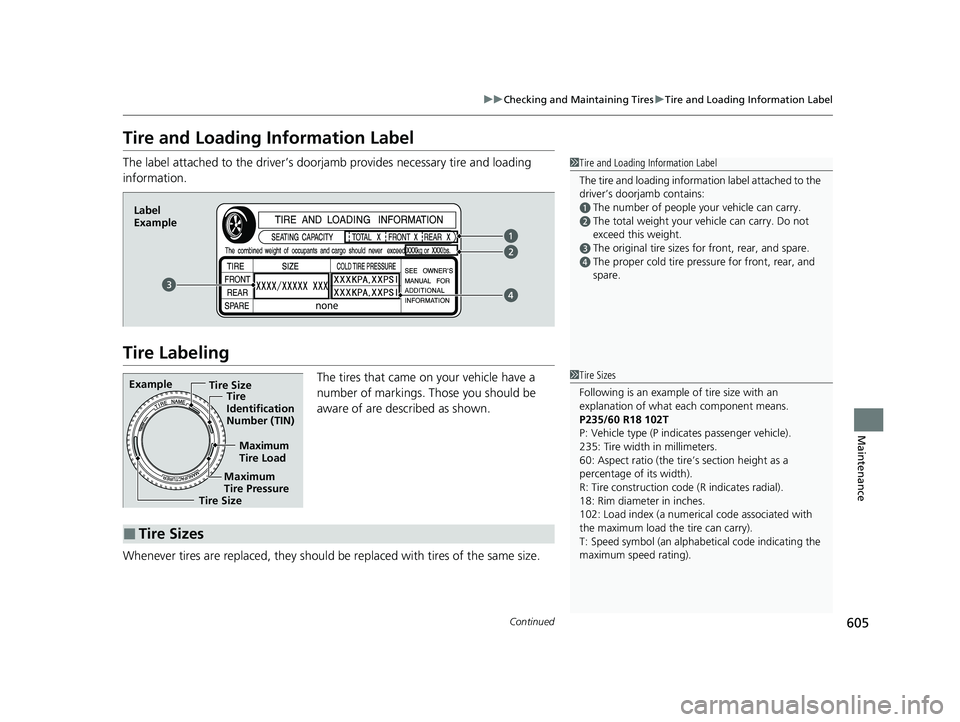
The label attached to the driver’s doorj amb provides necessary tire and loading
information.
Tire Labeling
The tires that came on your vehicle have a
number of markings. Those you should be
aware of are described as shown.
Whenever tires are replaced, they should be replaced with tires of the same size.
1Tire and Loading Information Label
The tire and loading informat ion label attached to the
driver’s doorjamb contains:
aThe number of people your vehicle can carry.
bThe total weight your vehicle can carry. Do not
exceed this weight.
cThe original tire sizes for front, rear, and spare.
dThe proper cold tire pressure for front, rear, and
spare.
Label
Example
Example Tire Size
Tire
Identification
Number (TIN)
Maximum
Tire Load
Maximum
Tire Pressure
Tire Size
■Tire Sizes
1 Tire Sizes
Following is an example of tire size with an
explanation of what each component means.
P235/60 R18 102T
P: Vehicle type (P indi cates passenger vehicle).
235: Tire width in millimeters.
60: Aspect ratio (the tire’s section height as a
percentage of its width).
R: Tire construction code (R indicates radial).
18: Rim diameter in inches.
102: Load index (a numerical code associated with
the maximum load the tire can carry).
T: Speed symbol (an alphabetical code indicating the
maximum speed rating).
21 CR-V HYBRID HMIN-31TPG6100.book 605 ページ 2020年9月14日 月曜日 午前11時36分
Page 610 of 690
609
uuChecking and Maintaining Tires uWear Indicators
Maintenance
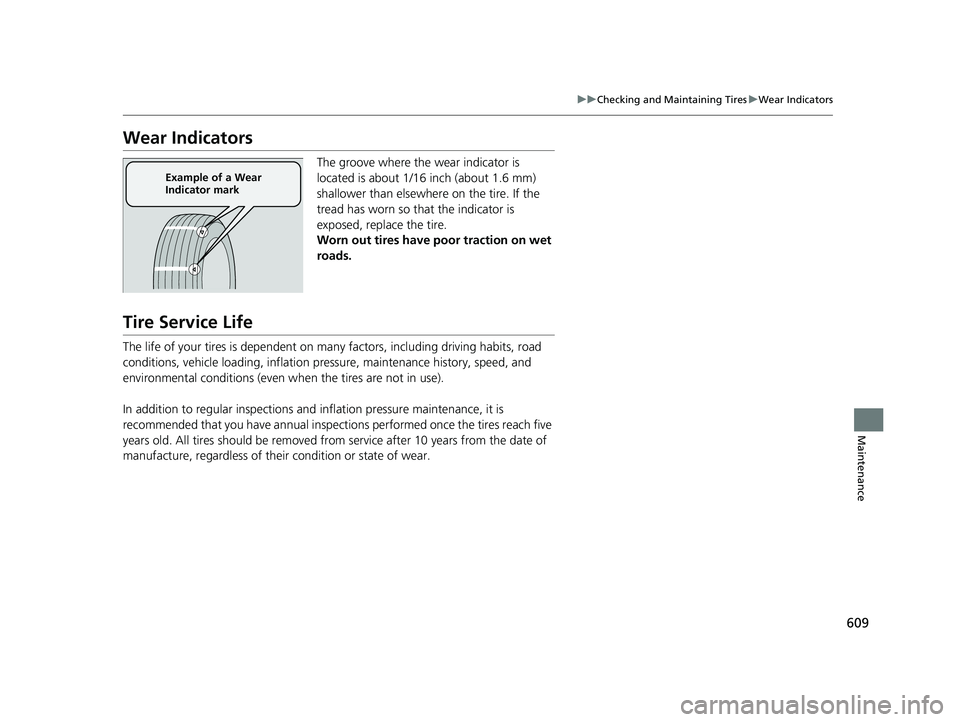
Wear Indicators
The groove where the wear indicator is
located is about 1/16 inch (about 1.6 mm)
shallower than elsewher e on the tire. If the
tread has worn so th at the indicator is
exposed, replace the tire.
Worn out tires have po or traction on wet
roads.
Tire Service Life
The life of your tires is dependent on many factors, including driving habits, road
conditions, vehicle loading, inflation pressure, maintenance history, speed, and
environmental conditions (even wh en the tires are not in use).
In addition to regular inspections and in flation pressure maintenance, it is
recommended that you have annual inspections performed once the tires reach five
years old. All tires should be removed fro m service after 10 years from the date of
manufacture, regardless of their condition or state of wear.
Example of a Wear
Indicator mark
21 CR-V HYBRID HMIN-31TPG6100.book 609 ページ 2020年9月14日 月曜日 午前11時36分
Page 611 of 690
610
uuChecking and Maintaining Tires uTire and Wheel Replacement
Maintenance
Tire and Wheel Replacement
Replace your tires with radials of the sa me size, load range, speed rating, and
maximum cold tire pressure ra ting (as shown on the tire‘s sidewall). Using tires of a
different size or construction can cause ce rtain vehicle systems such as the ABS and
Vehicle Stability Assist
TM (VSA ®) system to work incorrectly.
It is best to replace all four tires at the same time. If that isn’t possible, replace the
front or rear tires in pairs.
Make sure that the wheel’s specifications match thos e of the original wheels.
1Tire and Wheel Replacement
3WARNING
Installing improper tires on your vehicle can
affect handling and stability. This can cause
a crash in which you can be seriously hurt or
killed.
Always use the size and type of tires
recommended in this owner’s manual.
21 CR-V HYBRID HMIN-31TPG6100.book 610 ページ 2020年9月14日 月曜日 午前11時36分