lights HONDA CR-Z 2013 1.G Owner's Manual
[x] Cancel search | Manufacturer: HONDA, Model Year: 2013, Model line: CR-Z, Model: HONDA CR-Z 2013 1.GPages: 325, PDF Size: 11.73 MB
Page 120 of 325
119
Controls
Adjusting the Mirrors
Interior Rearview Mirror
Adjust the angle of the rearview mirror when you are sitting in the correct driving
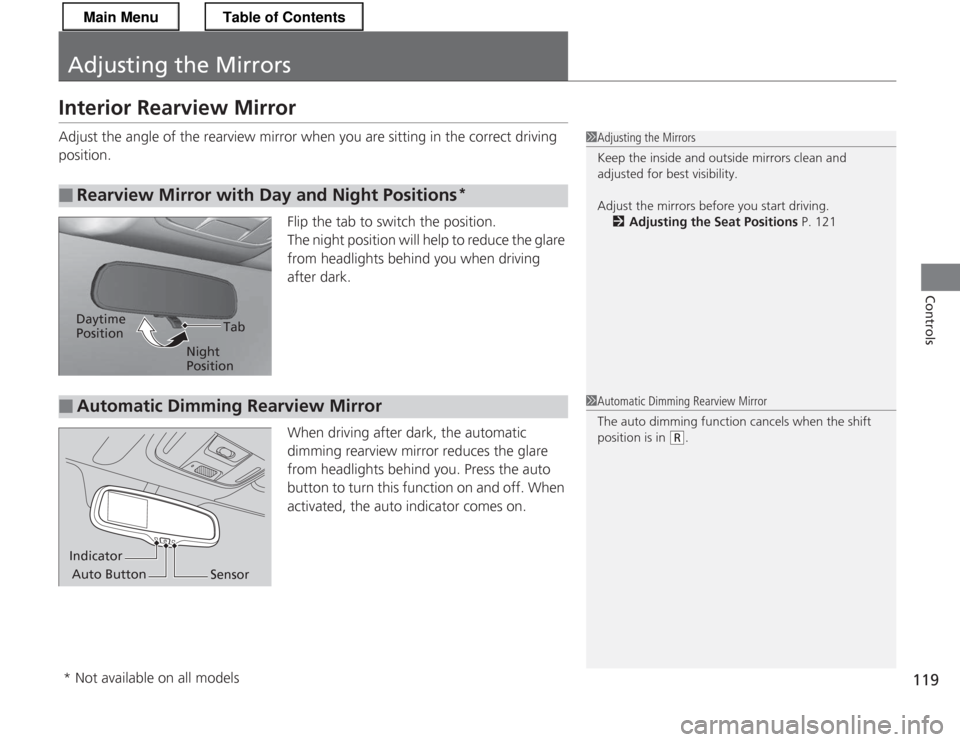
position.Flip the tab to switch the position.
The night position will help to reduce the glare
from headlights behind you when driving
after dark.
When driving after dark, the automatic
dimming rearview mirror reduces the glare
from headlights behind you. Press the auto
button to turn this function on and off. When
activated, the auto indicator comes on.
■Rearview Mirror with Day and Night Positions *
1Adjusting the Mirrors
Keep the inside and outside mirrors clean and
adjusted for best visibility.
Adjust the mirrors before you start driving.
2 Adjusting the Seat Positions P. 121
Tab
Daytime Position
Night Position
■Automatic Dimming Rearview Mirror1Automatic Dimming Rearview Mirror
The auto dimming function cancels when the shift
position is in
(R.
Indicator
Auto Button Sensor
* Not available on all models
Main MenuTable of Contents
Page 127 of 325
126
Controls
Interior Lights/Interior Convenience Items
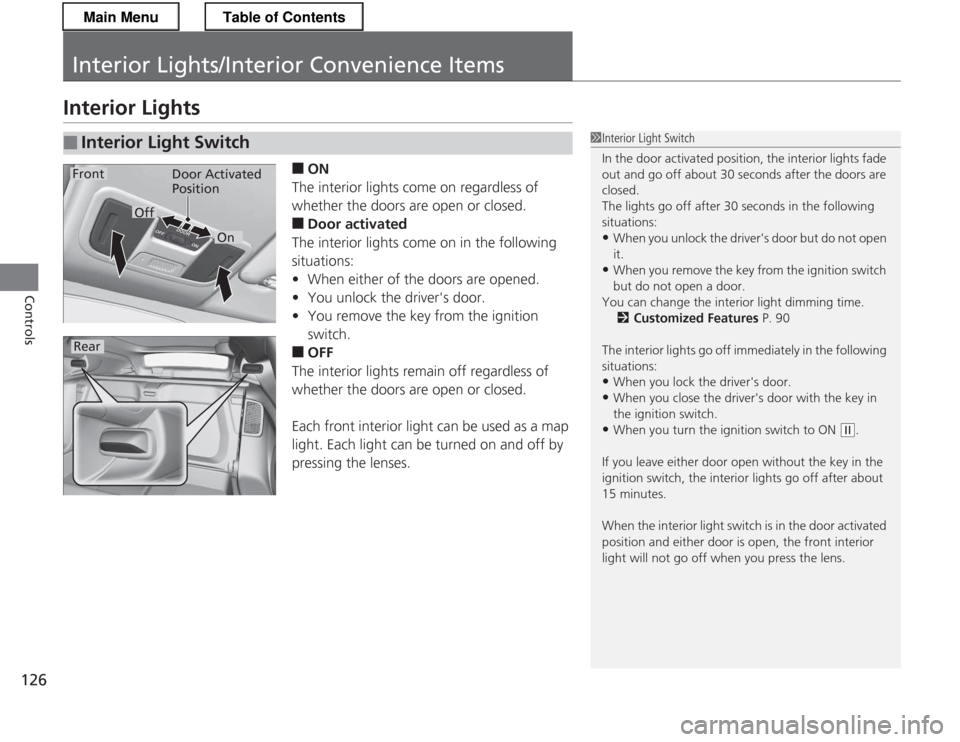
Interior Lights■ON
The interior lights come on regardless of
whether the doors are open or closed. ■ Door activated
The interior lights come on in the following
situations: • When either of the doors are opened.
• You unlock the driver's door.
• You remove the key from the ignition switch.
■ OFF
The interior lights remain off regardless of
whether the doors are open or closed.
Each front interior light can be used as a map
light. Each light can be turned on and off by
pressing the lenses.
■Interior Light Switch1Interior Light Switch
In the door activated position, the interior lights fade
out and go off about 30 seconds after the doors are closed.
The lights go off after 30 seconds in the following
situations: • When you unlock the driver's door but do not open
it.
• When you remove the key from the ignition switch
but do not open a door.
You can change the interior light dimming time. 2 Customized Features P. 90
The interior lights go off immediately in the following
situations: • When you lock the driver's door.
• When you close the driver's door with the key in
the ignition switch.
• When you turn the ignition switch to ON
(w .
If you leave either door open without the key in the
ignition switch, the interior lights go off after about 15 minutes.
When the interior light switch is in the door activated
position and either door is open, the front interior
light will not go off when you press the lens.
Door Activated
Position
On
Off
Rear
Front
Main MenuTable of Contents
Page 128 of 325
127
uuInterior Lights/Interior Convenience ItemsuInterior Convenience Items
Continued
Controls
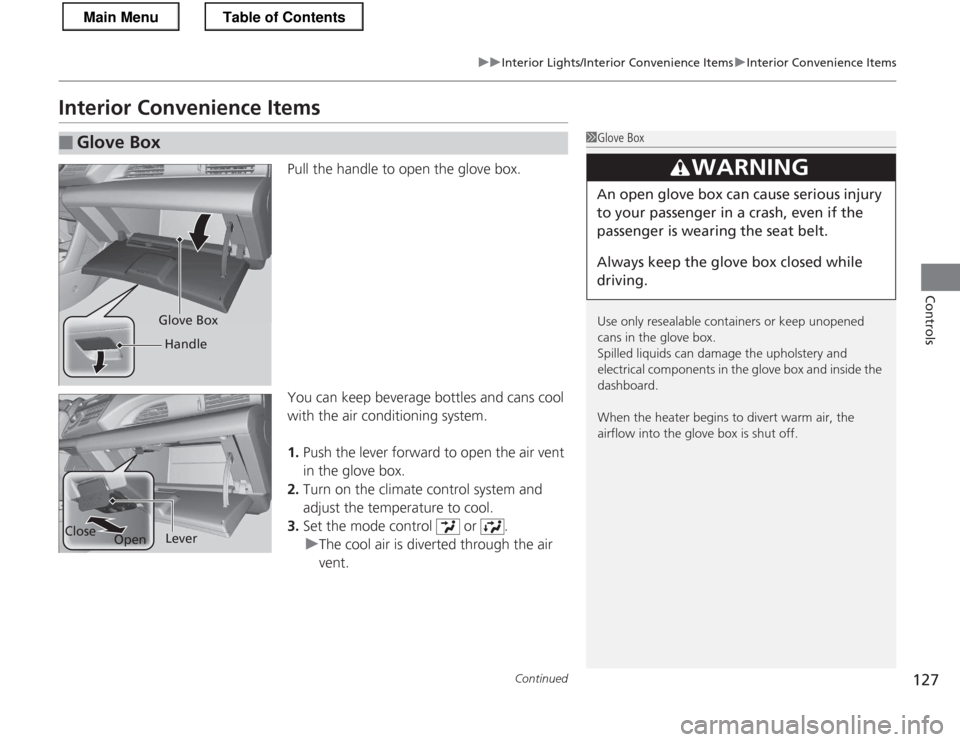
Interior Convenience ItemsPull the handle to open the glove box.
You can keep beverage bottles and cans cool
with the air conditioning system. 1.Push the lever forward to open the air vent
in the glove box.
2. Turn on the climate control system and
adjust the temperature to cool.
3. Set the mode control or .
uThe cool air is diverted through the air vent.
■Glove Box1Glove Box
Use only resealable containers or keep unopened
cans in the glove box.
Spilled liquids can damage the upholstery and
electrical components in the glove box and inside the
dashboard.
When the heater begins to divert warm air, the
airflow into the glove box is shut off.
3WARNING
An open glove box can cause serious injury
to your passenger in a crash, even if the
passenger is wearing the seat belt.
Always keep the glove box closed while
driving.
Glove Box
Handle
Close OpenLever
Main MenuTable of Contents
Page 129 of 325
uuInterior Lights/Interior Convenience ItemsuInterior Convenience Items
128
Controls
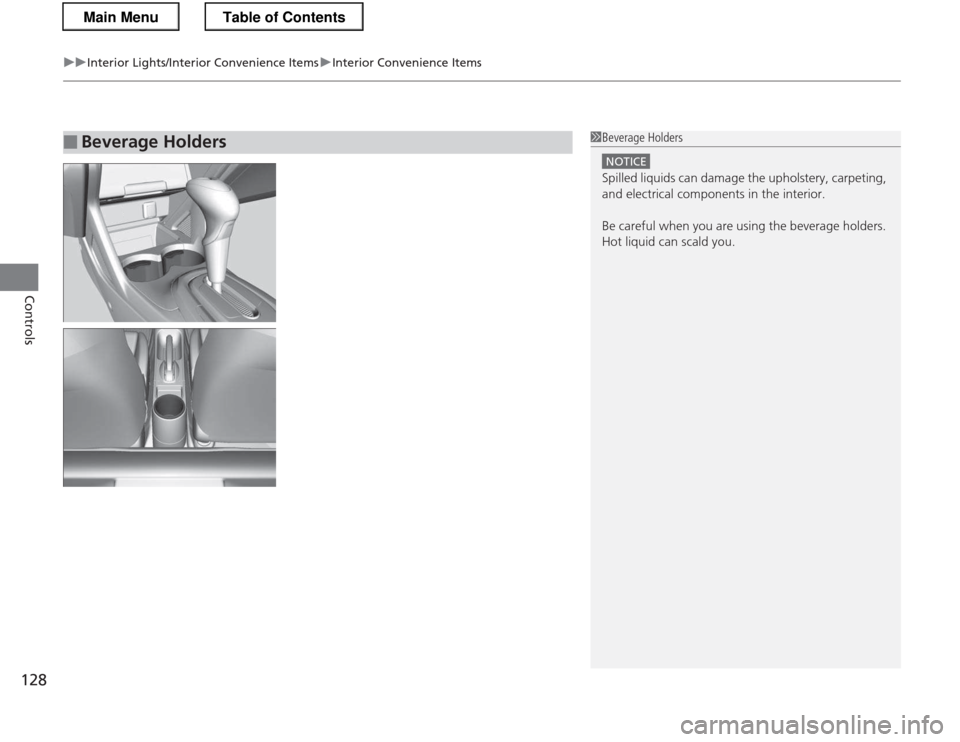
■Beverage Holders1Beverage Holders
NOTICE
Spilled liquids can damage the upholstery, carpeting,
and electrical components in the interior.
Be careful when you are using the beverage holders.
Hot liquid can scald you.
Main MenuTable of Contents
Page 130 of 325
Continued129
uuInterior Lights/Interior Convenience ItemsuInterior Convenience Items
Controls
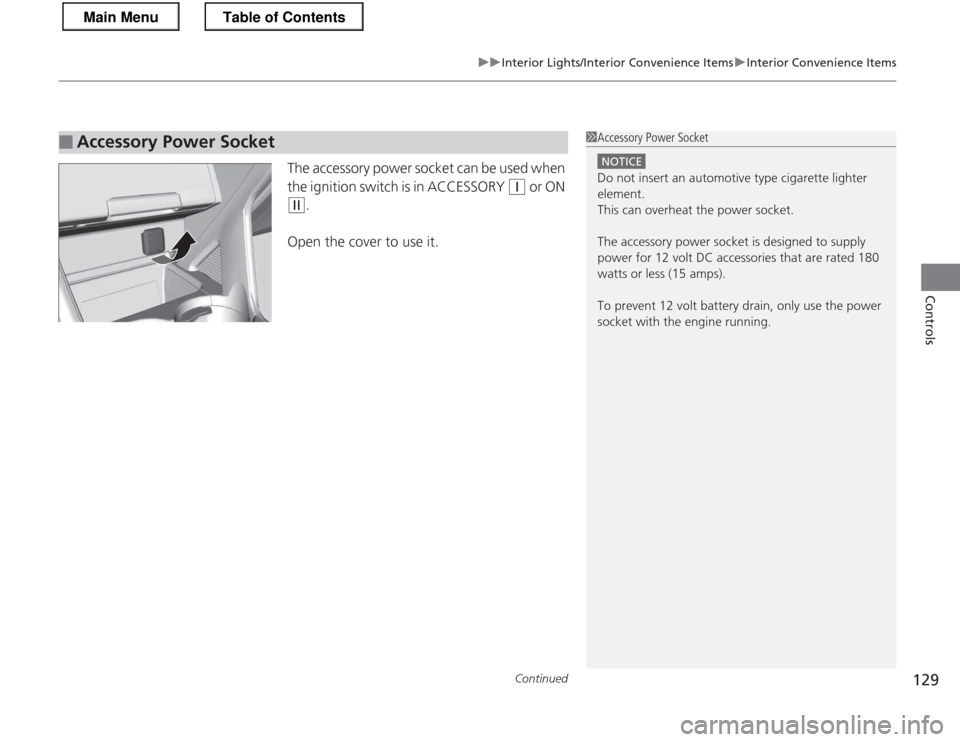
The accessory power socket can be used when
the ignition switch is in ACCESSORY
(q or ON
(w.
Open the cover to use it.
■Accessory Power Socket1Accessory Power Socket
NOTICE
Do not insert an automotive type cigarette lighter
element.
This can overheat the power socket.
The accessory power socket is designed to supply
power for 12 volt DC accessories that are rated 180
watts or less (15 amps).
To prevent 12 volt battery drain, only use the power socket with the engine running.
Main MenuTable of Contents
Page 131 of 325
uuInterior Lights/Interior Convenience ItemsuInterior Convenience Items
130
Controls
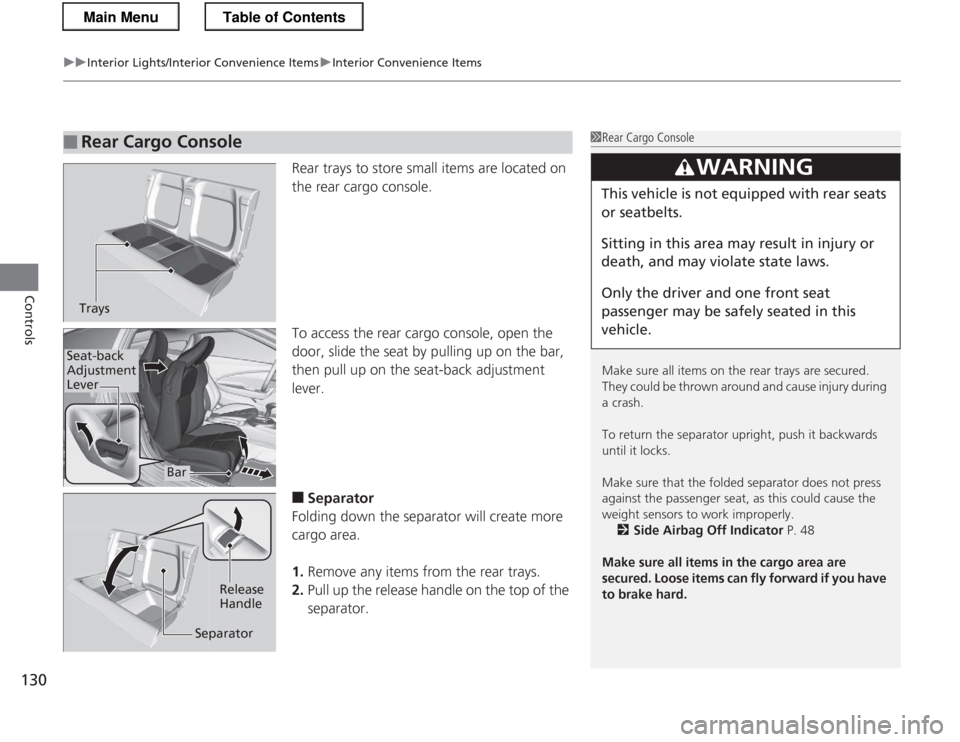
Rear trays to store small items are located on
the rear cargo console.
To access the rear cargo console, open the
door, slide the seat by pulling up on the bar, then pull up on the seat-back adjustment lever. ■ Separator
Folding down the separator will create more cargo area. 1. Remove any items from the rear trays.
2. Pull up the release handle on the top of the
separator.
■Rear Cargo Console1Rear Cargo Console
Make sure all items on the rear trays are secured.
They could be thrown around and cause injury during a crash.
To return the sepa rator upright, push it backwards
until it locks.
Make sure that the fol ded separator does not press
against the passenger seat, as this could cause the
weight sensors to work improperly.
2 Side Airbag Off Indicator P. 48
Make sure all items in the cargo area are
secured. Loose items can fly forward if you have
to brake hard.
3WARNING
This vehicle is not equipped with rear seats
or seatbelts.
Sitting in this area may result in injury or
death, and may violate state laws.
Only the driver and one front seat
passenger may be safely seated in this vehicle.
Trays
Bar
Seat-back Adjustment
Lever
Release Handle
Separator
Main MenuTable of Contents
Page 132 of 325
Continued131
uuInterior Lights/Interior Convenience ItemsuInterior Convenience Items
Controls
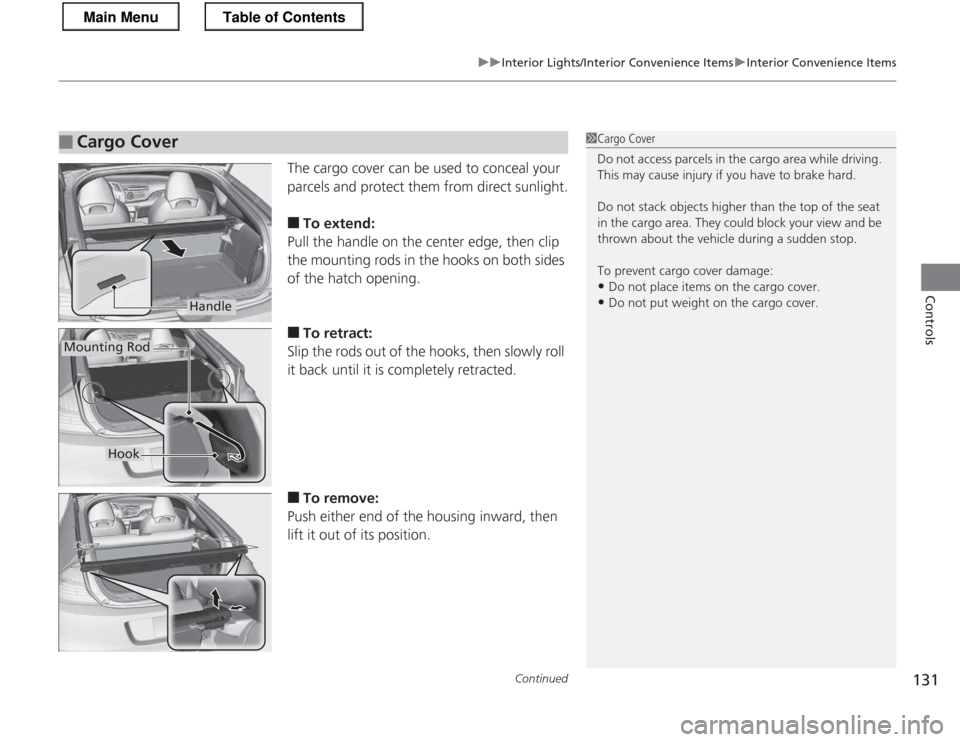
The cargo cover can be used to conceal your
parcels and protect them from direct sunlight. ■To extend:
Pull the handle on the center edge, then clip
the mounting rods in the hooks on both sides
of the hatch opening. ■ To retract:
Slip the rods out of the hooks, then slowly roll
it back until it is completely retracted. ■ To remove:
Push either end of the housing inward, then
lift it out of its position.
■Cargo Cover1Cargo Cover
Do not access parcels in the cargo area while driving.
This may cause injury if you have to brake hard.
Do not stack objects higher than the top of the seat
in the cargo area. They could block your view and be
thrown about the vehicle during a sudden stop.
To prevent cargo cover damage: • Do not place items on the cargo cover.
• Do not put weight on the cargo cover.
Handle
Mounting Rod
Hook
Main MenuTable of Contents
Page 133 of 325
132
uuInterior Lights/Interior Convenience ItemsuInterior Convenience Items
Controls
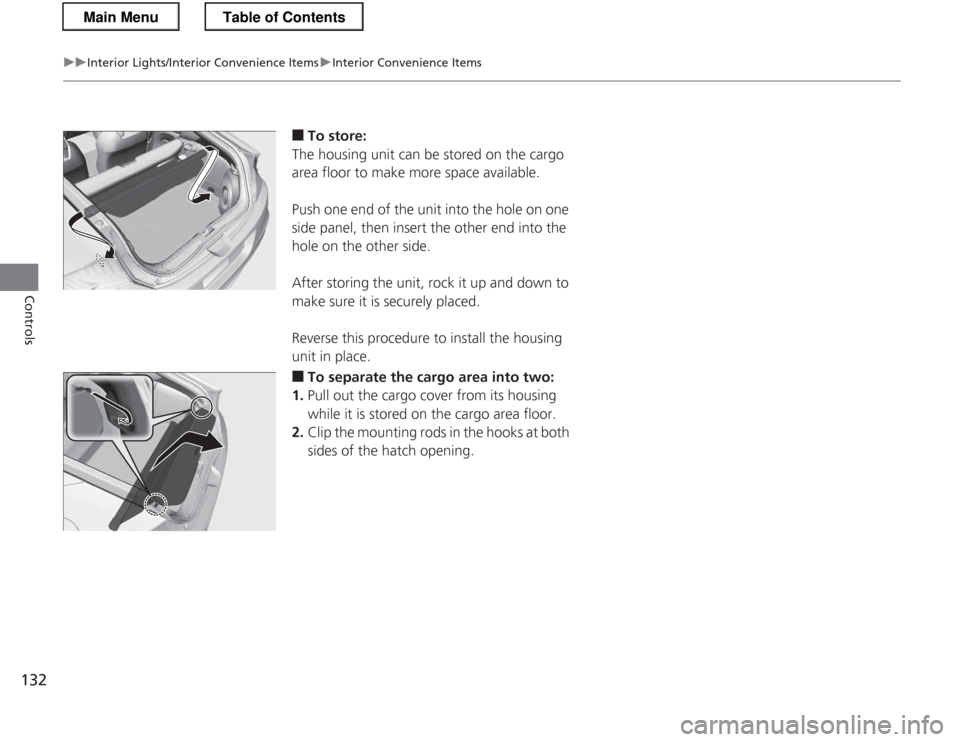
■To store:
The housing unit can be stored on the cargo
area floor to make more space available.
Push one end of the unit into the hole on one
side panel, then insert the other end into the
hole on the other side.
After storing the unit, ro ck it up and down to
make sure it is securely placed.
Reverse this procedure to install the housing
unit in place. ■ To separate the cargo area into two:
1. Pull out the cargo cover from its housing
while it is stored on the cargo area floor.
2. Clip the mounting rods in the hooks at both
sides of the hatch opening.
Main MenuTable of Contents
Page 134 of 325
133
uuInterior Lights/Interior Convenience ItemsuInterior Convenience Items
Controls
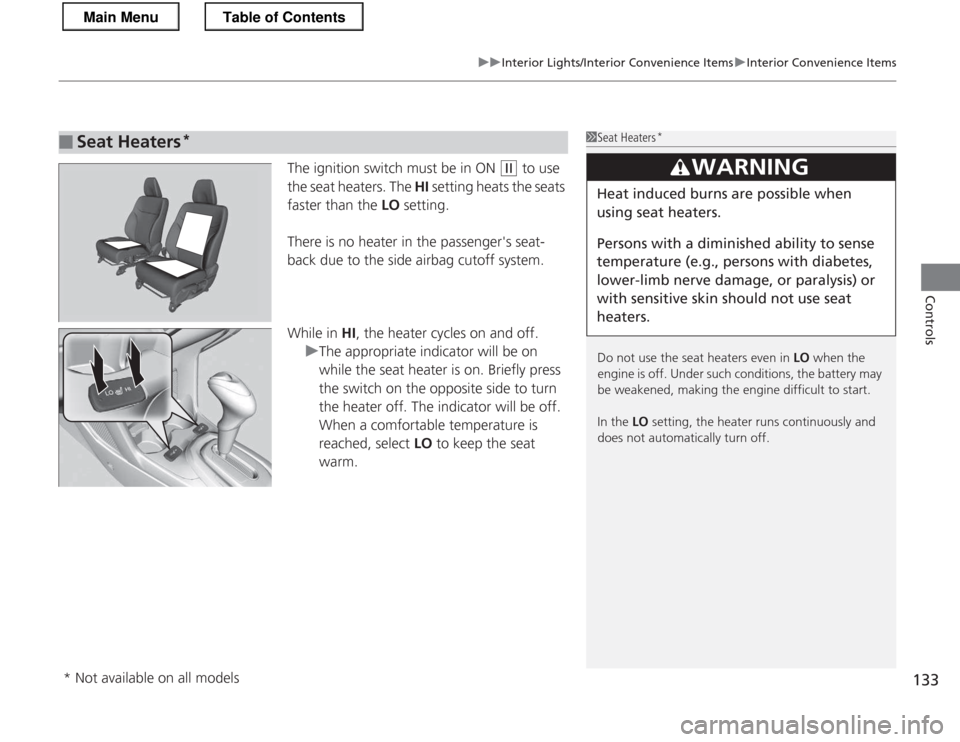
The ignition switch must be in ON (w to use
the seat heaters. The HI setting heats the seats
faster than the LO setting.
There is no heater in the passenger's seat-
back due to the side airbag cutoff system.
While in HI, the heater cycles on and off.
uThe appropriate indicator will be on
while the seat heater is on. Briefly press
the switch on the opposite side to turn
the heater off. The indicator will be off.
When a comfortable temperature is
reached, select LO to keep the seat
warm.
■Seat Heaters *1Seat Heaters
*
Do not use the seat heaters even in LO when the
engine is off. Under such conditions, the battery may
be weakened, making the engine difficult to start.
In the LO setting, the heater runs continuously and
does not automatically turn off.
3WARNING
Heat induced burns are possible when
using seat heaters.
Persons with a diminished ability to sense
temperature (e.g., persons with diabetes,
lower-limb nerve damage, or paralysis) or
with sensitive skin sho uld not use seat
heaters.
* Not available on all models
Main MenuTable of Contents
Page 173 of 325
172
Driving
Before Driving
Driving Preparation
Check the following items before you start driving. •Make sure there are no obstructions on the windows, door mirrors, exterior
lights, or other parts of the vehicle.
uRemove any frost, snow, or ice.
uRemove any snow on the roof, as this can slip down and obstruct your field of
vision while driving. If frozen solid, remove ice once it has softened.
uWhen removing ice from around the wheels, be sure not to damage the wheel
or wheel components.
• Make sure the hood is securely closed.
uIf the hood opens while driving, your front view will be blocked.
• Make sure the tires are in good condition.
uCheck air pressures, and check for damage and excessive wear.
2 Checking and Maintaining Tires P. 253
• Make sure there are no people or objects behind or around the vehicle.
uThere are blind spots from the inside.
■Exterior Checks1Exterior Checks
NOTICE
When doors are frozen shut, use warm water around
the door edges to melt any ice. Do not try to force
them open, as this can damage the rubber trim
around the doors. When done, wipe dry to avoid further freezing.
Do not pour warm water into the key cylinder.
You will be unable to insert key if the water freezes in
the hole.
Heat from the engine and exhaust can ignite
flammable materials left under the hood, causing a
fire. If you've parked your vehicle for an extended
period, inspect and remove any debris that may have
collected, such as dried grass and leaves that have
fallen or have been carried in for use as a nest by a
small animal.
Also check under the hood for leftover flammable
materials after you or someone else has performed
maintenance on your vehicle.
Main MenuTable of Contents