battery HONDA CR-Z 2013 1.G Owner's Guide
[x] Cancel search | Manufacturer: HONDA, Model Year: 2013, Model line: CR-Z, Model: HONDA CR-Z 2013 1.GPages: 325, PDF Size: 11.73 MB
Page 199 of 325
198
uuWhen DrivinguPlus Sport System
Driving
Plus Sport System
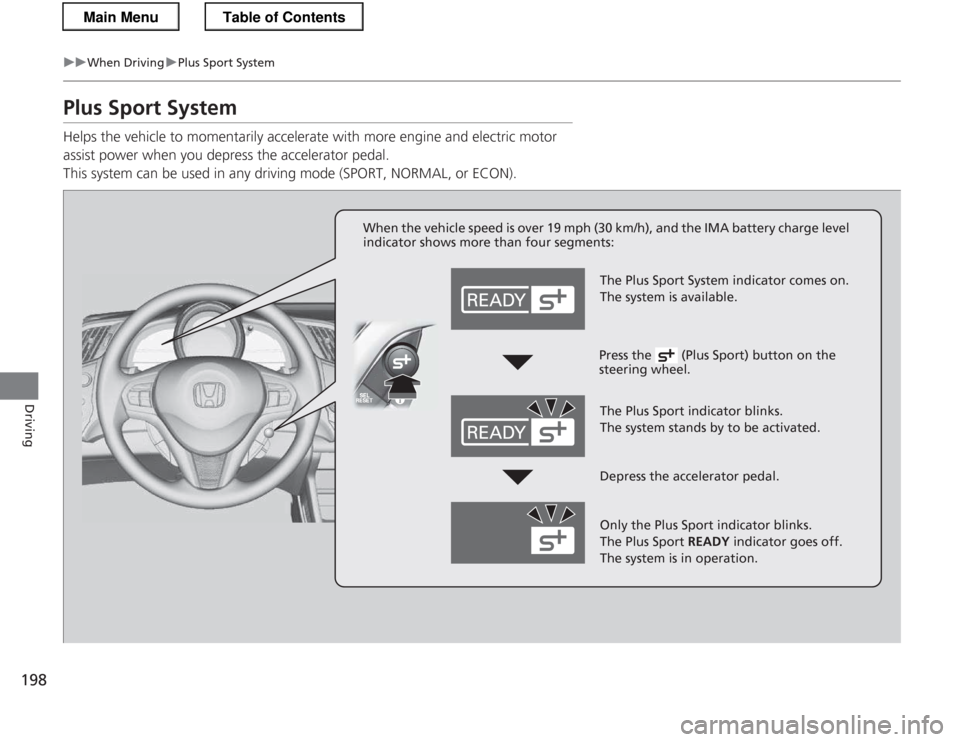
Helps the vehicle to momentarily accelerate with more engine and electric motor
assist power when you depress the accelerator pedal.
This system can be used in any driving mode (SPORT, NORMAL, or ECON).
When the vehicle speed is over 19 mph (30 km/h), and the IMA battery charge level
indicator shows more than four segments:
The Plus Sport System indicator comes on.
The system is available.
The Plus Sport indicator blinks.
The system stands by to be activated.
Only the Plus Sport indicator blinks.
The Plus Sport READY indicator goes off.
The system is in operation.
Press the (Plus Sport) button on the steering wheel.
Depress the accelerator pedal.
Main MenuTable of Contents
Page 224 of 325
223
uuBefore Performing MaintenanceuSafety When Performing Maintenance
Maintenance
Safety When Performing Maintenance
Some of the most important safety precautions are given here.
However, we cannot warn you of every conceivable hazard that can arise in
performing maintenance. Only you can decide whether or not you should perform
a given task. • To reduce the possibility of fire or explosion, keep cigarettes, sparks, and flames
away from the battery and all fuel related parts.
• Never leave rags, towels, or other flammable objects under the hood.
uHeat from the engine and exhaust can ignite them causing a fire.
• To clean parts, use a commercially available degreaser or parts cleaner, not
gasoline.
• Wear eye protection and protective clothing when working with the 12 volt
battery or compressed air.
• Engine exhaust contains carbon monoxide, which is poisonous and can kill you.
uOnly operate the engine if there is sufficient ventilation.
• The vehicle must be in a stationary condition.
uMake sure your vehicle is parked on level ground, the parking brake is set, and
the engine is off.
• Be aware that hot parts can burn you.
uMake sure to let the engine and exhau st system cool thoroughly before
touching vehicle parts.
• Be aware that moving parts can injure you.
uDo not start the engine unless instructed, and keep your hands and limbs away from moving parts.
• Do not touch the IMA battery and wiring (orange).
■Maintenance Safety
■Vehicle Safety
1Safety When Performing Maintenance
3WARNING
Improperly maintaining this vehicle or
failing to correct a problem before driving
can cause a crash in which you can be
seriously hurt or killed.
Always follow the inspection and
maintenance recommendations according
to the schedules in this owner's manual.
3WARNING
Failure to properly fol low maintenance
instructions and precautions can cause you
to be seriously hurt or killed.
Always follow the procedures and
precautions in this owner's manual.
Main MenuTable of Contents
Page 230 of 325
229
Maintenance
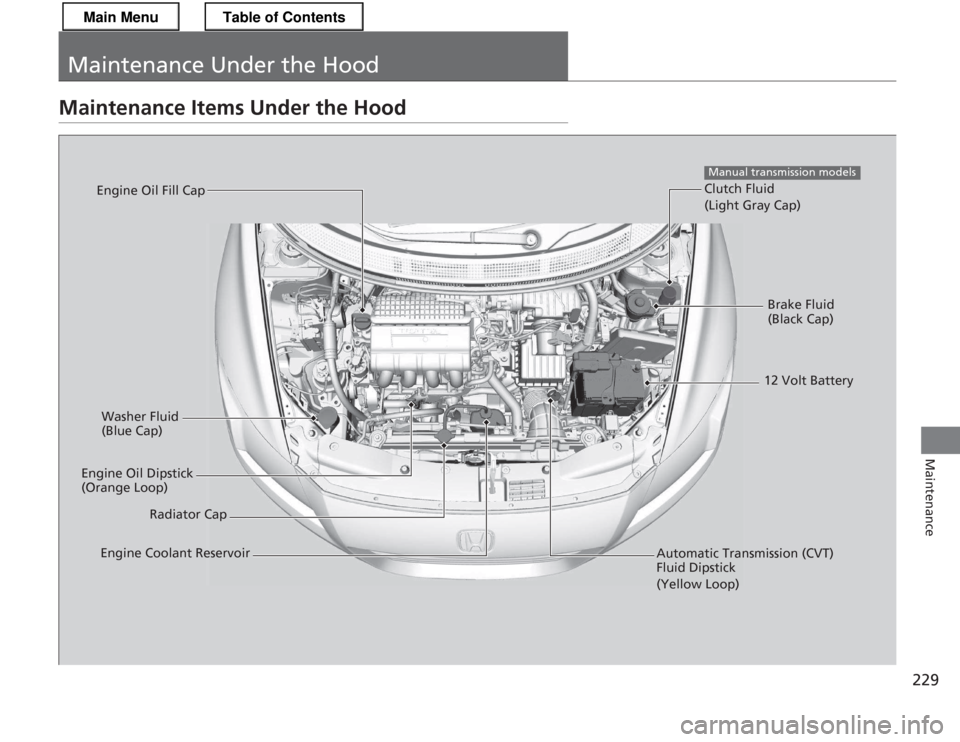
Maintenance Under the Hood
Maintenance Items Under the Hood
Brake Fluid
(Black Cap)
Clutch Fluid (Light Gray Cap)
Manual transmission models
Washer Fluid
(Blue Cap)
Engine Oil Dipstick
(Orange Loop) Radiator Cap
Engine Oil Fill Cap
Automatic Transmission (CVT) Fluid Dipstick (Yellow Loop)
Engine Coolant Reservoir 12 Volt Battery
Main MenuTable of Contents
Page 263 of 325

262
Maintenance
12 Volt Battery
Checking the 12 Volt BatteryCheck the battery condition monthly. Look at
the test indicator window and check the
terminals for corrosion.
If your vehicle's battery is disconnected or goes dead: • The audio system is disabled.
2 Reactivating the audio system P. 141
• The clock resets.
2 Setting the Clock P. 98
• The navigation system *
is disabled. A PIN code will be required.
2 Refer to the navigation system manual
Charging the 12 Volt Battery
Disconnect both battery cables to prevent damaging your vehicle's electrical system.
Always disconnect the negative (-) cable first, and reconnect it last.
112 Volt Battery
WARNING: Battery post, terminals,
and related accessori es contain lead
and lead compounds. Wash your hands after handling.
The test indicator's color information is on the
battery.
When you find corrosion, clean the battery terminals
by applying a baking powder and water solution. Clean terminals with a damp towel. Cloth/towel dry
the battery. Coat the termina ls with grease to help
prevent future corrosion.
3WARNING
The battery gives off explosive hydrogen
gas during normal operation.
A spark or flame can cause the battery to
explode with enough force to kill or seriously hurt you.
When conducting any battery
maintenance, wear protective clothing and
a face shield, or have a skilled technician do
it.
Test Indicator Window
* Not available on all models
Main MenuTable of Contents
Page 264 of 325
263
Maintenance
Remote Transmitter Care
Replacing the Button Battery
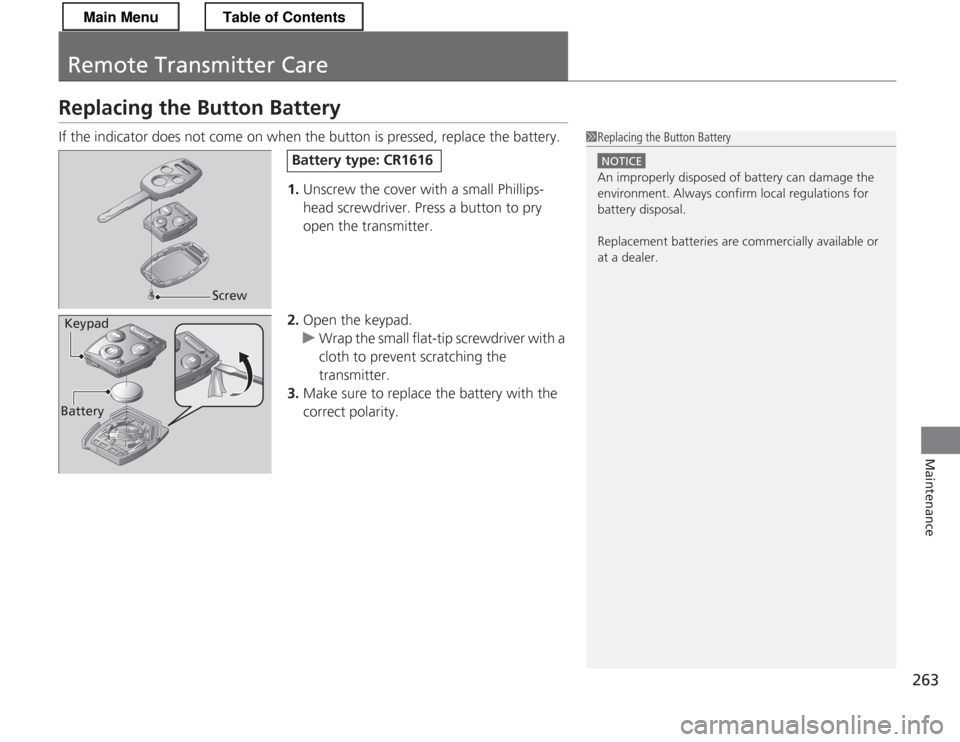
If the indicator does not come on when the button is pressed, replace the battery.
1.Unscrew the cover with a small Phillips- head screwdriver. Press a button to pry
open the transmitter.
2. Open the keypad.
uWrap the small flat-tip screwdriver with a
cloth to prevent scratching the transmitter.
3. Make sure to replace the battery with the
correct polarity.
1Replacing the Button Battery
NOTICE
An improperly disposed of battery can damage the
environment. Always confirm local regulations for
battery disposal.
Replacement batteries are commercially available or
at a dealer.
Screw
Battery type: CR1616
BatteryKeypad
Main MenuTable of Contents
Page 269 of 325
uuCleaninguExterior Care
268
Maintenance
A good coat of automotive body wax helps protect your vehicle’s paint from the
elements. Wax will wear off over time and expose your vehicle’s paint to the
elements, so reapply as necessary.
If you get gasoline, oil, engine coolant, or battery fluid on resin coated parts, they
may be stained or the coating may peel. Promptly wipe it away using a soft cloth and clean water.
Wipe using a glass cleaner.
Aluminum is susceptible to deterio ration caused by salt and other road
contaminants. Use a sponge and mild de tergent to wipe away promptly.
Be careful not to use harsh chemicals (including some commercial wheel cleaners) or
a stiff brush. They can damage the clear coat of the aluminum alloy wheels that
helps keep the aluminum from corroding and tarnishing.
■Applying Wax
■Maintaining the Bumpers and Other Resin Coated Parts
■Cleaning the Window
■Maintaining Aluminum Wheels
1Applying Wax
NOTICE
Chemical solvents and strong cleaners can damage
the paint, metal, and plastic on your vehicle. Wipe up
spills immediately.
1Maintaining the Bumpers and Other Resin Coated Parts
Ask a dealer about the correct coating material when
you want to repair the painted surface of the parts made of resin.
1Cleaning the Window
Wires are mounted to the inside of the rear window.
Wipe along the same direction as the wires with a
soft cloth so as not to damage them.
Main MenuTable of Contents
Page 287 of 325
286
Handling the Unexpected
Engine Does Not Start
Checking the Engine
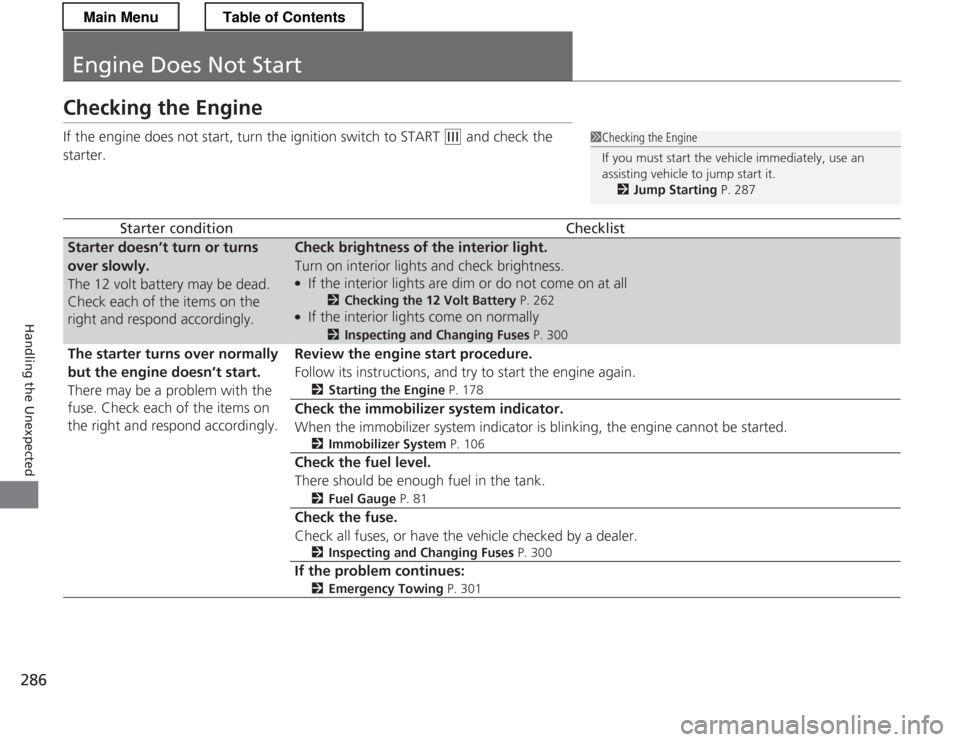
If the engine does not start, turn the ignition switch to START
(e and check the
starter.
Starter conditionChecklist
Starter doesn’t turn or turns over slowly.
The 12 volt battery may be dead.
Check each of the items on the
right and respond accordingly.Check brightness of the interior light.
Turn on interior lights and check brightness. ● If the interior lights are dim or do not come on at all
2Checking the 12 Volt Battery P. 262
● If the interior lights come on normally 2
Inspecting and Changing Fuses P. 300
The starter turns over normally
but the engine doesn’t start.
There may be a problem with the
fuse. Check each of the items on
the right and respond accordingly.Review the engine start procedure.
Follow its instructions, and try to start the engine again. 2Starting the Engine P. 178
Check the immobilizer system indicator.
When the immobilizer system indicator is blinking, the engine cannot be started.
2Immobilizer System P. 106
Check the fuel level. There should be enough fuel in the tank. 2Fuel Gauge P. 81
Check the fuse.
Check all fuses, or have the vehicle checked by a dealer.
2Inspecting and Changing Fuses P. 300
If the problem continues:
2 Emergency Towing P. 301
1Checking the Engine
If you must start the vehicle immediately, use an assisting vehicle to jump start it.
2 Jump Starting P. 287
Main MenuTable of Contents
Page 288 of 325
287
Continued
Handling the Unexpected
Jump Starting
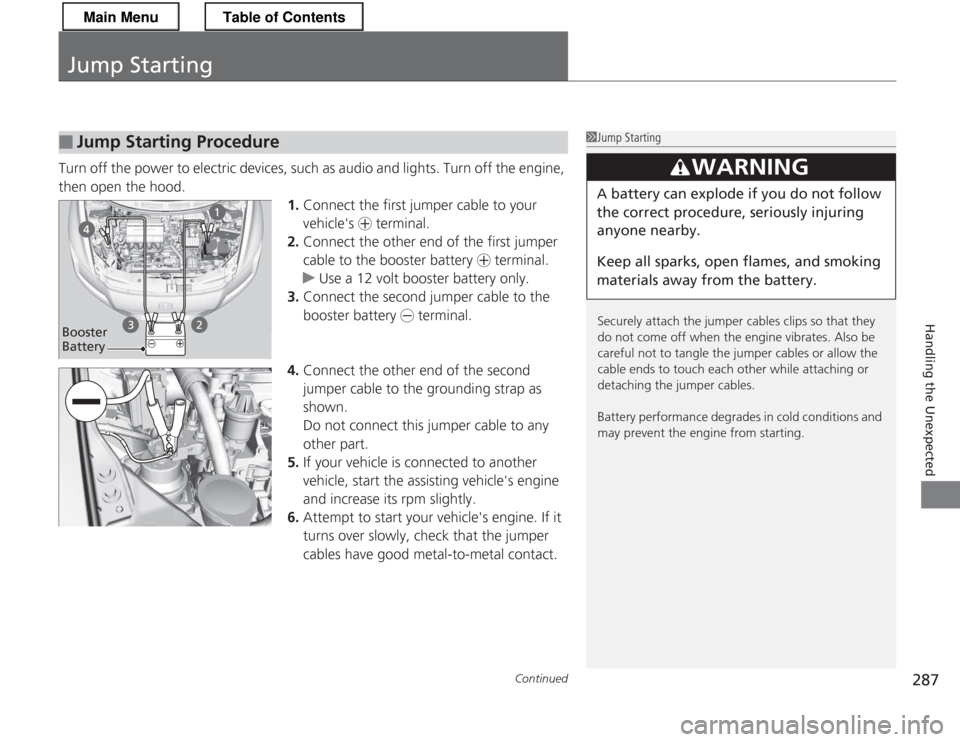
Turn off the power to electric devices, such as audio and lights. Turn off the engine,
then open the hood.
1.Connect the first jumper cable to your
vehicle's + terminal.
2. Connect the other end of the first jumper
cable to the booster battery + terminal.
uUse a 12 volt booster battery only.
3. Connect the second jumper cable to the booster battery - terminal.
4. Connect the other end of the second
jumper cable to the grounding strap as
shown.
Do not connect this jumper cable to any other part.
5. If your vehicle is co nnected to another
vehicle, start the assisting vehicle's engine
and increase its rpm slightly.
6. Attempt to start your vehicle's engine. If it
turns over slowly, check that the jumper cables have good metal-to-metal contact.
■Jump Starting Procedure1Jump Starting
Securely attach the jumper cables clips so that they
do not come off when the engine vibrates. Also be
careful not to tangle the jumper cables or allow the
cable ends to touch each other while attaching or
detaching the jumper cables.
Battery performance degrades in cold conditions and
may prevent the engine from starting.
3WARNING
A battery can explode if you do not follow the correct procedure, seriously injuring anyone nearby.
Keep all sparks, open flames, and smoking
materials away from the battery.
Booster
Battery
Main MenuTable of Contents
Page 289 of 325
288
uuJump Startingu
Handling the Unexpected
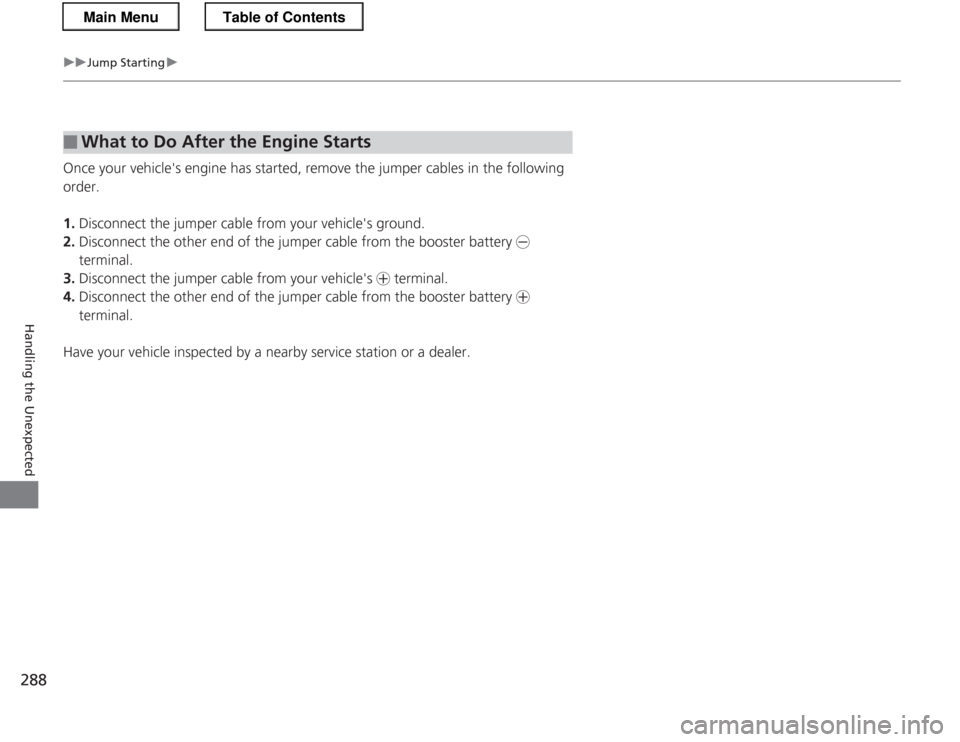
Once your vehicle's engine has started, remove the jumper cables in the following order. 1.Disconnect the jumper cable from your vehicle's ground.
2. Disconnect the other end of the ju mper cable from the booster battery -
terminal.
3. Disconnect the jumper cable from your vehicle's + terminal.
4. Disconnect the other end of the ju mper cable from the booster battery +
terminal.
Have your vehicle inspected by a nearby service station or a dealer.
■What to Do After the Engine Starts
Main MenuTable of Contents
Page 294 of 325
293
uuIndicator, Coming On/BlinkinguIf the Charging System Indicator Comes On
Handling the Unexpected
If the Charging System Indicator Comes On■Reasons for the indicator to come on
Comes on when the 12 volt battery is not being charged. ■ What to do when the indicator comes on
Turn off the climate control system, rear defogger, and other electrical
systems, and immediately contact a dealer for repairs.
1If the Charging System Indicator Comes On If you need to stop temporarily, do not turn off the
engine. Restarting the engine may rapidly discharge
the 12 volt battery.
This indicator may also come on when the Auto Idle
Stop function is activated for a while. Restart the
engine. 2 Auto Idle Stop P. 194
This indicator may also come on when the IMA
battery charge drops below a desired level.
The engine starts to recharge the battery. 2 Auto Idle Stop P. 191
The indicator goes off when the battery is being
charged normally.
This indicator may blink after starting when the
outside temperature is below -20°F (-30°C). It will stop blinking after the IMA battery warms up.
Manual transmission models
Automatic transmission (CVT) models
Main MenuTable of Contents