bulb HONDA CR-Z 2013 1.G Owners Manual
[x] Cancel search | Manufacturer: HONDA, Model Year: 2013, Model line: CR-Z, Model: HONDA CR-Z 2013 1.GPages: 325, PDF Size: 11.73 MB
Page 2 of 325
Contents
Child Safety P. 54 Exhaust Gas Hazard P. 62 Safety Labels P. 63
Opening and Closing the Hatch P. 104 Security System P. 106 Opening and Closing the Windows P. 108
Adjusting the Mirrors P. 119Adjusting the Seats P. 121
Climate Control System P. 134
General Information on the Audio System P. 155 Bluetooth® HandsFreeLink ® P. 158
When Driving P. 178 Braking P. 208 Parking Your Vehicle P. 212
Rearview Camera P. 214
Accessories and Modifications P. 220
Maintenance Under the Hood P. 229 Replacing Light Bulbs P. 242
Checking and Maintaining Tires P. 253 12 Volt Battery P. 262 Remote Transmitter Care P. 263
Cleaning P. 265
Engine Does Not Start P. 286 Jump Starting P. 287 Shift Lever Does Not Move P. 289
Fuses P. 297 Emergency Towing P. 301 When You Cannot Open the Hatch P. 303
Devices that Emit Radio Waves P. 309 Reporting Safety Defects P. 310
Authorized Manuals P. 315 Customer Service Information P. 316
Quick Reference GuideP. 2
Safe DrivingP. 27
Instrument PanelP. 65
ControlsP. 97
FeaturesP. 137
DrivingP. 171
MaintenanceP. 221
Handling the UnexpectedP. 269
InformationP. 305
IndexP. 317
Note: All page numbers referenced in this document are hyperlinked.
2013 CR-Z Online Reference Owner's Manual
Page 75 of 325
74
uuIndicatorsu
Instrument Panel
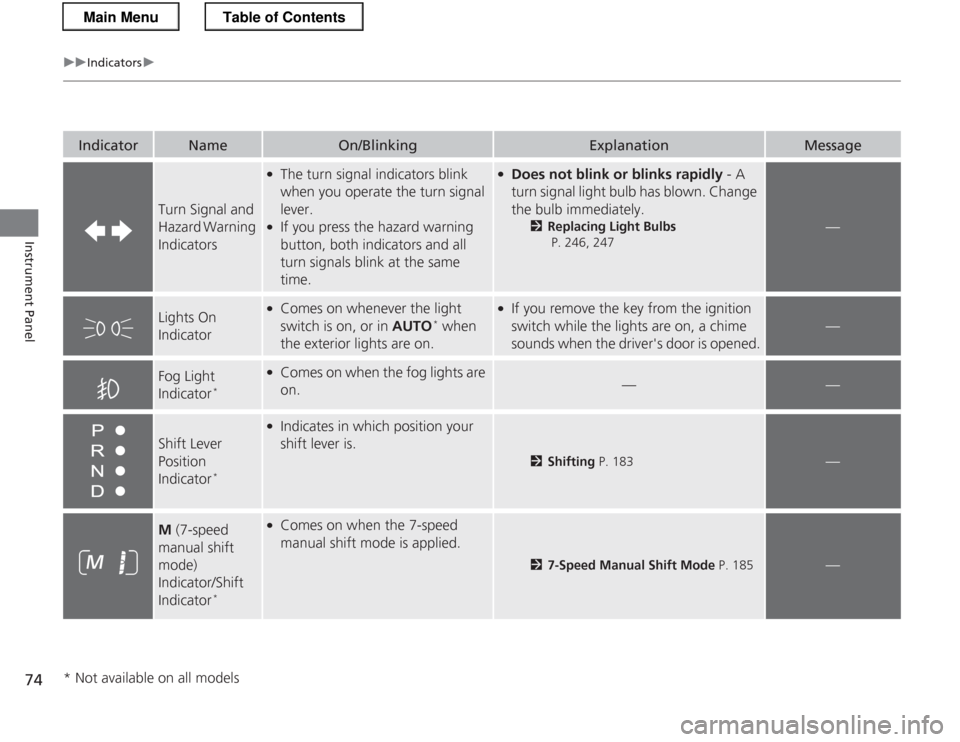
IndicatorNameOn/BlinkingExplanationMessage
Turn Signal and
Hazard Warning Indicators
●The turn signal indicators blink
when you operate the turn signal lever.
● If you press the hazard warning
button, both indicators and all
turn signals blink at the same
time.● Does not blink or blinks rapidly - A
turn signal light bulb has blown. Change
the bulb immediately. 2Replacing Light Bulbs
P. 246, 247
—
Lights On
Indicator●
Comes on whenever the light
switch is on, or in AUTO*
when
the exterior lights are on.● If you remove the key from the ignition
switch while the lights are on, a chime
sounds when the dr iver's door is opened.
—
Fog Light
Indicator*●
Comes on when the fog lights are
on.
——
Shift Lever Position
Indicator *
●
Indicates in which position your shift lever is.
2 Shifting P. 183—
M (7-speed
manual shift
mode) Indicator/Shift
Indicator *●
Comes on when the 7-speed
manual shift mode is applied.
2 7-Speed Manual Shift Mode P. 185—
* Not available on all models
Main MenuTable of Contents
Page 112 of 325
111
uuOperating the Switches Around the Steering WheeluTurn Signals
Continued
Controls
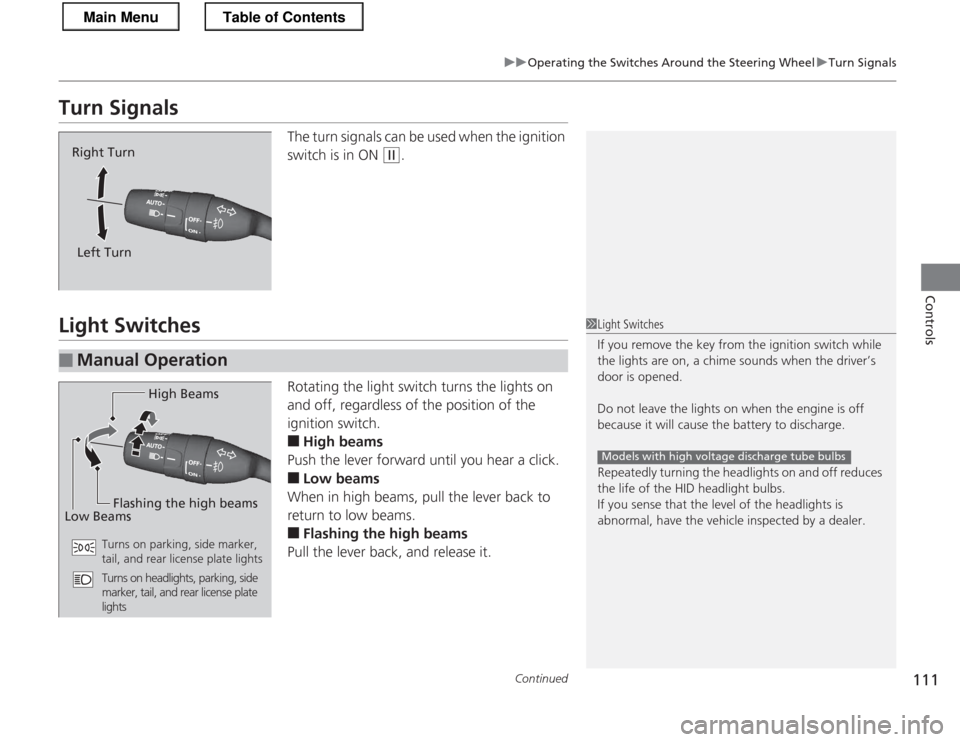
Turn SignalsThe turn signals can be used when the ignition
switch is in ON
(w.
Light Switches
Rotating the light switch turns the lights on
and off, regardless of the position of the
ignition switch. ■High beams
Push the lever forward until you hear a click. ■ Low beams
When in high beams, pull the lever back to
return to low beams. ■ Flashing the high beams
Pull the lever back, and release it.
Right Turn
Left Turn
■Manual Operation
1Light Switches
If you remove the key fr om the ignition switch while
the lights are on, a chime sounds when the driver’s door is opened.
Do not leave the lights on when the engine is off
because it will cause the battery to discharge.
Repeatedly turning the headlights on and off reduces
the life of the HID headlight bulbs.
If you sense that the level of the headlights is
abnormal, have the vehicle inspected by a dealer.
Models with high voltage discharge tube bulbs
High Beams
Flashing the high beams
Low Beams
Turns on parking, side marker,
tail, and rear license plate lights
Turns on headlights, parking, side
marker, tail, and rear license plate
lights
Main MenuTable of Contents
Page 114 of 325
113
uuOperating the Switches Around the Steering WheeluFog Lights*
Controls
Fog Lights *
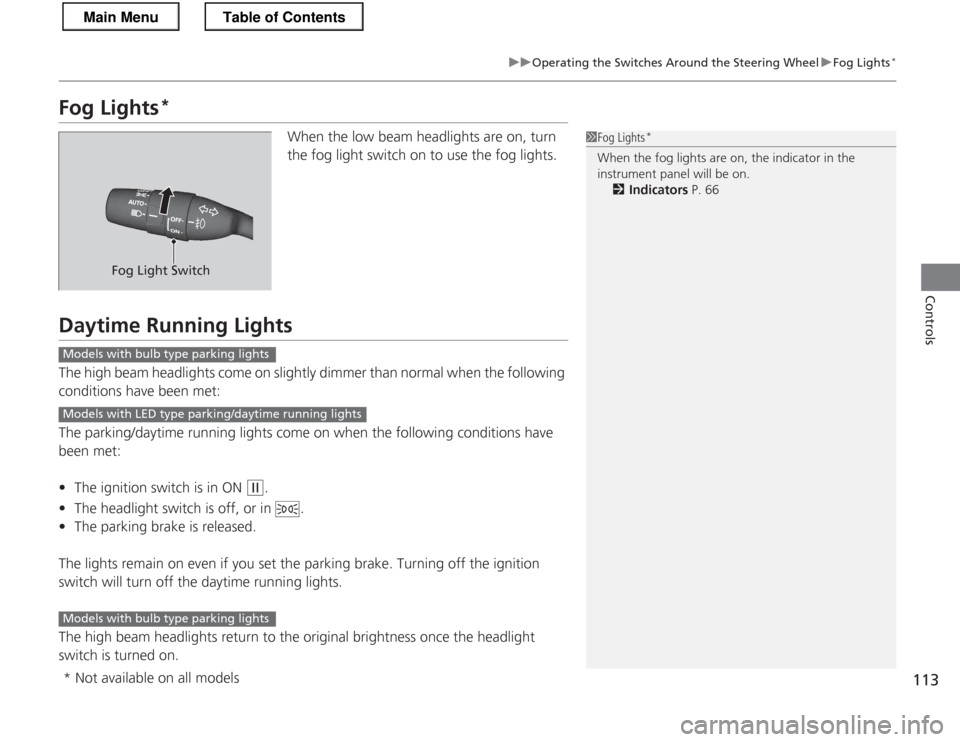
When the low beam headlights are on, turn
the fog light switch on to use the fog lights.
Daytime Running Lights
The high beam headlights come on slightly dimmer than normal when the following
conditions have been met:
The parking/daytime running lights come on when the following conditions have
been met: •The ignition switch is in ON
(w .
• The headlight switch is off, or in .
• The parking brake is released.
The lights remain on even if you set the parking brake. Turning off the ignition
switch will turn off the daytime running lights.
The high beam headlights return to the original brightness once the headlight
switch is turned on.
1Fog Lights *
When the fog lights are on, the indicator in the
instrument panel will be on. 2 Indicators P. 66
Fog Light Switch
Models with bulb type parking lights
Models with LED type parking/daytime running lights
Models with bulb type parking lights
* Not available on all models
Main MenuTable of Contents
Page 223 of 325
222
Maintenance
Before Performing Maintenance
Inspection and Maintenance
For your safety, perform all listed inspections and maintenance to keep your vehicle
in good condition. If you become aware of any abnormality (noise, smell, insufficient
brake fluid, oil residue on the ground, etc.), have your vehicle inspected by a dealer.
(Note, however, that service at a dealer is not mandatory to keep your warranties in
effect.) Refer to the separate maintenance booklet for detailed maintenance and
inspection information. ■ Daily inspections
Perform inspections before long distance trips, when washing the vehicle, or when refueling. ■ Periodic inspections
• Check the continuously variable transmission fluid level monthly.
2 Continuously Variable Transmission Fluid P. 238
• Check the brake fluid level monthly.
2 Brake/Clutch Fluid P. 240
• Check the tire pressure monthly. Examine the tread for wear and foreign objects.
2 Checking and Maintaining Tires P. 253
• Check the operation of the exterior lights monthly.
2 Replacing Light Bulbs P. 242
• Check the condition of the wiper blades at least every six months.
2 Checking and Mainta ining Wiper Blades P. 250
■Types of Inspection and Maintenance
1Inspection and Maintenance
Maintenance, replacement, or repair of
emissions control devices and systems may be
done by any automotive repair establishment or
individuals using parts that are “certified” to EPA standards.
According to state and federal regulations, failure to
perform maintenance on the maintenance main
items marked with # will not void your emissions
warranties. However, all maintenance services should
be performed in accordance with the intervals
indicated by the multi-information display. 2 Maintenance Service Items P. 227
If you want to perform complex maintenance tasks
that require more skills and tools, you can purchase a
subscription to the Service Express website at
www.techinfo.honda.com .
2 Authorized Manuals P. 315
If you want to perform maintenance yourself, make
sure that you have the necessary tools and skills first.
After performing maintenance, update the records in
the separate maintenance booklet.
U.S. models
Main MenuTable of Contents
Page 243 of 325
242
Maintenance
Replacing Light Bulbs
Headlight Bulbs
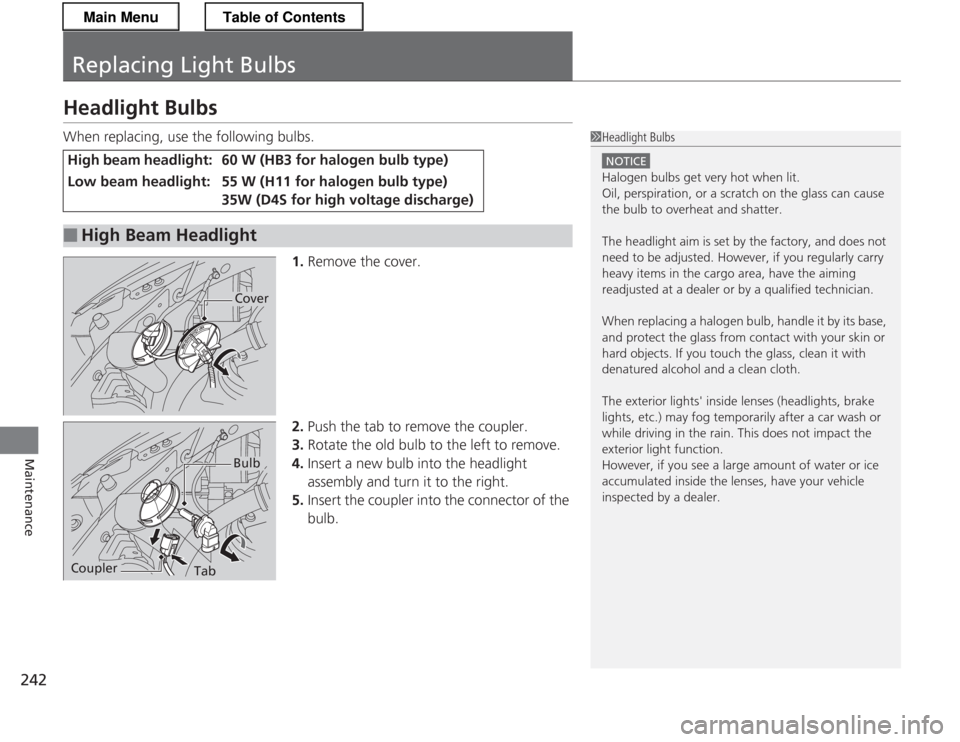
When replacing, use the following bulbs.1.Remove the cover.
2. Push the tab to remove the coupler.
3. Rotate the old bulb to the left to remove.
4. Insert a new bulb into the headlight
assembly and turn it to the right.
5. Insert the coupler into the connector of the
bulb.
High beam headlight:60 W (HB3 for halogen bulb type)
Low beam headlight:55 W (H11 for halogen bulb type)
35W (D4S for high voltage discharge)
■High Beam Headlight
1Headlight Bulbs
NOTICE
Halogen bulbs get very hot when lit.
Oil, perspiration, or a scratch on the glass can cause
the bulb to overheat and shatter.
The headlight aim is set by the factory, and does not
need to be adjusted. However, if you regularly carry
heavy items in the cargo area, have the aiming
readjusted at a dealer or by a qualified technician.
When replacing a halogen bulb, handle it by its base,
and protect the glass from contact with your skin or
hard objects. If you touch the glass, clean it with
denatured alcohol and a clean cloth.
The exterior lights' inside lenses (headlights, brake
lights, etc.) may fog temporarily after a car wash or
while driving in the rain. This does not impact the
exterior light function.
However, if you see a large amount of water or ice
accumulated inside the lenses, have your vehicle
inspected by a dealer.
Cover
TabCoupler
Bulb
Main MenuTable of Contents
Page 244 of 325
243
uuReplacing Light BulbsuHeadlight Bulbs
Maintenance
High voltage can remain in the circuit for a long period of time after the light is
switched off. Do not attempt to inspect or replace the high voltage discharge type
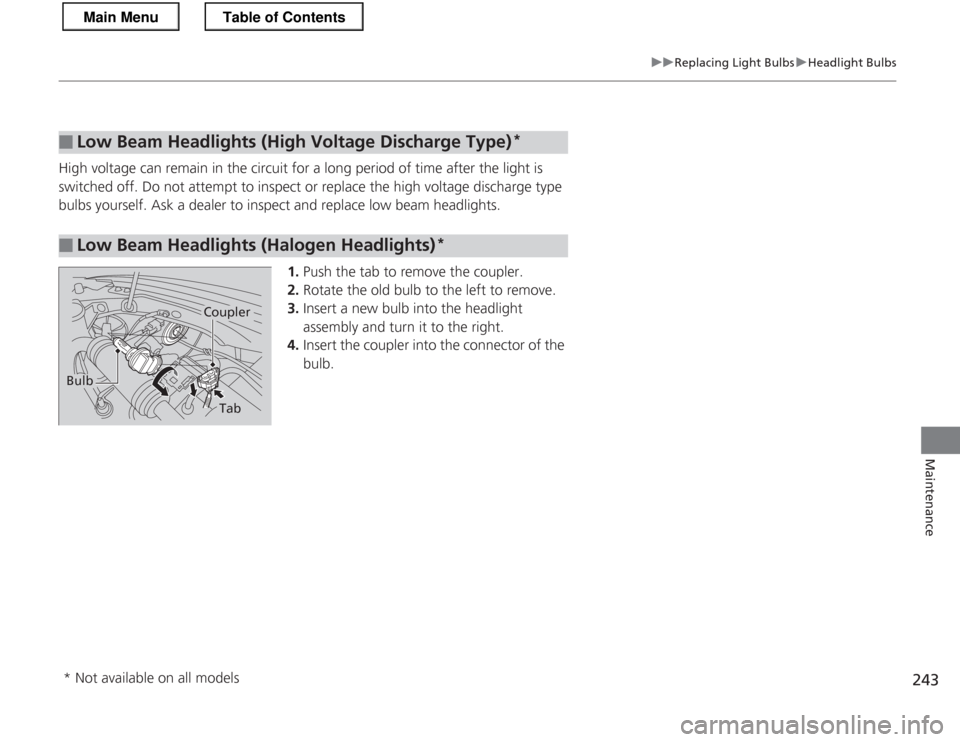
bulbs yourself. Ask a dealer to inspect and replace low beam headlights.1.Push the tab to remove the coupler.
2. Rotate the old bulb to the left to remove.
3. Insert a new bulb into the headlight
assembly and turn it to the right.
4. Insert the coupler into the connector of the
bulb.
■Low Beam Headlights (High Vol tage Discharge Type)*
■Low Beam Headlights (Halogen Headlights)
*
Bulb
Coupler
Tab
* Not available on all models
Main MenuTable of Contents
Page 245 of 325
244
uuReplacing Light BulbsuFog Light Bulbs*
Maintenance
Fog Light Bulbs *
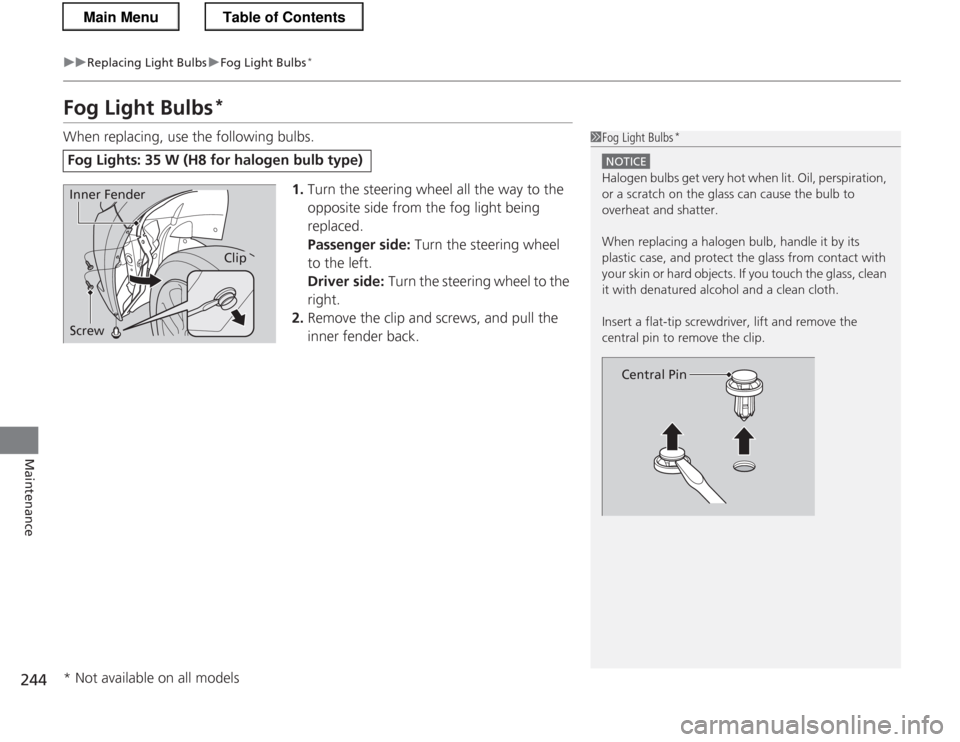
When replacing, use the following bulbs.
1.Turn the steering wheel all the way to the
opposite side from the fog light being
replaced.
Passenger side: Turn the steering wheel
to the left.
Driver side: Turn the steering wheel to the
right.
2. Remove the clip and screws, and pull the
inner fender back.
Fog Lights: 35 W (H8 for halogen bulb type)
1Fog Light Bulbs *
NOTICE
Halogen bulbs get very hot when li
t. Oil, perspiration,
or a scratch on the glass can cause the bulb to
overheat and shatter.
When replacing a halogen bulb, handle it by its
plastic case, and protect the glass from contact with
your skin or hard objects. If you touch the glass, clean
it with denatured alcohol and a clean cloth.
Insert a flat-tip screwdri ver, lift and remove the
central pin to remove the clip.
Central Pin
Inner Fender
Screw
Clip
* Not available on all models
Main MenuTable of Contents
Page 246 of 325
245
uuReplacing Light BulbsuFog Light Bulbs*
Maintenance
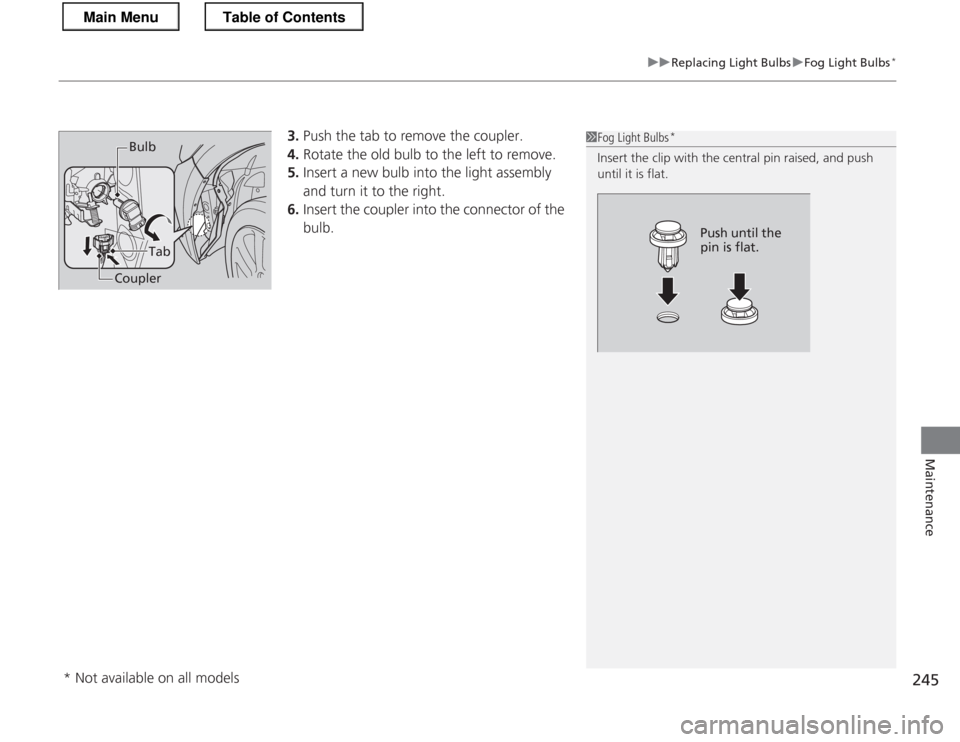
3.
Push the tab to remove the coupler.
4. Rotate the old bulb to the left to remove.
5. Insert a new bulb into the light assembly
and turn it to the right.
6. Insert the coupler into the connector of the
bulb.1Fog Light Bulbs *
Insert the clip wi th the central pin raised, and push
until it is flat.
Push until the
pin is flat.
Bulb
Tab
Coupler
* Not available on all models
Main MenuTable of Contents
Page 247 of 325
246
uuReplacing Light BulbsuFront Turn Signal/Parking*
/Side Marker Light Bulbs
Maintenance
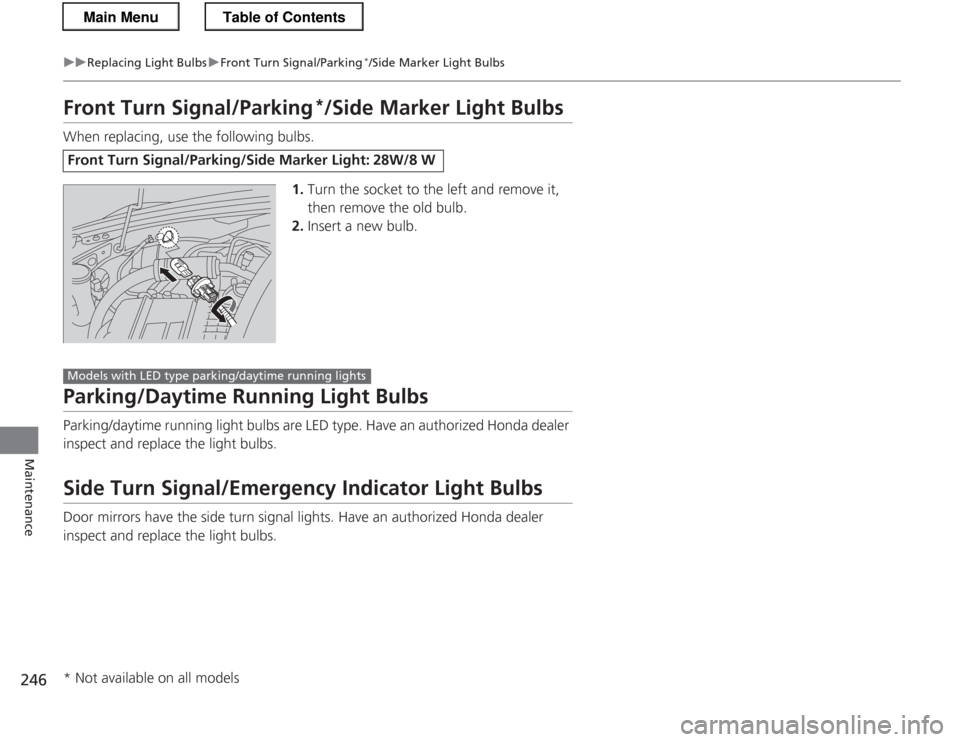
Front Turn Signal/Parking *
/Side Marker Light Bulbs
When replacing, use the following bulbs.
1.Turn the socket to the left and remove it,
then remove the old bulb.
2. Insert a new bulb.
Parking/Daytime Running Light Bulbs
Parking/daytime running light bulbs are LED type. Have an authorized Honda dealer
inspect and replace the light bulbs.
Side Turn Signal/Emergency Indicator Light Bulbs
Door mirrors have the side turn signal lights. Have an authorized Honda dealer
inspect and replace the light bulbs.
Front Turn Signal/Parking/Side Marker Light: 28W/8 W
Models with LED type parking/daytime running lights
* Not available on all models
Main MenuTable of Contents