engine HONDA CR-Z 2016 1.G Quick Guide
[x] Cancel search | Manufacturer: HONDA, Model Year: 2016, Model line: CR-Z, Model: HONDA CR-Z 2016 1.GPages: 64, PDF Size: 4.38 MB
Page 4 of 64
| 1
V
ISUAL
I
NDEX
INDEX
VOICE COMMAND
INDEX
CUSTOMER
INFORMATION
SPECIFICATIONS
MAINTENANCE
HANDLING THE UNEXPECTED
DRIVING
NAVIGATION
TABLE OF CONTENTS
VISUAL INDEX
SAFETY
INFORMATION
INSTRUMENT PANEL
VEHICLE
CONTROLS
AUDIO AND
CONNECTIVITY
BLUETOOTH®
HANDSFREELINK®
HONDALINK®
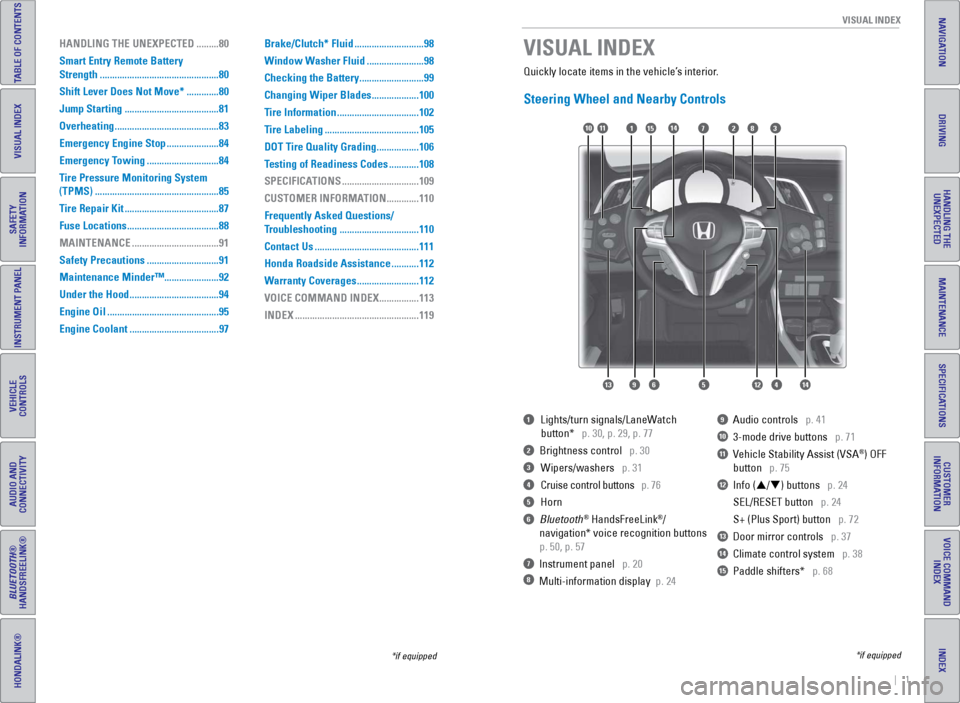
Quickly locate items in the vehicle’s interior.
Steering Wheel and Nearby Controls
1 Lights/turn signals/LaneW atch
button* p. 30, p. 29, p. 77
2 Brightness control p. 30
3 Wipers/washers p. 31
4 Cruise control buttons p. 76
5 Horn
6 Bluetooth® HandsFreeLink®/
navigation* voice recognition buttons
p. 50, p. 57
7 Instrument panel p. 20
8 Multi-information display p. 24
9 Audio controls p. 41
10 3-mode drive buttons p. 71
11 Vehicle Stability Assist (VSA®) OFF
button
p. 75
12 Info (p/q) buttons p. 24
SEL/RESET button
p. 24
S+ (Plus Sport) button
p. 72
13 Door mirror controls p. 37
14 Climate control system p. 38
15 Paddle shifters* p. 68
VISUAL INDEX
*if equipped
*if equipped
7
12564
10
13
14111283
914
15
HANDLING THE UNEXPECTED ......... 80
Smart Entry Remote Battery
Strength
................................................ 80
Shift Lever Does Not Move*
.............80
Jump Starting
...................................... 81
Overheating
.......................................... 83
Emergency Engine Stop
.....................84
Emergency Towing
.............................84
T
ire Pressure Monitoring System
(TPMS)
.................................................. 85
Tire Repair Kit
...................................... 87
Fuse Locations
..................................... 88
MAINTENANCE
................................... 91
Safety Precautions
.............................91
Maintenance Minder™......................92
Under the Hood
.................................... 94
Engine Oil
............................................. 95
Engine Coolant
.................................... 97Brake/Clutch* Fluid
............................
98
Window W asher Fluid .......................98
Checking the Battery
..........................99
Changing Wiper Blades
...................100
Tire Information
.................................102
T
ire Labeling ......................................105
DOT Tire Quality Grading
.................106
Testing of Readiness Codes
............108
SPECIFICATIONS
...............................109
CUSTOMER INFORMA
TION .............110
Frequently Asked Questions/
Troubleshooting
................................110
Contact Us
..........................................111
Honda Roadside Assistance
...........112
Warranty Coverages
.........................112
VOICE COMMAND INDEX
................113
INDEX
..................................................119
Page 5 of 64
2 || 3
S AFETY
V
ISUAL I NDEX
TABLE OF CONTENTS
INDEX
VISUAL INDEX
VOICE COMMAND
INDEX
SAFETY
INFORMATION
CUSTOMER
INFORMATION
INSTRUMENT PANEL
SPECIFICATIONS
VEHICLE
CONTROLS
MAINTENANCE
AUDIO AND
CONNECTIVITY
HANDLING THE UNEXPECTED
BLUETOOTH®
HANDSFREELINK®
DRIVING
HONDALINK®
NAVIGATION
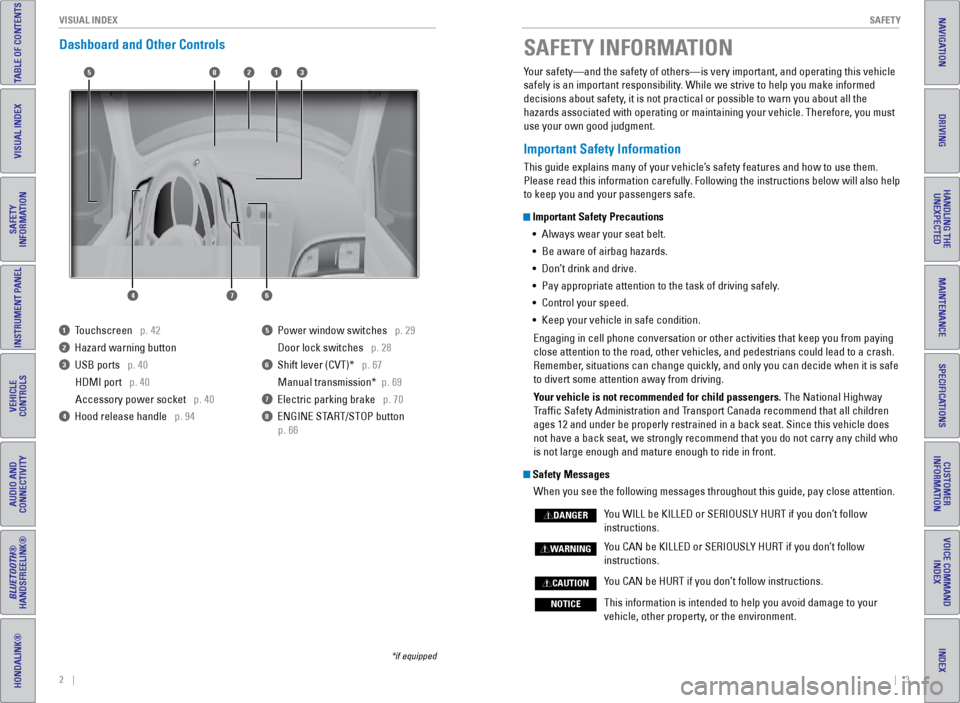
Dashboard and Other Controls
1 Touchscreen p. 42
2 Hazard warning button
3 USB ports p. 40
HDMI port p. 40
Accessory power socket p. 40
4 Hood release handle p. 94
5 Power window switches p. 29
Door lock switches
p. 28
6 Shift lever (CVT)* p. 67
Manual transmission*
p. 69
7 Electric parking brake p. 70
8 ENGINE START/STOP button
p. 66
*if equipped
Your safety—and the safety of others—is very important, and operati\
ng this vehicle
safely is an important responsibility. While we strive to help you make informed
decisions about safety, it is not practical or possible to warn you about all the
hazards associated with operating or maintaining your vehicle. Therefore\
, you must
use your own good judgment.
Important Safety Information
This guide explains many of your vehicle’s safety features and how to use them.
Please read this information carefully. Following the instructions below will also help
to keep you and your passengers safe.
Important Safety Precautions•
Always wear your seat belt.
•
Be aware of airbag hazards.
•
Don’
t drink and drive.
•
Pay appropriate attention to the task of driving safely
.
•
Control your speed.
•
Keep your vehicle in safe condition.
Engaging in cell phone conversation or other activities that keep you fr\
om paying
close attention to the road, other vehicles, and pedestrians could lead \
to a crash.
Remember
, situations can change quickly, and only you can decide when it is safe
to divert some attention away from driving.
Your vehicle is not recommended for child passengers. The National Highway
Traffic Safety Administration and Transport Canada recommend that all children
ages 12 and under be properly restrained in a back seat. Since this vehi\
cle does
not have a back seat, we strongly recommend that you do not carry any ch\
ild who
is not large enough and mature enough to ride in front.
Safety Messages
When you see the following messages throughout this guide, pay close att\
ention.
Y
ou WILL be KILLED or SERIOUSLY HURT if you don’t follow
instructions.
Y
ou CAN be KILLED or SERIOUSLY HURT if you don’t follow
instructions.
Y
ou CAN be HURT if you don’t follow instructions.
This information is intended to help you avoid damage to your
vehicle, other property
, or the environment.
DANGER
WARNING
CAUTION
NOTICE
SAFETY INFORMATION
158
4
3
7
2
6
Page 6 of 64
4 || 5
S AFETY
S
AFETY
TABLE OF CONTENTS
INDEX
VISUAL INDEX
VOICE COMMAND
INDEX
SAFETY
INFORMATION
CUSTOMER
INFORMATION
INSTRUMENT PANEL
SPECIFICATIONS
VEHICLE
CONTROLS
MAINTENANCE
AUDIO AND
CONNECTIVITY
HANDLING THE UNEXPECTED
BLUETOOTH®
HANDSFREELINK®
DRIVING
HONDALINK®
NAVIGATION
Carbon Monoxide Gas
The engine exhaust from this vehicle contains carbon monoxide, a colorle\
ss,
odorless, and highly toxic gas. As long as you properly maintain your ve\
hicle and
follow the instructions set forth below, you will not accumulate dangerous levels
of carbon monoxide gas in the vehicle interior.
Have the exhaust system inspected for leaks whenever:
•
The exhaust system is making an unusual noise.
•
The exhaust system may have been damaged.
•
The vehicle is raised for an oil change.
When you operate a vehicle with the hatch open, airflow can pull exhau\
st gas
into the interior and create a hazardous condition. If you must drive wi\
th the hatch
open, open all the windows and set the climate control system as shown b\
elow
.
1.
Select the fresh air mode.
2.
Select the mode.
3.
Set the fan speed to high.
4.
Set the temperature control to a comfortable setting.
Adjust the climate control system in the same manner if you sit in your \
p
arked
vehicle with the engine running.
Carbon monoxide gas is toxic. Breathing it can cause unconsciousness and\
even kill you.
Avoid any enclosed areas or activities that expose you to carbon monoxide\
.
WARNING
An enclosed area such as a garage can quickly fill up with carbon mono\
xide gas.
Do not run the engine with the garage door closed. Even when the garage \
door is
open, drive out of the garage immediately after starting the engine.
Seat Belts
A seat belt is your best protection in all types of collisions. Airbags \
are designed to
supplement seat belts, not replace them. So even though your vehicle is \
equipped
with airbags, make sure you and your passengers always wear your seat belts and
wear them properly.
Lap/Shoulder Seat BeltsBoth seating positions are equipped with lap/shoulder seat belts with em\
ergency
locking retractors. In normal driving, the retractor lets you move freel\
y while
keeping some tension on the belt. During a collision or sudden stop, the\
retractor
locks to restrain your body.
The passenger’s seat belt has a lockable retractor that must be properly activated
when using a forward-facing child seat, should you choose to disregard o\
ur
recommendations and install one.
Both seats are equipped with automatic seat belt tensioners to enhance s\
afety.
The tensioners automatically tighten the seat belts during a moderate to\
severe
frontal collision, sometimes even if the collision is not severe enough \
to inflate the
front airbags.
Proper Use of Seat BeltsFollow these guidelines for proper use:
•
All occupants should sit upright, well back in the seat, and remain in t\
ha
t
position for the duration of the trip. Slouching and leaning reduce the \
effectiveness of the belt and can increase the chance of serious injury \
in a
crash.
•
Never place the shoulder part of a lap/shoulder seat belt under your arm\
or
behind your back. This could cause very serious injuries in a crash.
•
T
wo people should never use the same seat belt. If they do, they could be\
very
seriously injured in a crash.
•
Do not put any accessories on the seat belts. Devices intended to improv\
e
comfort or reposition the shoulder part of a seat belt can reduce the pr\
otective
capability and increase the chance of serious injury in a crash.
•
No one should sit in a seat with an inoperative seat belt or one that do\
es not
appear to be working correctly. Using a seat belt that is not working properly
may not protect the occupant in a crash. Have a dealer check the belt as\
soon
as possible.
Not wearing a seat belt properly increases the chance of a serious injur\
y or
death in a crash, even though your vehicle has airbags.
Be sure you and your passenger always wear seat belts and wear them
properly.
WARNING
Page 14 of 64
20 || 21
I NSTRUMENT P
ANELI
NSTRUMENT P
ANEL
TABLE OF CONTENTS
INDEX
VISUAL INDEX
VOICE COMMAND
INDEX
SAFETY
INFORMATION
CUSTOMER
INFORMATION
INSTRUMENT PANEL
SPECIFICATIONS
VEHICLE
CONTROLS
MAINTENANCE
AUDIO AND
CONNECTIVITY
HANDLING THE UNEXPECTED
BLUETOOTH®
HANDSFREELINK®
DRIVING
HONDALINK®
NAVIGATION
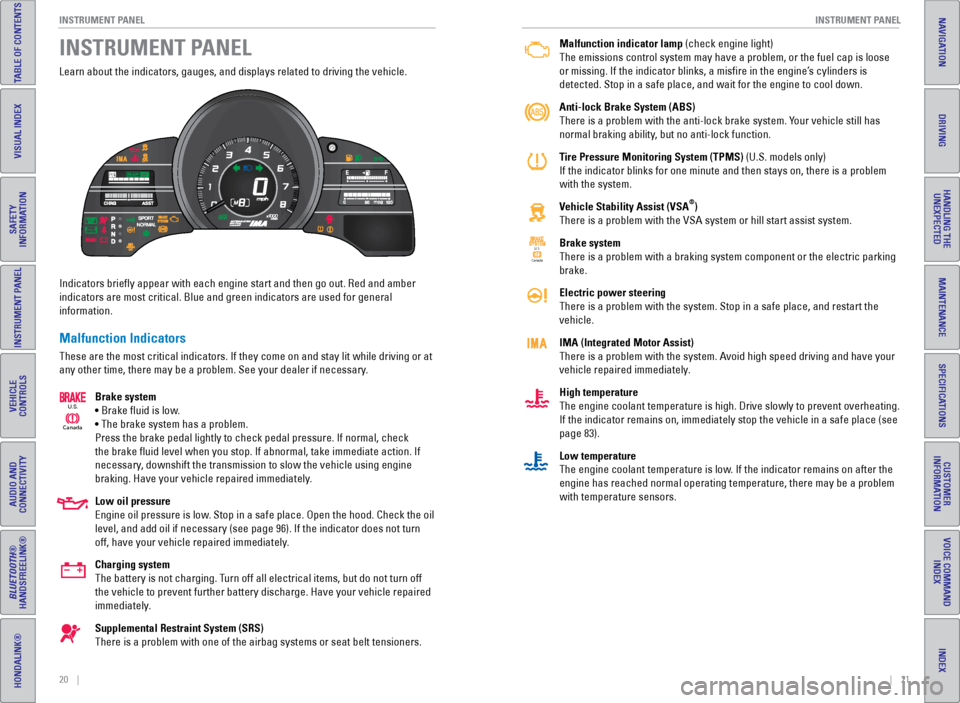
Learn about the indicators, gauges, and displays related to driving the \
vehicle.
Indicators briefly appear with each engine start and then go out. Red \
and amber
indicators are most critical. Blue and green indicators are used for gen\
eral
information.
Malfunction Indicators
These are the most critical indicators. If they come on and stay lit whi\
le driving or at
any other time, there may be a problem. See your dealer if necessary.
Brake system
• Brake fluid is low.
• The brake system has a problem.
Press the brake pedal lightly to check pedal pressure. If normal, check \
the brake fluid level when you stop. If abnormal, take immediate actio\
n. If
necessary, downshift the transmission to slow the vehicle using engine
braking. Have your vehicle repaired immediately.
Low oil pressure
Engine oil pressure is low. Stop in a safe place. Open the hood. Check the oil
level, and add oil if necessary (see page 96). If the indicator does n\
ot turn
off, have your vehicle repaired immediately.
Charging system
The battery is not charging. Turn off all electrical items, but do not turn off
the vehicle to prevent further battery discharge. Have your vehicle repa\
ired
immediately.
Supplemental Restraint System (SRS)
There is a problem with one of the airbag systems or seat belt tensioner\
s.
Canada
U.S.
INSTRUMENT PANELMalfunction indicator lamp (check engine light)
The emissions control system may have a problem, or the fuel cap is loos\
e
or missing. If the indicator blinks, a
misfire in the engine’s cylinders is
detected. Stop in a safe place, and wait for the engine to cool down.
Anti-lock Brake System (ABS)
There is a problem with the anti-lock brake system. Your vehicle still has
normal braking ability, but no anti-lock function.
Tire Pressure Monitoring System (TPMS) (U.S. models only)
If the indicator blinks for one minute and then stays on, there is a pro\
blem
with the system.
Vehicle Stability Assist (VSA
®)
There is a problem with the VSA system or hill start assist system.
Brake system
There is a problem with a braking system component or the electric parking
brake.
Electric power steering
There is a problem with the system. Stop in a safe place, and restart th\
e
vehicle.
IMA (Integrated Motor Assist)
There is a problem with the system. Avoid high speed driving and have your
vehicle repaired immediately.
High temperature
The engine coolant temperature is high. Drive slowly to prevent overheat\
ing.
If the indicator remains on, immediately stop the vehicle in a safe plac\
e (see
page 83).
Low temperature
The engine coolant temperature is low. If the indicator remains on after the
engine has reached normal operating temperature, there may be a problem \
with temperature sensors.
Canada U.S.
Page 15 of 64
22 || 23
I NSTRUMENT P
ANELI
NSTRUMENT P
ANEL
TABLE OF CONTENTS
INDEX
VISUAL INDEX
VOICE COMMAND
INDEX
SAFETY
INFORMATION
CUSTOMER
INFORMATION
INSTRUMENT PANEL
SPECIFICATIONS
VEHICLE
CONTROLS
MAINTENANCE
AUDIO AND
CONNECTIVITY
HANDLING THE UNEXPECTED
BLUETOOTH®
HANDSFREELINK®
DRIVING
HONDALINK®
NAVIGATION
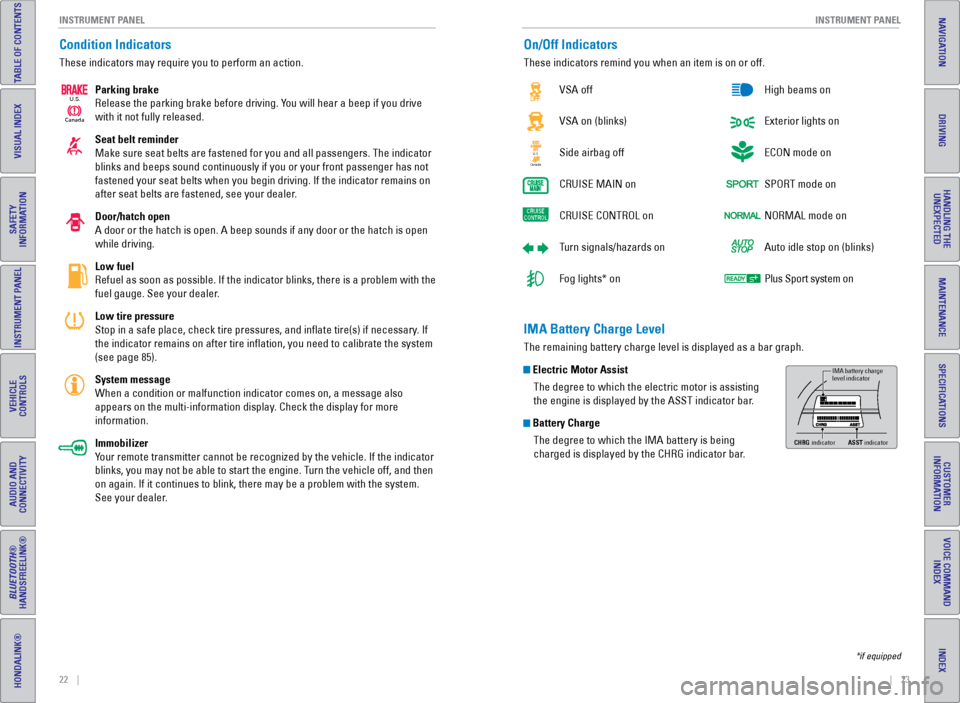
Condition Indicators
These indicators may require you to perform an action.
Parking brake
Release the parking brake before driving. You will hear a beep if you drive
with it not fully released.
Seat belt reminder
Make sure seat belts are fastened for you and all passengers. The indica\
tor
blinks and beeps sound continuously if you or your front passenger has not
fastened your seat belts when you begin driving. If the indicator remain\
s on
after seat belts are fastened, see your dealer.
Door/hatch open
A door or the hatch is open. A beep sounds if any door or the hatch is o\
pen
while driving.
Low fuel
Refuel as soon as possible. If the indicator blinks, there is a problem \
with the
fuel gauge. See your dealer.
Low tire pressure
Stop in a safe place, check tire pressures, and inflate tire(s) if n\
ecessary. If
the indicator remains on after tire inflation, you need to calibrate t\
he system
(see page 85).
System message
When a condition or malfunction indicator comes on, a message also
appears on the multi-information display. Check the display for more
information.
Immobilizer
Your remote transmitter cannot be recognized by the vehicle. If the indic\
ator
blinks, you may not be able to start the engine. Turn the vehicle off, and then
on again. If it continues to blink, there may be a problem with the syst\
em.
See your dealer.
Canada
U.S.
On/Off Indicators
These indicators remind you when an item is on or off.
VSA off
VSA on (blinks)
Side airbag off
CRUISE
MAIN on
CRUISE
CONTROL on
Turn signals/hazards on
Fog lights* on High beams on
Exterior lights on
ECON mode on
SPORT mode on
NORMAL mode on
Auto idle stop on (blinks)
Plus Sport system on
CanadaU.S.
*if equipped
IMA Battery Charge Level
The remaining battery charge level is displayed as a bar graph.
Electric Motor Assist
The degree to which the electric motor is assisting
the engine is displayed by the ASST indicator bar.
Battery ChargeThe degree to which the IMA battery is being
charged is displayed by the CHRG indicator bar.
IMA battery charge
level indicator
CHRG indicato rASST indicato r
Page 16 of 64
24 || 25
I NSTRUMENT P
ANELI
NSTRUMENT P
ANEL
TABLE OF CONTENTS
INDEX
VISUAL INDEX
VOICE COMMAND
INDEX
SAFETY
INFORMATION
CUSTOMER
INFORMATION
INSTRUMENT PANEL
SPECIFICATIONS
VEHICLE
CONTROLS
MAINTENANCE
AUDIO AND
CONNECTIVITY
HANDLING THE UNEXPECTED
BLUETOOTH®
HANDSFREELINK®
DRIVING
HONDALINK®
NAVIGATION
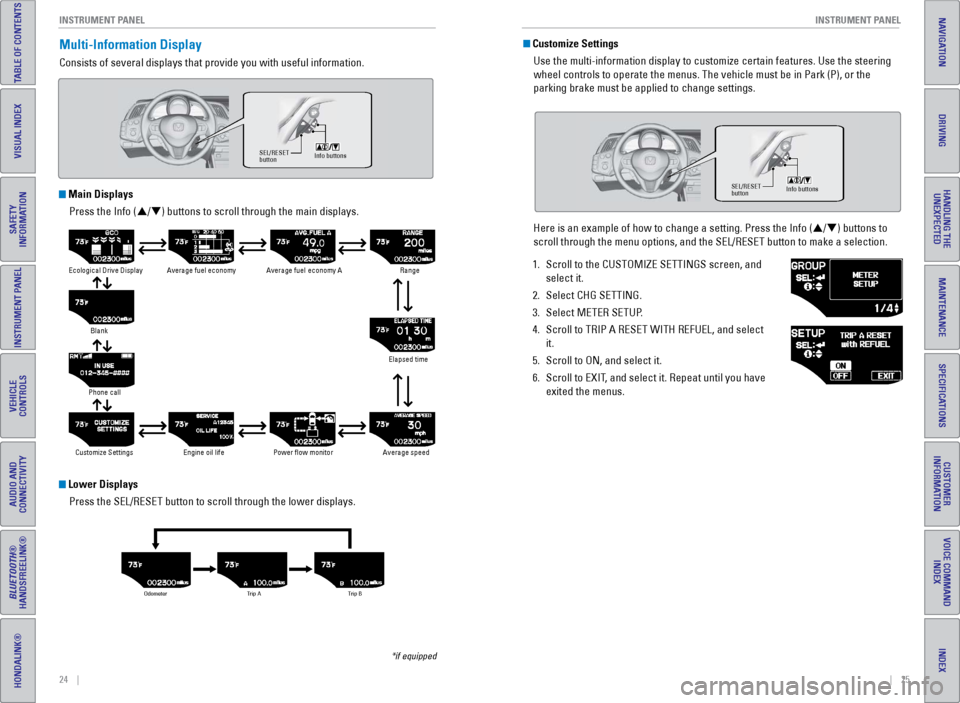
Multi-Information Display
Consists of several displays that provide you with useful information.
Info buttons SEL/RESE T
button
*if equipped
Main Displays
Press the Info (p/q) buttons to scroll through the main displays.
Lower DisplaysPress the SEL/RESET button to scroll through the lower displays.
Ecological Drive Display Average fuel economy Average fuel economy ARange
Elapsed time
Average speed
Power �ow monito r
Engine oil life
Customize Settings
Phone call Blank
Odometer
Trip ATrip B
Customize Settings
Use the multi-information display to customize certain features. Use the\
steering
wheel controls to operate the menus. The vehicle must be in Park (P), \
or the
parking brake must be applied to change settings.
Here is an example of how to change a setting. Press the Info (p/q) buttons to
scroll through the menu options, and the SEL/RESET button to make a sele\
ction.
1.
Scroll to the CUSTOMIZE SETTINGS screen, and
select it.
2.
Select CHG SETTING.
3.
Select METER SETUP
.
4.
Scroll to TRIP A RESET WITH REFUEL, and select
it.
5.
Scroll to ON, and select it.
6.
Scroll to EXIT
, and select it. Repeat until you have
exited the menus.
Info buttons SEL/RESE T
button
Page 35 of 64
62 || 63
DRIVING
DRIVING
TABLE OF CONTENTS
INDEX
VISUAL INDEX
VOICE COMMAND
INDEX
SAFETY
INFORMATION
CUSTOMER
INFORMATION
INSTRUMENT PANEL
SPECIFICATIONS
VEHICLE
CONTROLS
MAINTENANCE
AUDIO AND
CONNECTIVITY
HANDLING THE UNEXPECTED
BLUETOOTH®
HANDSFREELINK®
DRIVING
HONDALINK®
NAVIGATION
Learn about preparation for driving, as well as other features.
Before Driving
Check the following items before you begin driving.
Exterior Checks
•
Make sure there are no obstructions on the windows, door mirrors, exte
rior
lights, or other parts of the vehicle.
•
Remove any frost, snow
, or ice.
•
Make sure the hood is securely closed.
•
Heat from the engine and exhaust can ignite flammable materials left u\
nder
the hood, causing a fire. If you’ve parked your vehicle for an exte\
nded period,
inspect and remove any debris that may have collected, such as dried g
rass
and leaves that have fallen or have been carried in for use as a nest by\
a small
animal. Also check under the hood for leftover flammable materials aft\
er you or
someone else has performed maintenance on your vehicle.
•
Make sure the tires are in good condition.
•
Make sure there are no people or objects behind or around the vehicle.
Interior Checks•
Store or secure all items on board properly
.
•
Do not pile items in the cargo area higher than the seat-back height.
•
Do not place anything in the front seat footwells. Make sure to secure t\
he floor
mats.
•
If you have any animals on board, do not let them move freely around in \
the
vehicle.
•
Securely close and lock both doors and the hatch.
•
Adjust your seating position, mirrors, and steering wheel properly
.
•
Make sure items placed on the floor behind the seats cannot roll under\
the
seats.
•
Everyone in the vehicle must fasten their seat belt.
•
Make sure that the indicators in the instrument panel come on when you s\
tart
the vehicle, and go off soon after
.
DRIVING
If the doors are frozen shut, use warm water around the door edges to me\
lt any
ice. Do not try to force them open, as this can damage the rubber trim a\
round the
doors. When done, wipe dry to avoid further freezing.
NOTICE Improper accessories or modifications can affect your vehicle’s handling, and
stability, and performance, and cause a crash in which you can be seriously hurt
or killed.
Follow all instructions in the vehicle owner’s guide regarding accessories and
modifications.
WARNING
In addition:
•
During the first 600 miles (1,000 km) of operation, avoid sudden acc\
elerat
ion or
full throttle operation so as not to damage the engine or powertrain.
•
A
void hard braking for the first 200 miles (300 km). You should also follow this
when the brake pads are replaced.
Page 37 of 64
66 || 67
DRIVING
DRIVING
TABLE OF CONTENTS
INDEX
VISUAL INDEX
VOICE COMMAND
INDEX
SAFETY
INFORMATION
CUSTOMER
INFORMATION
INSTRUMENT PANEL
SPECIFICATIONS
VEHICLE
CONTROLS
MAINTENANCE
AUDIO AND
CONNECTIVITY
HANDLING THE UNEXPECTED
BLUETOOTH®
HANDSFREELINK®
DRIVING
HONDALINK®
NAVIGATION
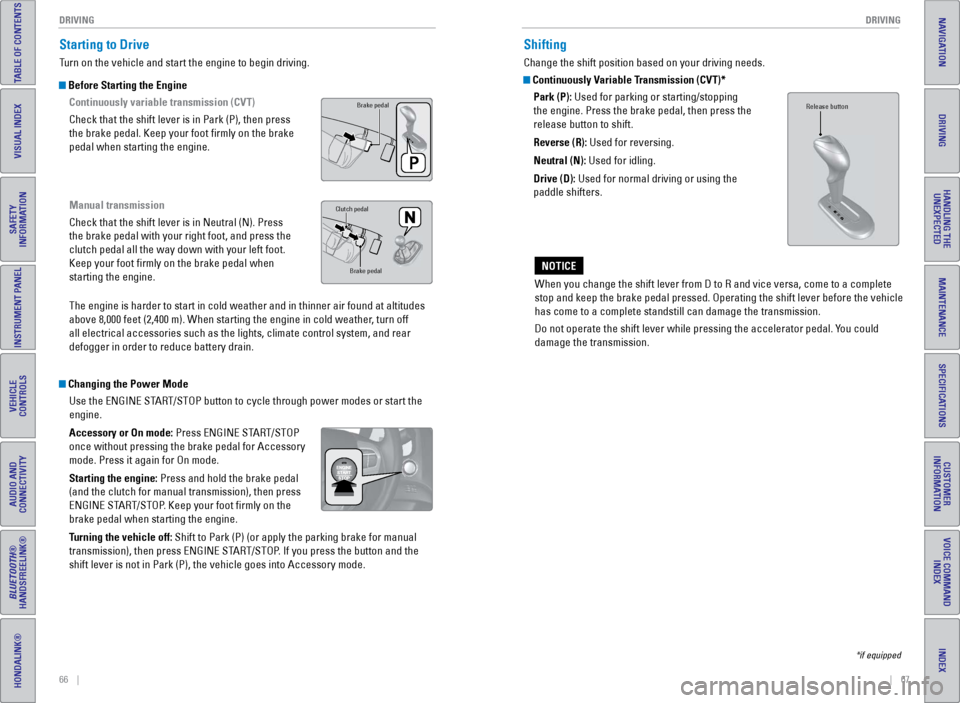
Starting to Drive
Turn on the vehicle and start the engine to begin driving.
Before Starting the Engine
Continuously variable transmission (CVT)
Check that the shift lever is in Park (P), then press
the brake pedal. Keep your foot firmly on the brake
pedal when starting the engine.
Manual transmission
Check that the shift lever is in Neutral (N). Press
the brake pedal with your right foot, and press the
clutch pedal all the way down with your left foot.
Keep your foot firmly on the brake pedal when
starting the engine.
The engine is harder to start in cold weather and in thinner air found a\
t altitudes
above 8,000 feet (2,400 m). When starting the engine in cold weather, turn off
all electrical accessories such as the lights, climate control system, a\
nd rear
defogger in order to reduce battery drain.
Changing the Power ModeUse the ENGINE START/STOP button to cycle through power modes or start the
engine.
Accessory or On mode: Press ENGINE START/STOP
once without pressing the brake pedal for Accessory
mode. Press it again for On mode.
Starting the engine: Press and hold the brake pedal
(and the clutch for manual transmission), then press
ENGINE START/STOP. Keep your foot firmly on the
brake pedal when starting the engine.
Turning the vehicle off: Shift to Park (P) (or apply the parking brake for manual
transmission), then press ENGINE START/STOP. If you press the button and the
shift lever is not in Park (P), the vehicle goes into Accessory mode.
Brake pedal
Clutch pedal
Brake pedal
*if equipped
Shifting
Change the shift position based on your driving needs.
Continuously Variable Transmission (CVT)*Park (P): Used for parking or starting/stopping
the engine. Press the brake pedal, then press the
release button to shift.
Reverse (R): Used for reversing.
Neutral (N): Used for idling.
Drive (D): Used for normal driving or using the
paddle shifters.
When you change the shift lever from D to R and vice versa, come to a co\
mplete
stop and keep the brake pedal pressed. Operating the shift lever before \
the vehicle
has come to a complete standstill can damage the transmission.
Do not operate the shift lever while pressing the accelerator pedal. You could
damage the transmission.
NOTICE
Release button
Page 38 of 64
68 || 69
DRIVING
DRIVING
TABLE OF CONTENTS
INDEX
VISUAL INDEX
VOICE COMMAND
INDEX
SAFETY
INFORMATION
CUSTOMER
INFORMATION
INSTRUMENT PANEL
SPECIFICATIONS
VEHICLE
CONTROLS
MAINTENANCE
AUDIO AND
CONNECTIVITY
HANDLING THE UNEXPECTED
BLUETOOTH®
HANDSFREELINK®
DRIVING
HONDALINK®
NAVIGATION
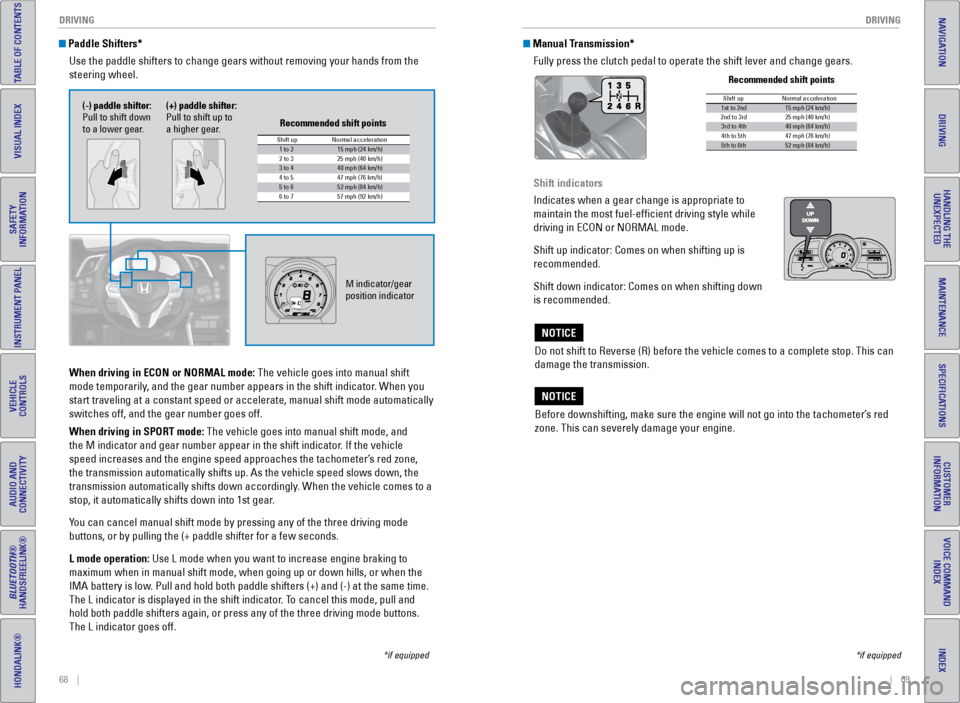
Paddle Shifters*
Use the paddle shifters to change gears without removing your hands from\
the
steering wheel.
*if equipped
When driving in ECON or NORMAL mode: The vehicle goes into manual shift
mode temporarily, and the gear number appears in the shift indicator. When you
start traveling at a constant speed or accelerate, manual shift mode aut\
omatically
switches off, and the gear number goes off.
When driving in SPORT mode: The vehicle goes into manual shift mode, and
the M indicator and gear number appear in the shift indicator. If the vehicle
speed increases and the engine speed approaches the tachometer’s red zone,
the transmission automatically shifts up. As the vehicle speed slows down, the
transmission automatically shifts down accordingly. When the vehicle comes to a
stop, it automatically shifts down into 1st gear.
You can cancel manual shift mode by pressing any of the three driving mod\
e
buttons, or by pulling the (+ paddle shifter for a few seconds.
L mode operation: Use L mode when you want to increase engine braking to
maximum when in manual shift mode, when going up or down hills, or when the
IMA battery is low. Pull and hold both paddle shifters (+) and (-) at the same time.
The L indicator is displayed in the shift indicator. To cancel this mode, pull and
hold both paddle shifters again, or press any of the three driving mode \
buttons.
The L indicator goes off.
M indicator/gear
position indicator
Shift up1 to 215 mph (24 km/h)
2 to 3 25 mph (40 km/h)
3 to 440 mph (64 km/h)
4 to 5
5 to 652 mph (84 km/h)
6 to 7 57 mph (92 km/h)
Normal acceleration
47 mph (76 km/h)
Recommended shift points
(-) paddle shifter:
Pull to shift down
to a lower gear. (+) paddle shifter:
Pull to shift up to
a higher gear.
Manual Transmission*
Fully press the clutch pedal to operate the shift lever and change gears\
.
Do not shift to Reverse (R) before the vehicle comes to a complete sto\
p. This can
damage the transmission.
NOTICE
Before downshifting, make sure the engine will not go into the tachomete\
r’s red
zone. This can severely damage your engine.
NOTICE
Shift up1st to 2nd15 mph (24 km/h)
2nd to 3rd 25 mph (40 km/h)
3rd to 4th40 mph (64 km/h)
4th to 5th 47 mph (76 km/h)
5th to 6th52 mph (84 km/h)
Normal acceleration
Recommended shift points
*if equipped
Shift indicators
Indicates when a gear change is appropriate to
maintain the most fuel-efficient driving style while
driving in ECON or NORMAL mode.
Shift up indicator: Comes on when shifting up is
recommended.
Shift down indicator: Comes on when shifting down
is recommended.
READY
Page 39 of 64
70 || 71
DRIVING
DRIVING
TABLE OF CONTENTS
INDEX
VISUAL INDEX
VOICE COMMAND
INDEX
SAFETY
INFORMATION
CUSTOMER
INFORMATION
INSTRUMENT PANEL
SPECIFICATIONS
VEHICLE
CONTROLS
MAINTENANCE
AUDIO AND
CONNECTIVITY
HANDLING THE UNEXPECTED
BLUETOOTH®
HANDSFREELINK®
DRIVING
HONDALINK®
NAVIGATION
Braking
Slow down or stop your vehicle, and keep it from moving when parked.
Foot Brake
Press the brake pedal to slow down or stop your
vehicle from moving.
Brake Assist System During hard or emergency braking, the system
increases braking force. The brake pedal may move
slightly or make a noise; this is normal. Continue to
hold the brake pedal firmly down.
Anti-Lock Brake System (ABS) During hard or emergency braking, the system
rapidly pumps the brakes to prevent wheel lockup
and help you maintain steering control. The brake
pedal may pulsate slightly during ABS operation;
this is normal. Do not pump the brake pedal, and
continue to hold it firmly down.
Electric Parking Brake Keep your vehicle from moving while parked using a simple switch.
To apply: Pull up the switch. The parking brake
indicator appears in the instrument panel.
To release: Press the brake pedal and make sure
your seat belt is fastened. Press the switch down
to release.
You can also lightly press the accelerator
pedal (and release the clutch pedal for manual
transmission) if your seat belt is fastened, the
vehicle is on, and the shift lever is in Drive (D)
or Reverse (R) (or a gear is engaged for manual
transmission).
Brake pedal
CVT
Brake pedal
Manual transmission
Pull up to apply
Press down to release
The ABS may not function correctly if you use an incorrect tire type and\
size.
NOTICE
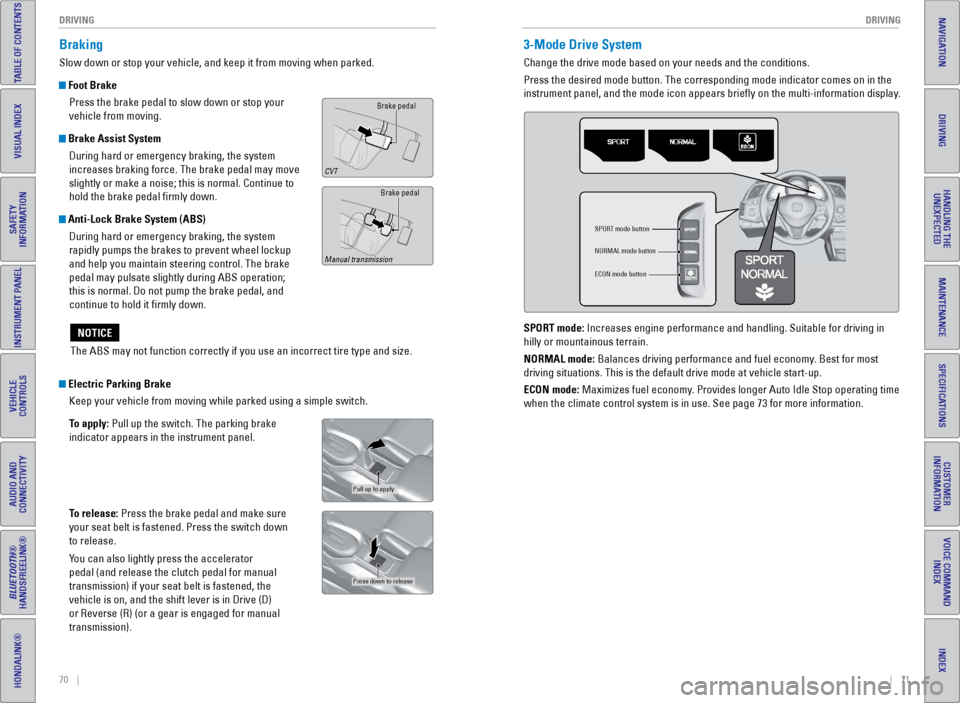
3-Mode Drive System
Change the drive mode based on your needs and the conditions.
Press the desired mode button. The corresponding mode indicator comes on\
in the
instrument panel, and the mode icon appears briefly on the multi-infor\
mation display.
SPORT mode button
NORMAL mode button
ECON mode button
SPORT mode: Increases engine performance and handling. Suitable for driving in
hilly or mountainous terrain.
NORMAL mode: Balances driving performance and fuel economy. Best for most
driving situations. This is the default drive mode at vehicle start-up.
ECON mode: Maximizes fuel economy. Provides longer Auto Idle Stop operating time
when the climate control system is in use. See page 73 for more information.