roof HONDA CROSSTOUR 2014 1.G Owners Manual
[x] Cancel search | Manufacturer: HONDA, Model Year: 2014, Model line: CROSSTOUR, Model: HONDA CROSSTOUR 2014 1.GPages: 573, PDF Size: 21.2 MB
Page 1 of 573
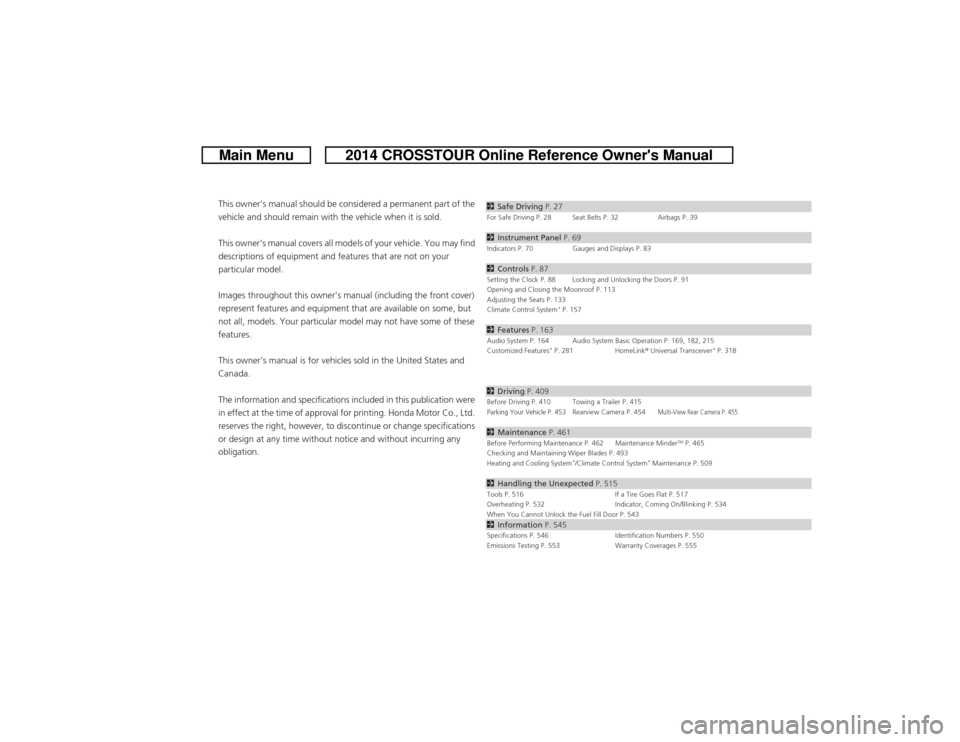
ContentsThis owner’s manual should be considered a permanent part of the
vehicle and should remain with the vehicle when it is sold.
This owner’s manual covers all models of your vehicle. You may find
descriptions of equipment and features that are not on your
particular model.
Images throughout this owner’s manual (including the front cover)
represent features and equipment that are available on some, but
not all, models. Your particular model may not have some of these
features.
This owner’s manual is for vehicles sold in the United States and
Canada.
The information and specifications included in this publication were
in effect at the time of approval for printing. Honda Motor Co., Ltd.
reserves the right, however, to discontinue or change specifications
or design at any time without notice and without incurring any
obligation.
2Safe Driving P. 27For Safe Driving P. 28 Seat Belts P. 32 Airbags P. 392Instrument Panel P. 69Indicators P. 70 Gauges and Displays P. 832Controls P. 87Setting the Clock P. 88 Locking and Unlocking the Doors P. 91
Opening and Closing the Moonroof P. 113
Adjusting the Seats P. 133
Climate Control System
* P. 157
2Features P. 163Audio System P. 164 Audio System Basic Operation P. 169, 182, 215
Customized Features
* P. 281 HomeLink® Universal Transceiver
* P. 318
2Driving P. 409Before Driving P. 410 Towing a Trailer P. 415Parking Your Vehicle P. 453
Rearview Camera P. 454
Multi-View Rear Camera P. 455
2Maintenance P. 461Before Performing Maintenance P. 462 Maintenance Minder
TM P. 465
Checking and Maintaining Wiper Blades P. 493
Heating and Cooling System
*/Climate Control System
* Maintenance P. 509
2Handling the Unexpected P. 515Tools P. 516 If a Tire Goes Flat P. 517
Overheating P. 532 Indicator, Coming On/Blinking P. 534
When You Cannot Unlock the Fuel Fill Door P. 5432Information P. 545Specifications P. 546 Identification Numbers P. 550
Emissions Testing P. 553 Warranty Coverages P. 555
Page 6 of 573
5Quick Reference Guide
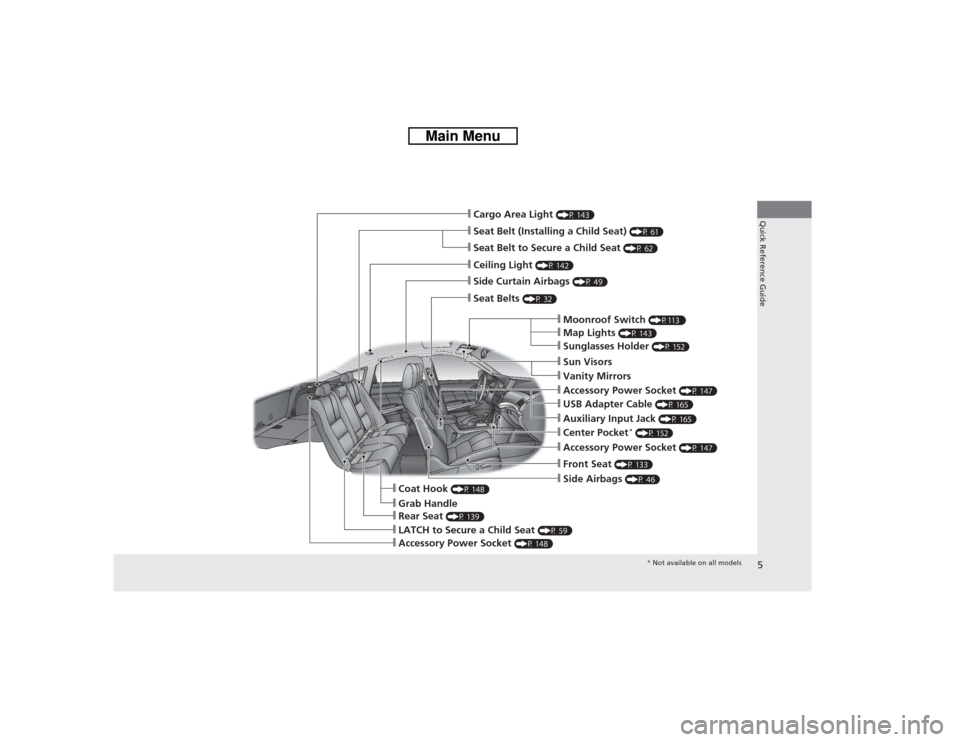
❙Seat Belt (Installing a Child Seat)
(P 61)
❙Moonroof Switch
(P113 )
❙Map Lights
(P 143)
❙Front Seat
(P 133)
❙Seat Belts
(P 32)
❙Side Airbags
(P 46)
❙LATCH to Secure a Child Seat
(P 59)
❙Ceiling Light
(P 142)
❙Side Curtain Airbags
(P 49)
❙Grab Handle
❙Cargo Area Light
(P 143)
❙Seat Belt to Secure a Child Seat
(P 62)
❙Sunglasses Holder
(P 152)
❙Accessory Power Socket
(P 147)
❙USB Adapter Cable
(P 165)
❙Accessory Power Socket
(P 147)
❙Auxiliary Input Jack
(P 165)
❙Coat Hook
(P 148)
❙Center Pocket
* (P 152)
❙Rear Seat
(P 139)
❙Sun Visors❙Vanity Mirrors
❙Accessory Power Socket
(P 148)
* Not available on all models
Page 23 of 573
22Quick Reference Guide
What to Do If*1:Models with the smart entry system have an ENGINE START/STOP button instead of an ignition switch.
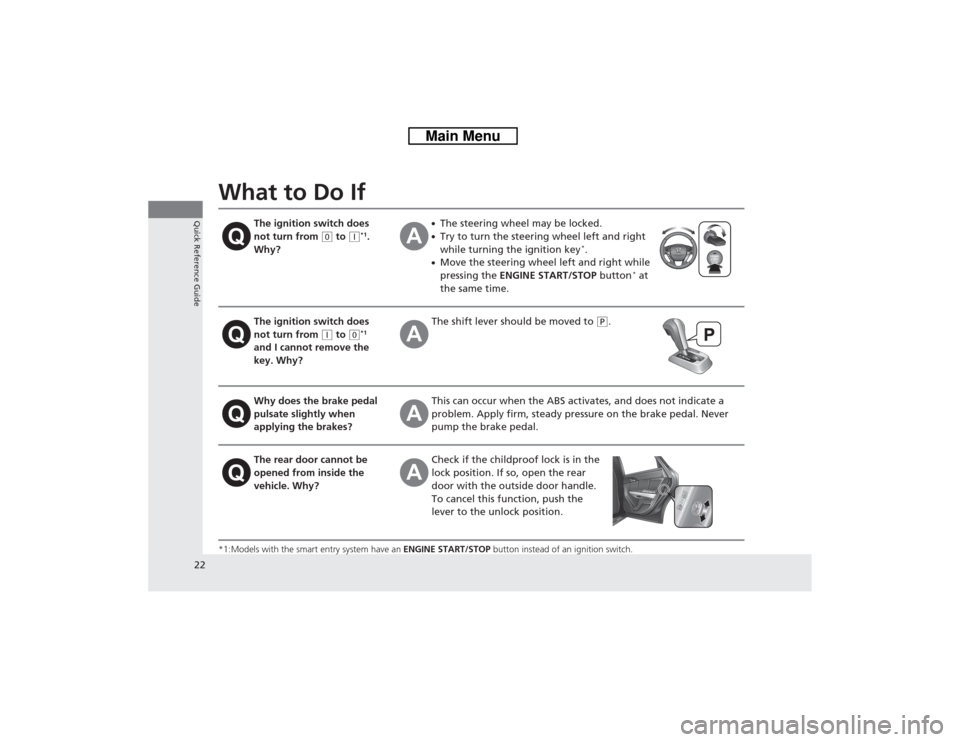
The ignition switch does
not turn from
(0 to
(q*1.
Why?
●The steering wheel may be locked.●Try to turn the steering wheel left and right
while turning the ignition key
*.
●Move the steering wheel left and right while
pressing the ENGINE START/STOP button
* at
the same time.
The ignition switch does
not turn from
(q to
(0*1
and I cannot remove the
key. Why?
The shift lever should be moved to
(P.
Why does the brake pedal
pulsate slightly when
applying the brakes?
This can occur when the ABS activates, and does not indicate a
problem. Apply firm, steady pressure on the brake pedal. Never
pump the brake pedal.
The rear door cannot be
opened from inside the
vehicle. Why?
Check if the childproof lock is in the
lock position. If so, open the rear
door with the outside door handle.
To cancel this function, push the
lever to the unlock position.
Page 50 of 573

49
uuAirbagsuSide Curtain Airbags
Continued
Safe Driving
Side Curtain AirbagsSide curtain airbags help protect the heads of the driver and passengers in outer
seating positions during a moderate-to-severe side impact. The side curtain airbags
equipped in this vehicle are also designed to help reduce the likelihood of partial and
complete ejection of vehicle occupants through side windows in crashes, particularly
rollover crashes.
The side curtain airbags are located in the
ceiling above the side windows on both sides
of the vehicle.
The side curtain airbag is designed to deploy
in a rollover or a moderate-to-severe side
impact.■Housing Locations
1Side Curtain Airbags
If the SRS control unit senses that your vehicle is
about to rollover, it immediately deploys both side
curtain airbags and activates both front seat belt
tensioners.
If the impact is on the passenger’s side, the
passenger’s side curtain airbag will inflate even if
there are no occupants on that side of the vehicle.
To get the best protection from the side curtain
airbags, occupants should wear their seat belts
properly and sit upright and well back in their seats.
Do not attach any objects to the side windows or roof
pillars as they can interfere with the proper operation
of the side curtain airbags.
Side Curtain Airbag Storage
■OperationDeployed Side Curtain Airbag
Page 88 of 573
87
Controls
This chapter explains how to operate the various controls necessary for driving.
Setting the Clock................................ 88
Locking and Unlocking the Doors
Key Types and Functions .................... 91Low Smart Entry Remote Signal Strength
*.. 93
Locking/Unlocking the Doors from the
Outside ............................................ 94
Locking/Unlocking the Doors from the
Inside ............................................... 99
Childproof Door Locks ..................... 100
Auto Door Locking/Unlocking .......... 101
Opening and Closing the Tailgate... 105
Security System................................ 107
Immobilizer System .......................... 107
Security System Alarm ...................... 107Opening and Closing the Windows..... 110
Opening and Closing the Moonroof
.. 113
Operating the Switches Around the
Steering Wheel
Ignition Switch
*............................... 114
ENGINE START/STOP Button
*........... 115
Ignition Switch and Power Mode
Comparison ................................... 118
Turn Signals ..................................... 119
Light Switches.................................. 119
Fog Lights ........................................ 122
Daytime Running Lights ................... 122
Wipers and Washers ........................ 123
Brightness Control ........................... 125
Rear Defogger/Heated Door Mirror Button.. 126Driving Position Memory System
*.... 127Adjusting the Steering Wheel .......... 129
Adjusting the Mirrors....................... 130
Interior Rearview Mirror ................... 130
Power Door Mirrors ......................... 131
Adjusting the Seats.......................... 133
Adjusting the Seat Positions ............. 133
Interior Lights/Interior Convenience
Items................................................ 142
Interior Lights .................................. 142
Interior Convenience Items .............. 144
Heating and Cooling System
*......... 154
Using Vents, Heating and A/C.......... 154
Climate Control System
*.................. 157
Using Automatic Climate Control .... 157
Automatic Climate Control Sensors ... 162
* Not available on all models
Page 100 of 573
99
uuLocking and Unlocking the DoorsuLocking/Unlocking the Doors from the Inside
Continued
Controls
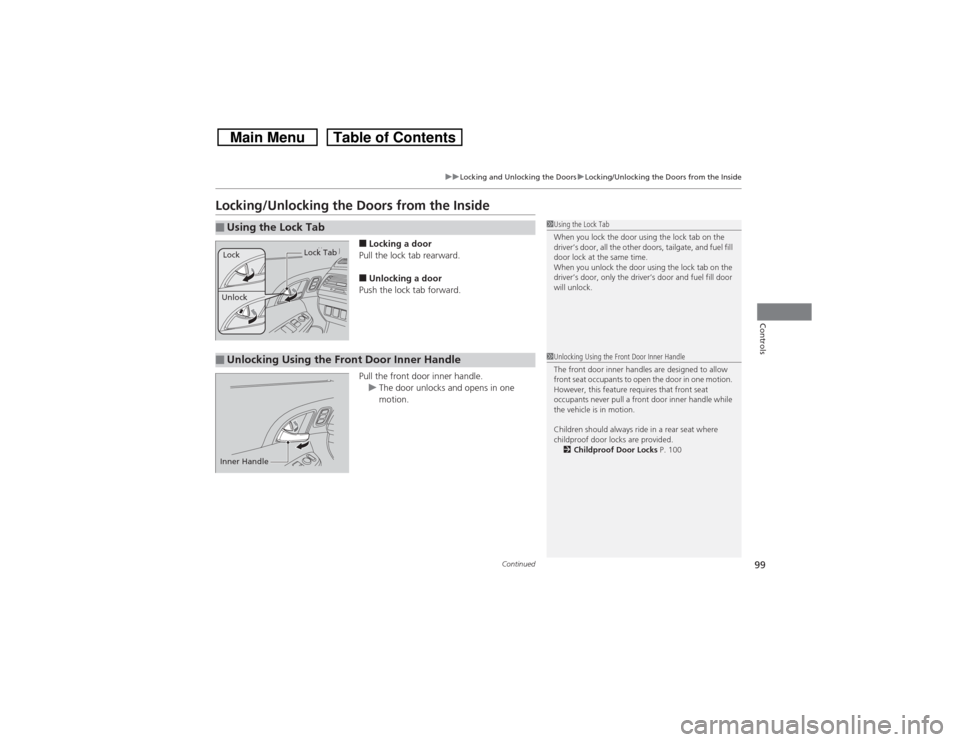
Locking/Unlocking the Doors from the Inside
■Locking a door
Pull the lock tab rearward.■Unlocking a door
Push the lock tab forward.
Pull the front door inner handle.
uThe door unlocks and opens in one
motion.
■Using the Lock Tab
1Using the Lock Tab
When you lock the door using the lock tab on the
driver’s door, all the other doors, tailgate, and fuel fill
door lock at the same time.
When you unlock the door using the lock tab on the
driver’s door, only the driver’s door and fuel fill door
will unlock.
Unlock
Lock Tab
Lock
■Unlocking Using the Front Door Inner Handle
1Unlocking Using the Front Door Inner Handle
The front door inner handles are designed to allow
front seat occupants to open the door in one motion.
However, this feature requires that front seat
occupants never pull a front door inner handle while
the vehicle is in motion.
Children should always ride in a rear seat where
childproof door locks are provided.
2Childproof Door Locks P. 100
Inner Handle
Page 101 of 573
uuLocking and Unlocking the DoorsuChildproof Door Locks
100Controls
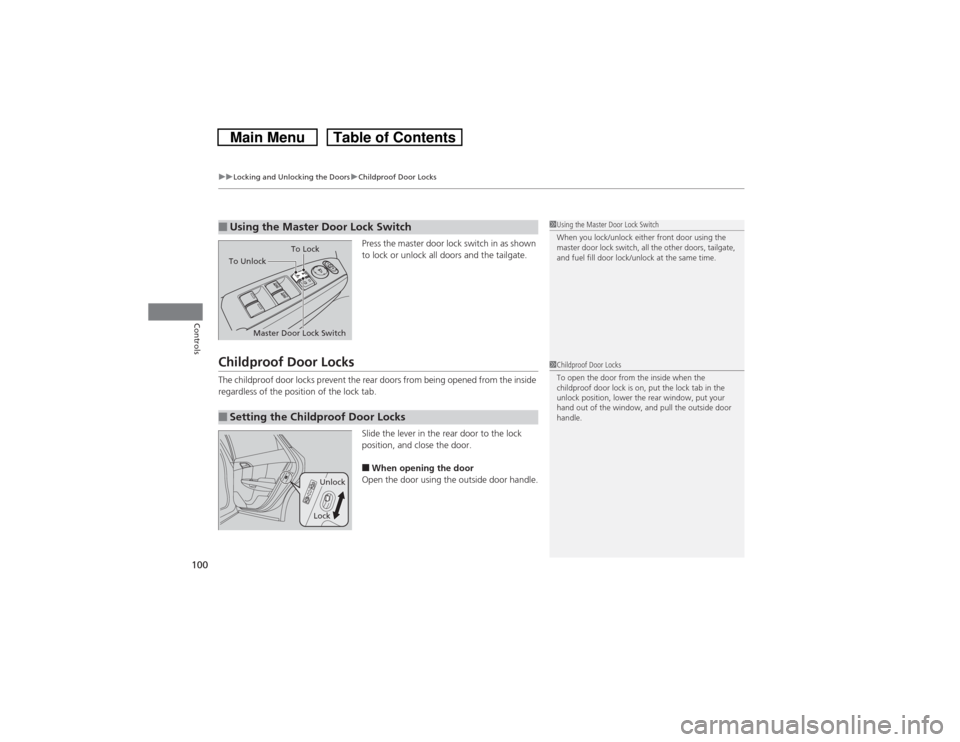
Press the master door lock switch in as shown
to lock or unlock all doors and the tailgate.
Childproof Door LocksThe childproof door locks prevent the rear doors from being opened from the inside
regardless of the position of the lock tab.
Slide the lever in the rear door to the lock
position, and close the door.
■When opening the door
Open the door using the outside door handle.
■Using the Master Door Lock Switch
1Using the Master Door Lock Switch
When you lock/unlock either front door using the
master door lock switch, all the other doors, tailgate,
and fuel fill door lock/unlock at the same time.
To Unlock
Master Door Lock SwitchTo Lock
■Setting the Childproof Door Locks
1Childproof Door Locks
To open the door from the inside when the
childproof door lock is on, put the lock tab in the
unlock position, lower the rear window, put your
hand out of the window, and pull the outside door
handle.
Unlock
Lock
Page 112 of 573
111
uuOpening and Closing the WindowsuOpening/Closing the Power Windows
Continued
Controls
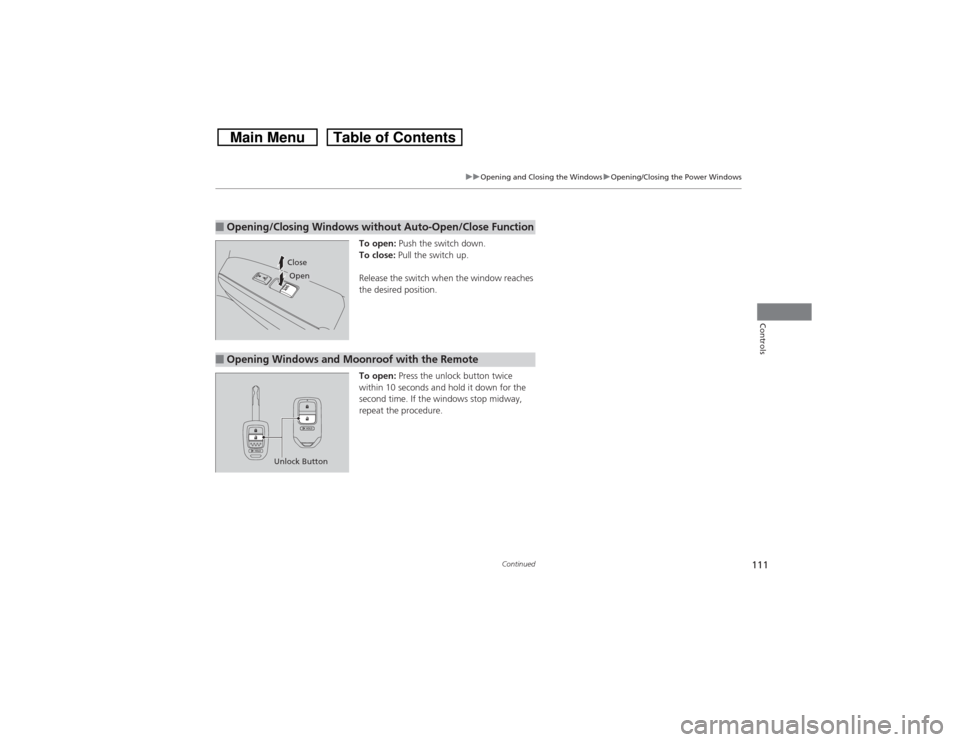
To open: Push the switch down.
To close: Pull the switch up.
Release the switch when the window reaches
the desired position.
To open: Press the unlock button twice
within 10 seconds and hold it down for the
second time. If the windows stop midway,
repeat the procedure.
■Opening/Closing Windows without Auto-Open/Close Function
CloseOpen
■Opening Windows and Moonroof with the Remote
Unlock Button
Page 113 of 573

112
uuOpening and Closing the WindowsuOpening/Closing the Power Windows
Controls
To open: Unlock the driver’s door with the
key. Within 10 seconds of returning the key to
the central position, turn the key in the unlock
direction and hold it there.
To close: Lock the driver’s door with the key.
Within 10 seconds of returning the key to the
central position, turn the key in the lock
direction and hold it there.
Release the key to stop the windows/
moonroof at the desired position. If you want
further adjustment, repeat the same
operation.
■Opening/Closing the Windows and Moonroof with the KeyClose
Open
Page 114 of 573
113Controls
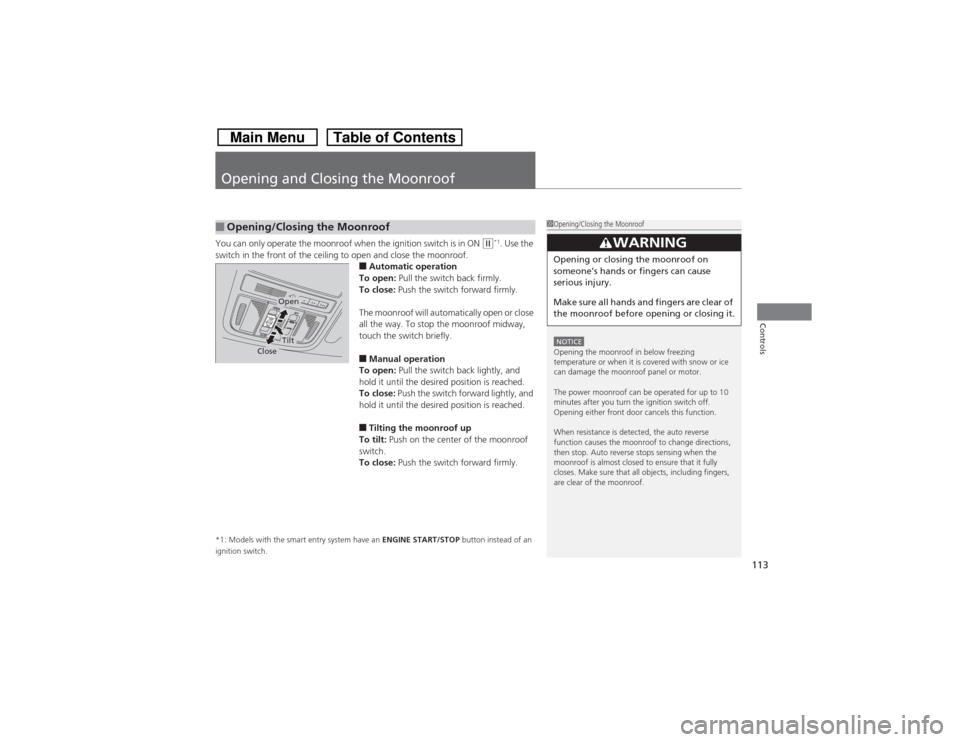
Opening and Closing the MoonroofYou can only operate the moonroof when the ignition switch is in ON
(w*1. Use the
switch in the front of the ceiling to open and close the moonroof.
■Automatic operation
To open: Pull the switch back firmly.
To close: Push the switch forward firmly.
The moonroof will automatically open or close
all the way. To stop the moonroof midway,
touch the switch briefly.■Manual operation
To open: Pull the switch back lightly, and
hold it until the desired position is reached.
To close: Push the switch forward lightly, and
hold it until the desired position is reached.■Tilting the moonroof up
To tilt: Push on the center of the moonroof
switch.
To close: Push the switch forward firmly.
*1: Models with the smart entry system have an ENGINE START/STOP button instead of an
ignition switch.■Opening/Closing the Moonroof
1Opening/Closing the MoonroofNOTICEOpening the moonroof in below freezing
temperature or when it is covered with snow or ice
can damage the moonroof panel or motor.
The power moonroof can be operated for up to 10
minutes after you turn the ignition switch off.
Opening either front door cancels this function.
When resistance is detected, the auto reverse
function causes the moonroof to change directions,
then stop. Auto reverse stops sensing when the
moonroof is almost closed to ensure that it fully
closes. Make sure that all objects, including fingers,
are clear of the moonroof.
3
WARNING
Opening or closing the moonroof on
someone’s hands or fingers can cause
serious injury.
Make sure all hands and fingers are clear of
the moonroof before opening or closing it.
Open
Close
Tilt