steering HONDA CROSSTOUR 2015 1.G Service Manual
[x] Cancel search | Manufacturer: HONDA, Model Year: 2015, Model line: CROSSTOUR, Model: HONDA CROSSTOUR 2015 1.GPages: 573
Page 367 of 573
366
Features
Bluetooth® HandsFreeLink ®
Bluetooth® HandsFreeLink ® (HFL) allows you to place and receive phone calls using
your vehicle’s navigation system, without handling your cell phone.
Using HFL
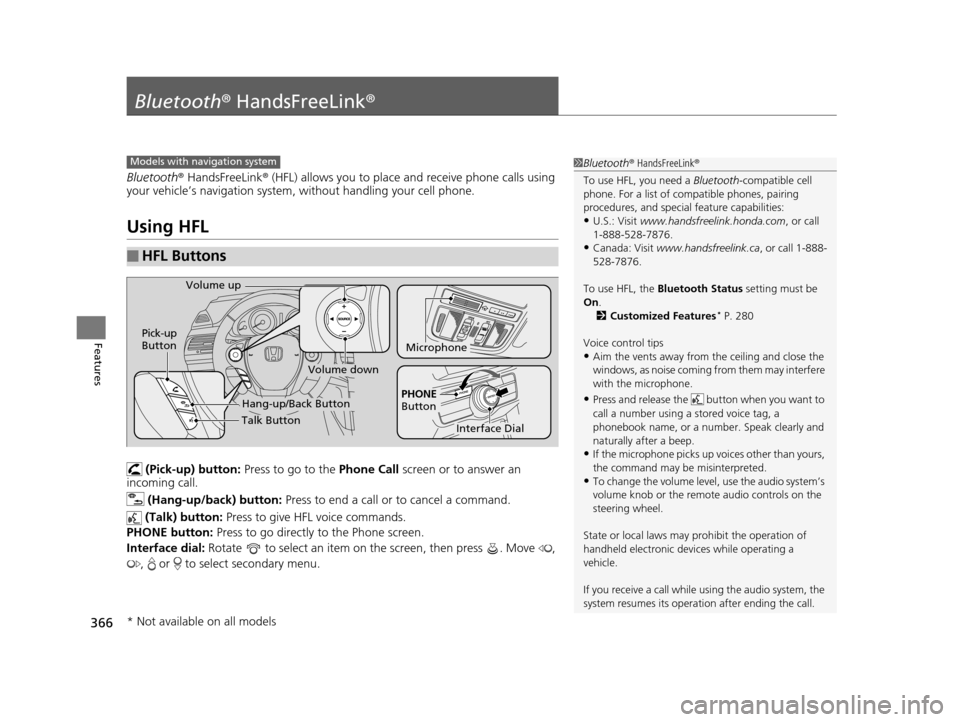
(Pick-up) button: Press to go to the Phone Call screen or to answer an
incoming call.
(Hang-up/back) button: Press to end a call or to cancel a command.
(Talk) button: Press to give HFL voice commands.
PHONE button: Press to go directly to the Phone screen.
Interface dial: Rotate to select an item on the screen, then press . Move ,
, or to select secondary menu.
■HFL Buttons
1 Bluetooth ® HandsFreeLink ®
To use HFL, you need a Bluetooth-compatible cell
phone. For a list of compatible phones, pairing
procedures, and special feature capabilities:
•U.S.: Visit www.handsfreelink.honda.com , or call
1-888-528-7876.
•Canada: Visit www.handsfreelink.ca , or call 1-888-
528-7876.
To use HFL, the Bluetooth Status setting must be
On .
2 Customized Features
* P. 280
Voice control tips
•Aim the vents away from the ceiling and close the
windows, as noise coming fr om them may interfere
with the microphone.
•Press and release the but ton when you want to
call a number using a stored voice tag, a
phonebook name, or a numbe r. Speak clearly and
naturally after a beep.
•If the microphone picks up vo ices other than yours,
the command may be misinterpreted.
•To change the volume level, use the audio system’s
volume knob or the remote audio controls on the
steering wheel.
State or local laws may pr ohibit the operation of
handheld electronic devi ces while operating a
vehicle.
If you receive a call while using the audio system, the
system resumes its operati on after ending the call.
Models with navigation system
Talk Button
Volume up
Microphone
Hang-up/Back Button
Pick-up
Button
Volume down
Interface Dial
PHONE
Button
* Not available on all models
15 CROSSTOUR-31TP66500.book 366 ページ 2014年7月31日 木曜日 午後3時23分
Page 412 of 573
Continued411
uuBefore Driving uDriving Preparation
Driving
• Store or secure all items on board properly.
u Carrying too much cargo, or improperly storing it, can affect your vehicle’s
handling, stability, sto pping distance, and tires, and make it unsafe.
2Maximum Load Limit P. 413
•Do not pile items higher than the seat height.
u They can block your view and may be thrown forward in the event of sudden
braking.
• Do not place anything in the front seat footwells. Make sure to secure the floor
mat.
u An object or unsecured floor mat can in terfere with your brake and accelerator
pedal operation while driving.
• If you have any animals on board, do not let them move around in the vehicle.
u They may interfere with driv ing and a crash could occur.
• Securely close and lock al l doors and the tailgate.
2Locking/Unlocking the Doors from the Inside P. 99
•Adjust your seating position properly.
u Adjust the head restraint, too.
2Adjusting the Seats P. 133
2 Adjusting the Head Restraints P. 136
•Adjust the mirrors and steering wh eel properly for your driving.
u Adjust them while sitting in the proper driving position.
2 Adjusting the Steering Wheel P. 129
2 Adjusting the Mirrors P. 130
■Interior Checks1Interior Checks
The headlight aim is set by the factory, and does not
need to be adjusted. Howeve r, if you regularly carry
heavy items in the cargo area or tow a trailer, have
the aiming readjusted at a dealer or by a qualified
technician.
15 CROSSTOUR-31TP66500.book 411 ページ 2014年7月31日 木曜日 午後3時23分
Page 416 of 573
415Continued
Driving
Towing a Trailer
Towing Preparation
Your vehicle can tow a trailer if you carefully observe the load limits, use the proper
equipment, and follow the towing guidelin es. Check the load limits before driving.
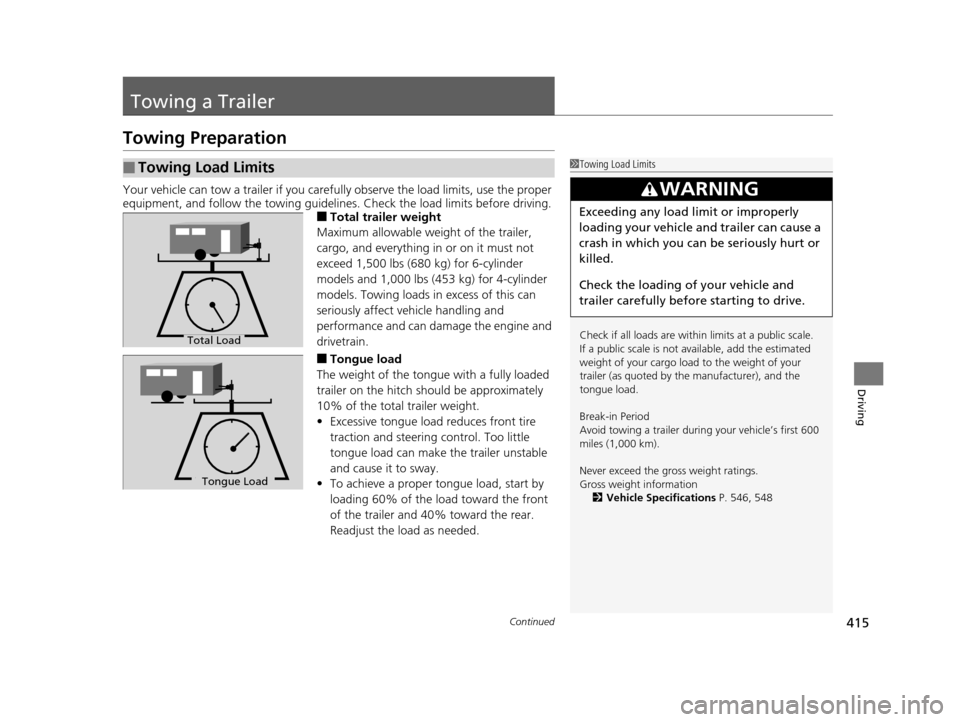
■Total trailer weight
Maximum allowable weight of the trailer,
cargo, and everything in or on it must not
exceed 1,500 lbs (680 kg) for 6-cylinder
models and 1,000 lbs (453 kg) for 4-cylinder
models. Towing loads in excess of this can
seriously affect vehicle handling and
performance and can damage the engine and
drivetrain.
■Tongue load
The weight of the tongue with a fully loaded
trailer on the hitch should be approximately
10% of the total trailer weight.
• Excessive tongue load reduces front tire
traction and steering control. Too little
tongue load can make the trailer unstable
and cause it to sway.
• To achieve a proper tongue load, start by
loading 60% of the load toward the front
of the trailer and 40% toward the rear.
Readjust the lo ad as needed.
■Towing Load Limits1Towing Load Limits
Check if all loads are within limits at a public scale.
If a public scale is not available, add the estimated
weight of your cargo load to the weight of your
trailer (as quoted by th e manufacturer), and the
tongue load.
Break-in Period
Avoid towing a trailer duri ng your vehicle’s first 600
miles (1,000 km).
Never exceed the gross weight ratings.
Gross weight information 2 Vehicle Specifications P. 546, 548
3WARNING
Exceeding any load limit or improperly
loading your vehicle and trailer can cause a
crash in which you can be seriously hurt or
killed.
Check the loading of your vehicle and
trailer carefully before starting to drive.
Total Load
To ngue LoadTongue Load
15 CROSSTOUR-31TP66500.book 415 ページ 2014年7月31日 木曜日 午後3時23分
Page 425 of 573
424
uuWhen Driving uPrecautions While Driving
Driving
Precautions While Driving
Avoid driving in deep water and on flooded roads. This can damage the engine or
driveline, or cause elec trical component failure.
If there is a strong impact with something under the vehicle, stop in a safe location.
Check the underside of the vehicle for damage or any fluid leaks.
*1: Models with the smart entry system have an ENGINE START/STOP button instead of an
ignition switch.
■In Rain
■Other Precautions
1 Precautions While Driving
NOTICE
Do not operate the shift lever while pressing the
accelerator pedal. You could damage the
transmission.
NOTICE
If you repeatedly turn the steering wheel at an
extremely low speed, or hold the steering wheel on
the full left or right position for a while, the electric
power steering (EPS) system heats up. The system
goes into a protective mode, and limits its
performance. The steering wheel becomes harder
and harder to operate. Once the system cools down,
the EPS system is restored.
Repeated operation under these conditions can
eventually damage the system.
If the ignition switch is turned to ACCESSORY
( q or
LOCK ( 0*1 while driving, the e ngine will shut down
and all steering and brake pow er assist functions will
stop, making it difficult to control the vehicle.
Do not put the shift lever in
( N, as you will lose
engine braking (and acce leration) performance.
15 CROSSTOUR-31TP66500.book 424 ページ 2014年7月31日 木曜日 午後3時23分
Page 431 of 573
430
uuWhen Driving uShifting
Driving
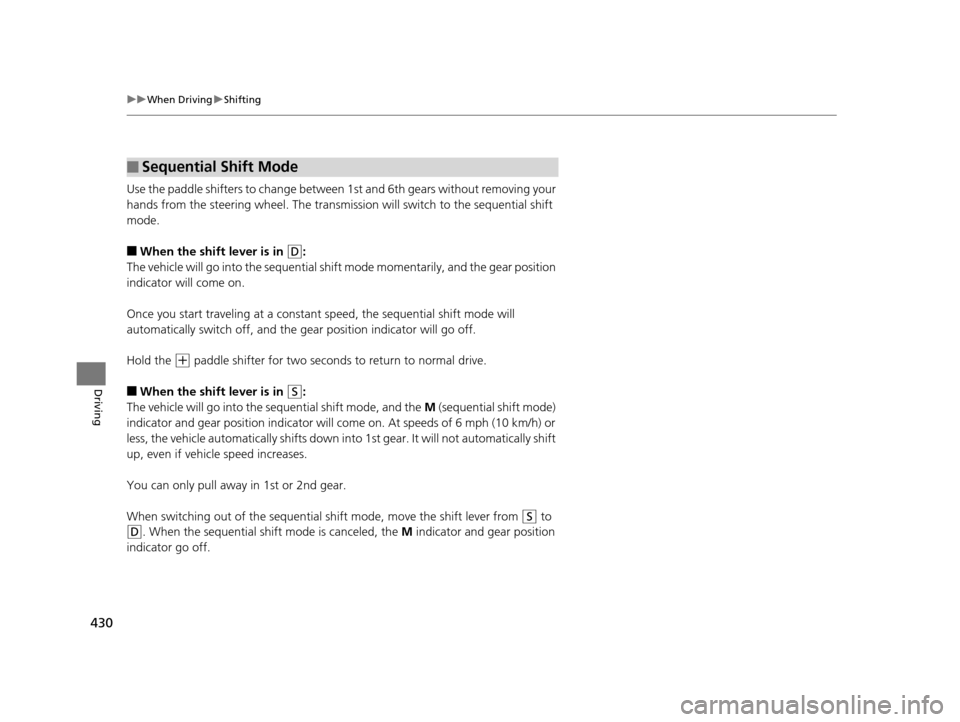
Use the paddle shifters to change between 1st and 6th gears without removing your
hands from the steering wheel. The transmissio n will switch to the sequential shift
mode.
■When the shift lever is in (D:
The vehicle will go into the sequential shi ft mode momentarily, and the gear position
indicator will come on.
Once you start traveling at a constant speed, the sequential shift mode will
automatically switch off, and the gear position indicator will go off.
Hold the
(+ paddle shifter for two seconds to return to normal drive.
■When the shift lever is in (S:
The vehicle will go into the sequential shift mode, and the M (sequential shift mode)
indicator and gear position indicator will come on. At speeds of 6 mph (10 km/h) or
less, the vehicle automatically shifts down into 1st gear. It will not automatically shift
up, even if vehicle speed increases.
You can only pull away in 1st or 2nd gear.
When switching out of th e sequential shift mode, move the shift lever from
(S to
(D. When the sequential shif t mode is canceled, the M indicator and gear position
indicator go off.
■Sequential Shift Mode
15 CROSSTOUR-31TP66500.book 430 ページ 2014年7月31日 木曜日 午後3時23分
Page 433 of 573
432
uuWhen Driving uCruise Control
Driving
Cruise Control
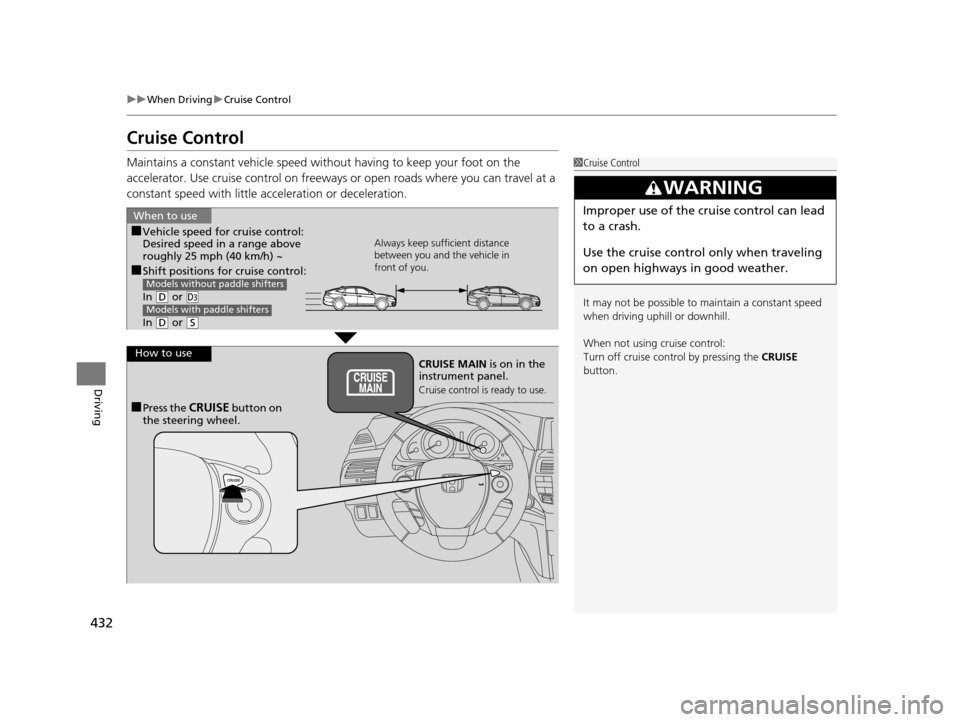
Maintains a constant vehicle speed without having to keep your foot on the
accelerator. Use cruise control on freeways or open roads where you can travel at a
constant speed with little acceleration or deceleration.1Cruise Control
It may not be possible to maintain a constant speed
when driving uphill or downhill.
When not using cruise control:
Turn off cruise control by pressing the CRUISE
button.
3WARNING
Improper use of the cruise control can lead
to a crash.
Use the cruise control only when traveling
on open highways in good weather.
■Shift positions for cruise control:
In
( D or (d
In (D or (S
Models without paddle shifters
Models with paddle shifters
When to use
Always keep sufficient distance
between you and the vehicle in
front of you.■Vehicle speed for cruise control:
Desired speed in a range above
roughly 25 mph (40 km/h) ~
How to use CRUISE MAIN is on in the
instrument panel.
Cruise control is ready to use.
■Press the CRUISE button on
the steering wheel.
15 CROSSTOUR-31TP66500.book 432 ページ 2014年7月31日 木曜日 午後3時23分
Page 435 of 573
uuWhen Driving uCruise Control
434
Driving
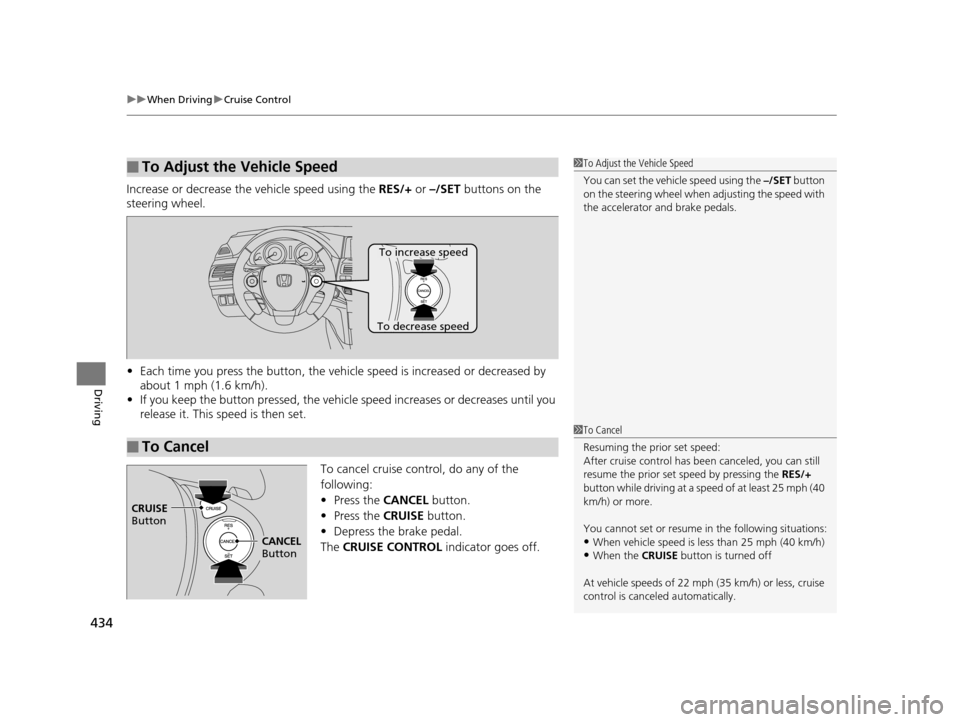
Increase or decrease the vehicle speed using the RES/+ or –/SET buttons on the
steering wheel.
• Each time you press the button, the vehicl e speed is increased or decreased by
about 1 mph (1.6 km/h).
• If you keep the button pressed, the vehicl e speed increases or decreases until you
release it. This speed is then set.
To cancel cruise control, do any of the
following:
• Press the CANCEL button.
• Press the CRUISE button.
• Depress the brake pedal.
The CRUISE CONTROL indicator goes off.
■To Adjust the Vehicle Speed1To Adjust the Vehicle Speed
You can set the vehicle speed using the –/SET button
on the steering wheel when adjusting the speed with
the accelerator and brake pedals.
■To Cancel
To decrease speed
To increase speed
1 To Cancel
Resuming the prior set speed:
After cruise control has be en canceled, you can still
resume the prior set speed by pressing the RES/+
button while driving at a speed of at least 25 mph (40
km/h) or more.
You cannot set or resume in the following situations:
•When vehicle speed is less than 25 mph (40 km/h)•When the CRUISE button is turned off
At vehicle speeds of 22 m ph (35 km/h) or less, cruise
control is canceled automatically.
CRUISE
Button
CANCEL
Button
15 CROSSTOUR-31TP66500.book 434 ページ 2014年7月31日 木曜日 午後3時23分
Page 451 of 573
uuBraking uBrake System
450
Driving
Your vehicle is equipped with disc brakes at all four wheels. A vacuum power assist
helps reduce the effort needed on the brake pedal. The brake assist system increases
the stopping force when you depress th e brake pedal hard in an emergency
situation. The anti-lock brake system (ABS ) helps you retain steering control when
braking very hard.
2 Brake Assist System P. 452
2 Anti-lock Brake System (ABS) P. 451
■Foot Brake1Foot Brake
Check the brakes after driving through deep water,
or if there is a buildup of road surface water. If
necessary, dry the brakes by lightly depressing the
pedal several times.
If you hear a continuous me tallic friction sound when
applying the brakes, the brake pads need to be
replaced. Have the vehicle checked by a dealer.
Constantly using the brak e pedal while going down a
long hill builds up heat, which reduces the brake
effectiveness. Apply engine braking by taking your
foot off the accelerator pe dal and downshifting to a
lower gear.
Do not rest your foot on the brake pedal while
driving, as it will lightly apply the brakes and cause
them to lose effectiveness over time and reduce pad
life. It will also conf use drivers behind you.
15 CROSSTOUR-31TP66500.book 450 ページ 2014年7月31日 木曜日 午後3時23分
Page 452 of 573
451
uuBraking uAnti-lock Brake System (ABS)
Driving
Anti-lock Brake System (ABS)
Helps prevent the wheels from locking up, and helps you retain steering control by
pumping the brakes rapidly, much faster than you.
The electronic brake distribu tion (EBD) system, which is part of the ABS, also
balances the front-to-rear braking distribution according to vehicle loading.
You should never pu mp the brake pedal. Let the ABS work for you by always
keeping firm, steady pressure on the brake pe dal. This is sometimes referred to as
“stomp and steer.”
■ABS operation
The brake pedal may pulsate slightly when the ABS is working. Keep holding the
pedal firmly down. On dry pavement, you w ill need to press on the brake pedal very
hard before the ABS activates. However, you may feel the ABS activate immediately
if you are trying to stop on snow or ice.
When the vehicle speed goes unde r 6 mph (10 km/h), the ABS stops.
■ABS1Anti-lock Brake System (ABS)
NOTICE
The ABS may not function correctly if you use an
incorrect tire type and size.
When the ABS indicator comes on while driving,
there may be a problem with the system.
While normal braking is not affected, there is a
possibility of the ABS not operating. Have the vehicle
checked by a dealer immediately.
The ABS does not reduce the ti me or distance it takes
to stop the vehicle. It only helps with steering control
during hard braking.
In the following cases, yo ur vehicle may need more
stopping distance than a vehicle without the ABS:
•When driving on rough road surfaces, including
when driving on uneven surf aces, such as gravel or
snow.
•When tire chains are installed.
You may hear a motor sound coming from the
engine compartment while system checks are being
performed immediately after starting the engine or
while driving. This is normal.
15 CROSSTOUR-31TP66500.book 451 ページ 2014年7月31日 木曜日 午後3時23分
Page 456 of 573
455
Driving
Multi-View Rear Camera
About Your Multi-View Rear Camera
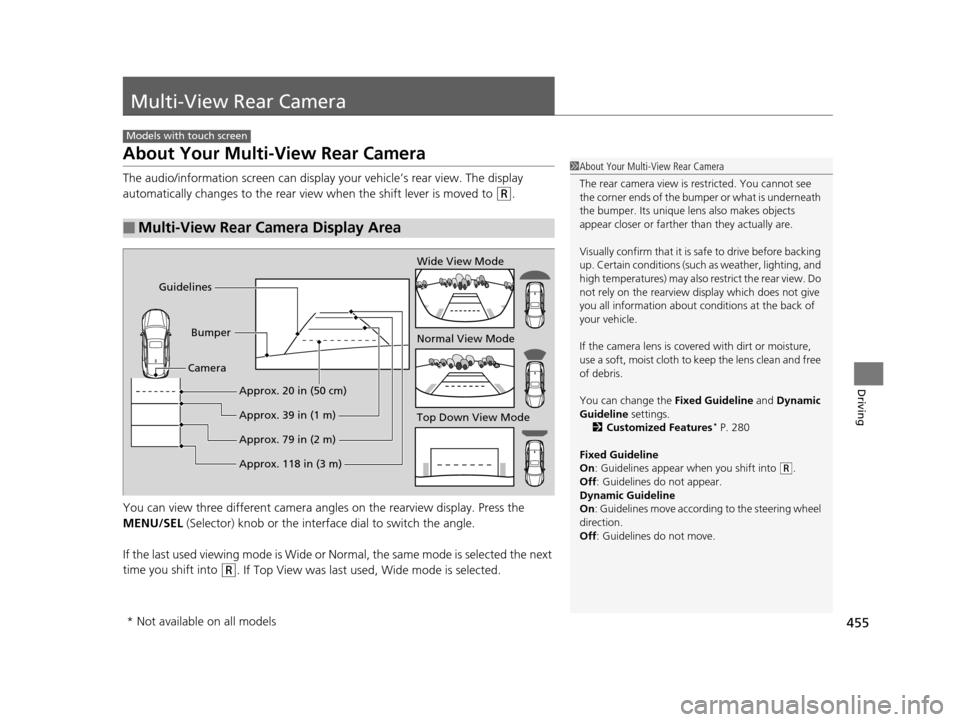
The audio/information screen can display your vehicle’s rear view. The display
automatically changes to the rear view when the shift lever is moved to
(R.
You can view three differen t camera angles on the rearview display. Press the
MENU/SEL (Selector) knob or the interfa ce dial to switch the angle.
If the last used viewing mode is Wide or Normal, the same mode is selected the next
time you shift into
(R. If Top View was last used, Wide mode is selected.
■Multi-View Rear Camera Display Area
Models with touch screen
1 About Your Multi-View Rear Camera
The rear camera view is restricted. You cannot see
the corner ends of the bum per or what is underneath
the bumper. Its unique le ns also makes objects
appear closer or farther than they actually are.
Visually confirm that it is safe to drive before backing
up. Certain conditions (such as weather, lighting, and
high temperatures) may also re strict the rear view. Do
not rely on the rearview display which does not give
you all information about conditions at the back of
your vehicle.
If the camera lens is cove red with dirt or moisture,
use a soft, moist cloth to keep the lens clean and free
of debris.
You can change the Fixed Guideline and Dynamic
Guideline settings.
2 Customized Features
* P. 280
Fixed Guideline
On : Guidelines appear when you shift into
(R.
Off : Guidelines do not appear.
Dynamic Guideline
On : Guidelines move according to the steering wheel
direction.
Off : Guidelines do not move.
Top Down View Mode Normal View Mode Wide View Mode
Guidelines
Bumper
Camera
Approx. 118 in (3 m) Approx. 79 in (2 m) Approx. 39 in (1 m) Approx. 20 in (50 cm)
* Not available on all models
15 CROSSTOUR-31TP66500.book 455 ページ 2014年7月31日 木曜日 午後3時23分