ESP HONDA CRV 2023 Owner's Guide
[x] Cancel search | Manufacturer: HONDA, Model Year: 2023, Model line: CRV, Model: HONDA CRV 2023Pages: 719, PDF Size: 13.43 MB
Page 374 of 719
373
uuCustomized Features u
Continued
Features
*1:Default Setting
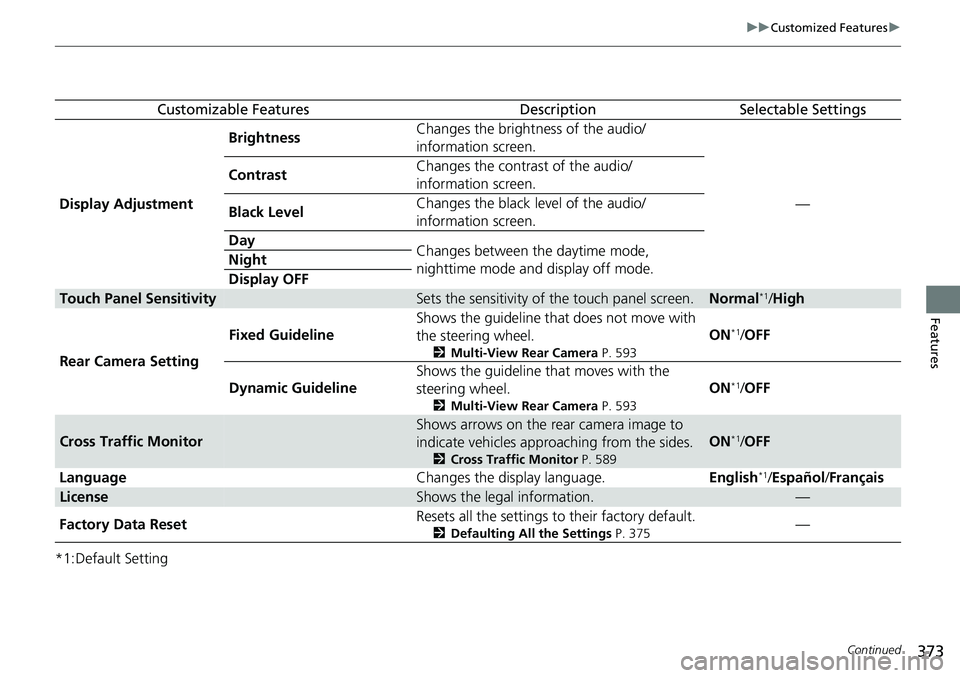
Customizable FeaturesDescriptionSelectable Settings
Display Adjustment Brightness
Changes the brightness of the audio/
information screen.
—
Contrast
Changes the contrast of the audio/
information screen.
Black Level Changes the black level of the audio/
information screen.
Day Changes between the daytime mode,
nighttime mode and display off mode.
Night
Display OFF
Touch Panel SensitivitySets the sensitivity of the touch panel screen.Normal*1/
High
Rear Camera Setting Fixed Guideline
Shows the guideline that
does not move with
the steering wheel.
2 Multi-View Rear Camera P. 593
ON*1/OFF
Dynamic Guideline Shows the guideline th
at moves with the
steering wheel.
2 Multi-View Rear Camera P. 593
ON*1/OFF
Cross Traffic Monitor
Shows arrows on the rear camera image to
indicate vehicles approaching from the sides.
2 Cross Traffic Monitor P. 589
ON*1/OFF
Language Changes the display language.English
*1/Español /Français
LicenseShows the legal information.—
Factory Data Reset Resets all the settings to their factory default.
2
Defaulting All the Settings P. 375—
Page 383 of 719
382
uuCustomized Features u
Features
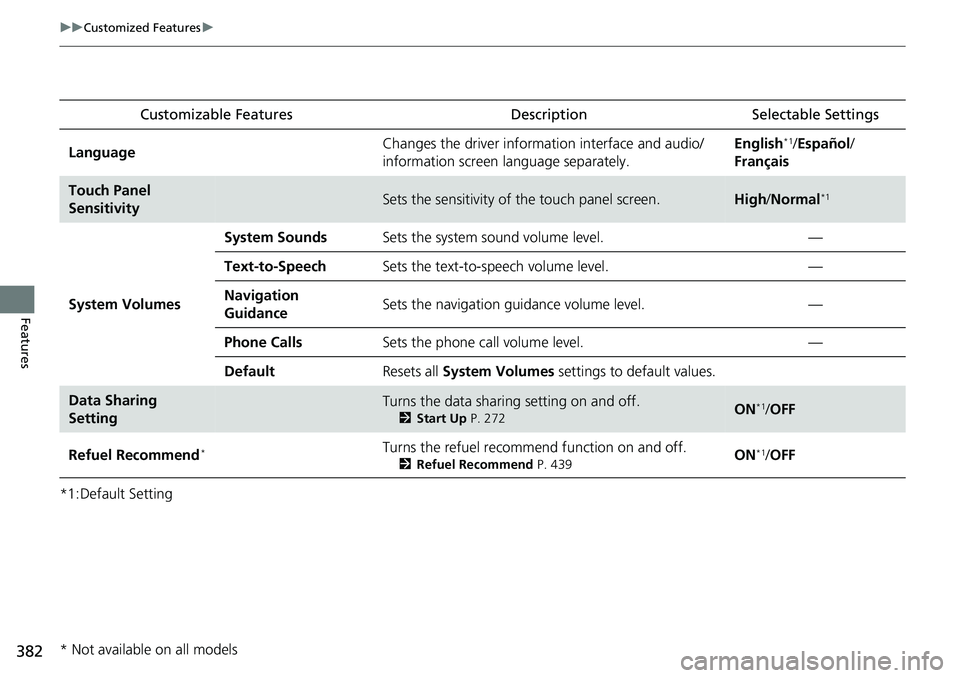
*1:Default SettingCustomizable Features
Description Selectable Settings
LanguageChanges the driver information interface and audio/
information screen language separately.English*1/Español /
Français
Touch Panel
SensitivitySets the sensitivity of the touch panel screen.High /Normal*1
System Volumes
System SoundsSets the system sound volume level.—
Text-to-SpeechSets the text-to-speech volume level.—
Navigation
GuidanceSets the navigation guidance volume level.—
Phone CallsSets the phone call volume level.—
DefaultResets all System Volumes settings to default values.
Data Sharing
SettingTurns the data sharing setting on and off.
2Start Up P. 272ON*1/OFF
Refuel Recommend*Turns the refuel recommend function on and off.
2 Refuel Recommend P. 439ON*1/OFF
* Not available on all models
Page 402 of 719
Continued401
uuBluetooth ® HandsFreeLink ®u Using HFL
Features
Left Selector Wheel: While receiving a call, the incoming call screen is displayed on
the driver information interface. You can pick up the call using the left selector
wheel.
2 Receiving a Call P. 418
PHONE button: Press to go directly to the Phone screen.
Selector knob: Rotate to select an item on the screen, then press .
1Bluetooth ® HandsFreeLink ®
Bluetooth ® Wireless Technology
The Bluetooth ® word mark and logos are registered
trademarks owned by Bluetooth SIG, Inc., and any
use of such marks by Honda Motor Co., Ltd., is under
license. Other trademarks and trade names are those
of their respective owners.
HFL Limitations
An incoming call on HFL will interrupt the audio
system when it is playing. It will resume when the call
is ended.
Page 422 of 719
Continued421
uuBluetooth ® HandsFreeLink ®u Using HFL
Features
(Talk) button: Press to access Voice Portal.
(Home) button: Press to go back to the home screen of the driver information
interface.
Left Selector Wheel: Press the (home) button. Roll up or down to select
Phone on the driver information interface, and then press the left selector wheel.
While receiving a call, the incoming call scr een is displayed on the driver information
interface. You can pick up the call using the left selector wheel.
2 Receiving a Call P. 435
To go to the phone screen:
1.Press the button.
2. Select Phone to switch the displa y to the phone screen.
1Bluetooth ® HandsFreeLink ®
Bluetooth ® Wireless Technology
The Bluetooth ® word mark and logos are registered
trademarks owned by Bluetooth SIG, Inc., and any
use of such marks by Honda Motor Co., Ltd., is under
license. Other trademarks and trade names are those
of their respective owners.
HFL Limitations
An incoming call on HFL will interrupt the audio
system when it is playing. It will resume when the call
is ended.
Page 424 of 719
423
uuBluetooth ® HandsFreeLink ®u HFL Menus
Continued
Features
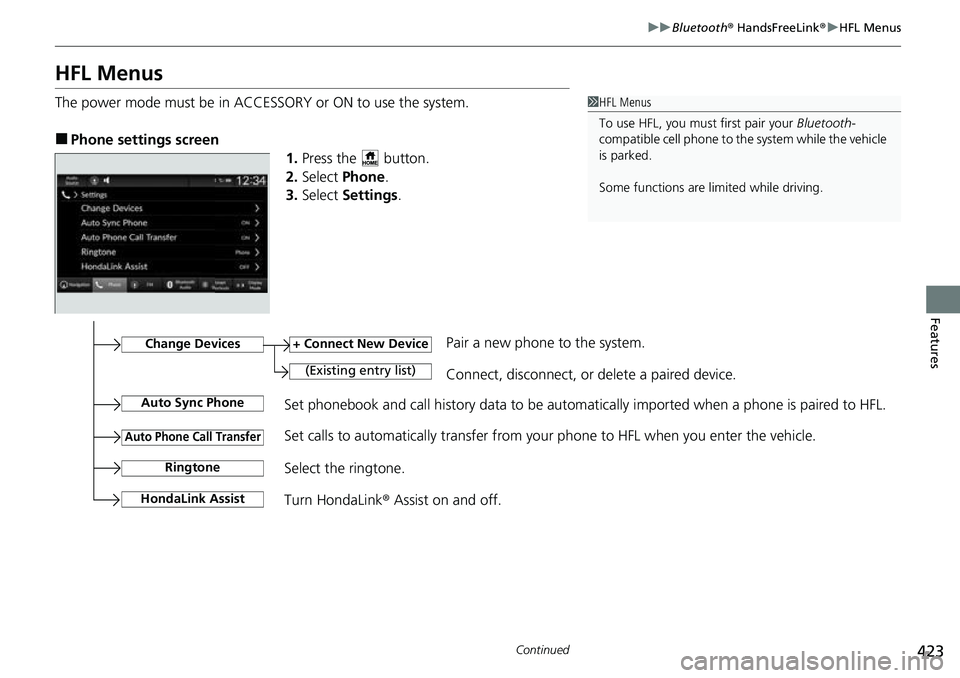
HFL Menus
The power mode must be in ACCESSO RY or ON to use the system.
■Phone settings screen
1.Press the button.
2. Select Phone .
3. Select Settings .
1HFL Menus
To use HFL, you must first pair your Bluetooth-
compatible cell phone to th e system while the vehicle
is parked.
Some functions are limited while driving.
Set phonebook and call history data to be automatically imported when a phone is paired to HFL.
+ Connect New Device
(Existing entry list)Connect, disconnect, or delete a paired device.
Change DevicesPair a new phone to the system.
Auto Sync Phone
Auto Phone Call Transfer
Ringtone
HondaLink Assist
Set calls to automatically transfer from your phone to HFL when you enter the vehicle.
Select the ringtone.
Turn HondaLink ® Assist on and off.
Page 464 of 719
463
uuWhen Driving uTransmission
Driving
Transmission
As with a conventional gasoline-powered ve hicle with an automatic transmission,
this vehicle will creep.
Keep the brake pedal firmly depressed when stopped.
Quickly depressing the accelerator pedal while driving uphill may cause the vehicle
to react similar to an automatic transmi ssion vehicle, unexpectedly increasing vehicle
speed. Depress the accelerator pedal carefu lly, especially on slippery roads and
curves.
1 Driving Guidelines for Your Utility Vehicle
Failure to operate your vehi cle correctly might result
in a crash or a rollover.
2 Important Handling Information P. 46
■Creeping
■Kickdown
Page 473 of 719
472
uuWhen Driving uDrive Mode Switch
Driving
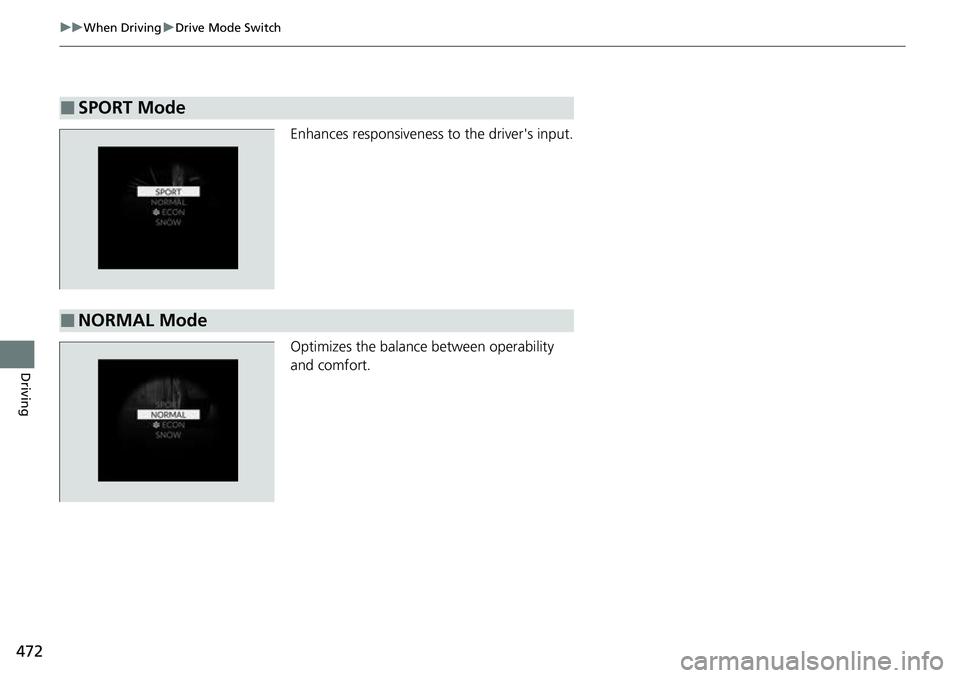
Enhances responsiveness to the driver's input.
Optimizes the balance between operability
and comfort.
■SPORT Mode
■NORMAL Mode
Page 477 of 719
476
uuWhen Driving uVehicle Stability AssistTM (VSA ®), aka Electronic Stability Control (ESC), System
Driving
Vehicle Stability AssistTM (VSA ®), aka Electronic
Stability Control (ESC), System
VSA ® helps stabilize the vehicle during cornering if the vehicle turns more or less
than what was intended. It also assists in maintaining traction on slippery surfaces.
It does so by regulating engine and motor output and selectively applying the
brakes.
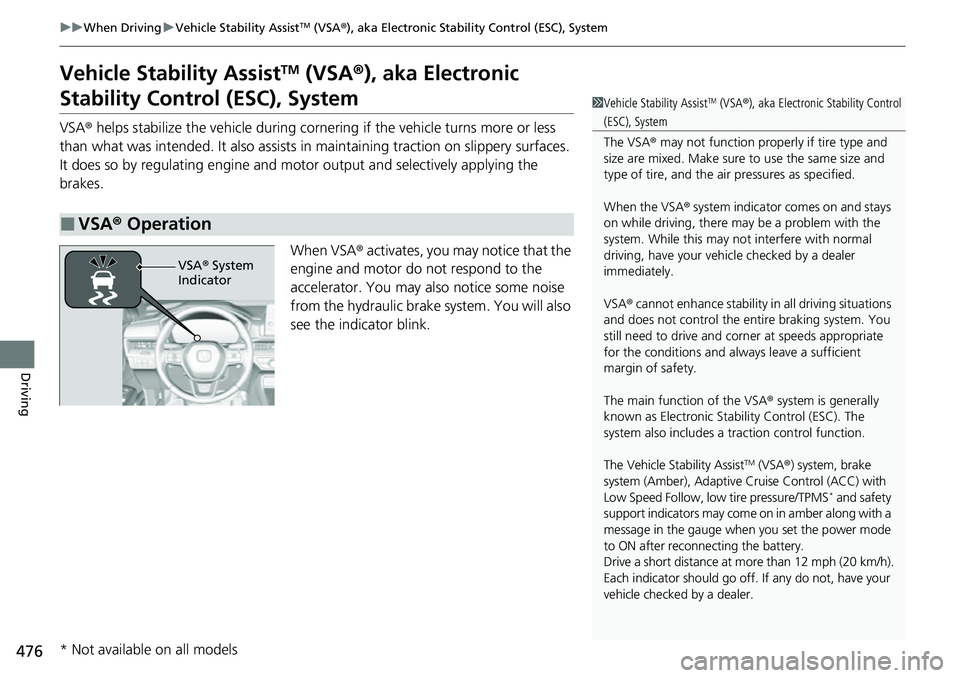
When VSA® activates, you may notice that the
engine and motor do not respond to the
accelerator. You may also notice some noise
from the hydraulic brake sy stem. You will also
see the indicator blink.
■VSA ® Operation
1 Vehicle Stability AssistTM (VSA ®), aka Electronic Stability Control
(ESC), System
The VSA ® may not function properl y if tire type and
size are mixed. Make sure to use the same size and
type of tire, and the air pressures as specified.
When the VSA ® system indicator comes on and stays
on while driving, there ma y be a problem with the
system. While this may not interfere with normal
driving, have your vehi cle checked by a dealer
immediately.
VSA ® cannot enhance stability in all driving situations
and does not control the entire braking system. You
still need to drive and corner at speeds appropriate
for the conditions and always leave a sufficient
margin of safety.
The main function of the VSA ® system is generally
known as Electronic Stability Control (ESC). The
system also includes a traction control function.
The Vehicle Stability Assist
TM (VSA ®) system, brake
system (Amber), Adaptive Cruise Control (ACC) with
Low Speed Follow, low tire pressure/TPMS
* and safety
support indicators may come on in amber along with a
message in the gauge when you set the power mode
to ON after reconn ecting the battery.
Drive a short distance at more than 12 mph (20 km/h).
Each indicator should go off. If any do not, have your
vehicle checked by a dealer.
VSA ® System
Indicator
* Not available on all models
Page 487 of 719
486
uuWhen Driving uTire Pressure Monitoring System (TPMS) - Required Federal Explanation
Driving
Please note that the TPMS is not a substitute for proper tire
maintenance, and it is the driver 's responsibility to maintain
correct tire pressure, even if un der-inflation has not reached the
level to trigger illumina tion of the TPMS low ti re pressure telltale.
Your vehicle has also been eq uipped with a TPMS malfunction
indicator to indicate when the sy stem is not operating properly.
The TPMS malfunction indicator is combined with the low tire
pressure telltale. When the system detects a malfunction, the
telltale will flash fo r approximately one minute and then remain
continuously illuminated. This sequence will continue upon
subsequent vehicle start-ups as long as the malfunction exists.
When the malfunction indicator is illuminated, the system may
not be able to detect or signal low tire pressure as intended.
TPMS malfunctions may occur for a variety of reasons, including
the installation of replacement or alternate tires or wheels on the
vehicle that prevent the TPMS from functioning properly.
Always check the TPMS malfunction telltale after replacing one or
more tires or wheels on your vehicle to ensure that the
replacement or alternate tires and wheels allow the TPMS to
continue to function properly.
Page 496 of 719

495
uuHonda Sensing ®u Collision Mitigation Braking SystemTM (CMBSTM)
Continued
Driving
Collision Mitigation Braking SystemTM (CMBSTM)
The system can assist you when it determines there is a possibility of your vehicle
colliding with a vehicle (including moto rcycles) ahead from behind, an oncoming
vehicle in front, a pedestrian, or someon e riding a bicycle (moving bicycle). The
CMBS
TM is designed to alert you when the potential for a collision is determined, as
well as assist in reducing speed, avoiding collisions, and reducing collision severity.
1 Collision Mitigation Braking SystemTM (CMBSTM)
Important Safety Reminder
The CMBS
TM is designed to reduce the severity of an
unavoidable collision. It does not prevent collisions
nor stop the vehicle automati cally. It is still your
responsibility to operate th e brake pedal and steering
wheel appropriately acco rding to the driving
conditions.
The CMBS
TM may not activate or may not detect a
vehicle in front of y our vehicle under certain
conditions: 2 CMBS
TM Conditions and Limitations P. 500
For directions on the prop er handling of the radar
sensor, refer to the following page. 2 Radar Sensor P. 570
You can read about handling information for the
camera equipped with this system. 2 Front Sensor Camera P. 568