ECU HONDA ELEMENT 2006 1.G User Guide
[x] Cancel search | Manufacturer: HONDA, Model Year: 2006, Model line: ELEMENT, Model: HONDA ELEMENT 2006 1.GPages: 249, PDF Size: 3.19 MB
Page 45 of 249
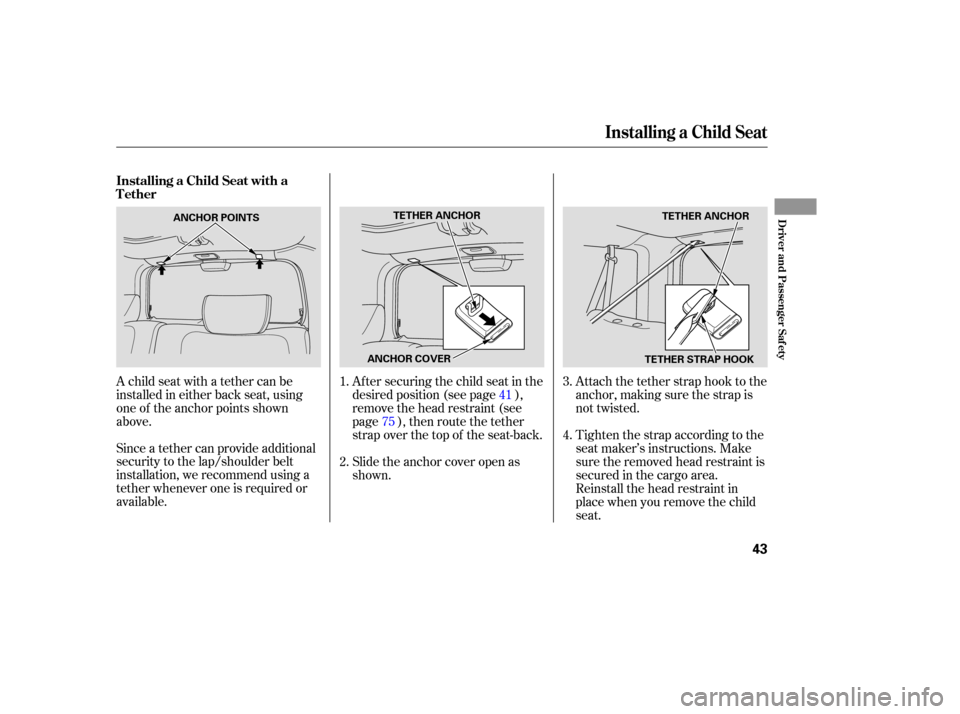
Since a tether can provide additional
security to the lap/shoulder belt
installation, we recommend using a
tether whenever one is required or
available.Af ter securing the child seat in the
desired position (see page ),
remove the head restraint (see
page ), then route the tether
strap over the top of the seat-back.
Slide the anchor cover open as
shown.
Attach the tether strap hook to the
anchor, making sure the strap is
not twisted.
A child seat with a tether can be
installed in either back seat, using
one of the anchor points shown
above.
Tighten the strap according to the
seat maker’s instructions. Make
sure the removed head restraint is
secured in the cargo area.
Reinstall the head restraint in
place when you remove the child
seat.
1.
41
2. 3.
4.
75
Installing a Child Seat with a
Tether
Installing a Child Seat
Driver and Passenger Saf ety
43
TETHER STRAP HOOK
ANCHOR POINTS
TETHER ANCHOR
ANCHOR COVER TETHER ANCHOR
Page 48 of 249

If you decide that a child can saf ely
ride up f ront, be sure to:Caref ully read the owner’s manual,
and make sure you understand all
seat belt instructions and all saf ety
inf ormation.
Move the vehicle seat to the rear-
most position.
Have the child sit up straight, back
against the seat, and feet on or
near the f loor.
To saf ely ride in f ront, a child must
be able to f ollow the rules, including
sitting properly, and wearing the seat
belt properly throughout a ride.
Physically, a child must be large
enough f or the lap/shoulder belt to
properly f it (see page ). If the seat
belt does not f it properly, with or
without the child sitting on a booster
seat, the child should not sit in f ront.
Check that the child’s seat belt is
properly and securely positioned.
Supervise the child. Even mature
children sometimes need to be
reminded to f asten the seat belts
or sit properly.
Of course, children vary widely. And
while age may be one indicator of
when a child can saf ely ride in f ront,
there are other important f actors you
should consider.
This could
cause very serious injuries during
a crash. It also increases the
chance that the child will slide
under the belt in a crash and be
injured. This could result
in serious neck injuries during a
crash.
If they do, they
could be very seriously injured in a
crash.
Devices intended to
improve a child’s comf ort or
reposition the shoulder part of a
seat belt can make the belt less
ef f ective and increase the chance
of serious injury in a crash.
44 Additional Saf ety Precautions
Maturity
Physical Size Do not let a child put the shoulder
part of a seat belt behind t he backor under t he arm.
Do not let a child wear a seat belt
across t he neck.
T wo children should never use thesame seat belt .
Do not put any accessories on aseat belt.
Protecting L arger Children
46
Page 66 of 249
Make sure the rear window is clear
and you have good visibility bef ore
starting to drive.
Thedefoggerwiresontheinsideof
the rear window can be accidentally
damaged. When cleaning the glass,
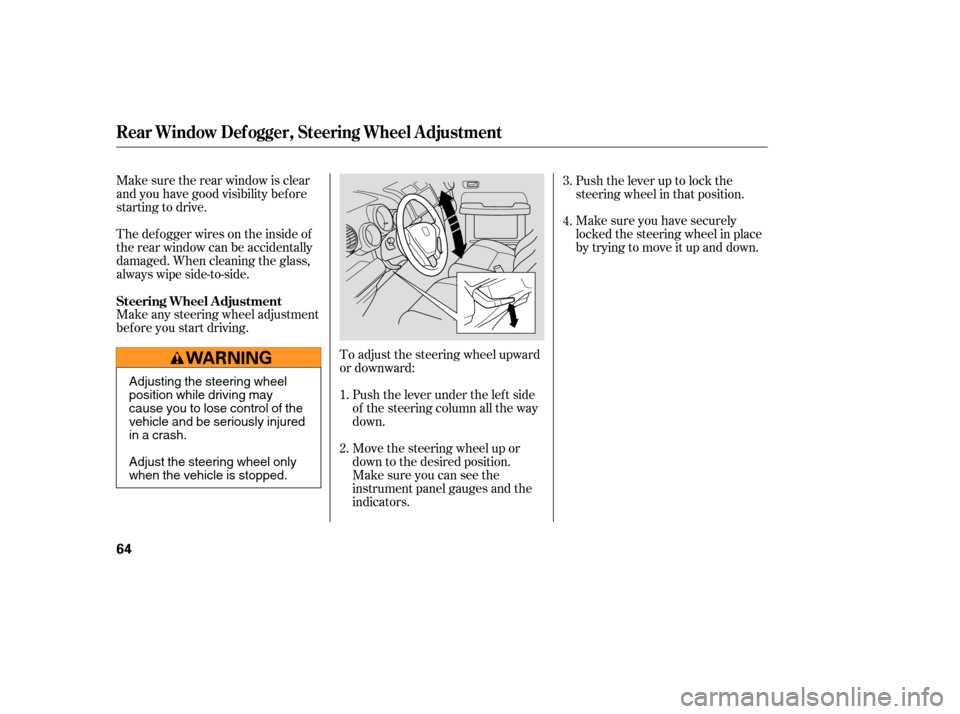
always wipe side-to-side.Push the lever up to lock the
steering wheel in that position.
Make sure you have securely
locked the steering wheel in place
by trying to move it up and down.
Make any steering wheel adjustment
bef ore you start driving. Push the lever under the lef t side
of the steering column all the way
down.
To adjust the steering wheel upward
or downward:
Move the steering wheel up or
down to the desired position.
Make sure you can see the
instrument panel gauges and the
indicators.
1.
2. 3.
4.
Steering Wheel A djustment
Rear Window Def ogger, Steering Wheel A djustment
64
Adjusting the steering wheel
position while driving may
cause you to lose control of the
vehicle and be seriously injured
inacrash.
Adjust the steering wheel only
when the vehicle is stopped.
Page 78 of 249
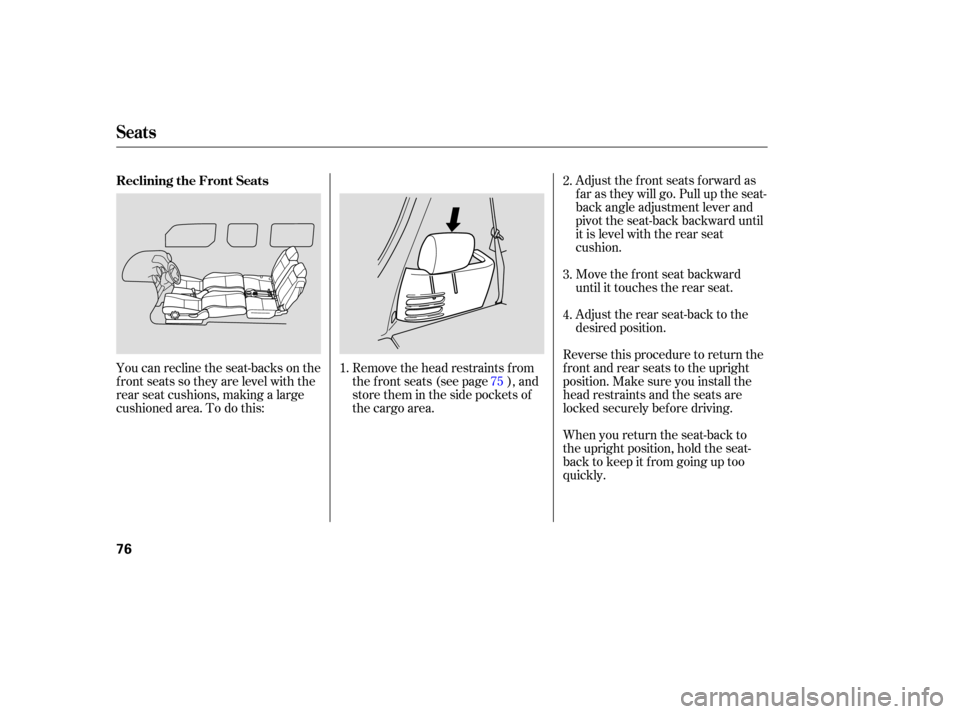
You can recline the seat-backs on the
f ront seats so they are level with the
rear seat cushions, making a large
cushioned area. To do this:Adjust the front seats forward as
f ar as they will go. Pull up the seat-
back angle adjustment lever and
pivot the seat-back backward until
it is level with the rear seat
cushion.
Move the f ront seat backward
until it touches the rear seat.
Adjust the rear seat-back to the
desired position.
Reverse this procedure to return the
front and rear seats to the upright
position. Make sure you install the
head restraints and the seats are
locked securely bef ore driving.
When you return the seat-back to
the upright position, hold the seat-
back to keep it f rom going up too
quickly.
Remove the head restraints f rom
the f ront seats (see page ), and
store them in the side pockets of
the cargo area.
1. 2.
3.
4.
75
Reclining the Front Seats
Seats
76
Page 80 of 249
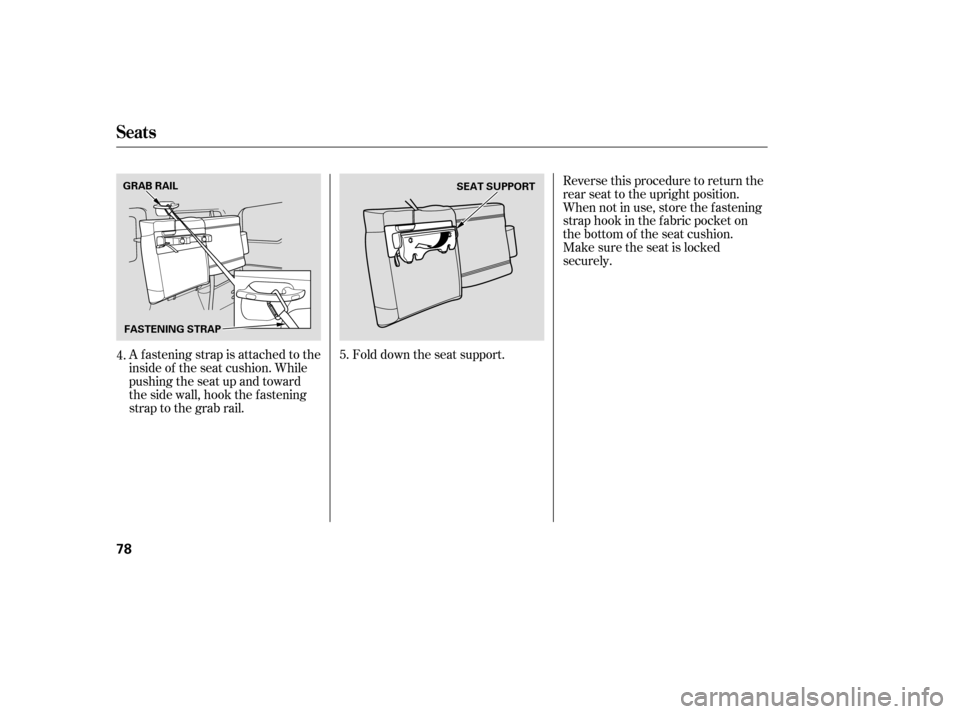
A fastening strap is attached to the
inside of the seat cushion. While
pushing the seat up and toward
thesidewall,hookthefastening
straptothegrabrail.Fold down the seat support.Reverse this procedure to return the
rear seat to the upright position.
When not in use, store the fastening
strap hook in the f abric pocket on
the bottom of the seat cushion.
Make sure the seat is locked
securely.
4. 5.
Seats
78
GRAB RAIL
FASTENING STRAP SEAT SUPPORT
Page 82 of 249
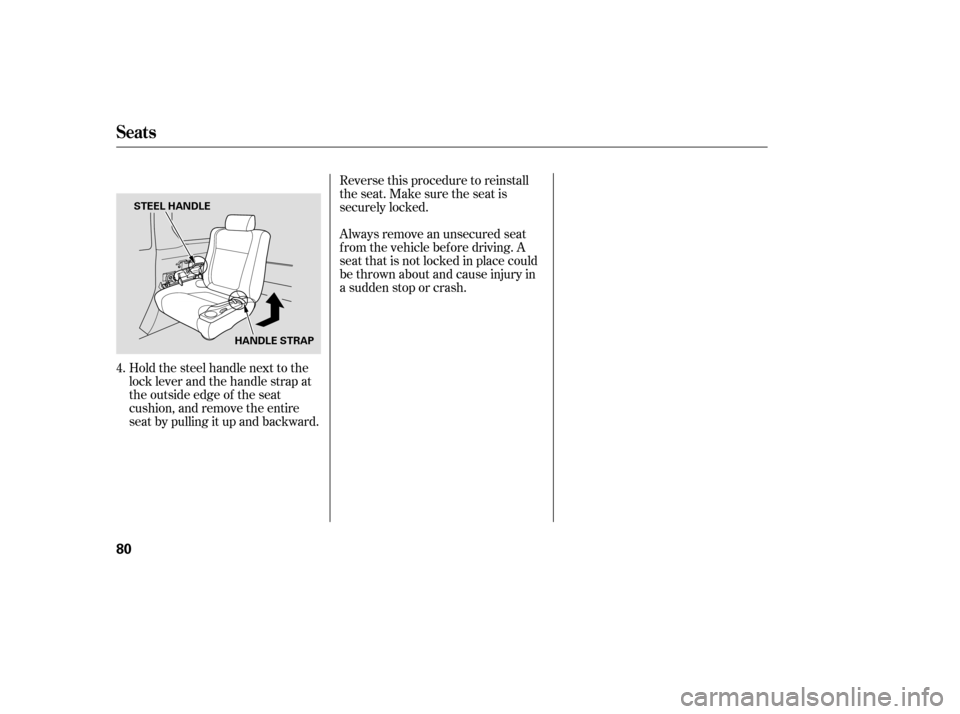
Reverse this procedure to reinstall
the seat. Make sure the seat is
securely locked.
Always remove an unsecured seat
f rom the vehicle bef ore driving. A
seat that is not locked in place could
be thrown about and cause injury in
a sudden stop or crash.
Hold the steel handle next to the
lock lever and the handle strap at
the outside edge of the seat
cushion, and remove the entire
seat by pulling it up and backward.
4.
Seats
80
STEEL HANDLE
HANDLE STRAP
Page 87 of 249
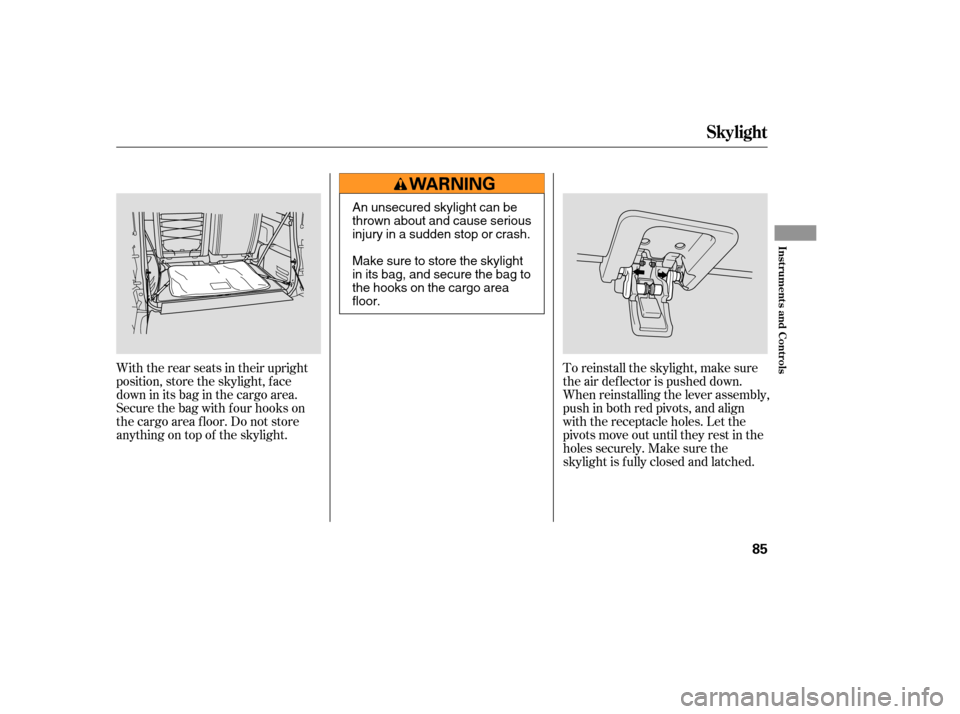
With the rear seats in their upright
position, store the skylight, f ace
down in its bag in the cargo area.
Secure the bag with four hooks on
the cargo area f loor. Do not store
anything on top of the skylight.To reinstall the skylight, make sure
the air deflector is pushed down.
When reinstalling the lever assembly,
push in both red pivots, and align
with the receptacle holes. Let the
pivots move out until they rest in the
holes securely. Make sure the
skylight is f ully closed and latched.
Skylight
Inst rument s and Cont rols
85
An unsecured skylight can be
thrown about and cause serious
injury in a sudden stop or crash.
Make sure to store the skylight
in its bag, and secure the bag to
the hooks on the cargo area
floor.
Page 129 of 249
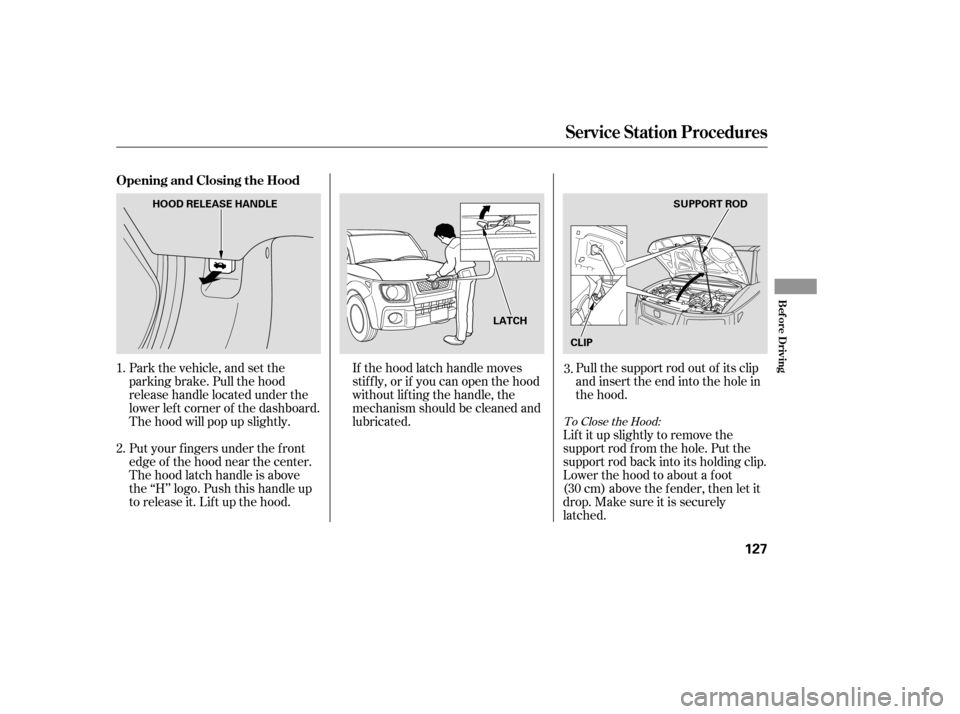
Pull the support rod out of its clip
and insert the end into the hole in
the hood.
If the hood latch handle moves
stif f ly, or if you can open the hood
without lifting the handle, the
mechanism should be cleaned and
lubricated.
Park the vehicle, and set the
parking brake. Pull the hood
release handle located under the
lower lef t corner of the dashboard.
The hood will pop up slightly.
Put your f ingers under the f ront
edge of the hood near the center.
The hood latch handle is above
the ‘‘H’’ logo. Push this handle up
to release it. Lift up the hood. Lif t it up slightly to remove the
support rod f rom the hole. Put the
support rod back into its holding clip.
Lower the hood to about a f oot
(30cm)abovethefender,thenletit
drop. Make sure it is securely
latched.
1.
2.
3.
To Close the Hood:
Opening and Closing the Hood
Service Station Procedures
Bef ore Driving
127
LATCH
HOOD RELEASE HANDLE
SUPPORT ROD
CLIP
Page 136 of 249

In addition, the total weight of the
vehicle, all passengers, accessories,
cargo, and trailer tongue load must
not exceed the Gross Vehicle
Weight Rating (GVWR) or the Gross
Axle Weight Rating (GAWR). Both
areonalabelonthedriver’s
doorjamb.Store or secure all items that could
be thrown around and hurt
someone during a crash.
Be sure items placed on the f loor
behind the f ront seats cannot roll
under the seats and interf ere with
the driver’s ability to operate the
pedals or the proper operation of
the seats.
Keep the glove box closed while
driving. If it is open, a passenger
could injure their knees during a
crash or sudden stop. Theseparationnetcanbeusedto
hold back sof t, lightweight items
stored in the cargo area. Heavy
items should be properly secured on
the f loor of the cargo area. The net
may not prevent heavy items f rom
being thrown f orward in a crash or a
sudden stop. If you use an accessory roof rack,
the roof rack weight limit may be
lower. Ref er to the inf ormation that
came with your roof rack.
If you carry any items on a roof
rack,besurethetotalweightof
the rack and the items does not
exceed 165 lbs (75 kg).
If you carry large items that
prevent you f rom closing the
tailgate or the hatch, exhaust gas
can enter the passenger area. To
avoid the possibility of , f ollow the
instructions on page . Distribute cargo evenly on the
f loor of the cargo area, placing the
heaviest items on the bottom and
as far forward as possible. Tie
down items that could be thrown
about the vehicle during a crash or
sudden stop. If youfoldtherearseatsdown,
f old them up, or remove them, tie
down items that could be thrown
about the vehicle during a crash or
sudden stop.
47
Carrying Cargo
Carrying Items in the Passenger
Compartment Optional Separation Net
carbon
monoxide poisoning
Carrying Cargo in the Cargo A rea
or on a Roof Rack
134
Page 141 of 249

Check the seat adjustment (see
page ).
Check the adjustment of the
inside and outside mirrors (see
page ).
Check the steering wheel
adjustment (see page ).Make sure the doors, hatch, and
tailgate are securely closed and
locked.
Fasten your seat belt. Check that
your passengers have f astened
their seat belts (see page ).
Youshoulddothefollowingchecks
and adjustments bef ore you drive
your vehicle.
Make sure all windows, mirrors,
and outside lights are clean and
unobstructed. Remove f rost, snow,
or ice. When you start the engine, check
the gauges and indicators in the
instrument panel (see page ).
Check that the hood is f ully closed.
Visually check the tires. If a tire
looks low, use a gauge to check its
pressure.
Check that any items you may be
carrying with you inside are stored
properly or f astened down
securely.
1.
2.
3.
4. 5.
6.
7.
8.
9.
10.
73
82 15
53
64
Preparing to Drive
Driving
139