ECU HONDA ELEMENT 2010 1.G User Guide
[x] Cancel search | Manufacturer: HONDA, Model Year: 2010, Model line: ELEMENT, Model: HONDA ELEMENT 2010 1.GPages: 342, PDF Size: 5.76 MB
Page 64 of 342
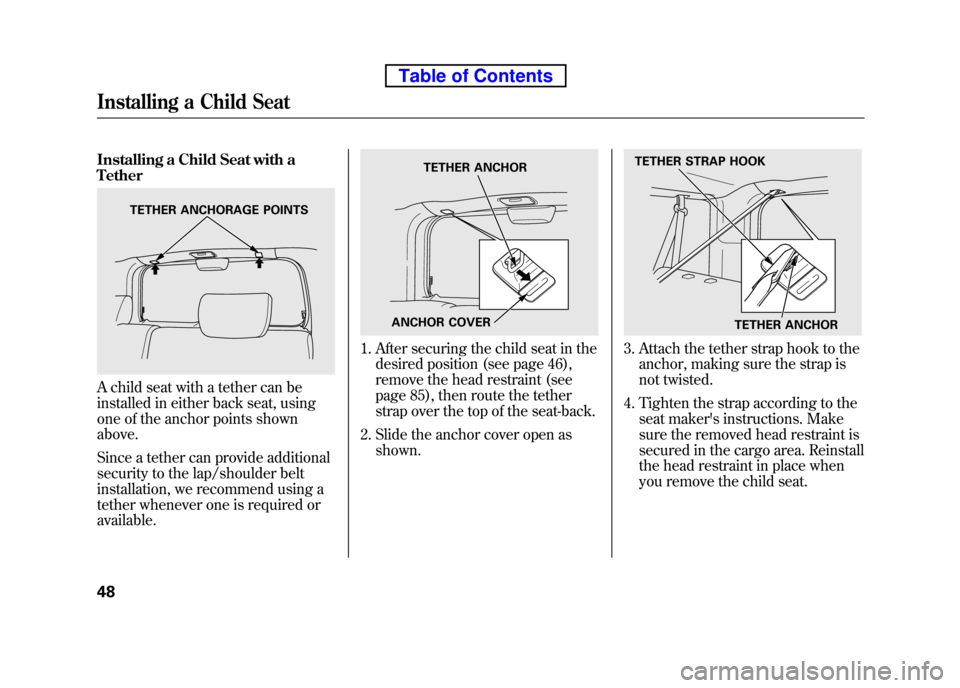
Installing a Child Seat with a Tether
A child seat with a tether can be
installed in either back seat, using
one of the anchor points shownabove.
Since a tether can provide additional
security to the lap/shoulder belt
installation, we recommend using a
tether whenever one is required oravailable.
1. After securing the child seat in thedesired position (see page 46),
remove the head restraint (see
page 85), then route the tether
strap over the top of the seat-back.
2. Slide the anchor cover open as shown.3. Attach the tether strap hook to theanchor, making sure the strap is
not twisted.
4. Tighten the strap according to the seat maker's instructions. Make
sure the removed head restraint is
secured in the cargo area. Reinstall
the head restraint in place when
you remove the child seat.
TETHER ANCHORAGE POINTS
TETHER ANCHOR
ANCHOR COVER
TETHER ANCHOR
TETHER STRAP HOOK
Installing a Child Seat
48
Table of Contents
Page 67 of 342

Of course, children vary widely. And
while age may be one indicator of
when a child can safely ride in front,
there are other important factors you
should consider.
Maturity
To safely ride in front, a child must
be able to follow the rules, including
sitting properly, and wearing the seat
belt properly throughout a ride.
Physical Size
Physically, a child must be large
enough for the lap/shoulder belt to
properly fit (see pages 14 and 49). If
the seat belt does not fit properly,
with or without the child sitting on a
booster seat, the child should not sit
in front.If you decide that a child can safely
ride up front, be sure to:
● Carefully read the owner's manual,
and make sure you understand all
seat belt instructions and all safetyinformation.
● Move the vehicle seat to the rear-
most position.
● Have the child sit up straight, back
against the seat, and feet on or
near the floor.
● Check that the child's seat belt is
properly and securely positioned.
● Supervise the child. Even mature
children sometimes need to be
reminded to fasten the seat belts
or sit properly. Additional Safety Precautions
●
Do not let a child wear a seat belt
across the neck.
This could result
in serious neck injuries during acrash.
●
Do not let a child put the shoulder part of a seat belt behind the back
or under the arm.
This could cause
very serious injuries during a
crash. It also increases the chance
that the child will slide under the
belt in a crash and be injured.
●
Two children should never use the same seat belt.If they do, they
could be very seriously injured in acrash.
●
Do not put any accessories on a seat belt.Devices intended to
improve a child's comfort or
reposition the shoulder part of a
seat belt can make the belt less
effective and increase the chance
of serious injury in a crash.
Protecting Larger Children
51
Driver and Passenger Safety
Table of Contents
Page 91 of 342
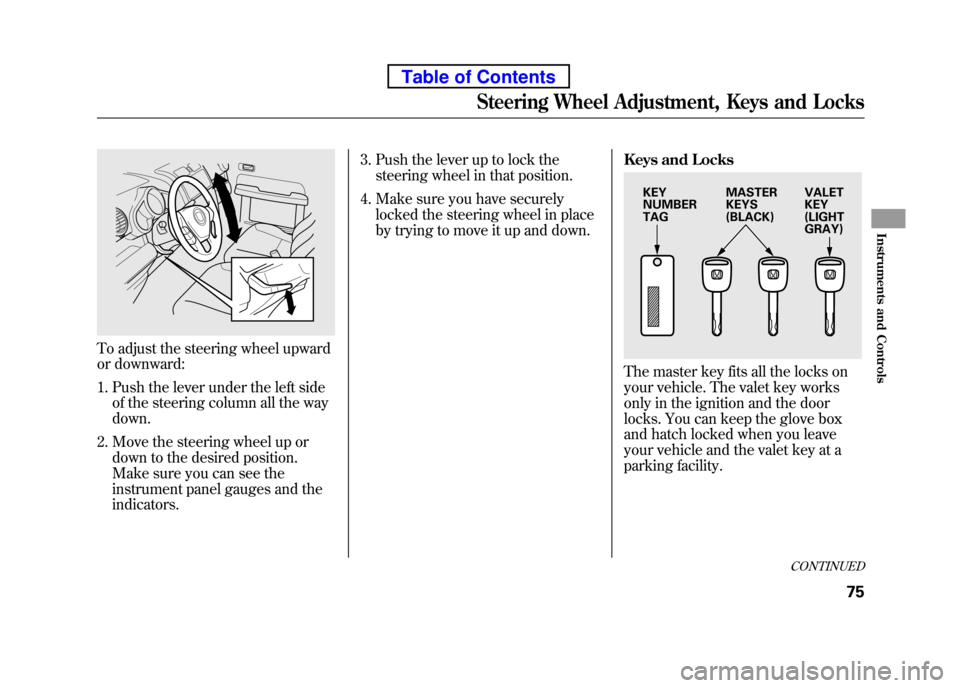
To adjust the steering wheel upward
or downward:1. Push the lever under the left side of the steering column all the way down.
2. Move the steering wheel up or down to the desired position.
Make sure you can see the
instrument panel gauges and theindicators. 3. Push the lever up to lock the
steering wheel in that position.
4. Make sure you have securely locked the steering wheel in place
by trying to move it up and down. Keys and Locks
The master key fits all the locks on
your vehicle. The valet key works
only in the ignition and the door
locks. You can keep the glove box
and hatch locked when you leave
your vehicle and the valet key at a
parking facility.
KEY NUMBERTAG
MASTER
KEYS
(BLACK)VALETKEY(LIGHTGRAY)
CONTINUED
Steering Wheel Adjustment, Keys and Locks
75
Instruments and Controls
Table of Contents
Page 103 of 342
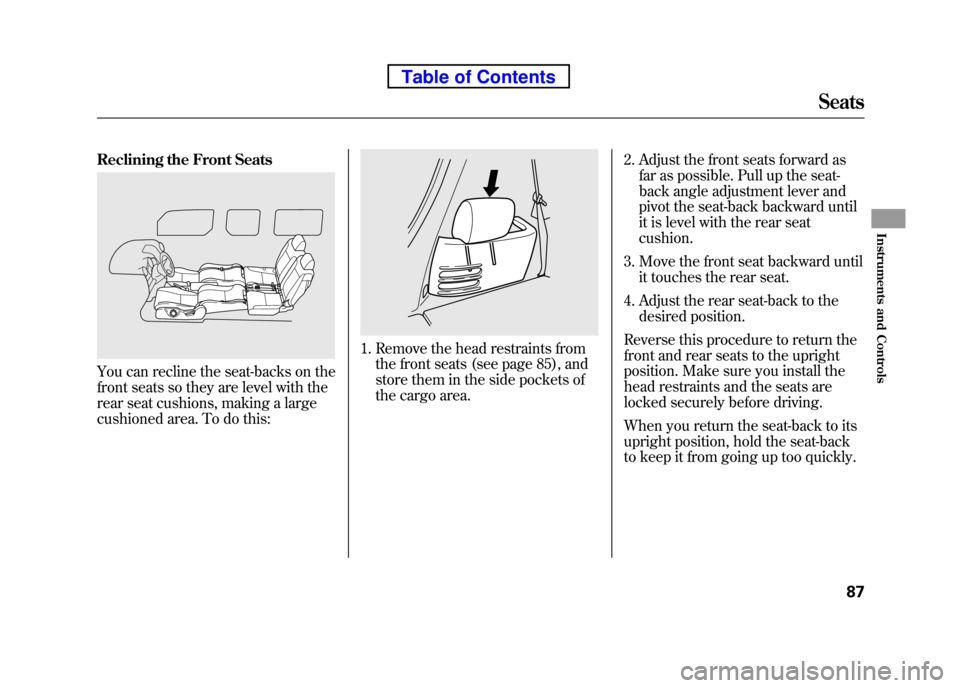
Reclining the Front Seats
You can recline the seat-backs on the
front seats so they are level with the
rear seat cushions, making a large
cushioned area. To do this:
1. Remove the head restraints fromthe front seats (see page 85), and
store them in the side pockets of
the cargo area. 2. Adjust the front seats forward as
far as possible. Pull up the seat-
back angle adjustment lever and
pivot the seat-back backward until
it is level with the rear seat cushion.
3. Move the front seat backward until it touches the rear seat.
4. Adjust the rear seat-back to the desired position.
Reverse this procedure to return the
front and rear seats to the upright
position. Make sure you install the
head restraints and the seats are
locked securely before driving.
When you return the seat-back to its
upright position, hold the seat-back
to keep it from going up too quickly.
Seats
87
Instruments and Controls
Table of Contents
Page 105 of 342
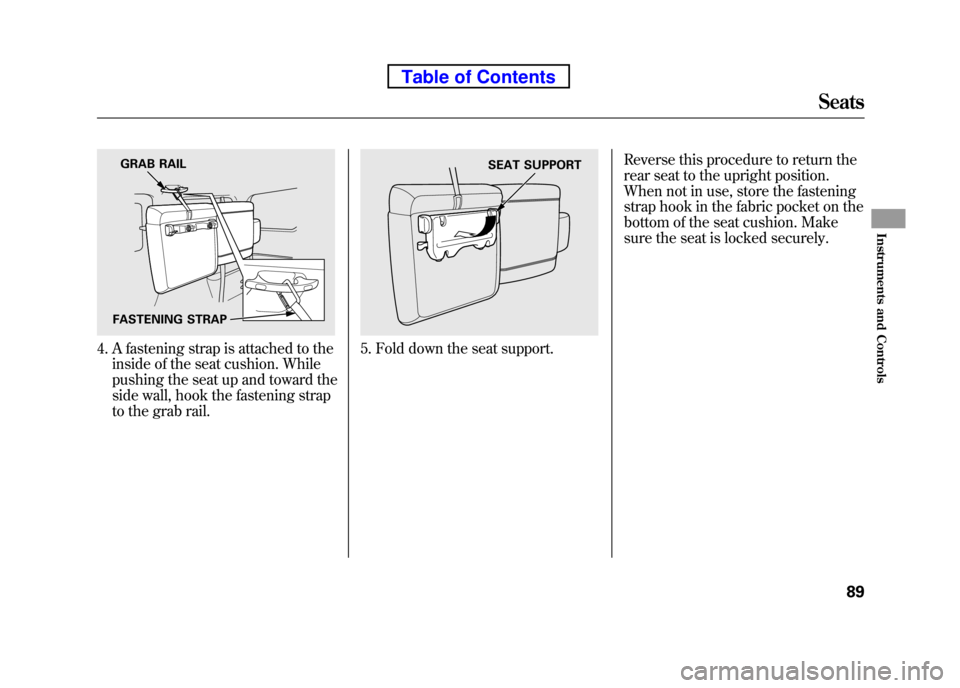
4. A fastening strap is attached to theinside of the seat cushion. While
pushing the seat up and toward the
side wall, hook the fastening strap
to the grab rail.5. Fold down the seat support. Reverse this procedure to return the
rear seat to the upright position.
When not in use, store the fastening
strap hook in the fabric pocket on the
bottom of the seat cushion. Make
sure the seat is locked securely.
GRAB RAIL
FASTENING STRAPSEAT SUPPORT
Seats
89
Instruments and Controls
Table of Contents
Page 107 of 342
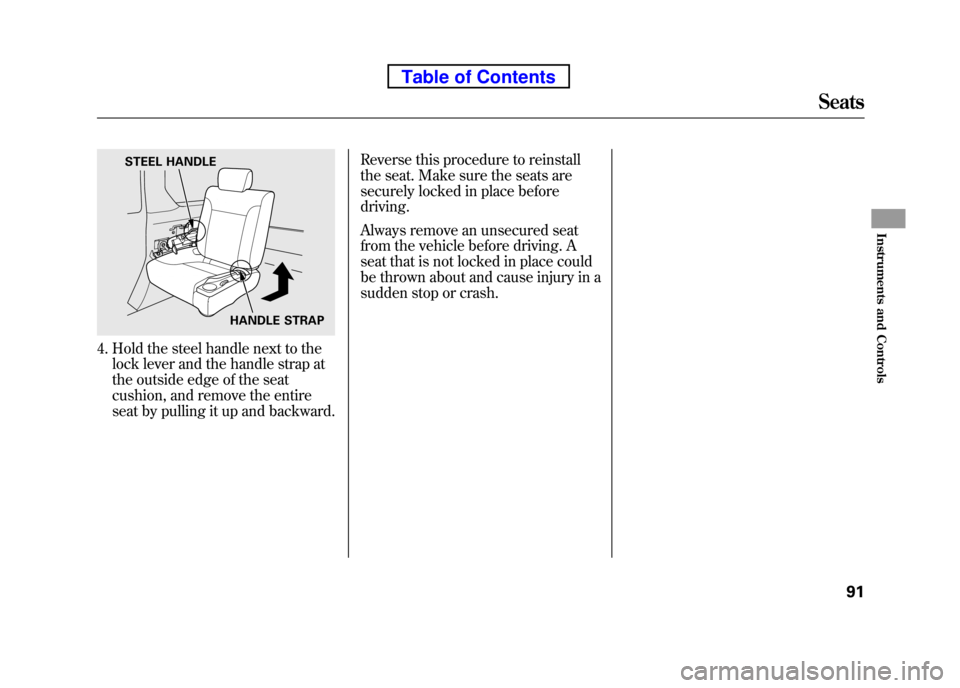
4. Hold the steel handle next to thelock lever and the handle strap at
the outside edge of the seat
cushion, and remove the entire
seat by pulling it up and backward. Reverse this procedure to reinstall
the seat. Make sure the seats are
securely locked in place beforedriving.
Always remove an unsecured seat
from the vehicle before driving. A
seat that is not locked in place could
be thrown about and cause injury in a
sudden stop or crash.
STEEL HANDLE
HANDLE STRAP
Seats
91
Instruments and Controls
Table of Contents
Page 115 of 342
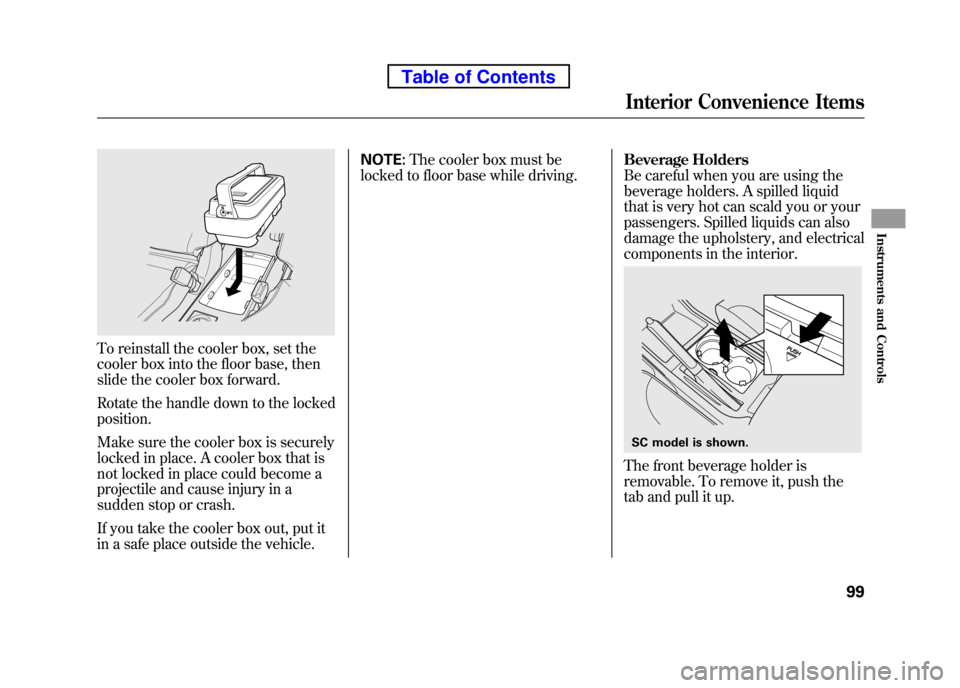
To reinstall the cooler box, set the
cooler box into the floor base, then
slide the cooler box forward.
Rotate the handle down to the locked position.
Make sure the cooler box is securely
locked in place. A cooler box that is
not locked in place could become a
projectile and cause injury in a
sudden stop or crash.
If you take the cooler box out, put it
in a safe place outside the vehicle.NOTE:
The cooler box must be
locked to floor base while driving. Beverage Holders
Be careful when you are using the
beverage holders. A spilled liquid
that is very hot can scald you or your
passengers. Spilled liquids can also
damage the upholstery, and electrical
components in the interior.
The front beverage holder is
removable. To remove it, push the
tab and pull it up.
SC model is shown.
Interior Convenience Items
99
Instruments and Controls
Table of Contents
Page 181 of 342
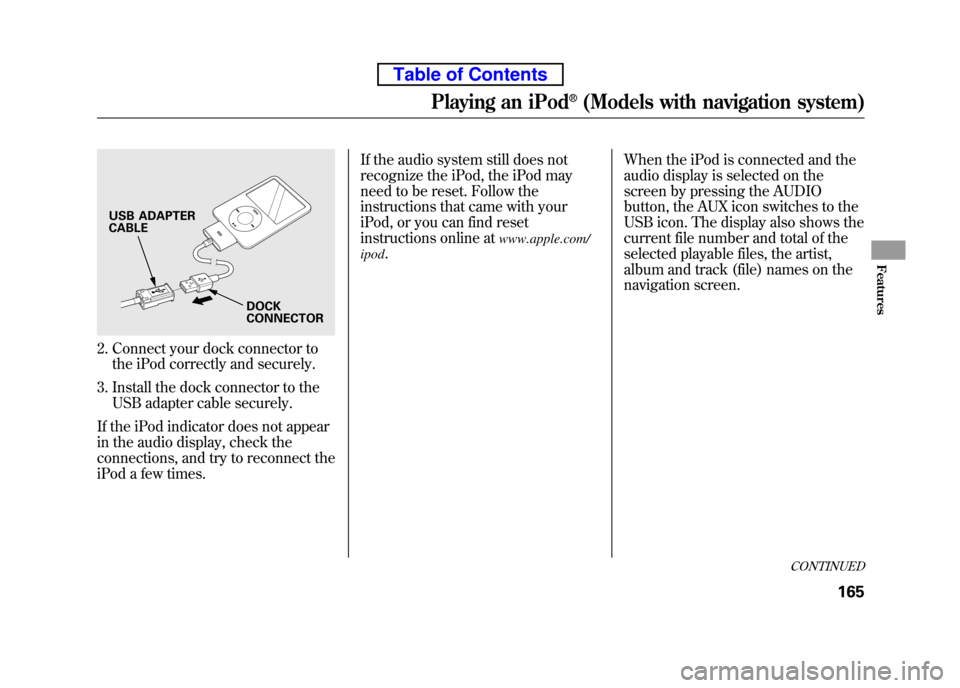
2. Connect your dock connector tothe iPod correctly and securely.
3. Install the dock connector to the USB adapter cable securely.
If the iPod indicator does not appear
in the audio display, check the
connections, and try to reconnect the
iPod a few times. If the audio system still does not
recognize the iPod, the iPod may
need to be reset. Follow the
instructions that came with your
iPod, or you can find reset
instructions online at
www.apple.com/
ipod . When the iPod is connected and the
audio display is selected on the
screen by pressing the AUDIO
button, the AUX icon switches to the
USB icon. The display also shows the
current file number and total of the
selected playable files, the artist,
album and track (file) names on the
navigation screen.
USB ADAPTER CABLE
DOCK
CONNECTOR
CONTINUED
Playing an iPod®(Models with navigation system)
165
Features
Table of Contents
Page 190 of 342

To Play a USB Flash Memory Device
This audio system can select and
play the audio files from a USB flash
memory device with the same
controls used for the in-dash disc
player. To play a USB flash memory
device, connect it to the USB adapter
cable in the glove box. The ignition
switch must be in the ACCESSORY
(I) or ON (II) position. Press the
AUDIO button beside the screen to
show the audio display and touch the
AUX icon.
You can also select an icon by
moving the joystick. Move it to left,
right, up, or down to change the
highlighting and scroll through lists,
then press ENT on the top of the
joystick to set your selection.To select the USB mode without
using the icon, press the CD/XM
button repeatedly. The status bar
appears on the bottom of the screen.
The audio system reads and plays
the audio files on the USB flash
memory device in MP3, WMA orAAC
ꭧformats. Depending on the
format, the display shows MP3,
WMA or AAC when a USB flash
memory device is playing. The USB
flash memory device limit is up to
700 folders or up to 65535 files. ꭧ : Only AAC format files recorded
with iTunes are playable on this
audio unit. The recommended USB flash
memory devices are 256 MB or
higher and formatted with the FAT
file system. Some digital audio
players may be compatible as well.
Some USB flash memory devices
(such as devices with security lock-
out features, etc.) will not work in
this audio unit.
Playing a USB Flash Memory Device (Models with navigation system)
174
Table of Contents
Page 193 of 342
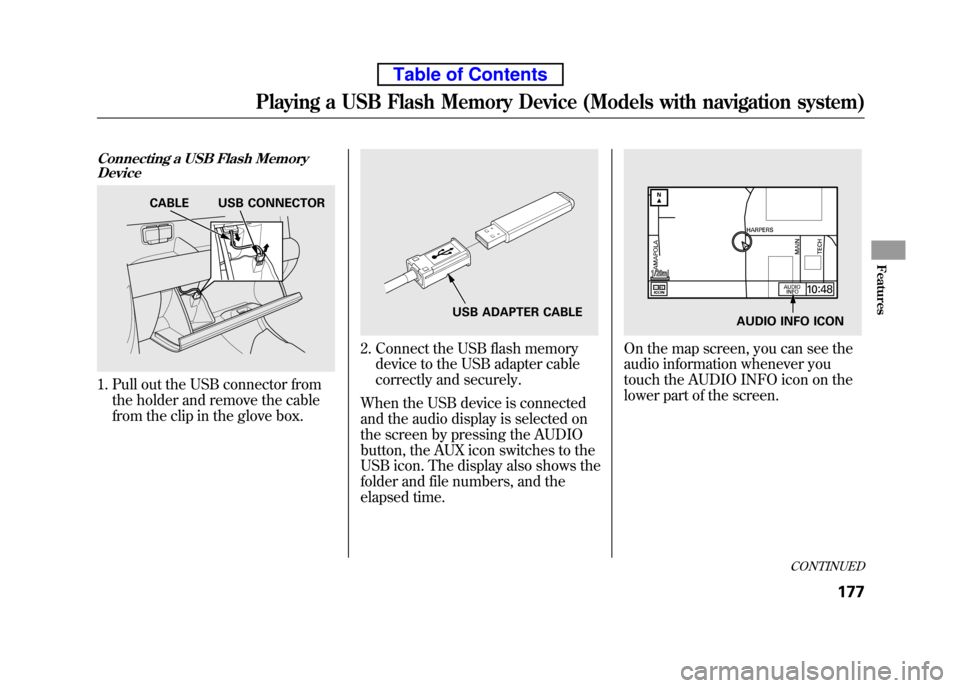
Connecting a USB Flash MemoryDevice
1. Pull out the USB connector from
the holder and remove the cable
from the clip in the glove box.
2. Connect the USB flash memorydevice to the USB adapter cable
correctly and securely.
When the USB device is connected
and the audio display is selected on
the screen by pressing the AUDIO
button, the AUX icon switches to the
USB icon. The display also shows the
folder and file numbers, and the
elapsed time.On the map screen, you can see the
audio information whenever you
touch the AUDIO INFO icon on the
lower part of the screen.
CABLE USB CONNECTOR
USB ADAPTER CABLEAUDIO INFO ICON
CONTINUED
Playing a USB Flash Memory Device (Models with navigation system)
177
Features
Table of Contents