tailgate HONDA ELEMENT 2010 1.G User Guide
[x] Cancel search | Manufacturer: HONDA, Model Year: 2010, Model line: ELEMENT, Model: HONDA ELEMENT 2010 1.GPages: 342, PDF Size: 5.76 MB
Page 99 of 342

See page 210 for information on
cargo loading. Keep the tailgate and
the hatch closed at all times while
driving to avoid damaging them, and
to prevent exhaust gas from getting
into the interior. SeeCarbon
Monoxide Hazard on page 52. Seat Adjustments
See pages 11
-13 for important safety
information and warnings about how to properly position seats and seat-backs.
Make all seat adjustments before you
start driving.
Front Seat
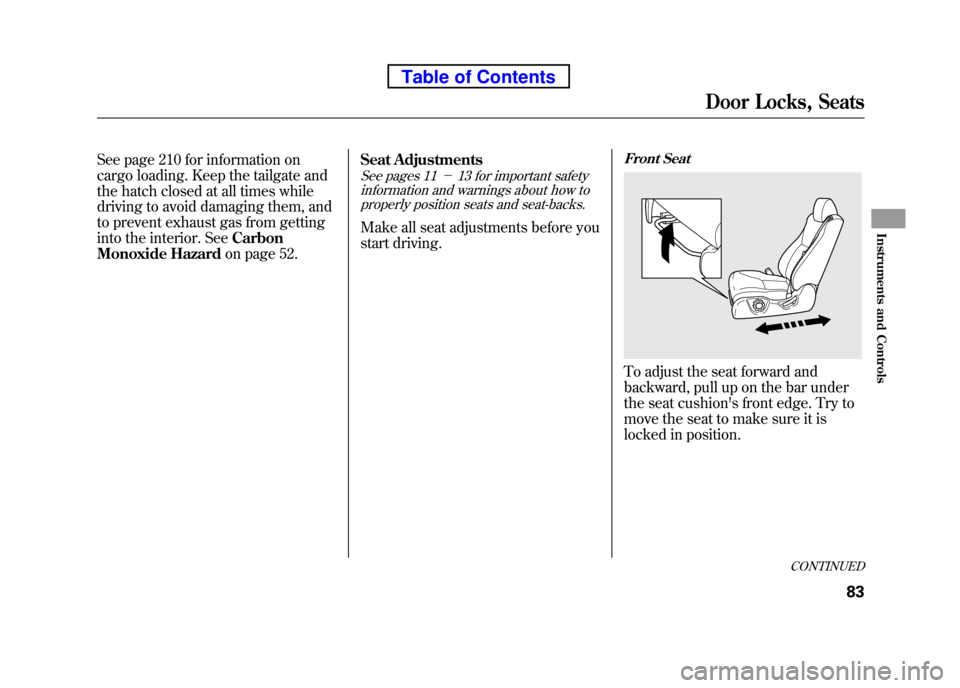
To adjust the seat forward and
backward, pull up on the bar under
the seat cushion's front edge. Try to
move the seat to make sure it is
locked in position.
CONTINUED
Door Locks, Seats
83
Instruments and Controls
Table of Contents
Page 122 of 342

Air flows from the defroster
vents at the base of the windshield.
When you select
or, the
system automatically switches to
fresh air mode and turns on the A/C.
The A/C indicator does not come on. Ventilation
The flow-through ventilation system
draws in outside air, circulates it
through the interior, then discharges
it through vents near the tailgate.
1. Set the temperature to the lower limit.
2. Make sure the A/C is off.
3. Select
and fresh air mode.
4. Set the fan to the desired speed. Using the Heater
The heater uses engine coolant to
warm the air. If the engine is cold, it
will be several minutes before you
feel warm air coming from the system.
1. Select
and fresh air mode.
2. Set the fan to the desired speed.
3. Adjust the warmth of the air with the temperature control dial.
Using the A/C
Air conditioning places an extra load
on the engine. Watch the engine
coolant temperature gauge (see page
67). If it moves near the red zone,
turn off the A/C until the gauge
reading returns to normal.
1. Turn on the A/C by pressing the button. The indicator in the button
comes on when a fan speed isselected.
2. Set the temperature to the lower limit. 3. Select
.
4. If the outside air is humid, select recirculation mode. If the outside
air is dry, select fresh air mode.
5. Set the fan to the desired speed.
If the interior is very warm,you can
cool it down more rapidly by partially
opening the windows, turning on the
A/C, and setting the fan to maximum
speed in fresh air mode.
To cool the interior with MAX A/C:
1. Set the mode control dial to MAX A/C.
The system automatically turns on
the A/C, selects
and switches
to recirculation mode.
2. Set the temperature to the lower limit.
3. Set the fan to the desired speed.
Vents, Heating, and A/C
106
Table of Contents
Page 226 of 342

Carrying Items in the Passenger Compartment● Store or secure all items that could
be thrown around and hurt
someone during a crash.
● Be sure items placed on the floor
behind the front seats cannot roll
under the seats and interfere with
the pedals, the seat operation, or
the proper operation of the sensors
under the seats.
● Keep the glove box closed while
driving. If it is open, a passenger
could injure their knees during a
crash or sudden stop. ●
If you fold the rear seats down or
up, or remove them, tie down
items that could be thrown about
the vehicle during a crash or
sudden stop. Also, keep all cargo
below the bottom of the windows.
If it is higher, it could interfere
with the proper operation of the
side curtain airbags.
Carrying Cargo in the Cargo Area
or on a Roof Rack ● Distribute cargo evenly on the
floor of the cargo area, placing the
heaviest items on the bottom and
as far forward as possible. Tie
down items that could be thrown
about the vehicle during a crash or
sudden stop. ●
If you carry large items that
prevent you from closing the
tailgate or the hatch, exhaust gas
can enter the passenger area. To
avoid the possibility of carbon
monoxide poisoning, follow the
instructions on page 52.
● If you carry any items on a roof
rack, be sure the total weight of
the rack and the items does not
exceed 75 lbs (34 kg).
If you use an accessory roof rack,
the roof rack weight limit may be
lower. Refer to the information that
came with your roof rack.
Carrying Cargo
210
Table of Contents
Page 231 of 342

You should do the following checks
and adjustments before you drive
your vehicle.1. Make sure all windows, mirrors, and outside lights are clean and
unobstructed. Remove frost, snow,
or ice.
2. Check that the hood is fully closed.
3. Visually check the tires. If a tire looks low, use a gauge to check itspressure.
4. Check that any items you may be carrying are stored properly or
fastened down securely. 5. Check the seat adjustment (see
page 83).
6. Check the adjustment of the inside and outside mirrors (see page 93).
7. Check the steering wheel adjustment (see page 74). 8. Make sure the doors, the hatch,
and the tailgate are securely
closed and locked.
9. Fasten your seat belt. Check that your passengers have fastened
their seat belts (see page 14).
10. When you start the engine, check the gauges and indicators in the
instrument panel (see page 57).
Preparing to Drive
215
Driving
Table of Contents
Page 282 of 342

Replacing Rear Bulbs
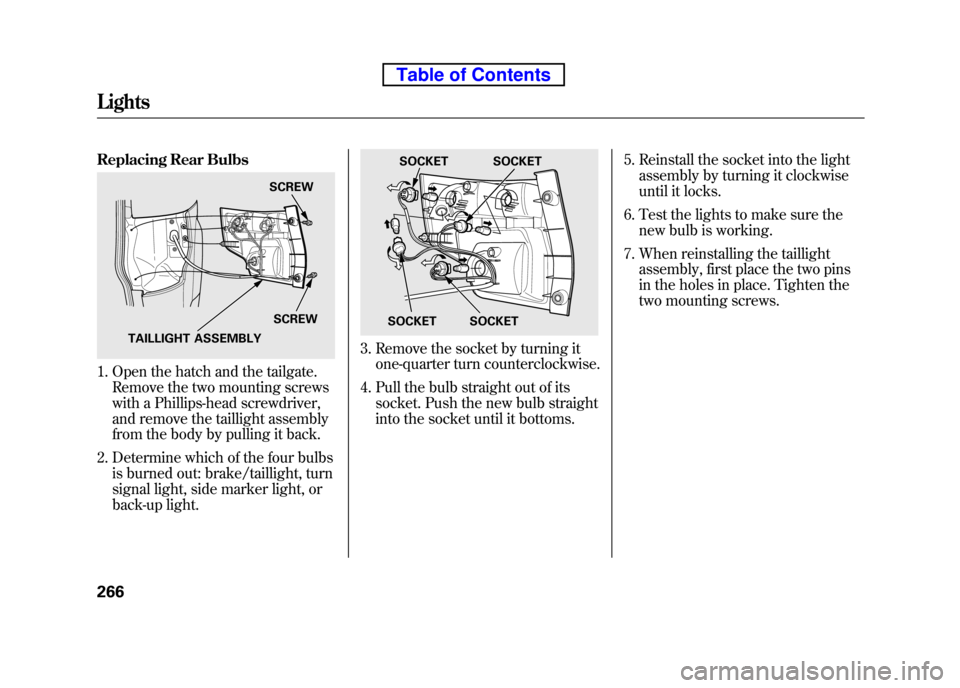
1. Open the hatch and the tailgate.Remove the two mounting screws
with a Phillips-head screwdriver,
and remove the taillight assembly
from the body by pulling it back.
2. Determine which of the four bulbs is burned out: brake/taillight, turn
signal light, side marker light, or
back-up light.
3. Remove the socket by turning itone-quarter turn counterclockwise.
4. Pull the bulb straight out of its socket. Push the new bulb straight
into the socket until it bottoms. 5. Reinstall the socket into the light
assembly by turning it clockwise
until it locks.
6. Test the lights to make sure the new bulb is working.
7. When reinstalling the taillight assembly, first place the two pins
in the holes in place. Tighten the
two mounting screws.
SCREW
SCREW
TAILLIGHT ASSEMBLY
SOCKET SOCKET
SOCKET
SOCKET
Lights
266
Table of Contents
Page 294 of 342

On vehicles with navigation system
The navigation system will also
disable itself. The next time you turn
on the ignition switch, the system
will require you to enter a PIN before
it can be used. Refer to the
navigation system manual.Vehicle Storage
If you need to park your vehicle for
an extended period (more than 1
month), there are several things you
should do to prepare it for storage.
Proper preparation helps prevent
deterioration and makes it easier to
get your vehicle back on the road. If
possible, store your vehicle indoors.
● Fill the fuel tank.
● Wash and dry the exterior completely.
● Clean the interior. Make sure the
carpeting, floor mats, etc., are
completely dry.
● Leave the parking brake off. Put
the transmission in reverse
(manual) or Park (automatic). ●
Block the rear wheels.
● If the vehicle is to be stored for a
longer period, it should be
supported on jackstands so the
tires are off the ground.
● Leave one window open slightly (if
the vehicle is being storedindoors).
● Disconnect the battery.
● Support the front and rear wiper
blade arms with a folded towel or
rag so they do not touch thewindshield.
● To minimize sticking, apply a
silicone spray lubricant to all door
and tailgate seals. Also, apply a
vehicle body wax to the painted
surfaces that mate with the door
and tailgate seals.
Checking the Battery, Vehicle Storage
278
Table of Contents
Page 299 of 342

If you have a flat tire while driving,
stop in a safe place to change it.
Drive slowly along the shoulder until
you get to an exit or an area to stop
that is far away from the traffic lanes.
The vehicle can easily roll off
the jack, seriously injuring
anyone underneath.
Follow the directions for
changing a tire exactly, and
never get under the vehicle
when it is supported only by thejack.1. Park the vehicle on firm, level, and
non-slippery ground. Put the
transmission in Park (automatic)
or reverse (manual). Apply the
parking brake.
If you are towing a trailer, unhitch
the trailer.
2. Turn on the hazard warning lights, and turn the ignition switch to the
LOCK (0) position. Have all
passengers get out of the vehicle
while you change the tire.
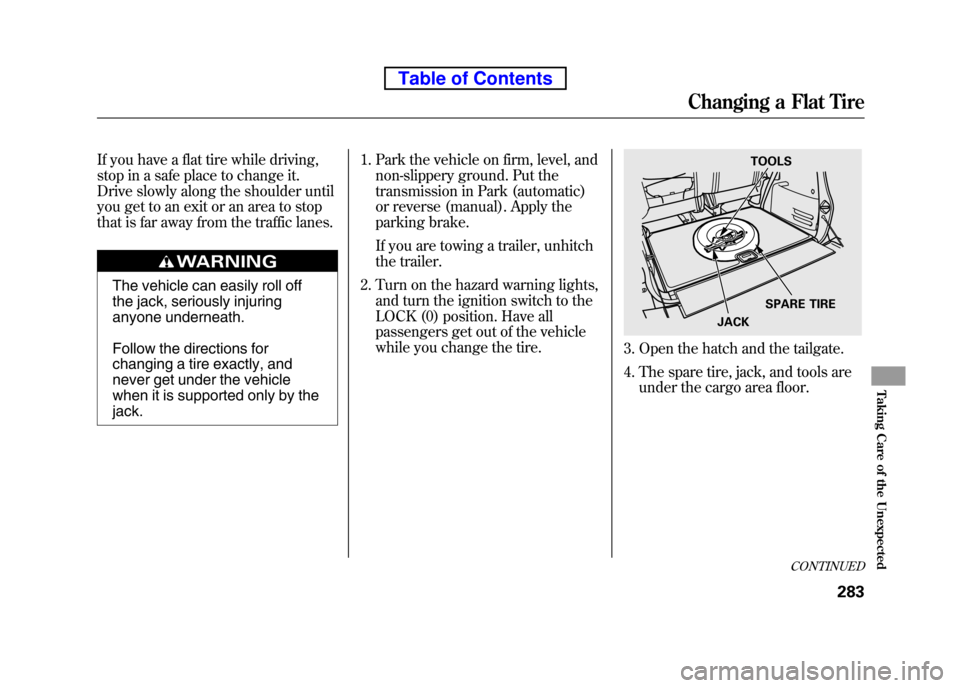
3. Open the hatch and the tailgate.
4. The spare tire, jack, and tools are
under the cargo area floor.
TOOLS
SPARE TIRE
JACK
CONTINUED
Changing a Flat Tire
283
Taking Care of the Unexpected
Table of Contents