maintenance HONDA ELEMENT 2010 1.G Service Manual
[x] Cancel search | Manufacturer: HONDA, Model Year: 2010, Model line: ELEMENT, Model: HONDA ELEMENT 2010 1.GPages: 342, PDF Size: 5.76 MB
Page 281 of 342
9. Put the inner fender cover in place.Install the holding clip.
Lock the clip in place by pushing
on the center.
Install the wheel arch protector
and tighten the screws securely. Replacing a Front Side Marker
Light Bulb
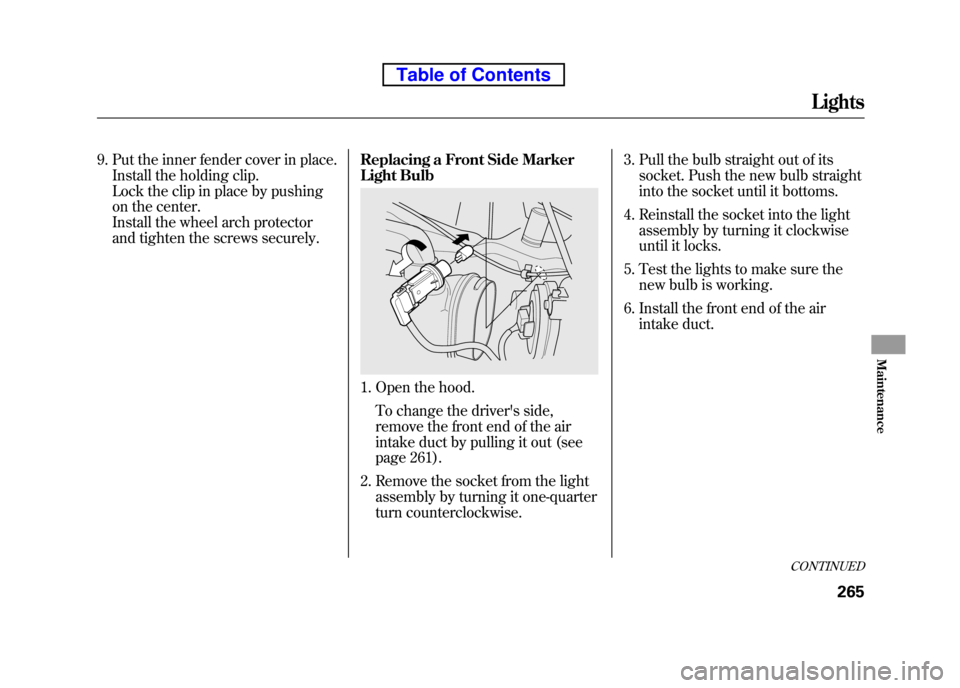
1. Open the hood.
To change the driver's side,
remove the front end of the air
intake duct by pulling it out (see
page 261).
2. Remove the socket from the light assembly by turning it one-quarter
turn counterclockwise. 3. Pull the bulb straight out of its
socket. Push the new bulb straight
into the socket until it bottoms.
4. Reinstall the socket into the light assembly by turning it clockwise
until it locks.
5. Test the lights to make sure the new bulb is working.
6. Install the front end of the air intake duct.
CONTINUED
Lights
265
Maintenance
Table of Contents
Page 283 of 342
Replacing a Rear License Plate Bulb
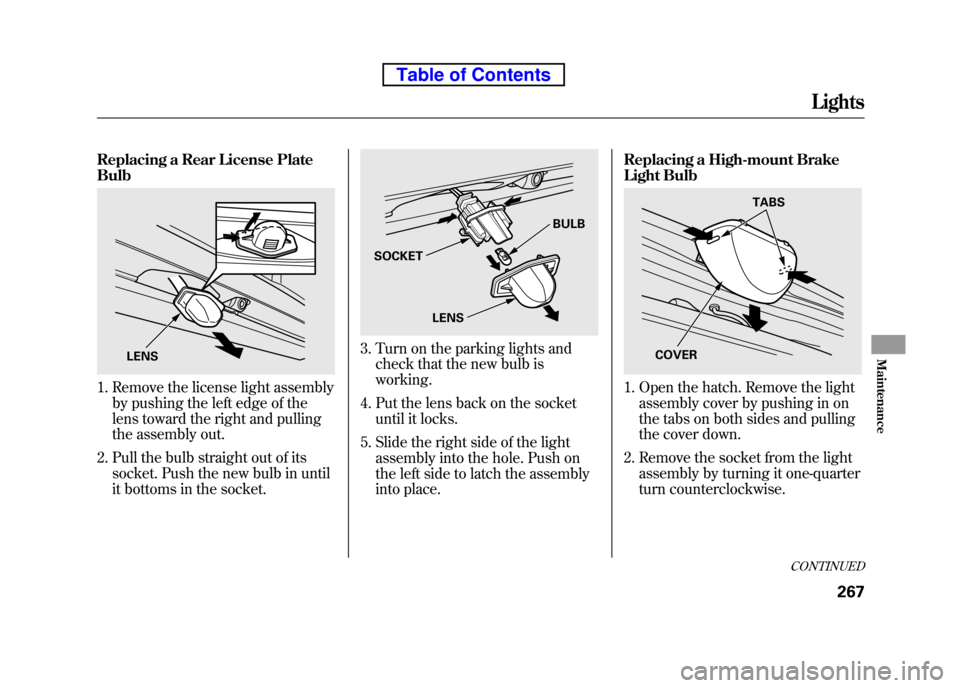
1. Remove the license light assemblyby pushing the left edge of the
lens toward the right and pulling
the assembly out.
2. Pull the bulb straight out of its socket. Push the new bulb in until
it bottoms in the socket.
3. Turn on the parking lights andcheck that the new bulb is working.
4. Put the lens back on the socket until it locks.
5. Slide the right side of the light assembly into the hole. Push on
the left side to latch the assembly
into place. Replacing a High-mount Brake
Light Bulb
1. Open the hatch. Remove the light
assembly cover by pushing in on
the tabs on both sides and pulling
the cover down.
2. Remove the socket from the light assembly by turning it one-quarter
turn counterclockwise.
LENS
SOCKET BULB
LENS
TABS
COVER
CONTINUED
Lights
267
Maintenance
Table of Contents
Page 285 of 342
If you remove the driver's floor mat,
make sure to re-anchor it when you
put it back in your vehicle.
If you use non-Honda floor mats,
make sure they fit properly and that
they can be used with the floor mat
anchors. Do not put additional floor
mats on top of the anchored mats.Dust and Pollen Filter
This filter removes the dust and
pollen that is brought in from the
outside through the heating and
cooling system.
Have your dealer replace the filter
when this service is indicated by a
maintenance message on the
information display. It should be
replaced every 15,000 miles
(24,000 km) if you drive primarily in
urban areas that have high
concentrations of soot in the air, or if
the flow from the heating and cooling
system becomes less than usual.Wiper Blades
Check the condition of the wiper
blades at least every 6 months.
Replace them if you find signs of
cracking in the rubber, areas that are
getting hard, or if they leave streaks
and unwiped areas when used.
1. Front:
Raise the wiper arm off the windshield.
Do not open the hood when the wiper
arms are raised, or you will damage the
hood and the arms. Rear:
Raise the wiper arm off the hatch
glass and hold it.
CONTINUED
Floor Mats, Dust and Pollen Filter, Wiper Blades
269
Maintenance
Table of Contents
Page 287 of 342
Wheels
Clean the wheels as you would the
rest of the exterior. Wash them with
the same solution, and rinse them thoroughly.
If equipped
Aluminum alloy wheels have a
protective clear-coat that keeps the
aluminum from corroding and
tarnishing. Cleaning the wheels with
harsh chemicals (including some
commercial wheel cleaners) or a stiff
brush can damage the clear-coat. To
clean the wheels, use a mild
detergent and a soft brush or sponge.Tires
To safely operate your vehicle, your
tires must be the proper type and
size, in good condition with adequate
tread, and correctly inflated.
The following pages give more
detailed information on how to take
care of your tires and what to do
when they need to be replaced.
Using tires that are excessively
worn or improperly inflated can
cause a crash in which you can
be seriously hurt or killed.
Follow all instructions in this
owner's manual regarding tire
inflation and maintenance.Inflation Guidelines
Keeping the tires properly inflated
provides the best combination of
handling, tread life, and riding comfort.
● Underinflated tires wear unevenly,
adversely affect handling and fuel
economy, and are more likely to
fail from being overheated.
● Overinflated tires can make your
vehicle ride more harshly, are
more prone to damage from road
hazards, and wear unevenly.
The tire pressure monitoring system
(TPMS) will warn you when a tire
pressure is low. See page 227 for
more information on the TPMS.
CONTINUED
Wheels, Tires
271
Maintenance
Table of Contents
Page 289 of 342
The compact spare tire pressure is:
60 psi (420 kPa, 4.2 kgf/cm2)
For convenience, the recommended
tire sizes and cold tire pressures are
on a label on the driver's doorjamb.
For additional technical information
about your tires, see page 311.
Tire Inspection
Every time you check inflation, you
should also examine the tires for
damage, foreign objects, and wear.
You should look for: ● Bumps or bulges in the tread or
side of the tire. Replace the tire if
you find either of these conditions.
● Cuts, splits, or cracks in the side of
the tire. Replace the tire if you can
see fabric or cord.
● Excessive tread wear.
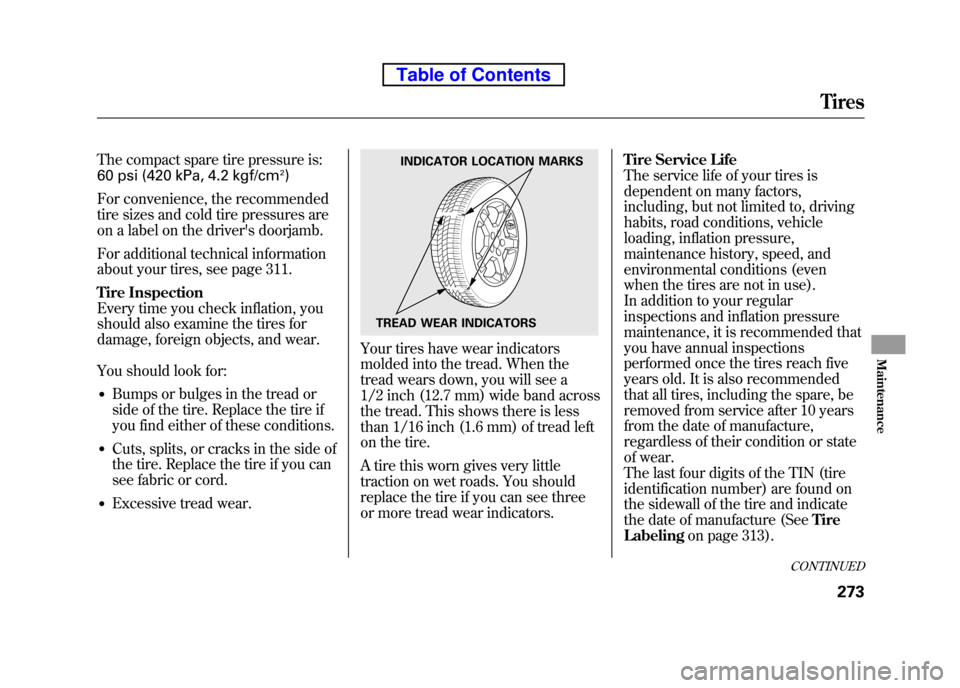
Your tires have wear indicators
molded into the tread. When the
tread wears down, you will see a
1/2 inch (12.7 mm) wide band across
the tread. This shows there is less
than 1/16 inch (1.6 mm) of tread left
on the tire.
A tire this worn gives very little
traction on wet roads. You should
replace the tire if you can see three
or more tread wear indicators. Tire Service Life
The service life of your tires is
dependent on many factors,
including, but not limited to, driving
habits, road conditions, vehicle
loading, inflation pressure,
maintenance history, speed, and
environmental conditions (even
when the tires are not in use).
In addition to your regular
inspections and inflation pressure
maintenance, it is recommended that
you have annual inspections
performed once the tires reach five
years old. It is also recommended
that all tires, including the spare, be
removed from service after 10 years
from the date of manufacture,
regardless of their condition or state
of wear.
The last four digits of the TIN (tire
identification number) are found on
the sidewall of the tire and indicate
the date of manufacture (See
Tire
Labeling on page 313).
INDICATOR LOCATION MARKS
TREAD WEAR INDICATORS
CONTINUED
Tires
273
Maintenance
Table of Contents
Page 290 of 342
Tire Maintenance
In addition to proper inflation, correct
wheel alignment helps to decrease
tire wear. If you find a tire is worn
unevenly, have your dealer check the
wheel alignment.
Have your dealer check the tires if
you feel a consistent vibration while
driving. A tire should always be
rebalanced if it is removed from the
wheel. When you have new tires
installed, make sure they are
balanced. This increases riding
comfort and tire life. For best results,
have the installer perform a dynamicbalance.
On vehicles with aluminum wheels,
improper wheel weights can damage
your vehicle's aluminum wheels. Use
only Honda wheel weights for balancing.Tire Rotation
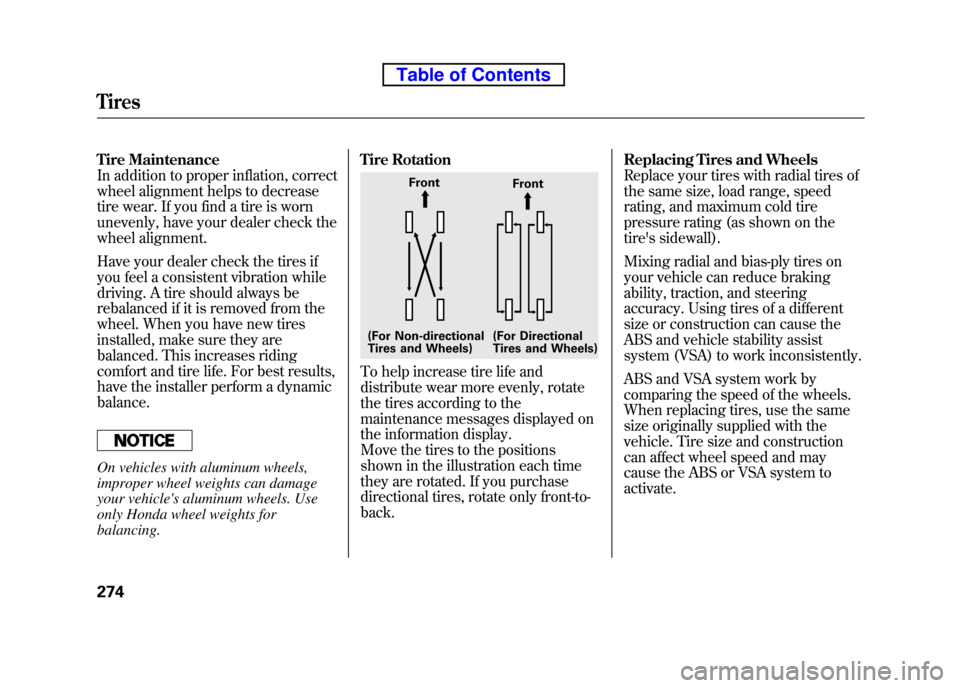
To help increase tire life and
distribute wear more evenly, rotate
the tires according to the
maintenance messages displayed on
the information display.
Move the tires to the positions
shown in the illustration each time
they are rotated. If you purchase
directional tires, rotate only front-to-back.
Replacing Tires and Wheels
Replace your tires with radial tires of
the same size, load range, speed
rating, and maximum cold tire
pressure rating (as shown on the
tire's sidewall).
Mixing radial and bias-ply tires on
your vehicle can reduce braking
ability, traction, and steering
accuracy. Using tires of a different
size or construction can cause the
ABS and vehicle stability assist
system (VSA) to work inconsistently.
ABS and VSA system work by
comparing the speed of the wheels.
When replacing tires, use the same
size originally supplied with the
vehicle. Tire size and construction
can affect wheel speed and may
cause the ABS or VSA system to activate.
Front
Front
(For Non-directional
Tires and Wheels) (For Directional
Tires and Wheels)
Tires
274
Table of Contents
Page 291 of 342
It is best to replace all four tires at
the same time. If that is not possible
or necessary, replace the two front
tires or two rear tires as a pair.
Replacing just one tire can seriously
affect your vehicle's handling.
If you ever replace a wheel, make
sure that the wheel's specifications
match those of the original wheels.
Also be sure you use only TPMS
specific wheels. If you do not, the tire
pressure monitoring system will not work.
Replacement wheels are available at
your dealer.
Installing improper tires on your
vehicle can affect handling and
stability. This can cause a crash
in which you can be seriously
hurt or killed.
Always use the size and type of
tires recommended in this
owner's manual.
Wheel and Tire Specifications Wheels:
(On all models except SC)
16 x 6 1/2JJ
(On SC model)
18 x 7JJ
Tires:
(On all models except SC)
P215/70R16 99S
(On SC model)
P225/55R18 97H See page 311 for DOT tire quality
grading information, and page 313
for tire size and labeling information.
Winter Driving
Tires marked
‘‘M + S’’ or ‘‘All
Season ’’on the sidewall have an all-
weather tread design suitable for
most winter driving conditions.
For the best performance in snowy
or icy conditions, you should install
snow tires or tire chains. They may
be required by local laws under
certain conditions.
Snow Tires
If you mount snow tires on your
vehicle, make sure they are radial
tires of the same size and load range
as original tires. Mount snow tires on
all four wheels. The traction provided
by snow tires on dry roads may be
lower than your original tires. Check
with the tire dealer for maximum
speed recommendations.
CONTINUED
Tires
275
Maintenance
Table of Contents
Page 293 of 342
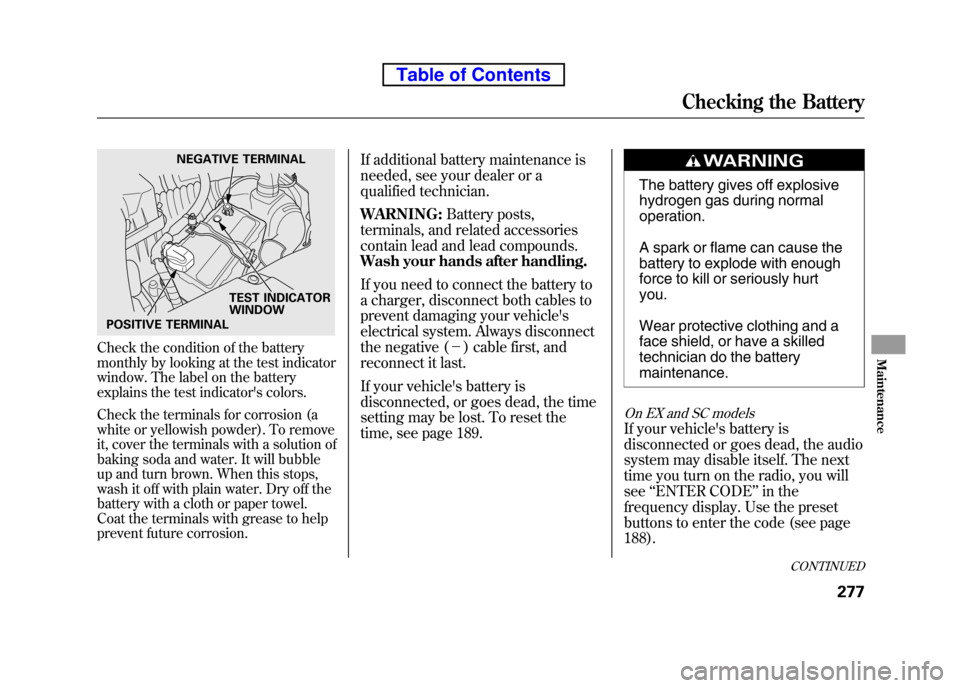
Check the condition of the battery
monthly by looking at the test indicator
window. The label on the battery
explains the test indicator's colors.
Check the terminals for corrosion (a
white or yellowish powder). To remove
it, cover the terminals with a solution of
baking soda and water. It will bubble
up and turn brown. When this stops,
wash it off with plain water. Dry off the
battery with a cloth or paper towel.
Coat the terminals with grease to help
prevent future corrosion.If additional battery maintenance is
needed, see your dealer or a
qualified technician. WARNING:
Battery posts,
terminals, and related accessories
contain lead and lead compounds.
Wash your hands after handling.
If you need to connect the battery to
a charger, disconnect both cables to
prevent damaging your vehicle's
electrical system. Always disconnect
the negative ( -) cable first, and
reconnect it last.
If your vehicle's battery is
disconnected, or goes dead, the time
setting may be lost. To reset the
time, see page 189.
The battery gives off explosive
hydrogen gas during normal operation.
A spark or flame can cause the
battery to explode with enough
force to kill or seriously hurtyou.
Wear protective clothing and a
face shield, or have a skilled
technician do the battery maintenance.
On EX and SC models
If your vehicle's battery is
disconnected or goes dead, the audio
system may disable itself. The next
time you turn on the radio, you willsee ‘‘ENTER CODE ’’in the
frequency display. Use the preset
buttons to enter the code (see page188).
NEGATIVE TERMINAL
TEST INDICATOR WINDOW
POSITIVE TERMINAL
CONTINUED
Checking the Battery
277
Maintenance
Table of Contents
Page 295 of 342

●Cover the vehicle with a ‘‘breathable ’’cover, one made from
a porous material such as cotton.
Non-porous materials, such as
plastic sheeting, trap moisture,
which can damage the paint.
● If possible, periodically run the
engine until it reaches full
operating temperature (the cooling
fans cycle on and off twice).
Preferably, do this once a month.
Vehicle Storage
279
Maintenance
Table of Contents
Page 331 of 342

Driving on a significantly under-
inflated tire causes the tire to
overheat and can lead to tire failure.
Under-inflation also reduces fuel
efficiency and tire tread life, and may
affect the vehicle's handling and
stopping ability.
Please note that the TPMS is not a
substitute for proper tire
maintenance, and it is the driver's
responsibility to maintain correct tire
pressure, even if under-inflation has
not reached the level to trigger
illumination of the TPMS low tire
pressure telltale.Your vehicle has also been equipped
with a TPMS malfunction indicator to
indicate when the system is not
operating properly. The TPMS
malfunction indicator is provided by
a separate telltale, which displays thesymbol
‘‘TPMS ’’when illuminated.
When the malfunction indicator isilluminated,
the system may not be able to detect
or signal low tire pressure asintended.
TPMS malfunctions may occur for a
variety of reasons, including the
installation of replacement or
alternate tires or wheels on the
vehicle that prevent the TPMS from
functioning properly. Always check the TPMS malfunction
telltale after replacing one or more
tires or wheels on your vehicle to
ensure that the replacement or
alternate tires and wheels allow the
TPMS to continue to functionproperly.
Tire Pressure Monitoring System (TPMS)
-Required Federal Explanation
315
Technical Information
Table of Contents