lock HONDA ELEMENT 2010 1.G Manual PDF
[x] Cancel search | Manufacturer: HONDA, Model Year: 2010, Model line: ELEMENT, Model: HONDA ELEMENT 2010 1.GPages: 342, PDF Size: 5.76 MB
Page 255 of 342

Check Out Your Vehicle
Before you leave the pavement, be
sure to do all scheduled maintenance
and service, and inspect your vehicle
for any problems. Pay special
attention to the condition of the tires,
and check the tire pressures.
After you return to the pavement,
carefully inspect your vehicle to
make sure there is no damage that
could make driving it unsafe.
Recheck the condition of the tires
and the tire pressures. Remember
The route presents limits (too steep
or bumpy roads). You have limits
(driving skill and comfort). And your
vehicle has limits (traction, stability,
and power).
Driving off-highway can be
hazardous if you fail to recognize
limits and take the properprecautions.Accelerating and Braking
For better traction on all surfaces,
accelerate slowly and gradually build
up speed. If you try to start too fast
on wet soil, mud, snow, or ice, you
might not have enough traction to
get underway, and you may dig
yourself a hole. Starting with the shift
lever in second (2) gear will help you
have a smoother start on snow or ice.
Keep in mind that you will usually
need more time and distance to
brake to a stop on unpaved surfaces.
Avoid hard braking. Do not
‘‘pump ’’
the brakes; let the anti-lock braking
system pump them for you. Avoiding Obstacles
Debris on the road can damage your
suspension or other components.
Because your vehicle has a high
center of gravity, driving over a large
obstacle, or allowing a wheel to drop
into a deep hole can cause your
vehicle to tip or roll over.
Driving on Slopes
If you can't clearly see all conditions
or obstacles on a slope, walk the
slope before you drive on it. If you
have any doubt whether or not you
can safely drive on the slope, don't
do it. Find another route.
If you are driving up a hill and find
that you cannot continue,
do not try to
turn around.
Your vehicle could roll
over. Slowly back down the hill,
following the same route you took up
the hill.
CONTINUED
Off-Highway Driving Guidelines
239
Driving
Table of Contents
Page 269 of 342
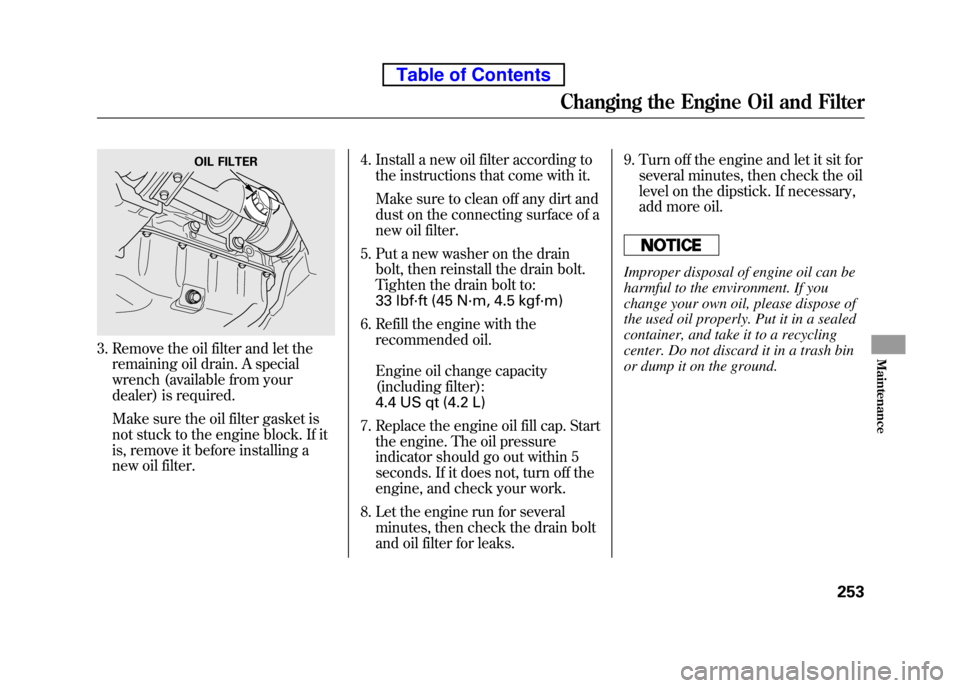
3. Remove the oil filter and let theremaining oil drain. A special
wrench (available from your
dealer) is required.
Make sure the oil filter gasket is
not stuck to the engine block. If it
is, remove it before installing a
new oil filter. 4. Install a new oil filter according to
the instructions that come with it.
Make sure to clean off any dirt and
dust on the connecting surface of a
new oil filter.
5. Put a new washer on the drain bolt, then reinstall the drain bolt.
Tighten the drain bolt to:
33 lbf·ft (45 N·m, 4.5 kgf·m)
6. Refill the engine with the recommended oil.
Engine oil change capacity
(including filter):
4.4 US qt (4.2 L)
7. Replace the engine oil fill cap. Start the engine. The oil pressure
indicator should go out within 5
seconds. If it does not, turn off the
engine, and check your work.
8. Let the engine run for several minutes, then check the drain bolt
and oil filter for leaks. 9. Turn off the engine and let it sit for
several minutes, then check the oil
level on the dipstick. If necessary,
add more oil.
Improper disposal of engine oil can be
harmful to the environment. If you
change your own oil, please dispose of
the used oil properly. Put it in a sealed
container, and take it to a recycling
center. Do not discard it in a trash bin
or dump it on the ground.
OIL FILTER
Changing the Engine Oil and Filter
253
Maintenance
Table of Contents
Page 271 of 342
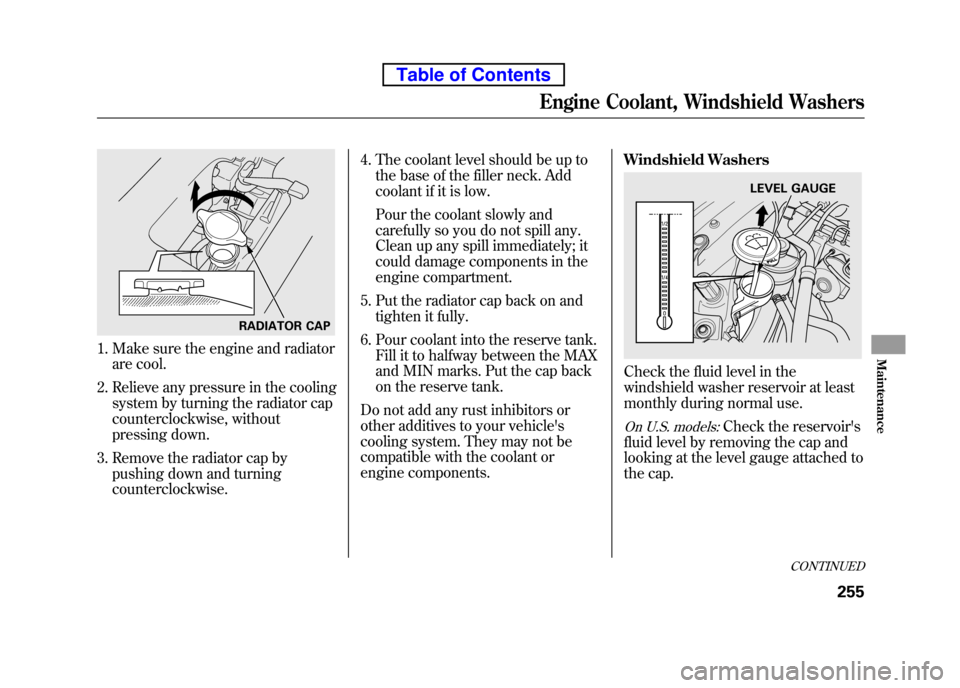
1. Make sure the engine and radiatorare cool.
2. Relieve any pressure in the cooling system by turning the radiator cap
counterclockwise, without
pressing down.
3. Remove the radiator cap by pushing down and turning
counterclockwise. 4. The coolant level should be up to
the base of the filler neck. Add
coolant if it is low.
Pour the coolant slowly and
carefully so you do not spill any.
Clean up any spill immediately; it
could damage components in the
engine compartment.
5. Put the radiator cap back on and tighten it fully.
6. Pour coolant into the reserve tank. Fill it to halfway between the MAX
and MIN marks. Put the cap back
on the reserve tank.
Do not add any rust inhibitors or
other additives to your vehicle's
cooling system. They may not be
compatible with the coolant or
engine components. Windshield Washers
Check the fluid level in the
windshield washer reservoir at least
monthly during normal use.
On U.S. models:Check the reservoir's
fluid level by removing the cap and
looking at the level gauge attached to
the cap.
RADIATOR CAP
LEVEL GAUGE
CONTINUED
Engine Coolant, Windshield Washers
255
Maintenance
Table of Contents
Page 276 of 342
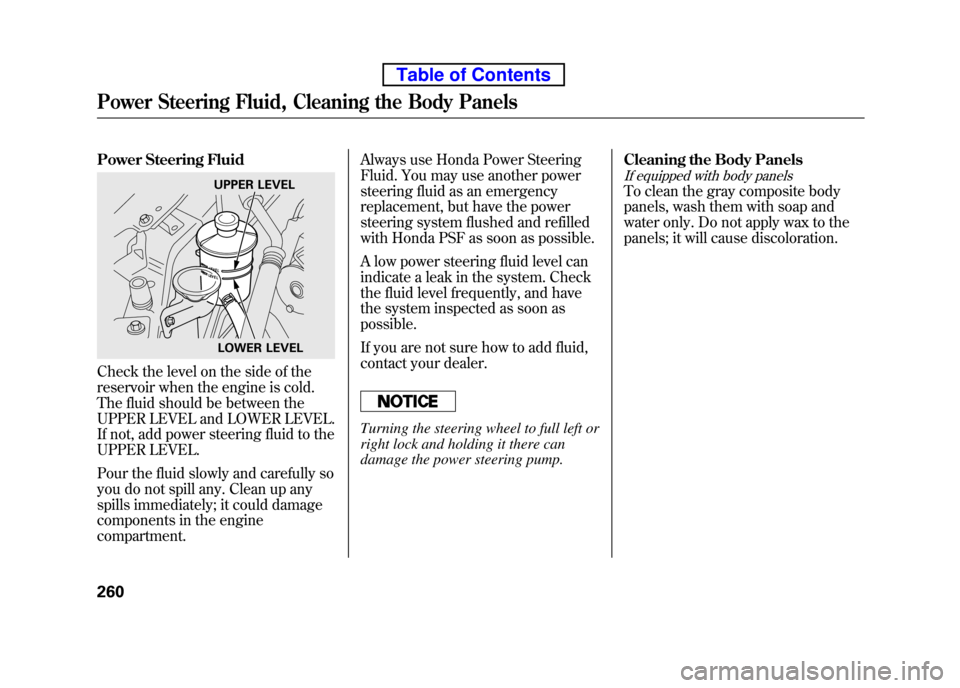
Power Steering Fluid
Check the level on the side of the
reservoir when the engine is cold.
The fluid should be between the
UPPER LEVEL and LOWER LEVEL.
If not, add power steering fluid to the
UPPER LEVEL.
Pour the fluid slowly and carefully so
you do not spill any. Clean up any
spills immediately; it could damage
components in the engine compartment.Always use Honda Power Steering
Fluid. You may use another power
steering fluid as an emergency
replacement, but have the power
steering system flushed and refilled
with Honda PSF as soon as possible.
A low power steering fluid level can
indicate a leak in the system. Check
the fluid level frequently, and have
the system inspected as soon aspossible.
If you are not sure how to add fluid,
contact your dealer.
Turning the steering wheel to full left or
right lock and holding it there can
damage the power steering pump.
Cleaning the Body Panels
If equipped with body panels
To clean the gray composite body
panels, wash them with soap and
water only. Do not apply wax to the
panels; it will cause discoloration.UPPER LEVEL
LOWER LEVEL
Power Steering Fluid, Cleaning the Body Panels
260
Table of Contents
Page 278 of 342
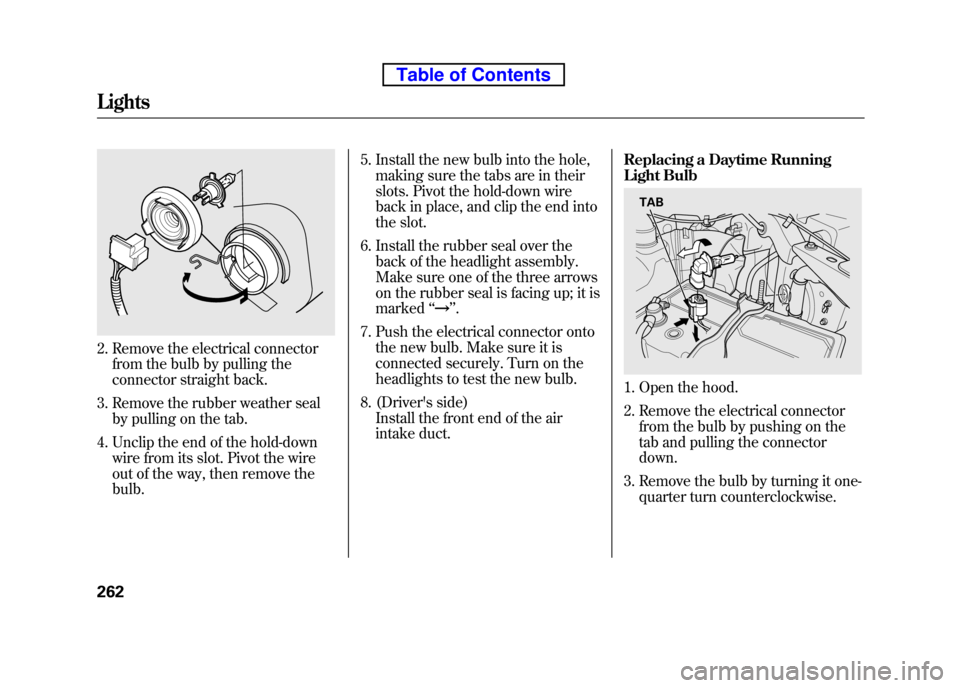
2. Remove the electrical connectorfrom the bulb by pulling the
connector straight back.
3. Remove the rubber weather seal by pulling on the tab.
4. Unclip the end of the hold-down wire from its slot. Pivot the wire
out of the way, then remove thebulb. 5. Install the new bulb into the hole,
making sure the tabs are in their
slots. Pivot the hold-down wire
back in place, and clip the end into
the slot.
6. Install the rubber seal over the back of the headlight assembly.
Make sure one of the three arrows
on the rubber seal is facing up; it ismarked ‘‘
’’.
7. Push the electrical connector onto the new bulb. Make sure it is
connected securely. Turn on the
headlights to test the new bulb.
8. (Driver's side) Install the front end of the air
intake duct. Replacing a Daytime Running
Light Bulb
1. Open the hood.
2. Remove the electrical connector
from the bulb by pushing on the
tab and pulling the connectordown.
3. Remove the bulb by turning it one- quarter turn counterclockwise.
TAB
Lights
262
Table of Contents
Page 279 of 342
4. Insert the new bulb into the hole,and turn it one-quarter turn
clockwise to lock it in place.
5. Push the electrical connector back onto the bulb. Make sure it is on
all the way.
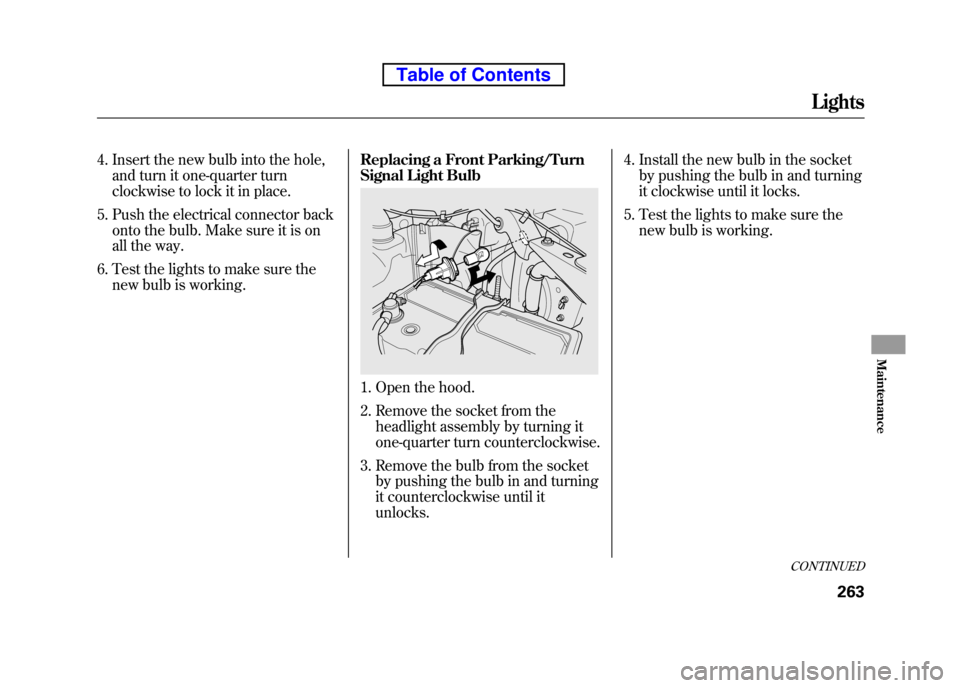
6. Test the lights to make sure the new bulb is working. Replacing a Front Parking/Turn
Signal Light Bulb
1. Open the hood.
2. Remove the socket from the
headlight assembly by turning it
one-quarter turn counterclockwise.
3. Remove the bulb from the socket by pushing the bulb in and turning
it counterclockwise until itunlocks. 4. Install the new bulb in the socket
by pushing the bulb in and turning
it clockwise until it locks.
5. Test the lights to make sure the new bulb is working.
CONTINUED
Lights
263
Maintenance
Table of Contents
Page 280 of 342
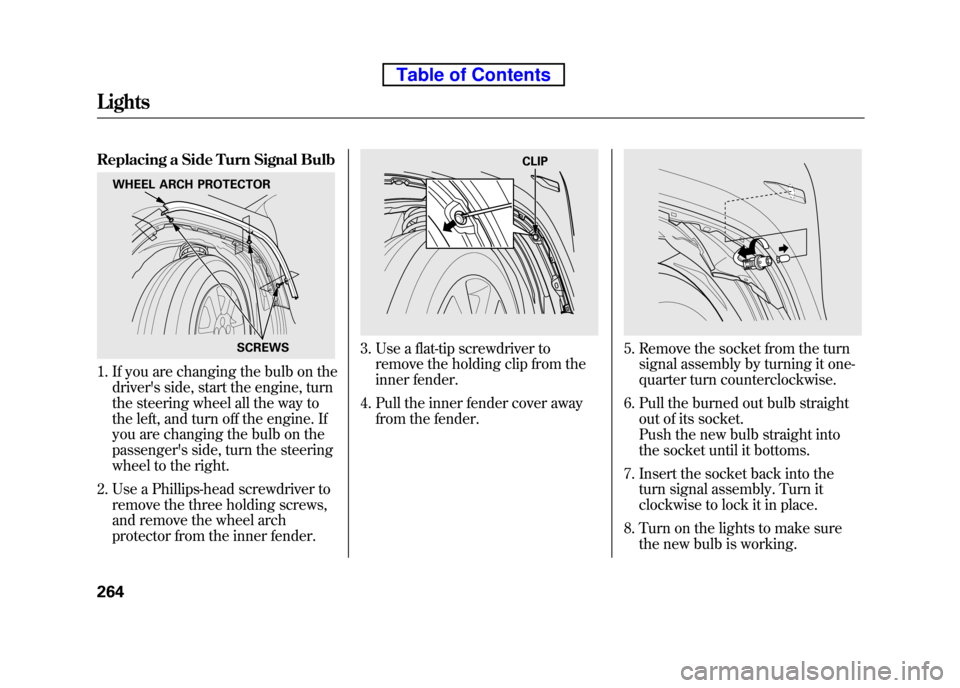
Replacing a Side Turn Signal Bulb
1. If you are changing the bulb on thedriver's side, start the engine, turn
the steering wheel all the way to
the left, and turn off the engine. If
you are changing the bulb on the
passenger's side, turn the steering
wheel to the right.
2. Use a Phillips-head screwdriver to remove the three holding screws,
and remove the wheel arch
protector from the inner fender.
3. Use a flat-tip screwdriver toremove the holding clip from the
inner fender.
4. Pull the inner fender cover away from the fender.5. Remove the socket from the turnsignal assembly by turning it one-
quarter turn counterclockwise.
6. Pull the burned out bulb straight out of its socket.
Push the new bulb straight into
the socket until it bottoms.
7. Insert the socket back into the turn signal assembly. Turn it
clockwise to lock it in place.
8. Turn on the lights to make sure the new bulb is working.
WHEEL ARCH PROTECTOR
SCREWS
CLIP
Lights
264
Table of Contents
Page 281 of 342
9. Put the inner fender cover in place.Install the holding clip.
Lock the clip in place by pushing
on the center.
Install the wheel arch protector
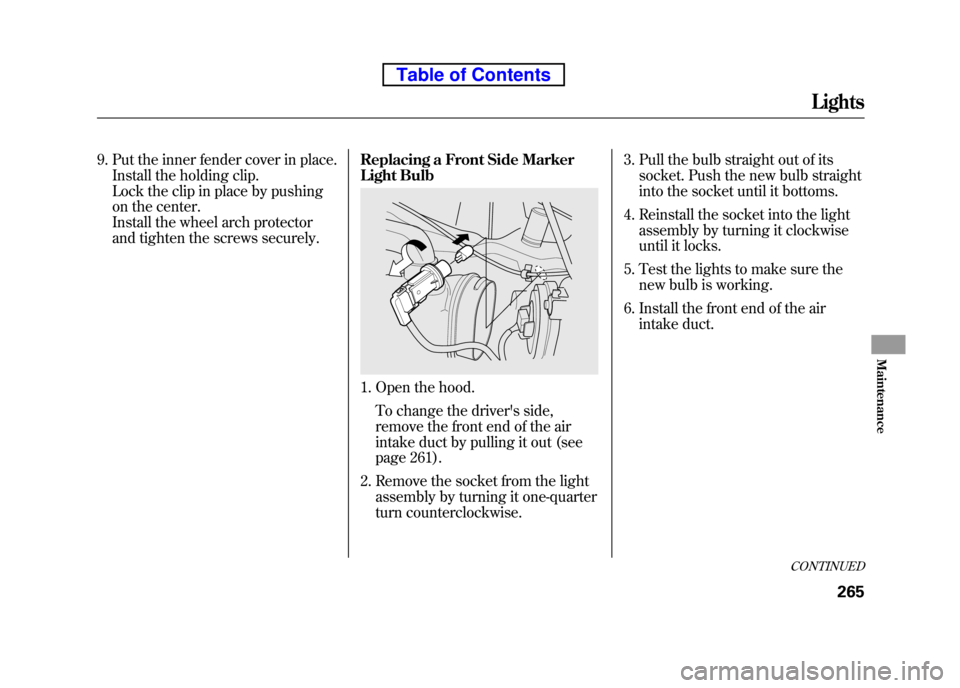
and tighten the screws securely. Replacing a Front Side Marker
Light Bulb
1. Open the hood.
To change the driver's side,
remove the front end of the air
intake duct by pulling it out (see
page 261).
2. Remove the socket from the light assembly by turning it one-quarter
turn counterclockwise. 3. Pull the bulb straight out of its
socket. Push the new bulb straight
into the socket until it bottoms.
4. Reinstall the socket into the light assembly by turning it clockwise
until it locks.
5. Test the lights to make sure the new bulb is working.
6. Install the front end of the air intake duct.
CONTINUED
Lights
265
Maintenance
Table of Contents
Page 282 of 342
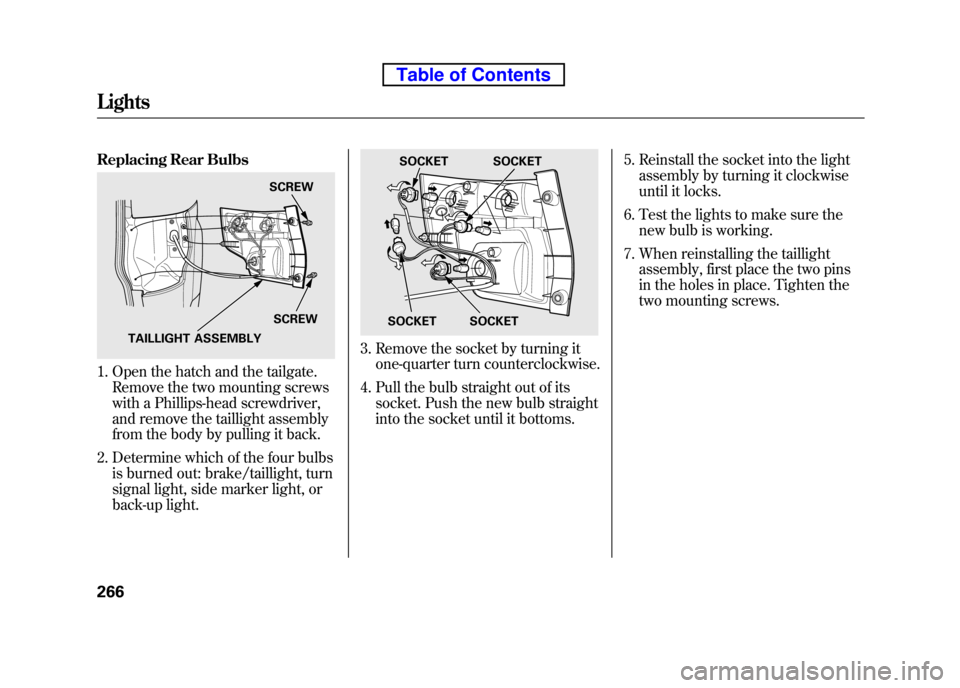
Replacing Rear Bulbs
1. Open the hatch and the tailgate.Remove the two mounting screws
with a Phillips-head screwdriver,
and remove the taillight assembly
from the body by pulling it back.
2. Determine which of the four bulbs is burned out: brake/taillight, turn
signal light, side marker light, or
back-up light.
3. Remove the socket by turning itone-quarter turn counterclockwise.
4. Pull the bulb straight out of its socket. Push the new bulb straight
into the socket until it bottoms. 5. Reinstall the socket into the light
assembly by turning it clockwise
until it locks.
6. Test the lights to make sure the new bulb is working.
7. When reinstalling the taillight assembly, first place the two pins
in the holes in place. Tighten the
two mounting screws.
SCREW
SCREW
TAILLIGHT ASSEMBLY
SOCKET SOCKET
SOCKET
SOCKET
Lights
266
Table of Contents
Page 283 of 342
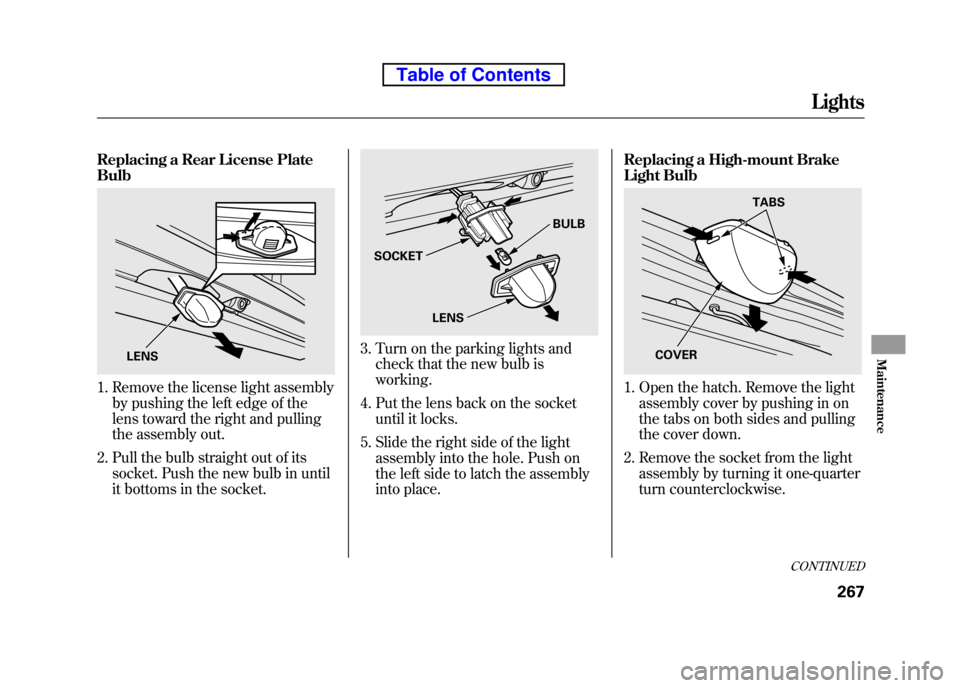
Replacing a Rear License Plate Bulb
1. Remove the license light assemblyby pushing the left edge of the
lens toward the right and pulling
the assembly out.
2. Pull the bulb straight out of its socket. Push the new bulb in until
it bottoms in the socket.
3. Turn on the parking lights andcheck that the new bulb is working.
4. Put the lens back on the socket until it locks.
5. Slide the right side of the light assembly into the hole. Push on
the left side to latch the assembly
into place. Replacing a High-mount Brake
Light Bulb
1. Open the hatch. Remove the light
assembly cover by pushing in on
the tabs on both sides and pulling
the cover down.
2. Remove the socket from the light assembly by turning it one-quarter
turn counterclockwise.
LENS
SOCKET BULB
LENS
TABS
COVER
CONTINUED
Lights
267
Maintenance
Table of Contents