glove box HONDA ELEMENT 2010 1.G Owners Manual
[x] Cancel search | Manufacturer: HONDA, Model Year: 2010, Model line: ELEMENT, Model: HONDA ELEMENT 2010 1.GPages: 342, PDF Size: 5.76 MB
Page 5 of 342

Trip meter................................ 66
Gearshift Lever Positions
Automatic Transmission ....................... 219
Manual Transmission ..............217
Glove Box .................................. 100
Gross Axle Weight Rating
(GAWR) ................................. 232
Gross Vehicle Weight Rating (GVWR) .......................... 209, 232
H
Halogen Headlight Bulbs ...........261
Hatch ........................................... 81
Hazard Warning Flashers ............73
Headlights Aiming .................................... 261
Daytime Running Lights ..........72
High Beam Indicator ................61
High Beams, Turning on ..........71
Lights On Indicator ..................61
Low Beams, Turning on ...........71
Reminder Chime ......................71
Replacing Halogen Bulbs ........261 Turning on
............................... 71
Head Restraints ............................ 85
Heating and Cooling ..................104
High Altitude, Starting at ............216
Hood, Opening and Closing the .......................................... 200
Horn ........................................ 4, 69
Hydraulic Clutch ........................258
I
Identification Number, Vehicle ................................... 306
Ignition
Keys ......................................... 75
Switch ...................................... 79
Immobilizer System .....................76
Important Safety Precautions .........6
Indicators, Instrument Panel ........57
ABS (Anti-lock Brake) .......59, 226
Brake (Parking and Brake
System) ......................... 58, 297
Charging System ..............58, 295
Cruise Control .......................... 60
Cruise Main ............................. 60Door and Tailgate Open
...........61
DRL (Daytime Running
Lights) .................................. 60
High Beam ............................... 61
Key (Immobilizer System) .......60
Lights On ................................. 61
Low Fuel .................................. 61
Low Oil Pressure ..............58, 295
Low Tire Pressure .............62, 227
Maintenance Minder .........59, 243
Malfunction Indicator
Lamp ............................. 58, 296
Passenger Airbag Off ...............32
Seat Belt Reminder .............18, 58
Side Airbag Off ....................32, 59
SRS ..................................... 31, 59
TPMS ................................ 63, 228
Turn Signal and Hazard Warning ............................... 60
VSA OFF .................................. 62
VSA System ............................. 62
Washer Level ........................... 61
Individual Map Lights ..................95
Infant Restraint ............................ 40
CONTINUED
Index
V
INDEX
Page 6 of 342

Infant Seats.................................. 40
Tether Anchorage Point ...........48
Inflation, Proper Tire ..................271
Recommended Pressures .......272
Inside Mirror ............................... 93
Inspection, Tire .......................... 273
Installing a Child Seat ..................43
Instrument Panel ..........................57
Instrument Panel Brightness .......72
Instruments and Controls .............55
Interior Lights .............................. 95
Introduction ................................... i
iPod
®.......................................... 162
iPod®Error Messages ................172
J
Jacking up the Vehicle ...............283
Jack, Tire ................................... 283
Jump Starting ............................. 291
K
Keys ............................................. 75L
Label, Certification
.....................306
Lane Change, Signaling ...............71
Lap/Shoulder Belt .................14, 19
LATCH Anchorage System ..........44
Light Control Switch ....................95
Lights
Bulb Replacement ...................261
Indicator ................................... 57
Interior ..................................... 95
Parking .................................... 71
Turn Signal .............................. 71
Load Limit .................................. 208
LOCK (Ignition Key Position) ......79
Locks
Anti-theft Steering Column .......79
Fuel Fill Door .......................... 199
Glove Box ............................... 100
Hatch ....................................... 81
Lockout Prevention ..................81
Power Door .............................. 80
Tailgate .................................... 82
Low Coolant Level ......................201
Lower Anchors ............................. 44Low Fuel Indicator
.......................61
Low Oil Pressure
Indicator ........................... 58, 295
Lubricant Specifications Chart ...309
Luggage, Storing (cargo) ...........207
M
Maintenance .............................. 241
Main Items and Sub Items ......246
Minder .................................... 243
Minder Indicator ......................59
Owner's Maintenance
Checks ................................ 248
Safety ...................................... 242
Schedule ................................. 249
Malfunction Indicator Lamp ................................ 58, 296
Manual Transmission .................217
Checking Fluid Level ..............257
Shifting ................................... 217
Manual Transmission Fluid .......257
Meters, Gauges ............................ 64
Methanol in Gasoline .................198
Mirrors, Adjusting ........................93
Index
VI
Page 71 of 342
This section gives information about
the controls and displays that
contribute to the daily operation of
your vehicle. All the essential
controls are within easy reach.
Control Locations..........................56
Instrument Panel ..........................
57
Instrument Panel Indicators ..........58
Gauges ..........................................
64
Information Display ..................65
Odometer ..................................
65
Trip Meter ................................ 66
Fuel Gauge ............................... 66
Check Fuel Cap Message .........
66
Temperature Gauge ..................67
Maintenance Minder ................
67
Outside Temperature Indicator ............................... 68Controls Near the Steering
Wheel ....................................... 69
Windshield Wipers and Washers .................................... 70
Turn Signals and Headlights .........71
Instrument Panel Brightness ........
72
Hazard Warning Button ................73
Rear Window Defogger .................74
Steering Wheel Adjustment ..........
74
Keys and Locks ............................. 75
Immobilizer System ......................
76
Remote Transmitter ......................77
Ignition Switch ..............................
79
Door Locks ................................... 80
Power Door Locks ....................
80
Rear Doors ................................ 81
Hatch ........................................ 81
Tailgate .....................................
82
Seats ............................................. 83
Seat Adjustments ......................
83
Driver's Seat Height Adjustment ........................... 84
Front Seat Armrests ..................85
Head Restraints ......................... 85Reclining the Front Seats
..........
87
Folding the Rear Seats ..............
88
Removing the Rear Seats ..........90
Power Windows ............................
92
Mirrors ......................................... 93
Adjusting the Power Mirrors .....
93
Rear Windows ............................... 94
Parking Brake ............................... 94
Interior Lights ...............................
95
Light Control Switch .................95
Individual Map Lights ...............
95
Courtesy Light .......................... 96
Ceiling Light .............................
96
Cargo Area Light .......................96
Ignition Switch Light .................
96
Interior Convenience Items ...........97
Cooler Box ................................ 98
Beverage Holders .....................
99
Accessory Power Sockets .......100
Glove Box ...............................
100
Sun Visor ................................ 100
Vanity Mirror ..........................
101
Overhead Console ..................101
Instruments and Controls
55
Instruments and Controls
Page 91 of 342
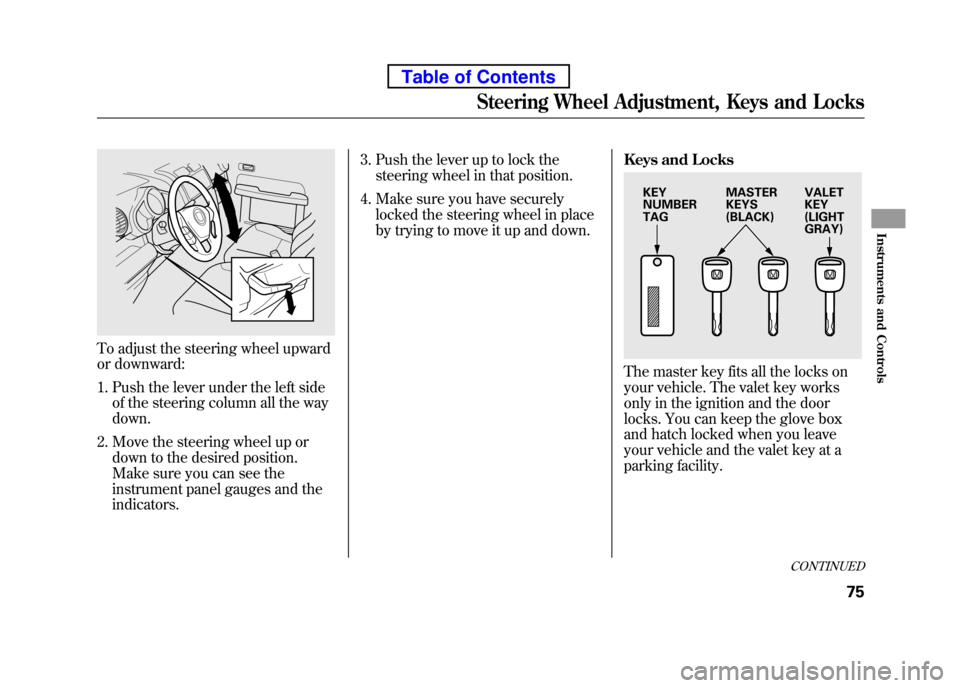
To adjust the steering wheel upward
or downward:1. Push the lever under the left side of the steering column all the way down.
2. Move the steering wheel up or down to the desired position.
Make sure you can see the
instrument panel gauges and theindicators. 3. Push the lever up to lock the
steering wheel in that position.
4. Make sure you have securely locked the steering wheel in place
by trying to move it up and down. Keys and Locks
The master key fits all the locks on
your vehicle. The valet key works
only in the ignition and the door
locks. You can keep the glove box
and hatch locked when you leave
your vehicle and the valet key at a
parking facility.
KEY NUMBERTAG
MASTER
KEYS
(BLACK)VALETKEY(LIGHTGRAY)
CONTINUED
Steering Wheel Adjustment, Keys and Locks
75
Instruments and Controls
Table of Contents
Page 113 of 342
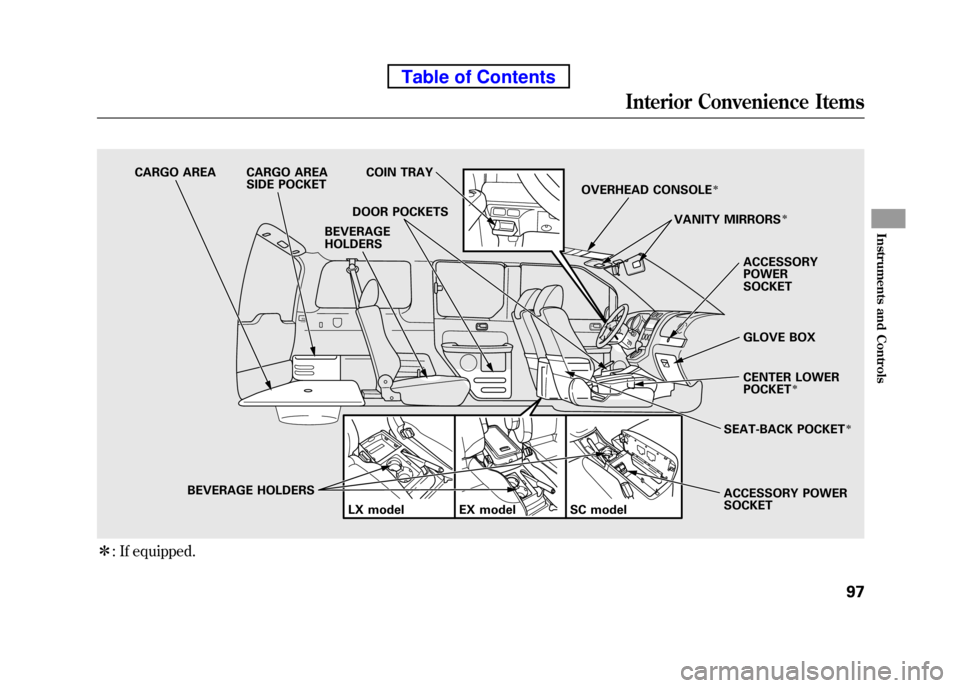
ꭧ: If equipped.
CARGO AREA CARGO AREA
SIDE POCKET COIN TRAY
DOOR POCKETS
BEVERAGE HOLDERS LX model EX model OVERHEAD CONSOLEꭧ
ACCESSORY POWERSOCKET
GLOVE BOX
CENTER LOWER POCKET
ꭧ
SEAT-BACK POCKETꭧ
ACCESSORY POWER SOCKET
VANITY MIRRORS
ꭧ
SC model
BEVERAGE
HOLDERS
Interior Convenience Items
97
Instruments and Controls
Table of Contents
Page 116 of 342
Accessory Power Sockets
Your vehicle has one, two, or three
accessory power sockets, depending
on the model. All models have a front
accessory power socket on the
dashboard above the glove box.
EX and SC models have an accessory
power socket in the cargo area on
the passenger's side.
The SC model has one additional
socket in the center console.
These sockets are intended to supply
power for 12 volt DC accessories that
are rated 120 watts or less (10 amps).
None of the sockets will power an
automotive type cigarette lighter
element. When more than one
socket is being used, the combined
power rating of the accessories
should be 120 watts or less (10 amps).Glove Box
Open the glove box by pulling the
bottom of the handle. Close it with a
firm push. Lock or unlock the glove
box with the master key.
An open glove box can cause
serious injury to your passenger
in a crash, even if the
passenger is wearing the seat belt.
Always keep the glove box
closed while driving.
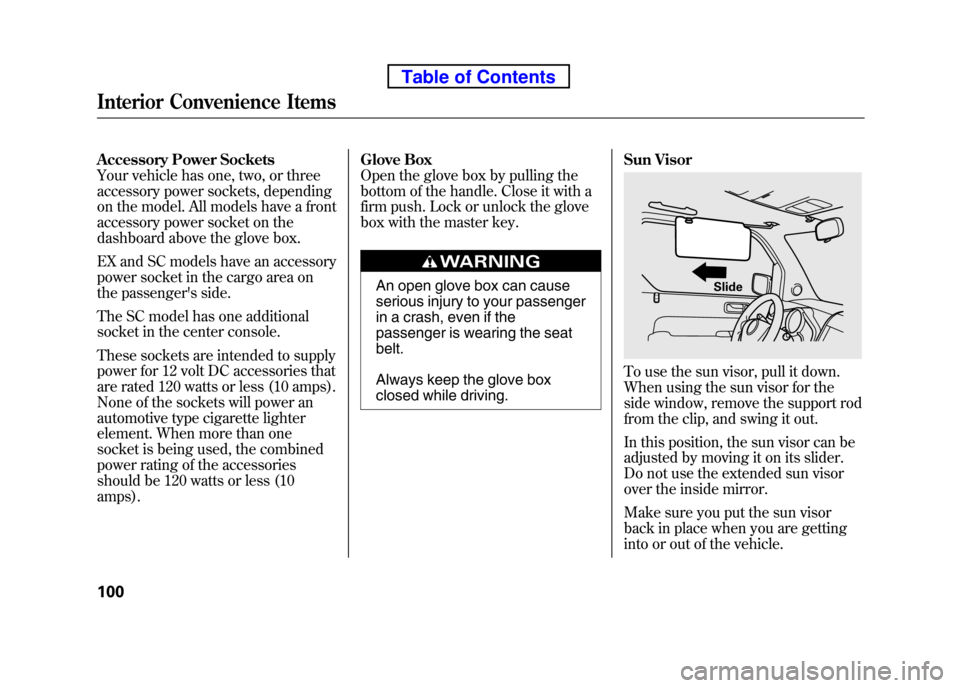
Sun Visor
To use the sun visor, pull it down.
When using the sun visor for the
side window, remove the support rod
from the clip, and swing it out.
In this position, the sun visor can be
adjusted by moving it on its slider.
Do not use the extended sun visor
over the inside mirror.
Make sure you put the sun visor
back in place when you are getting
into or out of the vehicle.
Slide
Interior Convenience Items
100
Table of Contents
Page 179 of 342

To Play an iPod®
This audio system can select and
play the audio files on the iPod®with
the same controls used for the
in-dash disc player. To play an iPod,
connect it to the USB adapter cable
in the glove box by using your dock
connector. Press the AUDIO button
beside the screen to show the audio
display and touch the AUX icon. The
ignition switch must be in the
ACCESSORY (I) or ON (II) position.
The iPod will also be recharged with
the ignition switch in these positions.
You can also select an icon by
moving the joystick. Move it to left,
right, up, or down to change the
highlighting and scroll through lists,
then press ENT on the top of the
joystick to set your selection. To select the USB mode without
using the icon, press the CD/XM
button repeatedly. The status bar
appears on the bottom of the screen.
The audio system reads and plays
sound files to be playable on the
iPod. The system cannot operate an
iPod as a mass storage device. The
system will only play songs stored on
the iPod with iTunes.
iPod and iTunes are registered
trademarks owned by Apple Inc.
Voice Control System
You can select the AUX mode by
using the navigation system voice
control buttons, but cannot operate
the play mode functions.
iPods compatible with your audio
system using the USB adapter cable are:
Model Software
iPod classic Ver. 1.0 or more
iPod with video
(iPod 5th generation) Ver. 1.2 or more
iPod nano Ver. 1.2 or more
iPod nano 2nd generation Ver. 1.1.2 or more
iPod nano 3rd generation Ver. 1.0 or more
iPod nano 4thgeneration Ver. 1.0.2 or more
iPod touch Ver. 1.1.1 or more
iPod touch 2nd generation Ver. 2.1.1 or more
CONTINUED
Playing an iPod®(Models with navigation system)
163
Features
Table of Contents
Page 180 of 342
Use only compatible iPods with the
latest software. iPods that are not
compatible will not work in this audiounit. NOTE:● Do not connect your iPod using a HUB.
● Do not keep the iPod in the
vehicle. Direct sunlight and high
heat will damage it.
● Do not use an extension cable
between the USB adapter cable
equipped with your vehicle and
your dock connector.
● We recommend backing up your
data before playing it.
● Some devices cannot be powered
or charged via the USB adapter. If
this is the case, use the accessory
adapter to supply power to yourdevice. In AAC format, DRM (digital rights
management) files cannot be played.
If the system finds a DRM file, the
audio unit displays UNPLAYABLE,
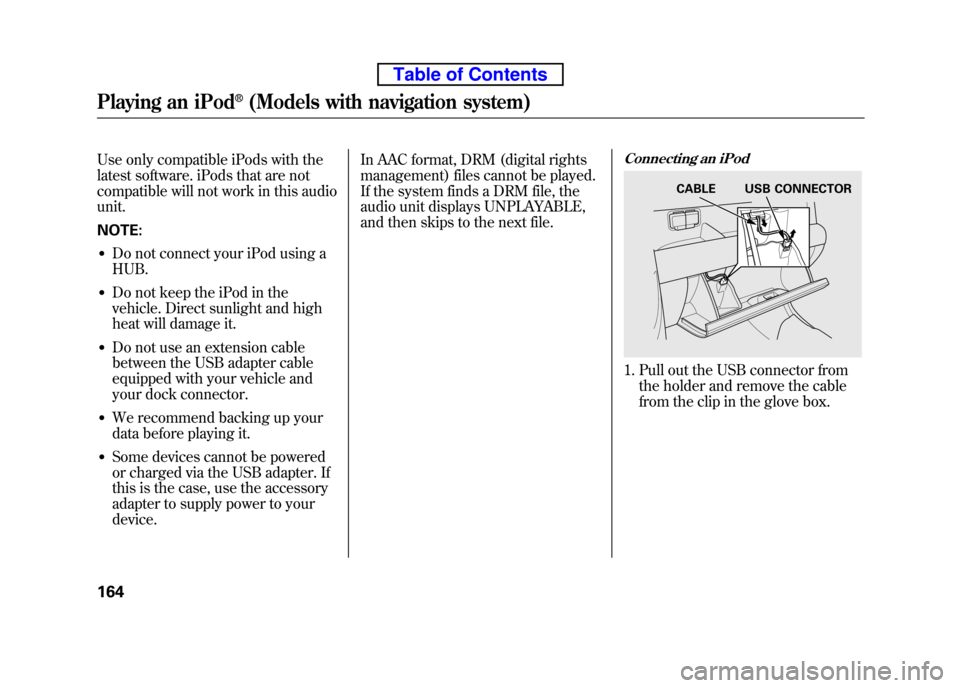
and then skips to the next file.Connecting an iPod
1. Pull out the USB connector from
the holder and remove the cable
from the clip in the glove box.
CABLE USB CONNECTOR
Playing an iPod®(Models with navigation system)
164
Table of Contents
Page 190 of 342

To Play a USB Flash Memory Device
This audio system can select and
play the audio files from a USB flash
memory device with the same
controls used for the in-dash disc
player. To play a USB flash memory
device, connect it to the USB adapter
cable in the glove box. The ignition
switch must be in the ACCESSORY
(I) or ON (II) position. Press the
AUDIO button beside the screen to
show the audio display and touch the
AUX icon.
You can also select an icon by
moving the joystick. Move it to left,
right, up, or down to change the
highlighting and scroll through lists,
then press ENT on the top of the
joystick to set your selection.To select the USB mode without
using the icon, press the CD/XM
button repeatedly. The status bar
appears on the bottom of the screen.
The audio system reads and plays
the audio files on the USB flash
memory device in MP3, WMA orAAC
ꭧformats. Depending on the
format, the display shows MP3,
WMA or AAC when a USB flash
memory device is playing. The USB
flash memory device limit is up to
700 folders or up to 65535 files. ꭧ : Only AAC format files recorded
with iTunes are playable on this
audio unit. The recommended USB flash
memory devices are 256 MB or
higher and formatted with the FAT
file system. Some digital audio
players may be compatible as well.
Some USB flash memory devices
(such as devices with security lock-
out features, etc.) will not work in
this audio unit.
Playing a USB Flash Memory Device (Models with navigation system)
174
Table of Contents
Page 193 of 342
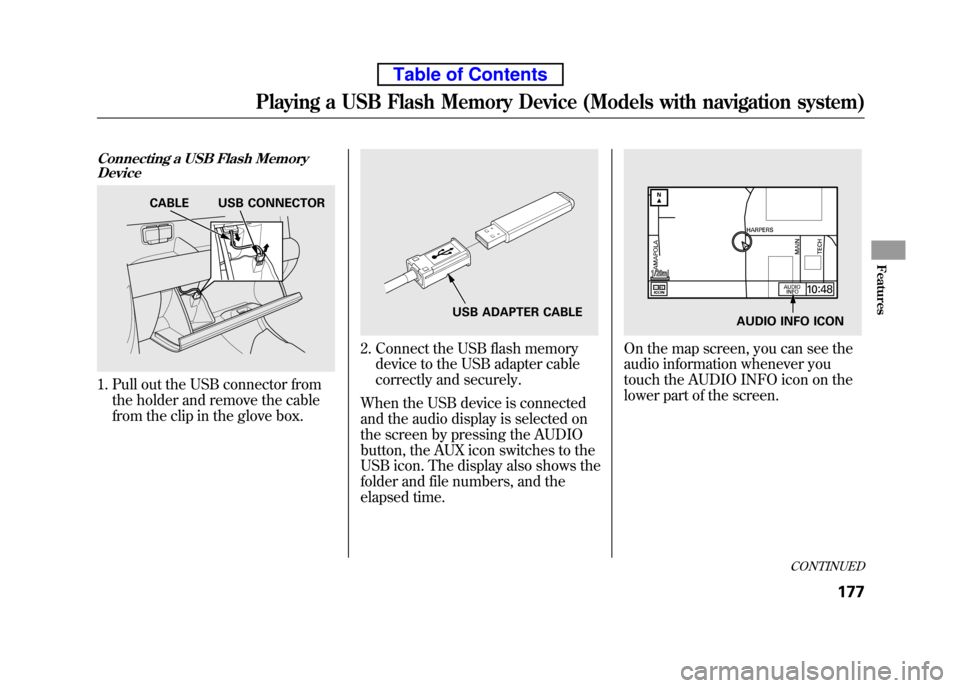
Connecting a USB Flash MemoryDevice
1. Pull out the USB connector from
the holder and remove the cable
from the clip in the glove box.
2. Connect the USB flash memorydevice to the USB adapter cable
correctly and securely.
When the USB device is connected
and the audio display is selected on
the screen by pressing the AUDIO
button, the AUX icon switches to the
USB icon. The display also shows the
folder and file numbers, and the
elapsed time.On the map screen, you can see the
audio information whenever you
touch the AUDIO INFO icon on the
lower part of the screen.
CABLE USB CONNECTOR
USB ADAPTER CABLEAUDIO INFO ICON
CONTINUED
Playing a USB Flash Memory Device (Models with navigation system)
177
Features
Table of Contents