jacking HONDA ELEMENT 2010 1.G Owners Manual
[x] Cancel search | Manufacturer: HONDA, Model Year: 2010, Model line: ELEMENT, Model: HONDA ELEMENT 2010 1.GPages: 342, PDF Size: 5.76 MB
Page 6 of 342

Infant Seats.................................. 40
Tether Anchorage Point ...........48
Inflation, Proper Tire ..................271
Recommended Pressures .......272
Inside Mirror ............................... 93
Inspection, Tire .......................... 273
Installing a Child Seat ..................43
Instrument Panel ..........................57
Instrument Panel Brightness .......72
Instruments and Controls .............55
Interior Lights .............................. 95
Introduction ................................... i
iPod
®.......................................... 162
iPod®Error Messages ................172
J
Jacking up the Vehicle ...............283
Jack, Tire ................................... 283
Jump Starting ............................. 291
K
Keys ............................................. 75L
Label, Certification
.....................306
Lane Change, Signaling ...............71
Lap/Shoulder Belt .................14, 19
LATCH Anchorage System ..........44
Light Control Switch ....................95
Lights
Bulb Replacement ...................261
Indicator ................................... 57
Interior ..................................... 95
Parking .................................... 71
Turn Signal .............................. 71
Load Limit .................................. 208
LOCK (Ignition Key Position) ......79
Locks
Anti-theft Steering Column .......79
Fuel Fill Door .......................... 199
Glove Box ............................... 100
Hatch ....................................... 81
Lockout Prevention ..................81
Power Door .............................. 80
Tailgate .................................... 82
Low Coolant Level ......................201
Lower Anchors ............................. 44Low Fuel Indicator
.......................61
Low Oil Pressure
Indicator ........................... 58, 295
Lubricant Specifications Chart ...309
Luggage, Storing (cargo) ...........207
M
Maintenance .............................. 241
Main Items and Sub Items ......246
Minder .................................... 243
Minder Indicator ......................59
Owner's Maintenance
Checks ................................ 248
Safety ...................................... 242
Schedule ................................. 249
Malfunction Indicator Lamp ................................ 58, 296
Manual Transmission .................217
Checking Fluid Level ..............257
Shifting ................................... 217
Manual Transmission Fluid .......257
Meters, Gauges ............................ 64
Methanol in Gasoline .................198
Mirrors, Adjusting ........................93
Index
VI
Page 301 of 342

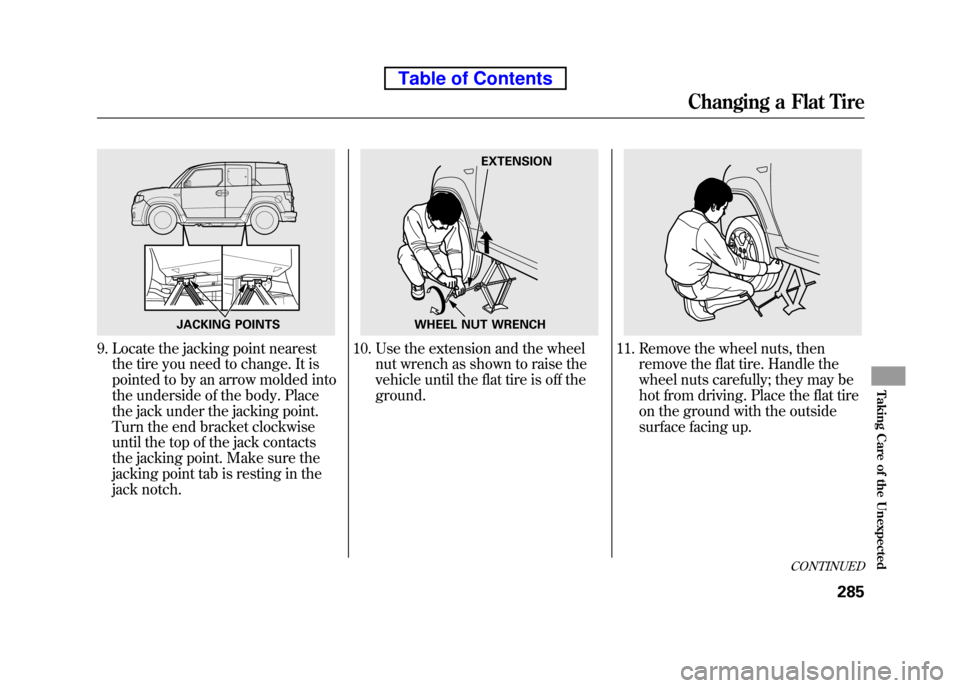
9. Locate the jacking point nearestthe tire you need to change. It is
pointed to by an arrow molded into
the underside of the body. Place
the jack under the jacking point.
Turn the end bracket clockwise
until the top of the jack contacts
the jacking point. Make sure the
jacking point tab is resting in the
jack notch.10. Use the extension and the wheel nut wrench as shown to raise the
vehicle until the flat tire is off theground.11. Remove the wheel nuts, thenremove the flat tire. Handle the
wheel nuts carefully; they may be
hot from driving. Place the flat tire
on the ground with the outside
surface facing up.
JACKING POINTS
EXTENSION
WHEEL NUT WRENCH
CONTINUED
Changing a Flat Tire
285
Taking Care of the Unexpected
Table of Contents