washer fluid HONDA ELEMENT 2010 1.G Owners Manual
[x] Cancel search | Manufacturer: HONDA, Model Year: 2010, Model line: ELEMENT, Model: HONDA ELEMENT 2010 1.GPages: 342, PDF Size: 5.76 MB
Page 4 of 342

EngineAdding Engine Coolant ...........254
Coolant Temperature Gauge ....67
If it Won't Start ........................289
Malfunction Indicator Lamp ............................. 58, 296
Oil Life Indicator .....................243
Oil Pressure Indicator .......58, 295
Oil, What Kind to Use .............251
Overheating ............................ 293
Specifications .......................... 308
Speed Limiter ..................218, 221
Starting ................................... 216
Engine Coolant .......................... 254
Engine Number .........................307
Ethanol in Gasoline ....................198
Evaporative Emissions Controls .................................. 316
Exhaust Fumes ............................ 52
Expectant Mothers, Use of Seat Belts by .................................... 16
F
Fan, Interior ............................... 105Features
..................................... 103
Filters
Dust and Pollen .......................269
Oil ........................................... 252
Flashers, Hazard Warning ...........73
Flat Tire, Changing a .................283
Floor Mats ................................. 268
Fluids Automatic Transmission .........256
Brake ...................................... 258
Clutch ..................................... 258
Location .................................. 250
Manual Transmission ..............257
Power Steering ........................260
Rear Differential ......................258
Windshield Washer .................255
FM/AM Radio Reception ...........186
Folding the Rear Seats .................88
Four-way Flashers ........................73
Front Airbags ........................... 9, 25
Front Seat
Adjusting .................................. 83
Fuel ............................................ 198
Check Fuel Cap Message ........66
Economy ................................. 202
Fill Door and Cap ....................199Gauge
...................................... 66
Low Fuel Indicator ...................61
Octane Requirement ...............198
Reserve Indicator .....................61
Tank, Filling the ......................199
Fuel Economy ............................ 202
Fuses, Checking the ..................298
G
Gas Mileage, Improving .............203
Gasoline ..................................... 198
Gauge ...................................... 66
Low Fuel Indicator ...................61
Octane Requirement ...............198
Tank, Refueling .......................199
Gas Station Procedures ..............199
Gauges Engine Coolant Temperature ...67
Fuel .......................................... 66
Odometer ................................. 65
Outside Temperature Indicator ............................... 68
Speedometer ............................ 64
Tachometer .............................. 64
Index
IV
Page 8 of 342

Protecting Children......................35
General Guidelines ..................35
Protecting Infants .....................40
Protecting Larger Children ......49
Protecting Small Children ........41
Using Child Seats with Tethers ................................. 48
Using LATCH .......................... 44
R
Radiator Overheating .................293
Radio/CD Sound System ...........109
Radio Theft Protection ...............188
Readiness Codes ........................319
Rear Differential Fluid ................258
Rear Lights, Bulb Replacement ........................... 266
Rear Seat, Folding ........................88
Rearview Camera and Monitor .................................. 196
Rearview Mirror ........................... 93
Rear Window Defogger ................74
Rear Window Wiper and Washer ..................................... 70Reclining the Front Seats
.............87
Recommended Shift Speeds .......218
Refueling .................................... 199
Reminder Indicators .....................58
Remote Audio Controls ..............191
Remote Transmitter .....................77
Replacement Information
Dust and Pollen Filter .............269
Engine Oil and Filter ...............252
Fuses ...................................... 298
Light Bulbs ............................. 261
Schedule ................................. 249
Spark Plugs ............................. 308
Tires ....................................... 274
Wiper Blades .......................... 269
Replacing Seat Belts After a Crash ........................................ 20
Reporting Safety Defects (U.S. Vehicles) ................................ 324
Reserve Tank, Engine Coolant ............................ 201, 254
Restraint, Child ............................ 35
Reverse Gear Position ................220
Reverse Lockout ........................217
Rotation, Tire ............................. 274S
Safety Belts
.............................. 8, 18
Safety Defects, Reporting (U.S. only) ....................................... 324
Safety Features .............................. 7
Airbags ................................. 9, 22
Head Restraints ........................13
Seat Belts ........................ 8, 14, 18
Seats & Seat-Backs ..............11, 12
Safety Labels, Location of .............53
Safety Messages ..........................iii
Seat Adjustments .........................83
Seat Belts ................................. 8, 18
Additional Information .............18
Advice for Pregnant Women ....16
Automatic Seat Belt
Tensioners ........................... 20
Cleaning .................................. 268
Lap/Shoulder Belt ..............14, 19
Maintenance ............................ 20
Reminder Indicator and Beeper ............................. 18, 58
System Components ................18
Use During Pregnancy .............16
Index
VIII
Page 11 of 342

Unleaded Gasoline.....................198
USB Flash Memory Device Error
Messages ............................... 182
Used Oil, How to Dispose of ......253
V
Vanity Mirror ............................. 101
Vehicle Capacity Load ................208
Vehicle Dimensions ...................308
Vehicle Identification Number ...306
Vehicle Stability Assist (VSA
®),
aka Electronic Stability
Control (ESC), System
VSA OFF Indicator ..................230
Vehicle Stability Assist (VSA) System ................................ 230
VSA OFF Indicator ...................62
VSA OFF Switch .....................231
VSA System Indicator ..............62
Vehicle Storage .......................... 278
Ventilation .................................. 106
VIN ............................................ 306
Viscosity, Oil .............................. 251W
WARNING, Explanation of
...........iii
Warning Labels, Location of .........53
Warranty Coverages (U.S. only) ....................................... 323
Washer, Windshield
Checking the Fluid Level ........255
Fluid Level Indicator (Canada only) ..................................... 61
Operation ................................. 70
Wheels ....................................... 271
Adjusting the Steering ..............74
Alignment and Balance ...........274
Compact Spare ........................282
Wrench, Nut ........................... 283
Windows
Operating the Power ................92
Rear, Defogger ......................... 74
Windshield Cleaning ................................... 70
Defroster ................................. 107
Washers ............................ 70, 255
Wipers, Windshield
Changing Blades .....................269Operation
................................. 70
Worn Tires ................................. 273
Wrecker, Emergency Towing ....303
X
XM®Radio .......................... 113, 132
Index
XI
INDEX
Page 77 of 342
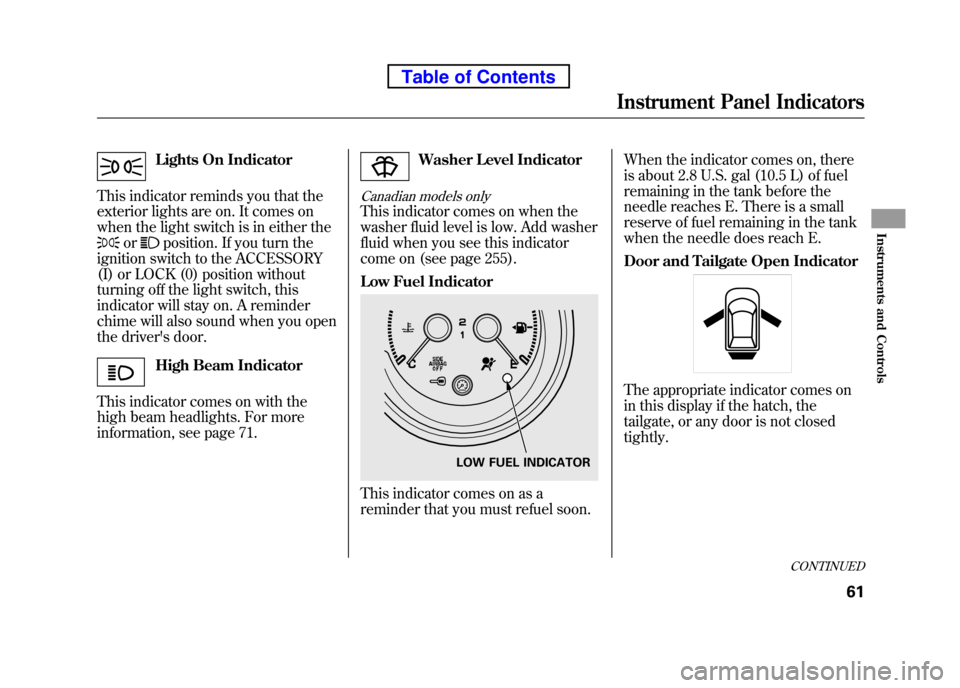
Lights On Indicator
This indicator reminds you that the
exterior lights are on. It comes on
when the light switch is in either the
orposition. If you turn the
ignition switch to the ACCESSORY
(I) or LOCK (0) position without
turning off the light switch, this
indicator will stay on. A reminder
chime will also sound when you open
the driver's door.
High Beam Indicator
This indicator comes on with the
high beam headlights. For more
information, see page 71.
Washer Level Indicator
Canadian models only
This indicator comes on when the
washer fluid level is low. Add washer
fluid when you see this indicator
come on (see page 255).
Low Fuel Indicator
This indicator comes on as a
reminder that you must refuel soon. When the indicator comes on, there
is about 2.8 U.S. gal (10.5 L) of fuel
remaining in the tank before the
needle reaches E. There is a small
reserve of fuel remaining in the tank
when the needle does reach E.
Door and Tailgate Open Indicator
The appropriate indicator comes on
in this display if the hatch, the
tailgate, or any door is not closedtightly.
LOW FUEL INDICATOR
CONTINUED
Instrument Panel Indicators
61
Instruments and Controls
Table of Contents
Page 257 of 342
This section explains why it is important
to keep your vehicle well maintained and
how to follow basic maintenance safety
precautions.
This section also includes instructions
on how to read the maintenance minder
messages on the information display,
and instructions for simple maintenance
tasks you may want to take care of
yourself.
If you have the skills and tools to
perform more complex maintenance
tasks on your vehicle, you may want to
purchase the service manual. See page
325 for information on how to obtain a
copy, or see your dealer.
U.S. Vehicles:
Maintenance, replacement, or repair
of emissions control devices and
systems may be done by any
automotive repair establishment or
individual using parts that are‘‘certified ’’to EPA standards.Maintenance Safety .....................242
Maintenance Minder ..................
243
Fluid Locations ........................... 250
Adding Engine Oil ......................
251
Changing the Engine Oil and Filter ....................................... 252
Engine Coolant ........................... 254
Windshield Washers ...................255
Transmission Fluid .....................
256
Automatic Transmission Fluid ................................... 256
Manual Transmission Fluid ....257
Rear Differential Fluid .................
258
Brake and Clutch Fluid ...............258
Power Steering Fluid ..................
260
Cleaning the Body Panels ...........260
Lights .......................................... 261
Cleaning the Seat Belts ...............
268
Floor Mats .................................. 268
Dust and Pollen Filter .................
269
Wiper Blades .............................. 269
Wheels ........................................
271
Tires ........................................... 271
Checking the Battery ..................277Vehicle Storage
...........................
278
Maintenance
241
Maintenance
Page 266 of 342
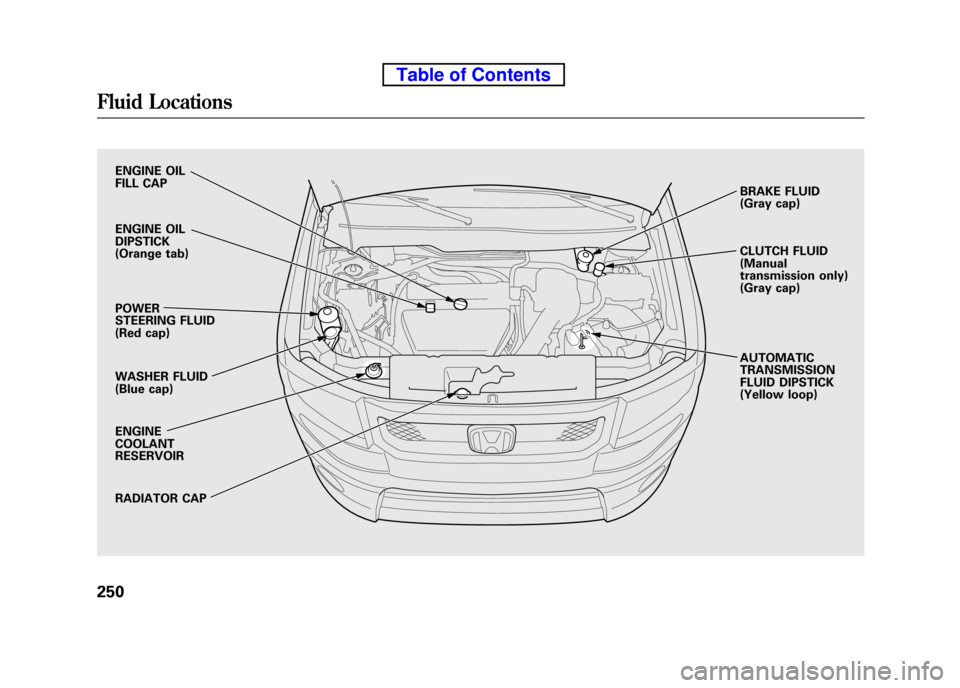
ENGINE OIL
FILL CAP
ENGINE OIL DIPSTICK
(Orange tab) POWER
STEERING FLUID
(Red cap)
WASHER FLUID
(Blue cap) ENGINE COOLANTRESERVOIR
RADIATOR CAPBRAKE FLUID
(Gray cap)
CLUTCH FLUID (Manual
transmission only)
(Gray cap) AUTOMATIC TRANSMISSION
FLUID DIPSTICK
(Yellow loop)
Fluid Locations
250
Table of Contents
Page 271 of 342
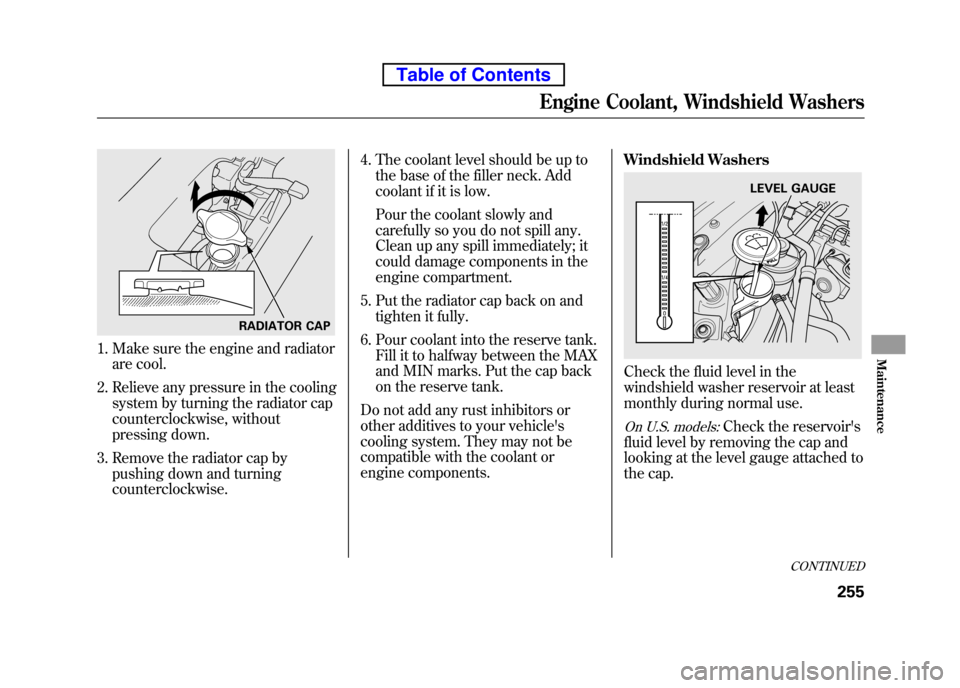
1. Make sure the engine and radiatorare cool.
2. Relieve any pressure in the cooling system by turning the radiator cap
counterclockwise, without
pressing down.
3. Remove the radiator cap by pushing down and turning
counterclockwise. 4. The coolant level should be up to
the base of the filler neck. Add
coolant if it is low.
Pour the coolant slowly and
carefully so you do not spill any.
Clean up any spill immediately; it
could damage components in the
engine compartment.
5. Put the radiator cap back on and tighten it fully.
6. Pour coolant into the reserve tank. Fill it to halfway between the MAX
and MIN marks. Put the cap back
on the reserve tank.
Do not add any rust inhibitors or
other additives to your vehicle's
cooling system. They may not be
compatible with the coolant or
engine components. Windshield Washers
Check the fluid level in the
windshield washer reservoir at least
monthly during normal use.
On U.S. models:Check the reservoir's
fluid level by removing the cap and
looking at the level gauge attached to
the cap.
RADIATOR CAP
LEVEL GAUGE
CONTINUED
Engine Coolant, Windshield Washers
255
Maintenance
Table of Contents
Page 272 of 342
On Canadian models:The low washer
level indicator comes on when the
level is low (see page 61).
Fill the reservoir with a good-quality
windshield washer fluid. This
increases the cleaning capability and
prevents freezing in cold weather.
When you refill the reservoir, clean
the edges of the windshield wiper
blades with windshield washer fluid
on a clean cloth. This will help to
condition them.
Do not use engine antifreeze or a
vinegar/water solution in the
windshield washer reservoir. Antifreeze
can damage your vehicle's paint, while
a vinegar/water solution can damage
the windshield washer pump. Use only
commercially-available windshield
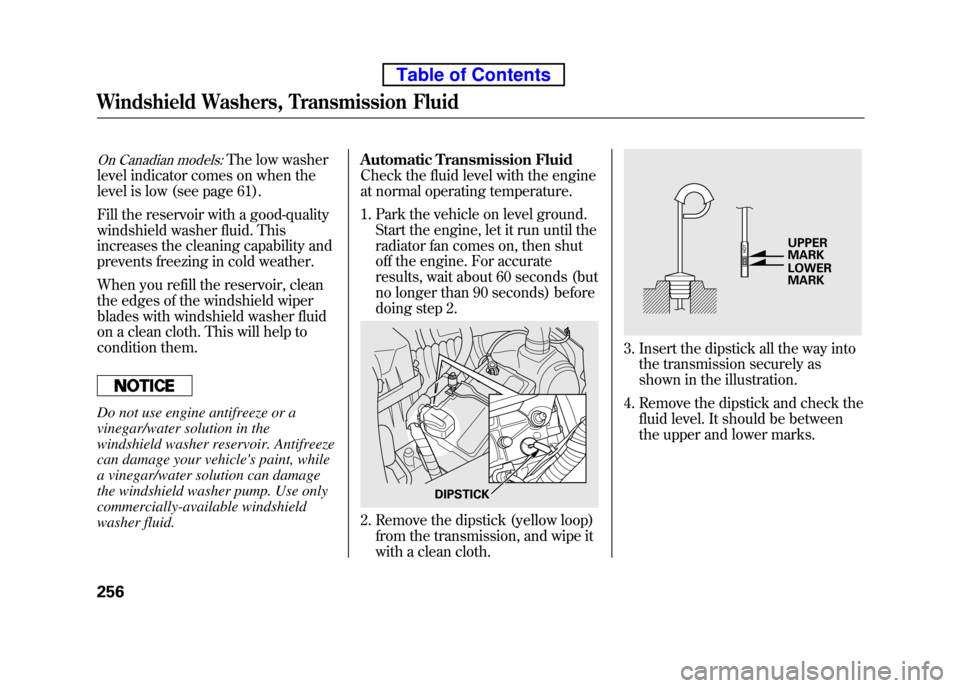
washer fluid. Automatic Transmission Fluid
Check the fluid level with the engine
at normal operating temperature.
1. Park the vehicle on level ground.
Start the engine, let it run until the
radiator fan comes on, then shut
off the engine. For accurate
results, wait about 60 seconds (but
no longer than 90 seconds) before
doing step 2.
2. Remove the dipstick (yellow loop)
from the transmission, and wipe it
with a clean cloth.
3. Insert the dipstick all the way intothe transmission securely as
shown in the illustration.
4. Remove the dipstick and check the fluid level. It should be between
the upper and lower marks.
DIPSTICK
UPPER MARK LOWER MARK
Windshield Washers, Transmission Fluid
256
Table of Contents
Page 273 of 342
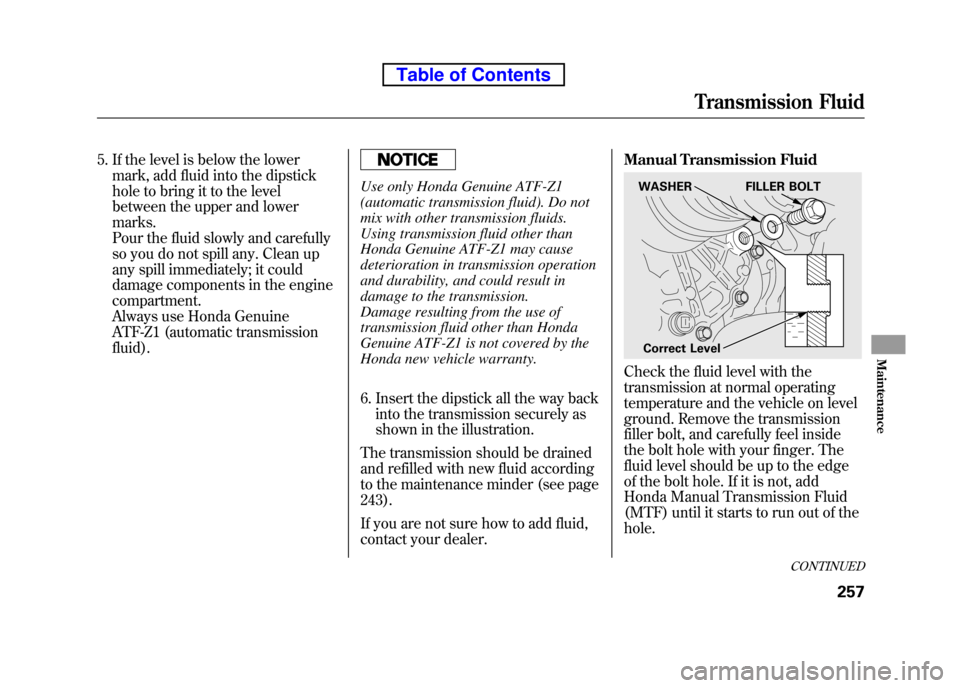
5. If the level is below the lowermark, add fluid into the dipstick
hole to bring it to the level
between the upper and lower marks.
Pour the fluid slowly and carefully
so you do not spill any. Clean up
any spill immediately; it could
damage components in the enginecompartment.
Always use Honda Genuine
ATF-Z1 (automatic transmission fluid).
Use only Honda Genuine ATF-Z1
(automatic transmission fluid). Do not
mix with other transmission fluids.
Using transmission fluid other than
Honda Genuine ATF-Z1 may cause
deterioration in transmission operation
and durability, and could result in
damage to the transmission.
Damage resulting from the use of
transmission fluid other than Honda
Genuine ATF-Z1 is not covered by the
Honda new vehicle warranty.
6. Insert the dipstick all the way backinto the transmission securely as
shown in the illustration.
The transmission should be drained
and refilled with new fluid according
to the maintenance minder (see page 243).
If you are not sure how to add fluid,
contact your dealer. Manual Transmission Fluid
Check the fluid level with the
transmission at normal operating
temperature and the vehicle on level
ground. Remove the transmission
filler bolt, and carefully feel inside
the bolt hole with your finger. The
fluid level should be up to the edge
of the bolt hole. If it is not, add
Honda Manual Transmission Fluid
(MTF) until it starts to run out of thehole.
WASHER FILLER BOLT
Correct Level
CONTINUED
Transmission Fluid
257
Maintenance
Table of Contents
Page 274 of 342
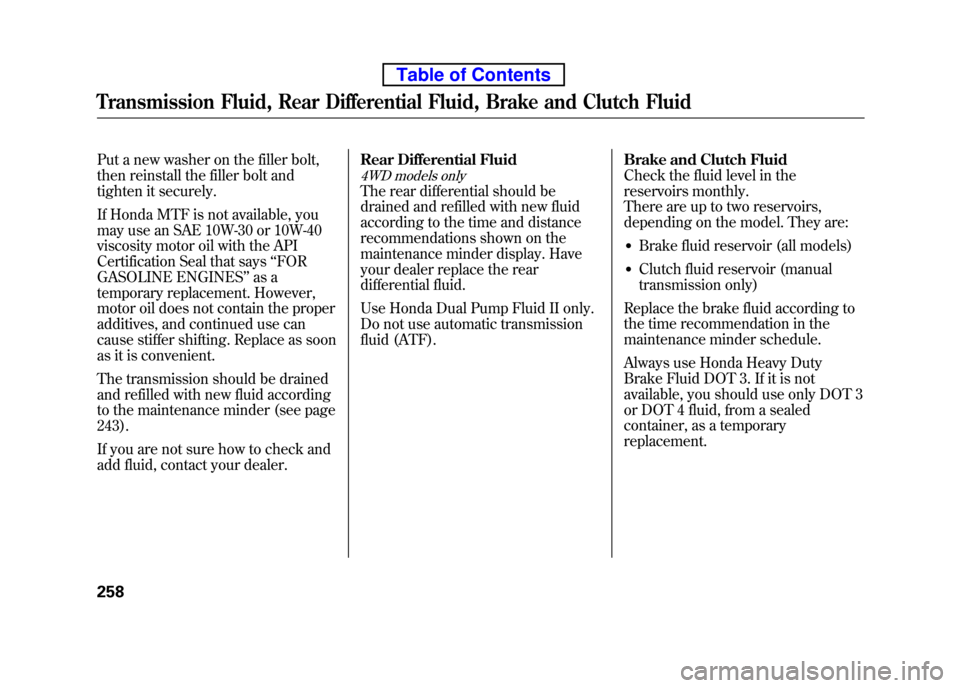
Put a new washer on the filler bolt,
then reinstall the filler bolt and
tighten it securely.
If Honda MTF is not available, you
may use an SAE 10W-30 or 10W-40
viscosity motor oil with the API
Certification Seal that says‘‘FOR
GASOLINE ENGINES ’’as a
temporary replacement. However,
motor oil does not contain the proper
additives, and continued use can
cause stiffer shifting. Replace as soon
as it is convenient.
The transmission should be drained
and refilled with new fluid according
to the maintenance minder (see page243).
If you are not sure how to check and
add fluid, contact your dealer. Rear Differential Fluid
4WD models only
The rear differential should be
drained and refilled with new fluid
according to the time and distance
recommendations shown on the
maintenance minder display. Have
your dealer replace the rear
differential fluid.
Use Honda Dual Pump Fluid II only.
Do not use automatic transmission
fluid (ATF).
Brake and Clutch Fluid
Check the fluid level in the
reservoirs monthly.
There are up to two reservoirs,
depending on the model. They are:
● Brake fluid reservoir (all models)
● Clutch fluid reservoir (manual
transmission only)
Replace the brake fluid according to
the time recommendation in the
maintenance minder schedule.
Always use Honda Heavy Duty
Brake Fluid DOT 3. If it is not
available, you should use only DOT 3
or DOT 4 fluid, from a sealed
container, as a temporaryreplacement.
Transmission Fluid, Rear Differential Fluid, Brake and Clutch Fluid
258
Table of Contents