remove seats HONDA ELEMENT 2010 1.G Owners Manual
[x] Cancel search | Manufacturer: HONDA, Model Year: 2010, Model line: ELEMENT, Model: HONDA ELEMENT 2010 1.GPages: 342, PDF Size: 5.76 MB
Page 60 of 342
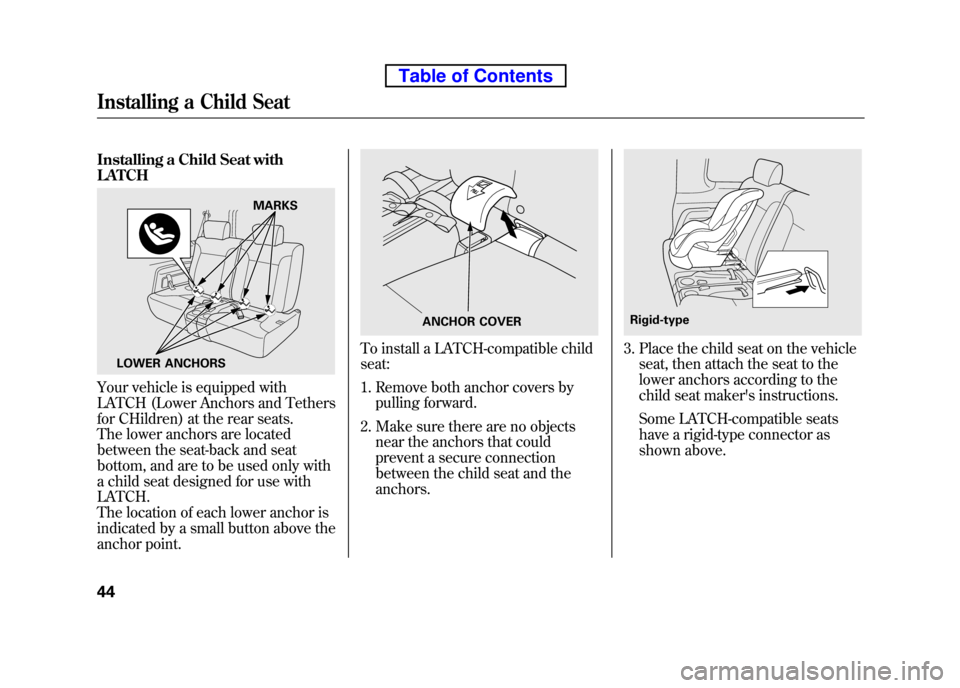
Installing a Child Seat with LATCH
Your vehicle is equipped with
LATCH (Lower Anchors and Tethers
for CHildren) at the rear seats.
The lower anchors are located
between the seat-back and seat
bottom, and are to be used only with
a child seat designed for use withLATCH.
The location of each lower anchor is
indicated by a small button above the
anchor point.
To install a LATCH-compatible child seat:
1. Remove both anchor covers bypulling forward.
2. Make sure there are no objects near the anchors that could
prevent a secure connection
between the child seat and theanchors.3. Place the child seat on the vehicleseat, then attach the seat to the
lower anchors according to the
child seat maker's instructions.
Some LATCH-compatible seats
have a rigid-type connector as
shown above.
MARKS
LOWER ANCHORS
ANCHOR COVERRigid-type
Installing a Child Seat
44
Table of Contents
Page 61 of 342
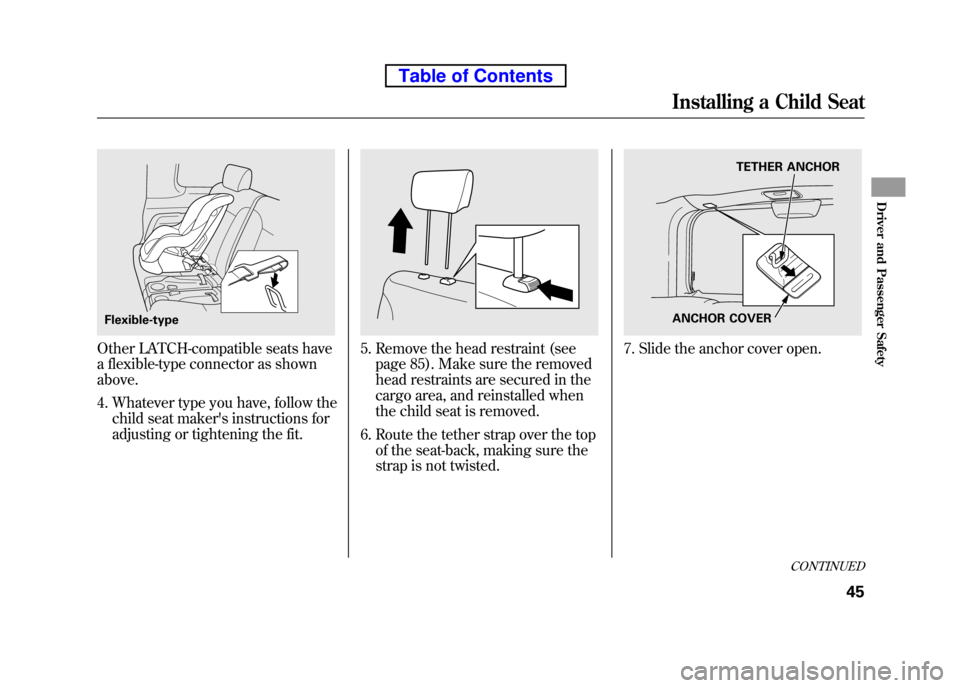
Other LATCH-compatible seats have
a flexible-type connector as shownabove.4. Whatever type you have, follow the child seat maker's instructions for
adjusting or tightening the fit.5. Remove the head restraint (seepage 85). Make sure the removed
head restraints are secured in the
cargo area, and reinstalled when
the child seat is removed.
6. Route the tether strap over the top of the seat-back, making sure the
strap is not twisted.7. Slide the anchor cover open.
Flexible-typeANCHOR COVER TETHER ANCHOR
CONTINUED
Installing a Child Seat
45
Driver and Passenger Safety
Table of Contents
Page 62 of 342
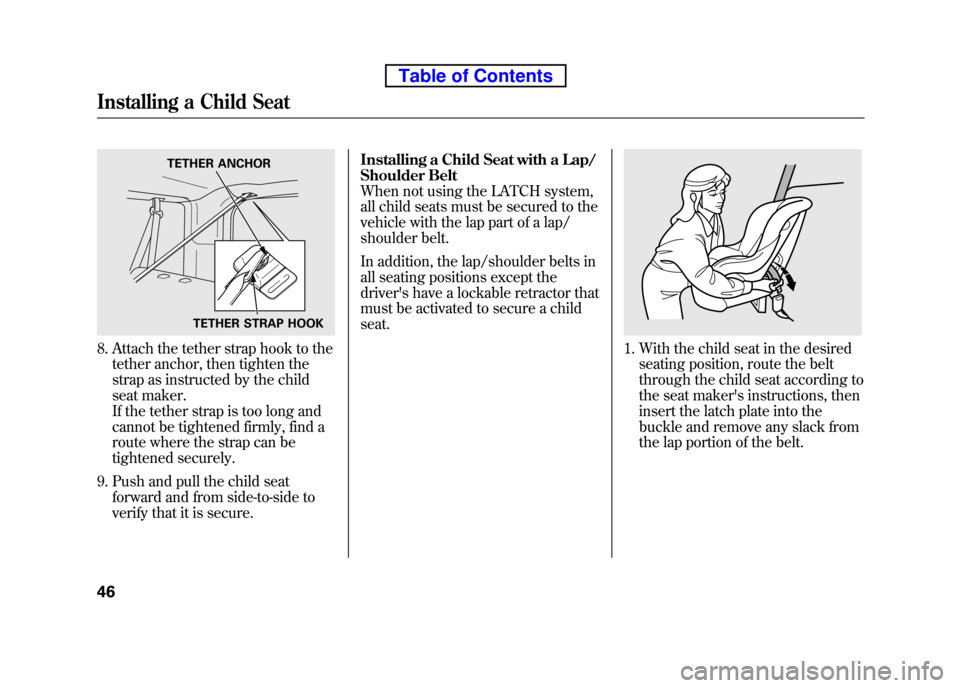
8. Attach the tether strap hook to thetether anchor, then tighten the
strap as instructed by the child
seat maker.
If the tether strap is too long and
cannot be tightened firmly, find a
route where the strap can be
tightened securely.
9. Push and pull the child seat forward and from side-to-side to
verify that it is secure. Installing a Child Seat with a Lap/
Shoulder Belt
When not using the LATCH system,
all child seats must be secured to the
vehicle with the lap part of a lap/
shoulder belt.
In addition, the lap/shoulder belts in
all seating positions except the
driver's have a lockable retractor that
must be activated to secure a childseat.1. With the child seat in the desired
seating position, route the belt
through the child seat according to
the seat maker's instructions, then
insert the latch plate into the
buckle and remove any slack from
the lap portion of the belt.
TETHER STRAP HOOK
TETHER ANCHOR
Installing a Child Seat
46
Table of Contents
Page 102 of 342
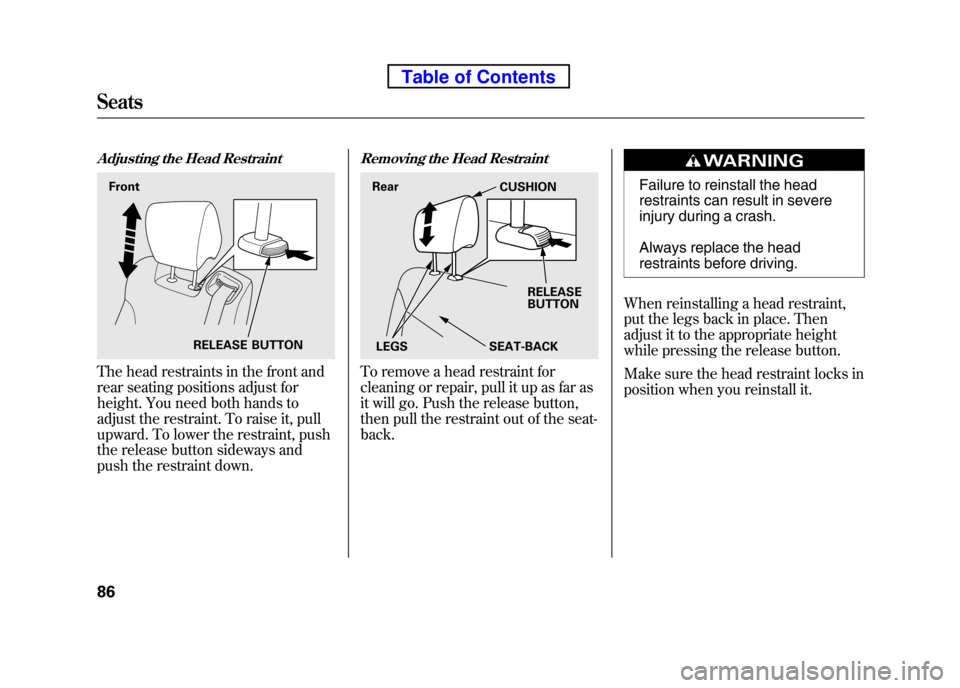
Adjusting the Head Restraint
The head restraints in the front and
rear seating positions adjust for
height. You need both hands to
adjust the restraint. To raise it, pull
upward. To lower the restraint, push
the release button sideways and
push the restraint down.
Removing the Head Restraint
To remove a head restraint for
cleaning or repair, pull it up as far as
it will go. Push the release button,
then pull the restraint out of the seat-back.
Failure to reinstall the head
restraints can result in severe
injury during a crash.
Always replace the head
restraints before driving.
When reinstalling a head restraint,
put the legs back in place. Then
adjust it to the appropriate height
while pressing the release button.
Make sure the head restraint locks in
position when you reinstall it.
RELEASE BUTTON
Front
Rear
CUSHION
RELEASE
BUTTON
SEAT-BACK
LEGS
Seats
86
Table of Contents
Page 103 of 342
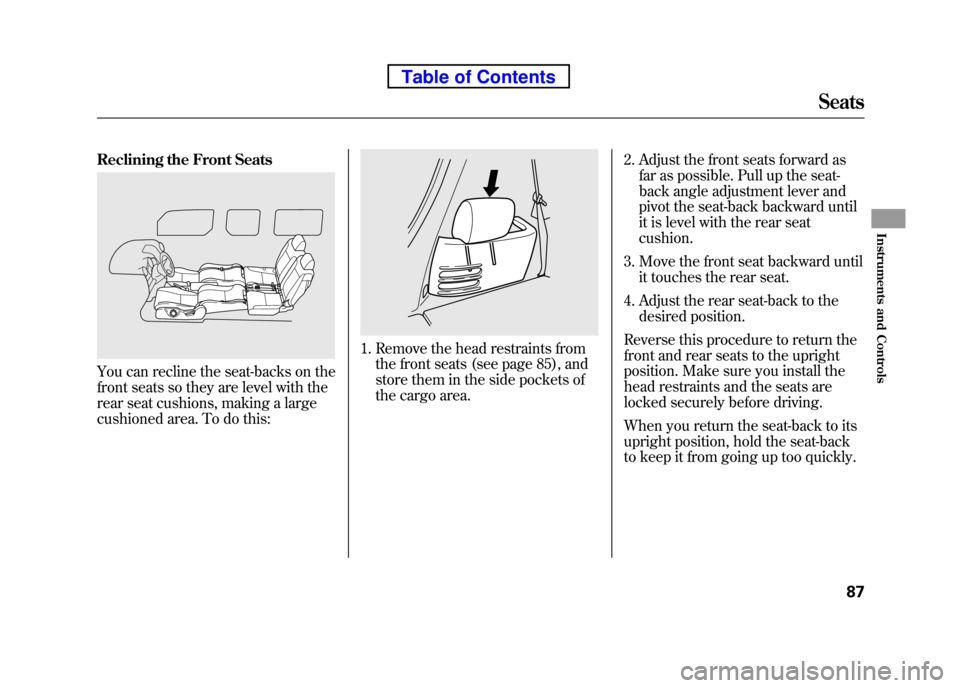
Reclining the Front Seats
You can recline the seat-backs on the
front seats so they are level with the
rear seat cushions, making a large
cushioned area. To do this:
1. Remove the head restraints fromthe front seats (see page 85), and
store them in the side pockets of
the cargo area. 2. Adjust the front seats forward as
far as possible. Pull up the seat-
back angle adjustment lever and
pivot the seat-back backward until
it is level with the rear seat cushion.
3. Move the front seat backward until it touches the rear seat.
4. Adjust the rear seat-back to the desired position.
Reverse this procedure to return the
front and rear seats to the upright
position. Make sure you install the
head restraints and the seats are
locked securely before driving.
When you return the seat-back to its
upright position, hold the seat-back
to keep it from going up too quickly.
Seats
87
Instruments and Controls
Table of Contents
Page 106 of 342
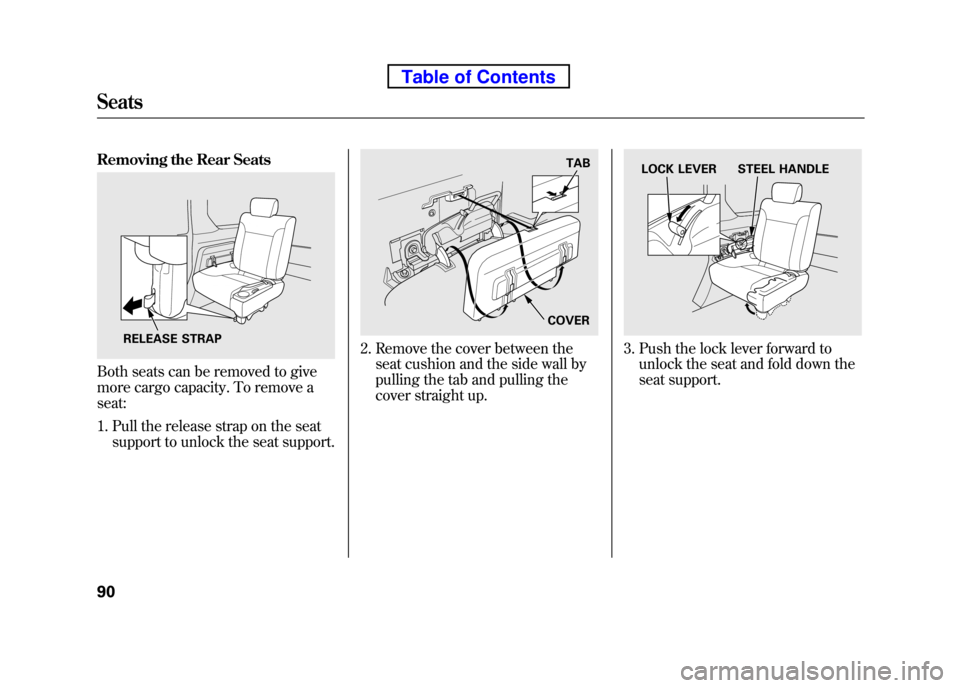
Removing the Rear Seats
Both seats can be removed to give
more cargo capacity. To remove a seat:1. Pull the release strap on the seat support to unlock the seat support.
2. Remove the cover between theseat cushion and the side wall by
pulling the tab and pulling the
cover straight up.3. Push the lock lever forward tounlock the seat and fold down the
seat support.RELEASE STRAP
TAB
COVERLOCK LEVER STEEL HANDLE
Seats
90
Table of Contents
Page 107 of 342
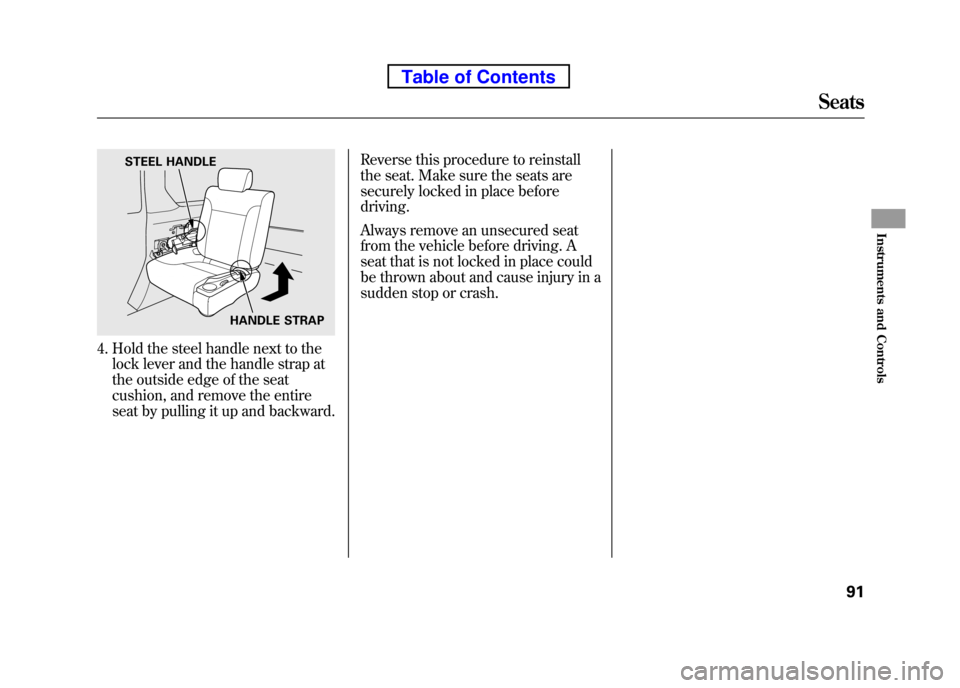
4. Hold the steel handle next to thelock lever and the handle strap at
the outside edge of the seat
cushion, and remove the entire
seat by pulling it up and backward. Reverse this procedure to reinstall
the seat. Make sure the seats are
securely locked in place beforedriving.
Always remove an unsecured seat
from the vehicle before driving. A
seat that is not locked in place could
be thrown about and cause injury in a
sudden stop or crash.
STEEL HANDLE
HANDLE STRAP
Seats
91
Instruments and Controls
Table of Contents
Page 114 of 342
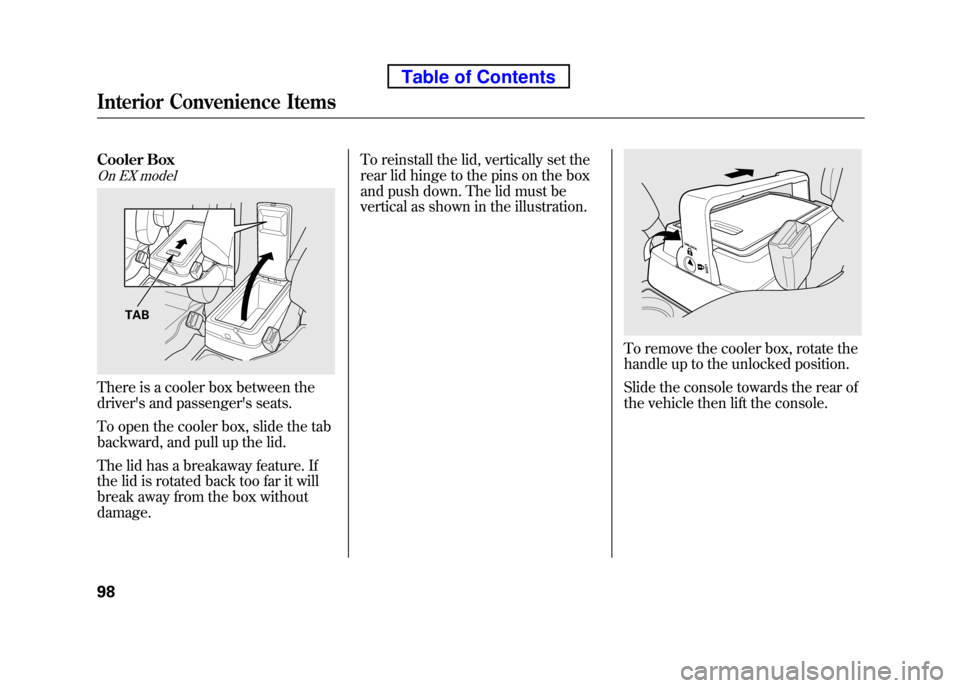
Cooler Box
On EX model
There is a cooler box between the
driver's and passenger's seats.
To open the cooler box, slide the tab
backward, and pull up the lid.
The lid has a breakaway feature. If
the lid is rotated back too far it will
break away from the box withoutdamage.To reinstall the lid, vertically set the
rear lid hinge to the pins on the box
and push down. The lid must be
vertical as shown in the illustration.
To remove the cooler box, rotate the
handle up to the unlocked position.
Slide the console towards the rear of
the vehicle then lift the console.
TAB
Interior Convenience Items
98
Table of Contents
Page 223 of 342
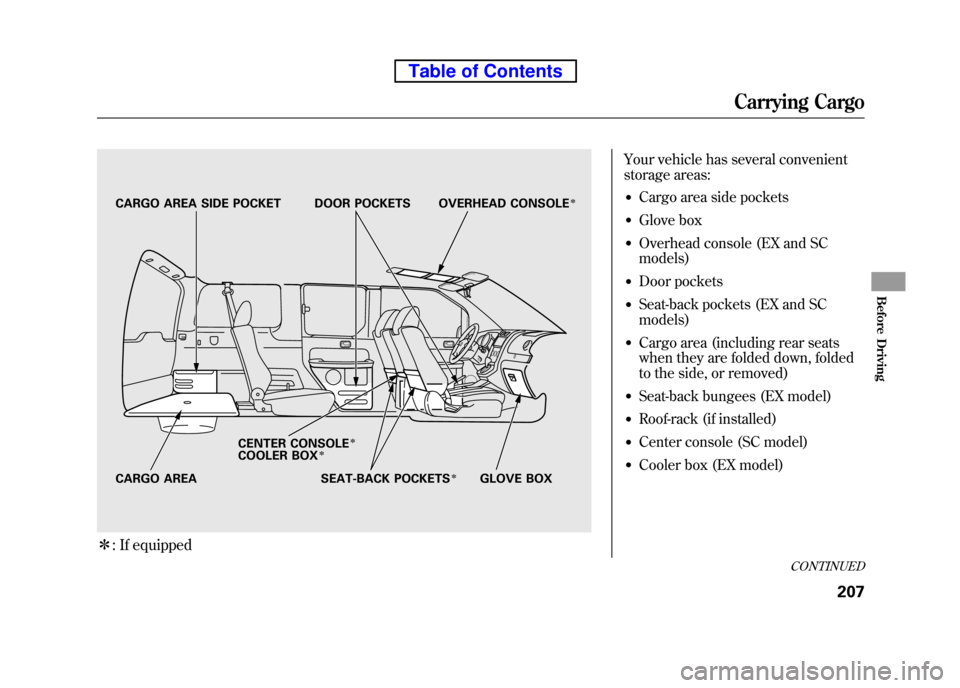
ꭧ: If equipped Your vehicle has several convenient
storage areas:
● Cargo area side pockets
● Glove box
● Overhead console (EX and SCmodels)
● Door pockets
● Seat-back pockets (EX and SCmodels)
● Cargo area (including rear seats
when they are folded down, folded
to the side, or removed)
● Seat-back bungees (EX model)
● Roof-rack (if installed)
● Center console (SC model)
● Cooler box (EX model)
CARGO AREA CENTER CONSOLE
ꭧ
COOLER BOXꭧ
SEAT-BACK POCKETSꭧGLOVE BOX
CARGO AREA SIDE POCKET DOOR POCKETS OVERHEAD CONSOLE
ꭧ
CONTINUED
Carrying Cargo
207
Before Driving
Table of Contents
Page 226 of 342

Carrying Items in the Passenger Compartment● Store or secure all items that could
be thrown around and hurt
someone during a crash.
● Be sure items placed on the floor
behind the front seats cannot roll
under the seats and interfere with
the pedals, the seat operation, or
the proper operation of the sensors
under the seats.
● Keep the glove box closed while
driving. If it is open, a passenger
could injure their knees during a
crash or sudden stop. ●
If you fold the rear seats down or
up, or remove them, tie down
items that could be thrown about
the vehicle during a crash or
sudden stop. Also, keep all cargo
below the bottom of the windows.
If it is higher, it could interfere
with the proper operation of the
side curtain airbags.
Carrying Cargo in the Cargo Area
or on a Roof Rack ● Distribute cargo evenly on the
floor of the cargo area, placing the
heaviest items on the bottom and
as far forward as possible. Tie
down items that could be thrown
about the vehicle during a crash or
sudden stop. ●
If you carry large items that
prevent you from closing the
tailgate or the hatch, exhaust gas
can enter the passenger area. To
avoid the possibility of carbon
monoxide poisoning, follow the
instructions on page 52.
● If you carry any items on a roof
rack, be sure the total weight of
the rack and the items does not
exceed 75 lbs (34 kg).
If you use an accessory roof rack,
the roof rack weight limit may be
lower. Refer to the information that
came with your roof rack.
Carrying Cargo
210
Table of Contents