ECO mode HONDA FIT 2011 2.G Navigation Manual
[x] Cancel search | Manufacturer: HONDA, Model Year: 2011, Model line: FIT, Model: HONDA FIT 2011 2.GPages: 152, PDF Size: 6.63 MB
Page 3 of 152
2Navigation System
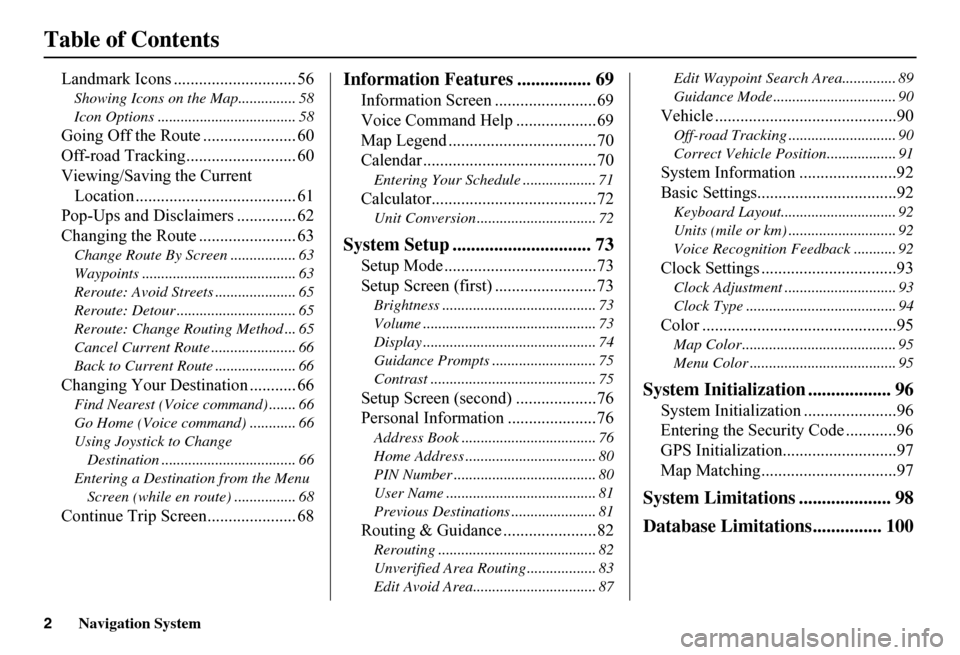
Table of Contents
Landmark Icons ............................. 56
Showing Icons on the Map............... 58
Icon Options .................................... 58
Going Off the Route ...................... 60
Off-road Tracking.......................... 60
Viewing/Saving the Current
Location ...................................... 61
Pop-Ups and Disclaimers .............. 62
Changing the Route ....................... 63
Change Route By Screen ................. 63
Waypoints ........................................ 63
Reroute: Avoid Streets ..................... 65
Reroute: Detour ............................... 65
Reroute: Change Routing Method ... 65
Cancel Current Route ...................... 66
Back to Current Route ..................... 66
Changing Your Destination ........... 66
Find Nearest (Voice command) ....... 66
Go Home (Voice command) ............ 66
Using Joystick to Change
Destination ................................... 66
Entering a Destination from the Menu
Screen (while en route) ................ 68
Continue Trip Screen..................... 68
Information Features ................ 69
Information Screen ........................69
Voice Command Help ...................69
Map Legend ...................................70
Calendar .........................................70
Entering Your Schedule ................... 71
Calculator.......................................72
Unit Conversion ............................... 72
System Setup .............................. 73
Setup Mode ....................................73
Setup Screen (first) ........................73
Brightness ........................................ 73
Volume ............................................. 73
Display ............................................. 74
Guidance Prompts ....... .................... 75
Contrast ........................................... 75
Setup Screen (second) ...................76
Personal Information .....................76
Address Book ................................... 76
Home Address .................................. 80
PIN Number ..................................... 80
User Name ....................................... 81
Previous Destinations ...................... 81
Routing & Guidance ......................82
Rerouting ......................................... 82
Unverified Area Routing .................. 83
Edit Avoid Area................................ 87
Edit Waypoint Search Area.............. 89
Guidance Mode .... ............................ 90
Vehicle ...........................................90
Off-road Tracking............................ 90
Correct Vehicle Position.................. 91
System Information .......................92
Basic Settings.................................92
Keyboard Layout.. ............................ 92
Units (mile or km) ............................ 92
Voice Recognition Fe edback ........... 92
Clock Settings ................................93
Clock Adjustment ............................. 93
Clock Type ....................................... 94
Color ..............................................95
Map Color ........................................ 95
Menu Color ...................................... 95
System Initialization .................. 96
System Initializat ion ......................96
Entering the Security Code ............96
GPS Initialization ...........................97
Map Matching................................97
System Limitations .................... 98
Database Limitations............... 100
Page 16 of 152
Navigation System15
Getting Started
Using the On-screen
Keyboard
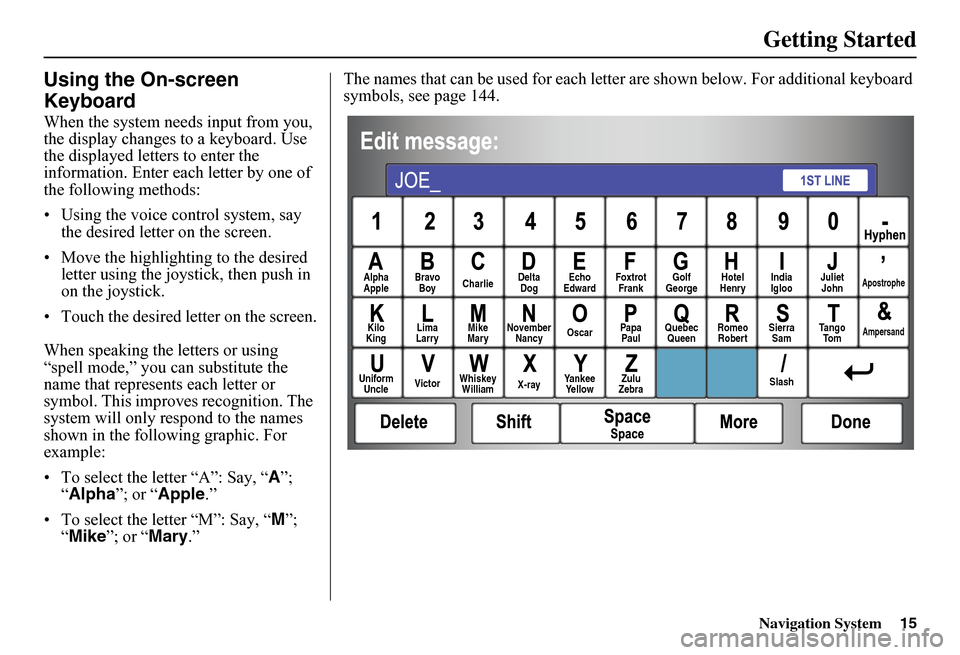
When the system needs input from you, the display changes to a keyboard. Use the displayed letters to enter the information. Enter each letter by one of the following methods:
• Using the voice control system, say the desired letter on the screen.
• Move the highlighting to the desired letter using the joystick, then push in on the joystick.
• Touch the desired le tter on the screen.
When speaking the letters or using “spell mode,” you can substitute the name that represents each letter or symbol. This improves recognition. The system will only re spond to the names shown in the following graphic. For example:
• To select the letter “A”: Say, “ A”; “ Alpha”; or “Apple.”
• To select the letter “M”: Say, “ M”; “ Mike”; or “Mary.”
The names that can be used for each lette r are shown below. For additional keyboard symbols, see page 144.
AlphaApple Bravo Boy Charlie Delta Dog Echo Edward Foxtrot Frank Golf George Hotel Henry Juliet JohnApostrophe
KiloKing Lima Larry Mike Mary November Nancy Oscar Papa Paul Quebec Queen Romeo Robert Sierra Sam Ta n g o To mAmpersand
UniformUncle Victor Whiskey William X-ray Yankee Ye l l o w Zulu Zebra Slash
India Igloo
Page 24 of 152
Navigation System23
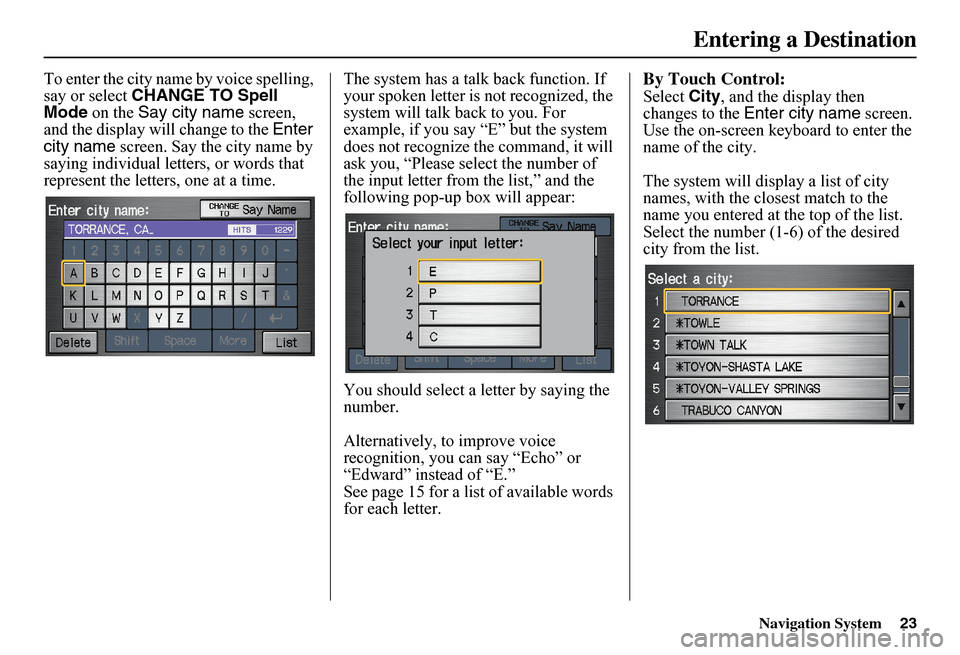
To enter the city name by voice spelling, say or select CHANGE TO Spell Mode on the Say city name screen, and the display will change to the Enter city name screen. Say the city name by saying individual letters, or words that represent the letters, one at a time.
The system has a talk back function. If your spoken letter is not recognized, the system will talk back to you. For example, if you say “E” but the system does not recognize the command, it will ask you, “Please select the number of the input letter from the list,” and the following pop-up box will appear:
You should select a letter by saying the number.
Alternatively, to improve voice recognition, you can say “Echo” or “Edward” instead of “E.”See page 15 for a list of available words for each letter.
By Touch Control:
Select City, and the display then changes to the Enter city name screen. Use the on-screen keyboard to enter the name of the city.
The system will display a list of city names, with the closest match to the name you entered at the top of the list. Select the number (1-6) of the desired city from the list.
Entering a Destination
Page 30 of 152
Navigation System29
Selecting the Street
By Voice Control:
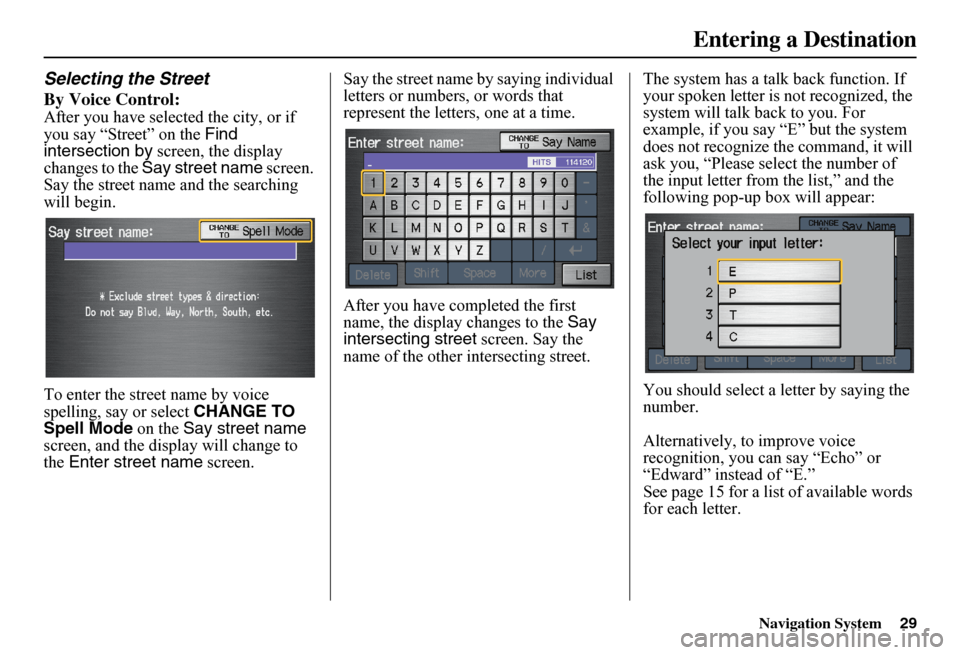
After you have selected the city, or if you say “Street” on the Find intersection by screen, the display changes to the Say street name screen. Say the street name and the searching will begin.
To enter the street name by voice spelling, say or select CHANGE TO Spell Mode on the Say street name screen, and the disp lay will change to the Enter street name screen.
Say the street name by saying individual letters or numbers, or words that represent the letters, one at a time.
After you have completed the first name, the display changes to the Say intersecting street screen. Say the name of the other intersecting street.
The system has a talk back function. If your spoken letter is not recognized, the system will talk back to you. For example, if you say “E” but the system does not recognize the command, it will ask you, “Please select the number of the input letter from the list,” and the following pop-up box will appear:
You should select a letter by saying the number.
Alternatively, to improve voice recognition, you can say “Echo” or “Edward” instead of “E.”See page 15 for a list of available words for each letter.
Entering a Destination
Page 75 of 152
74Navigation System
System Setup
Display
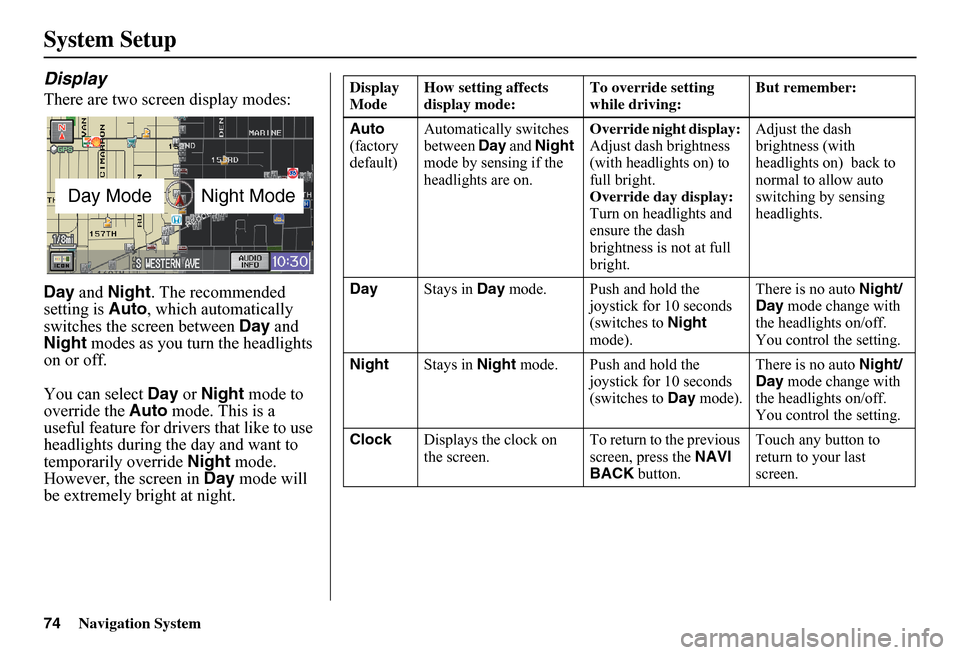
There are two screen display modes:
Day and Night. The recommended setting is Auto, which automatically switches the screen between Day and Night modes as you turn the headlights on or off.
You can select Day or Night mode to override the Auto mode. This is a useful feature for drivers that like to use headlights during the day and want to temporarily override Night mode. However, the screen in Day mode will be extremely bright at night.
Day ModeNight Mode
Display Mode How setting affects display mode: To override setting while driving: But remember:
Auto (factory default)
Automatically switches between Day and Night mode by sensing if the headlights are on.
Override night display: Adjust dash brightness (with headlights on) to full bright.Override day display:Turn on headlights and ensure the dash brightness is not at full bright.
Adjust the dash brightness (with headlights on) back to normal to allow auto switching by sensing headlights.
Day Stays in Day mode. Push and hold the joystick for 10 seconds (switches to Night mode).
There is no auto Night/ Day mode change with the headlights on/off. You control the setting.
Night Stays in Night mode. Push and hold the joystick for 10 seconds (switches to Day mode).
There is no auto Night/ Day mode change with the headlights on/off. You control the setting.
Clock Displays the clock on the screen. To return to the previous screen, press the NAVI BACK button.
Touch any button to return to your last screen.
Page 91 of 152
90Navigation System
System Setup
Guidance Mode
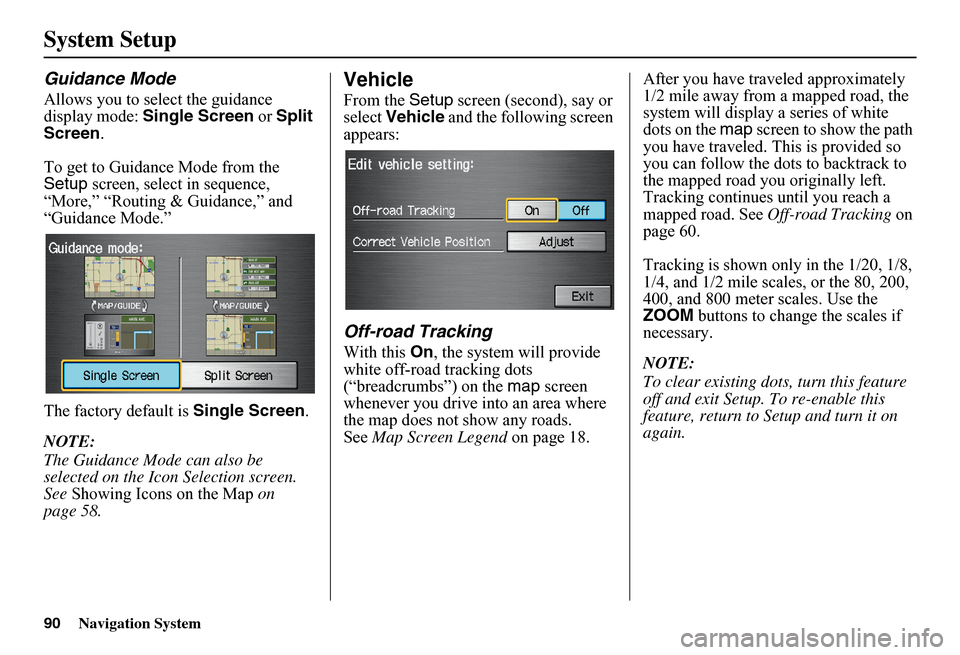
Allows you to select the guidance display mode: Single Screen or Split Screen .
To get to Guidance Mode from the Setup screen, select in sequence, “More,” “Routing & Guidance,” and “Guidance Mode.”
The factory default is Single Screen.
NOTE:
The Guidance Mode can also be selected on the Icon Selection screen. See Showing Icons on the Map on page 58.
Vehicle
From the Setup screen (second), say or select Vehicle and the following screen appears:
Off-road Tracking
With this On, the system will provide white off-road tracking dots (“breadcrumbs”) on the map screen whenever you drive into an area where the map does not show any roads.See Map Screen Legend on page 18.
After you have traveled approximately 1/2 mile away from a mapped road, the system will display a series of white dots on the map screen to show the path you have traveled. This is provided so you can follow the dots to backtrack to the mapped road you originally left. Tracking continues until you reach a mapped road. See Off-road Tracking on page 60.
Tracking is shown only in the 1/20, 1/8, 1/4, and 1/2 mile scales, or the 80, 200, 400, and 800 meter scales. Use the ZOOM buttons to change the scales if necessary.
NOTE:
To clear existing dots , turn this feature off and exit Setup. To re-enable this feature, return to Setup and turn it on again.
Page 96 of 152
Navigation System95
System Setup
Color
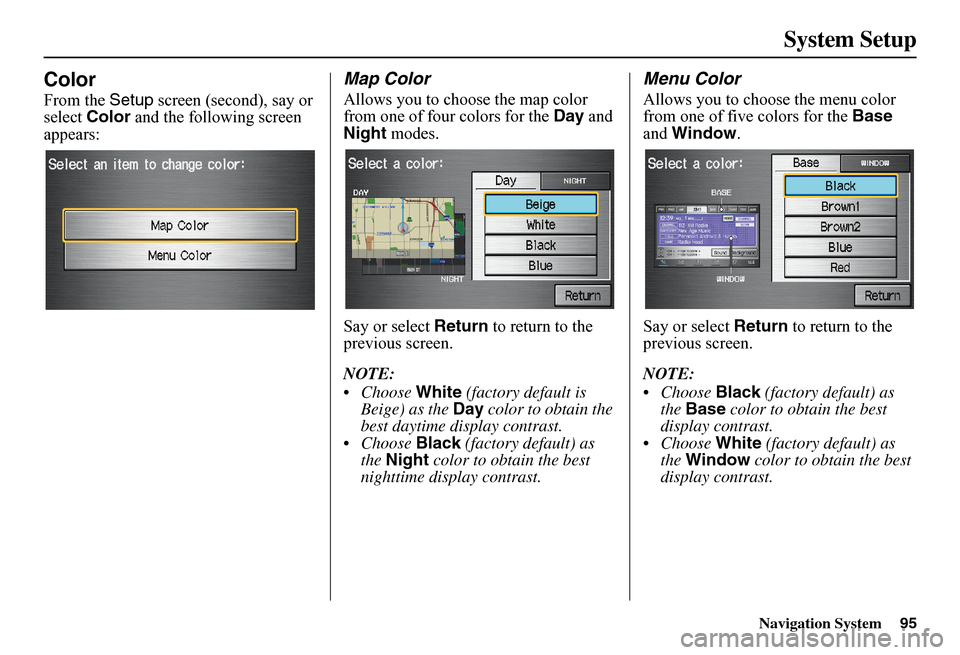
From the Setup screen (second), say or select Color and the following screen appears:
Map Color
Allows you to choose the map color from one of four colors for the Day and Night modes.
Say or select Return to return to the previous screen.
NOTE:
Choose White (factory default is Beige) as the Day color to obtain the best daytime display contrast. Choose Black (factory default) as the Night color to obtain the best nighttime display contrast.
Menu Color
Allows you to choose the menu color from one of five colors for the Base and Window.
Say or select Return to return to the previous screen.
NOTE:
Choose Black (factory default) as the Base color to obtain the best display contrast. Choose White (factory default) as the Window color to obtain the best display contrast.
Page 106 of 152
Navigation System105
Customer Assistance
PC Card Operation
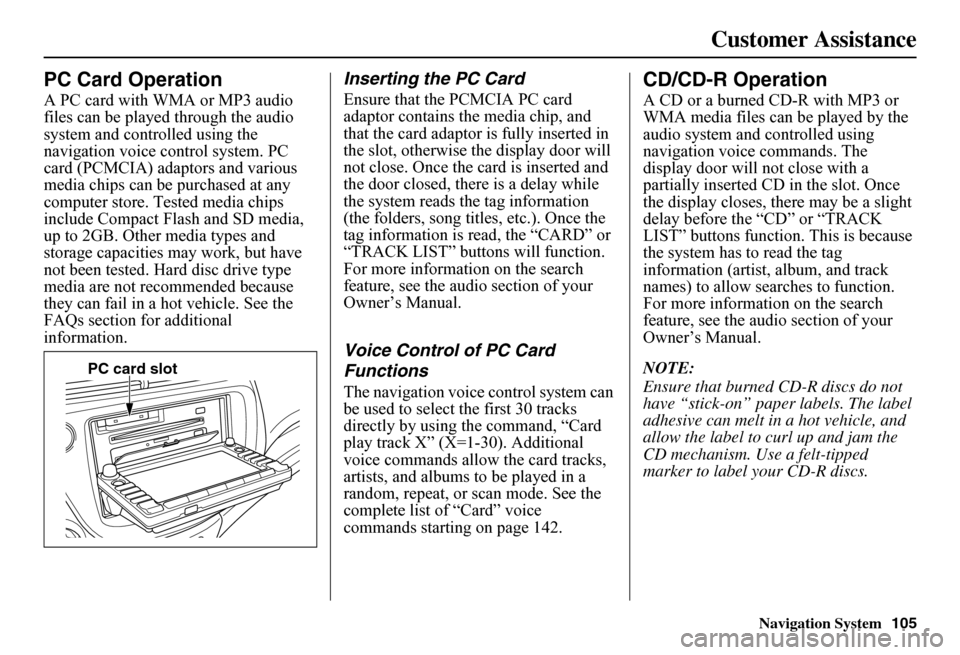
A PC card with WMA or MP3 audio files can be played through the audio system and controlled using the navigation voice control system. PC card (PCMCIA) adaptors and various media chips can be purchased at any computer store. Tested media chips include Compact Flash and SD media, up to 2GB. Other media types and storage capacities may work, but have not been tested. Hard disc drive type media are not recommended because they can fail in a hot vehicle. See the FAQs section for additional information.
Inserting the PC Card
Ensure that the PCMCIA PC card adaptor contains th e media chip, and that the card adaptor is fully inserted in the slot, otherwise the display door will not close. Once the card is inserted and the door closed, ther e is a delay while the system reads the tag information (the folders, song titles, etc.). Once the tag information is read, the “CARD” or “TRACK LIST” buttons will function. For more information on the search feature, see the audio section of your Owner’s Manual.
Voice Control of PC Card
Functions
The navigation voice control system can be used to select the first 30 tracks directly by using the command, “Card play track X” (X=1-30). Additional voice commands allow the card tracks, artists, and albums to be played in a random, repeat, or scan mode. See the complete list of “Card” voice commands starting on page 142.
CD/CD-R Operation
A CD or a burned CD-R with MP3 or WMA media files can be played by the audio system and controlled using navigation voice commands. The display door will not close with a partially inserted CD in the slot. Once the display closes, there may be a slight delay before the “CD” or “TRACK LIST” buttons function. This is because the system has to read the tag information (artist, album, and track names) to allow searches to function. For more information on the search feature, see the audio section of your Owner’s Manual.
NOTE:
Ensure that burned CD-R discs do not have “stick-on” paper labels. The label adhesive can melt in a hot vehicle, and allow the label to curl up and jam the CD mechanism. Use a felt-tipped marker to label your CD-R discs.
PC card slot
Page 125 of 152
124Navigation System
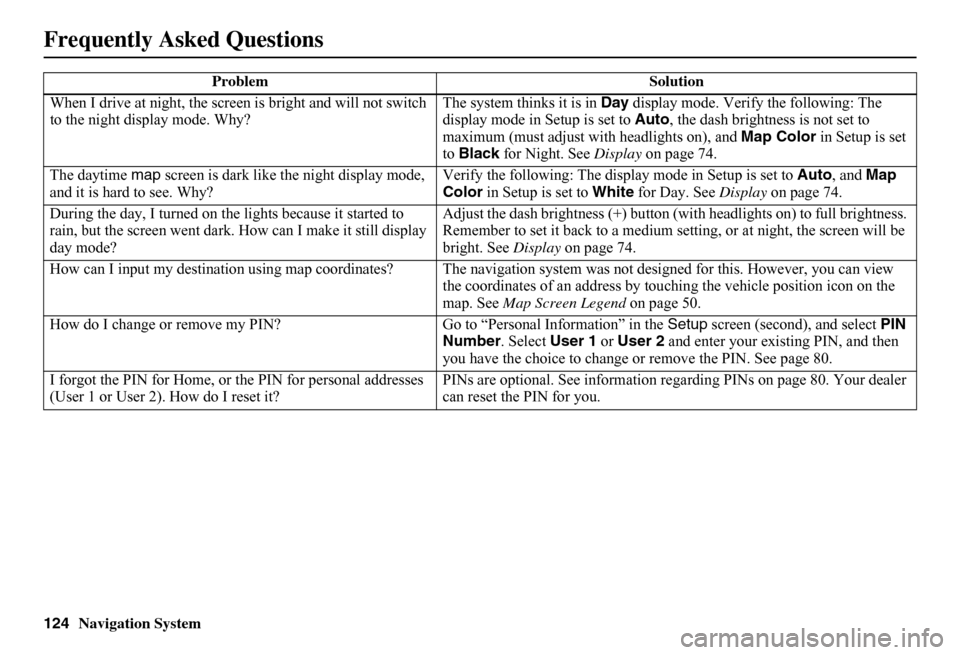
When I drive at night, the screen is bright and will not switch to the night display mode. Why? The system thinks it is in Day display mode. Verify the following: The display mode in Setup is set to Auto, the dash brightness is not set to maximum (must adjust with headlights on), and Map Color in Setup is set to Black for Night. See Display on page 74.
The daytime map screen is dark like the night display mode, and it is hard to see. Why? Verify the following: The disp lay mode in Setup is set to Auto, and Map Color in Setup is set to White for Day. See Display on page 74.
During the day, I turned on the lights because it started to rain, but the screen went dark. How can I make it still display day mode?
Adjust the dash brightness (+) button (with headlights on) to full brightness. Remember to set it back to a medium set ting, or at night, the screen will be bright. See Display on page 74.
How can I input my destination using map coordinates? The navigation system was not designed for this. However, you can view the coordinates of an address by touching the vehicle position icon on the map. See Map Screen Legend on page 50.
How do I change or remove my PIN? Go to “Personal Information” in the Setup screen (second), and select PIN Number . Select User 1 or User 2 and enter your existing PIN, and then you have the choice to change or remove the PIN. See page 80.
I forgot the PIN for Home, or the PIN for personal addresses (User 1 or User 2). How do I reset it? PINs are optional. See information re garding PINs on page 80. Your dealer can reset the PIN for you.
Problem Solution
Frequently Asked Questions
Page 138 of 152
Navigation System137
Glossary
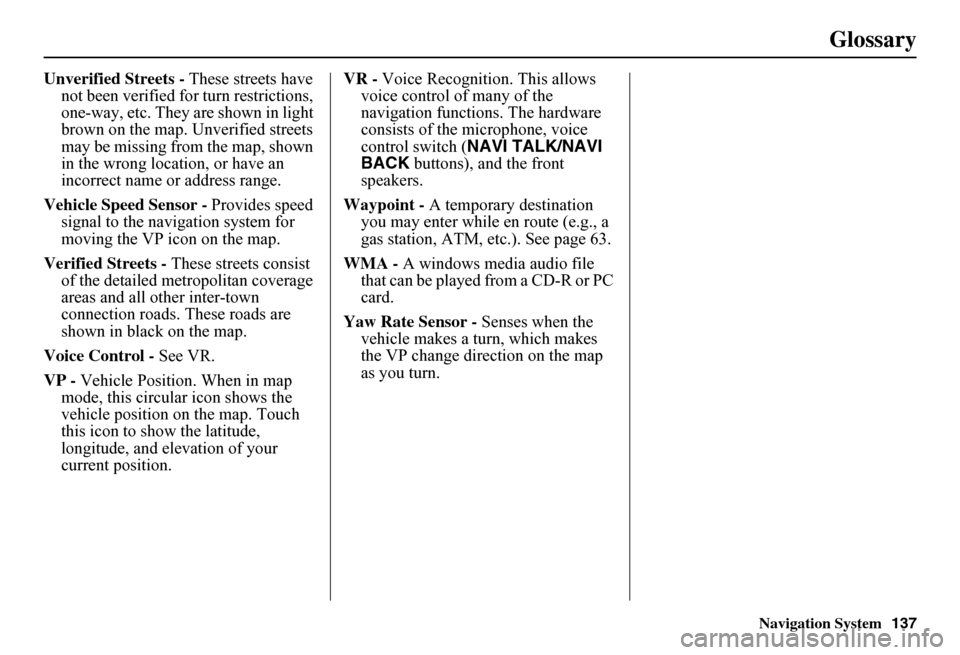
Unverified Streets - These streets have not been verified for turn restrictions, one-way, etc. They are shown in light brown on the map. Unverified streets may be missing from the map, shown in the wrong location, or have an incorrect name or address range.
Vehicle Speed Sensor - Provides speed signal to the navigation system for moving the VP icon on the map.
Verified Streets - These streets consist of the detailed metropolitan coverage areas and all other inter-town connection roads. These roads are shown in black on the map.
Voice Control - See VR.
VP - Vehicle Position. When in map mode, this circular icon shows the vehicle position on the map. Touch this icon to show the latitude, longitude, and elevation of your current position.
VR - Voice Recognition. This allows voice control of many of the navigation functions. The hardware consists of the microphone, voice control switch ( NAVI TALK/NAVI BACK buttons), and the front speakers.
Waypoint - A temporary destination you may enter while en route (e.g., a gas station, ATM, etc.). See page 63.
WMA - A windows media audio file that can be played from a CD-R or PC card.
Yaw Rate Sensor - Senses when the vehicle makes a turn, which makes the VP change direction on the map as you turn.