sensor HONDA FIT 2013 3.G User Guide
[x] Cancel search | Manufacturer: HONDA, Model Year: 2013, Model line: FIT, Model: HONDA FIT 2013 3.GPages: 286, PDF Size: 9.38 MB
Page 49 of 286
48
uuAirbagsuAirbag Care
Safe Driving
Airbag Care
You do not need to, and should not, perform any maintenance on or replace any
airbag system components yourself. However, you should have your vehicle
inspected by a dealer in the following situations: ■ When the airbags have deployed
If an airbag has inflated, the control unit and other related parts must be replaced.
Similarly, once an automatic seat belt tensioner has been activated, it must be replaced. ■ When the vehicle has been in a moderate-to-severe collision
Even if the airbags did not inflate, have your dealer inspect the following: the driver’s
seat position sensor, weight sensors in the passenger’s seat, front seat belt
tensioners, and each seat belt that was worn during the crash.
■ Do not remove or modify a front seat without consulting a dealer
This would likely disable the driver’s seat position sensor or the passenger’s weight
sensors. If it is necessary to remove or modify a front seat to accommodate a person
with disabilities, contact a Honda dealer, or for U.S. vehicles, American Honda
Automobile Customer Service at 800-999-1009 and for Canadian vehicles, Honda
Canada Customer Relations at 888-9-HONDA-9.
1Airbag Care
We recommend against the use of salvaged airbag
system components, including the airbag, tensioners,
sensors, and control unit.
Main MenuTable of Contents
Page 67 of 286
66
uuIndicatorsu
Instrument Panel
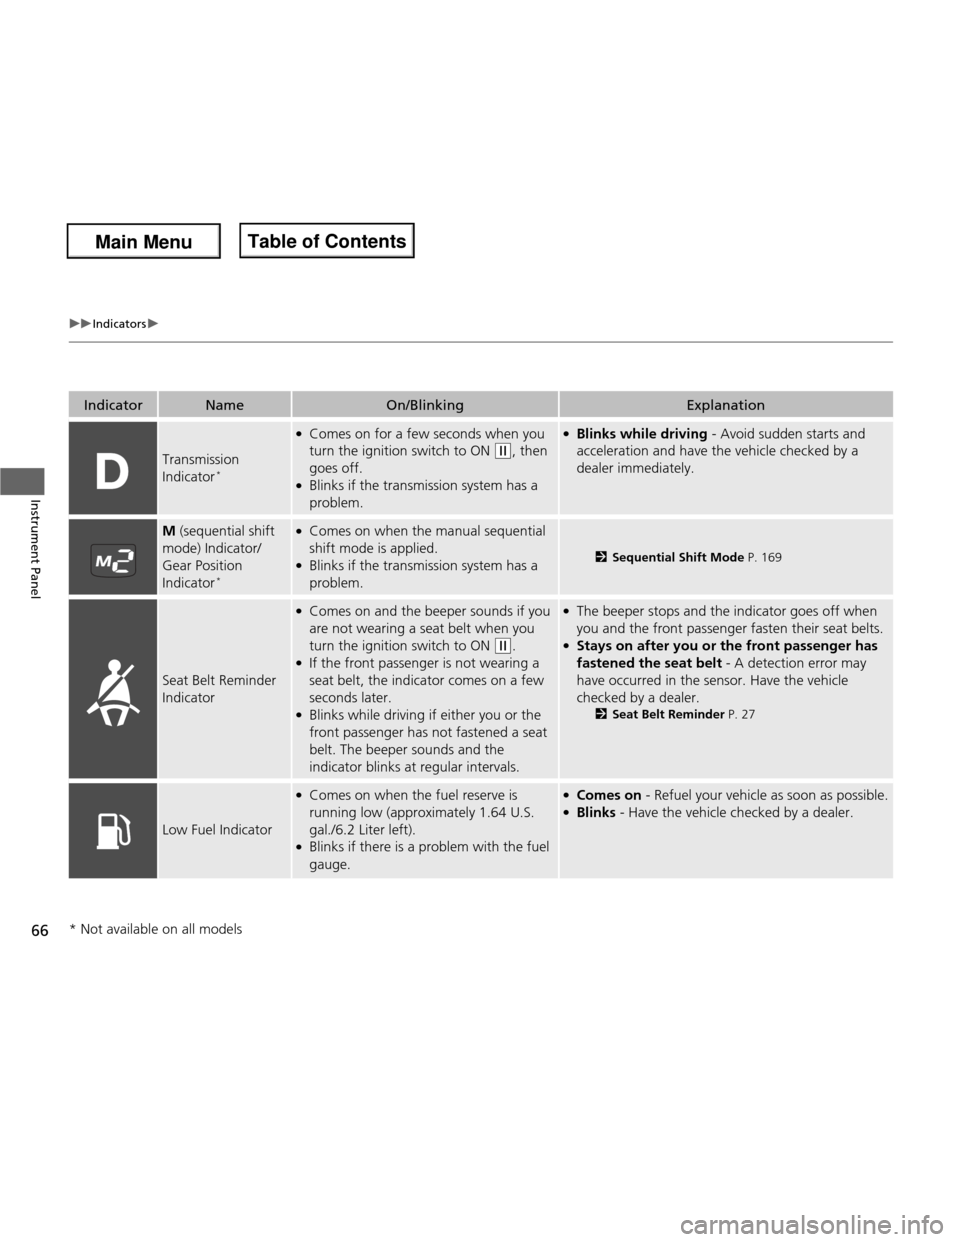
IndicatorNameOn/BlinkingExplanation
Transmission
Indicator*
●
Comes on for a few seconds when you
turn the ignition switch to ON
(w , then
goes off.
● Blinks if the transmission system has a
problem.
●Blinks while driving - Avoid sudden starts and
acceleration and have the vehicle checked by a dealer immediately.
M (sequential shift
mode) Indicator/
Gear Position
Indicator *●
Comes on when the manual sequential
shift mode is applied.
● Blinks if the transmission system has a
problem.
2 Sequential Shift Mode P. 169
Seat Belt Reminder
Indicator
●
Comes on and the beeper sounds if you
are not wearing a seat belt when you
turn the ignition switch to ON
(w .
● If the front passenger is not wearing a
seat belt, the indicator comes on a few seconds later.
● Blinks while driving if either you or the
front passenger has not fastened a seat
belt. The beeper sounds and the
indicator blinks at regular intervals.
●The beeper stops and the indicator goes off when
you and the front passenger fasten their seat belts.
● Stays on after you or the front passenger has
fastened the seat belt - A detection error may
have occurred in the sensor. Have the vehicle
checked by a dealer. 2Seat Belt Reminder P. 27
Low Fuel Indicator
●
Comes on when the fuel reserve is
running low (approximately 1.64 U.S.
gal./6.2 Liter left).
● Blinks if there is a problem with the fuel gauge.●Comes on - Refuel your vehicle as soon as possible.
● Blinks - Have the vehicle checked by a dealer.
* Not available on all models
Main Menu
Main MenuTable of Contents
Page 68 of 286
67
uuIndicatorsu
Continued
Instrument Panel
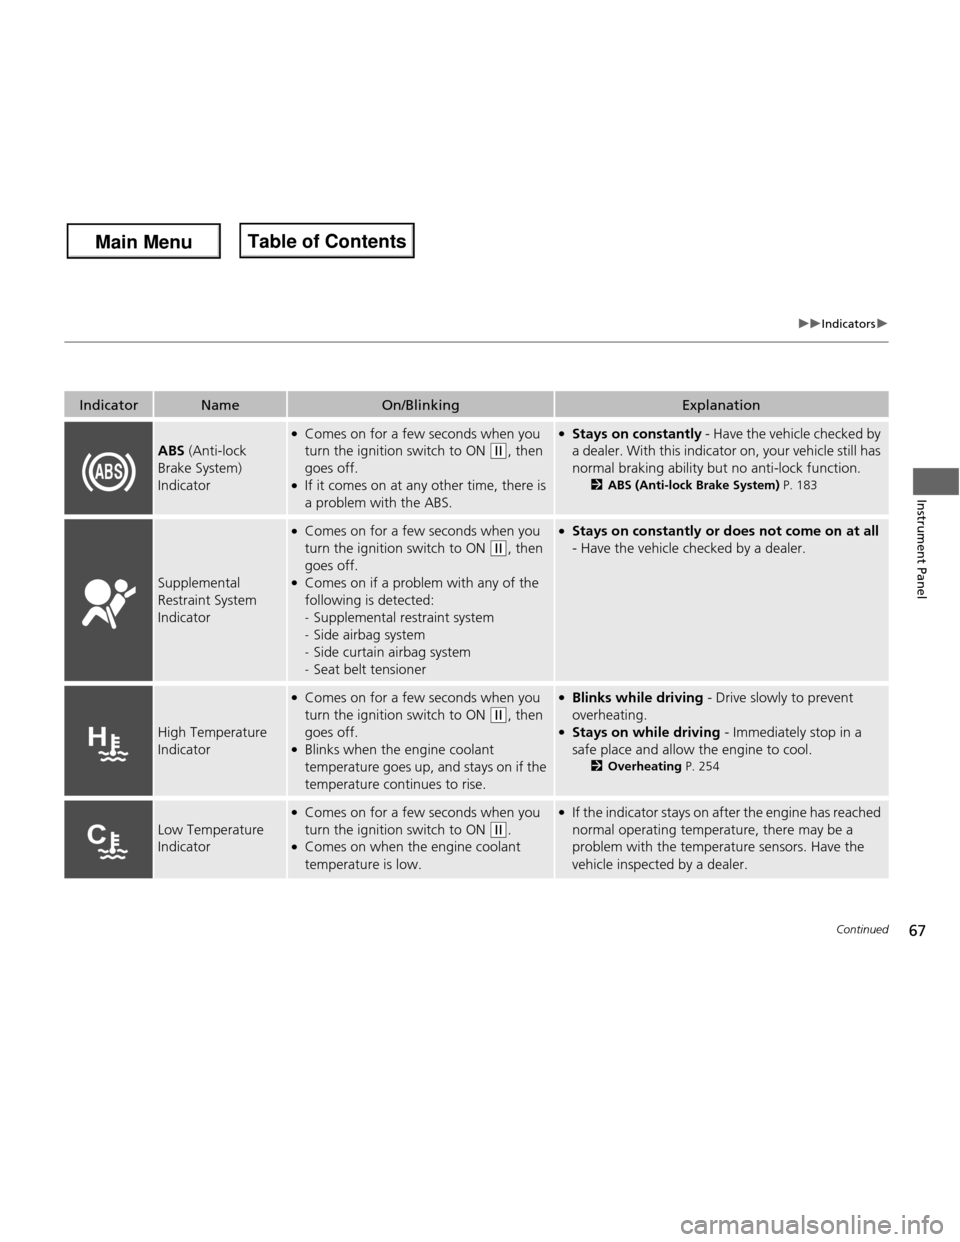
IndicatorNameOn/BlinkingExplanation
ABS (Anti-lock
Brake System)
Indicator
● Comes on for a few seconds when you
turn the ignition switch to ON
(w , then
goes off.
● If it comes on at any other time, there is
a problem with the ABS.
● Stays on constantly - Have the vehicle checked by
a dealer. With this indicator on, your vehicle still has
normal braking ability but no anti-lock function. 2ABS (Anti-lock Brake System) P. 183
Supplemental
Restraint System
Indicator
●
Comes on for a few seconds when you
turn the ignition switch to ON
(w , then
goes off.
● Comes on if a problem with any of the
following is detected: -Supplemental restraint system
- Side airbag system
- Side curtain airbag system
- Seat belt tensioner
●
Stays on constantly or does not come on at all
- Have the vehicle checked by a dealer.
High Temperature
Indicator
● Comes on for a few seconds when you
turn the ignition switch to ON
(w , then
goes off.
● Blinks when the engine coolant
temperature goes up, and stays on if the
temperature continues to rise.
● Blinks while driving - Drive slowly to prevent
overheating.
● Stays on while driving - Immediately stop in a
safe place and allow the engine to cool. 2Overheating P. 254
Low Temperature
Indicator
●
Comes on for a few seconds when you
turn the ignition switch to ON
(w .
● Comes on when the engine coolant
temperature is low.
●
If the indicator stays on after the engine has reached
normal operating temperature, there may be a
problem with the temperature sensors. Have the
vehicle inspected by a dealer.
Main Menu
Main MenuTable of Contents
Page 109 of 286
108
uuAdjusting the SeatsuRear Seats
Controls
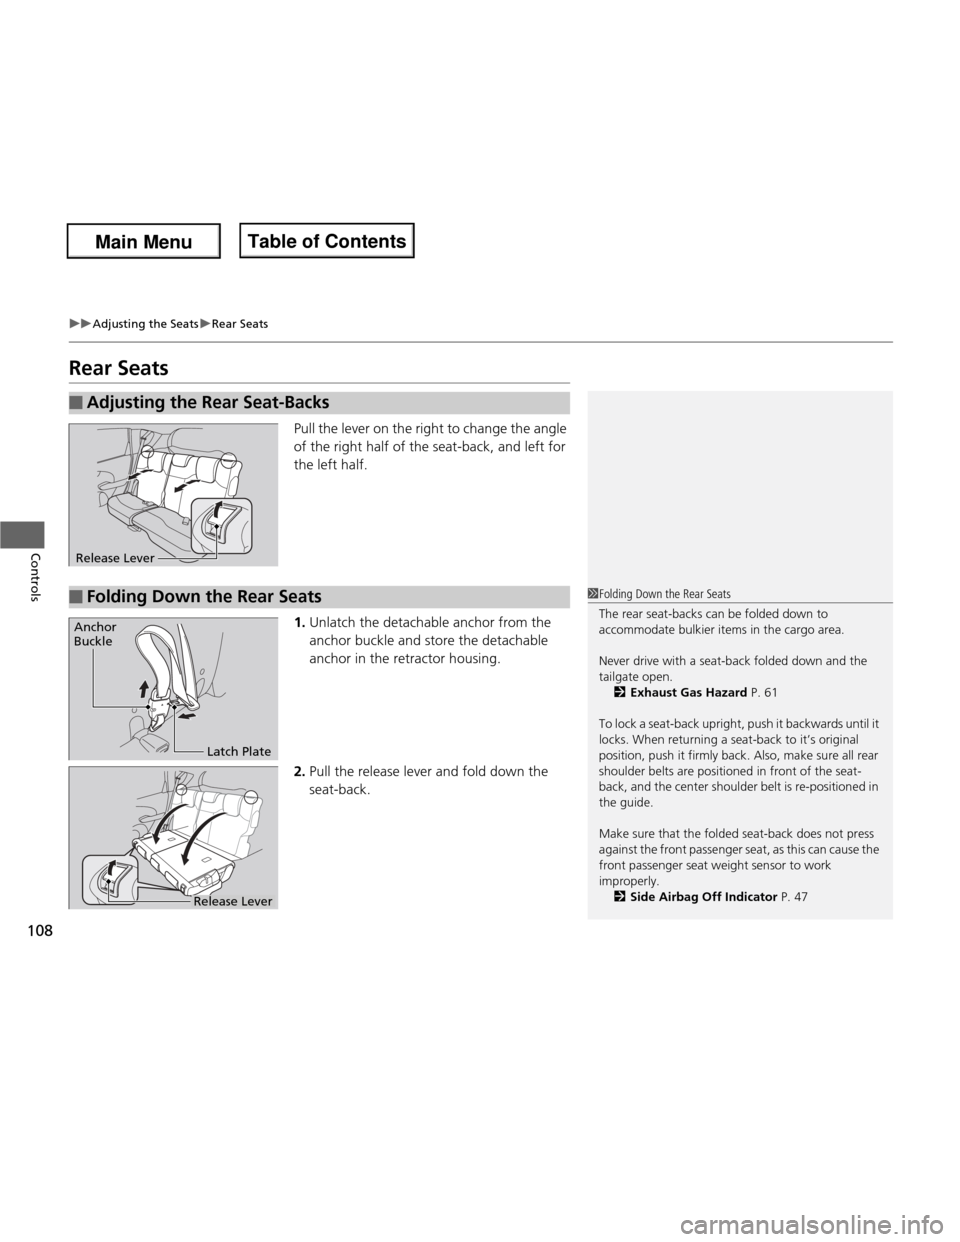
Rear SeatsPull the lever on the right to change the angle
of the right half of the seat-back, and left for
the left half. 1.Unlatch the detachable anchor from the
anchor buckle and store the detachable
anchor in the retractor housing.
2. Pull the release lever and fold down the seat-back.
■Adjusting the Rear Seat-Backs
Release Lever
■Folding Down the Rear Seats1Folding Down the Rear Seats
The rear seat-backs can be folded down to
accommodate bulkier items in the cargo area.
Never drive with a seat-back folded down and the tailgate open.
2 Exhaust Gas Hazard P. 61
To lock a seat-back upright, push it backwards until it
locks. When returning a seat-back to it’s original
position, push it firmly back. Also, make sure all rear
shoulder belts are positioned in front of the seat-
back, and the center shoulder belt is re-positioned in the guide.
Make sure that the folded seat-back does not press
against the front passenger seat, as this can cause the
front passenger seat weight sensor to work
improperly. 2 Side Airbag Off Indicator P. 47
Anchor
Buckle
Latch Plate
Release Lever
Main Menu
Main MenuTable of Contents
Page 157 of 286

156
uuBefore DrivinguDriving Preparation
Driving
•Be sure items placed on the floor behind the front seats cannot roll under the
seats.
uThey can interfere with the driver’s ability to operate the pedals, the operation
of the seats, or the operation of the sensors under the seats.
• Everyone in the vehicle must fasten their seat belt.
2 Fastening a Seat Belt P. 29
• Make sure that the indicators in the instrument panel come on when you start the
vehicle, and go off soon after.
uAlways have a dealer check the vehicle if a problem is indicated.
2 Indicators P. 64
Main Menu
Main MenuTable of Contents
Page 212 of 286
211
uuMaintenance Under the HooduRefilling Window Washer Fluid
Maintenance
Refilling Window Washer Fluid
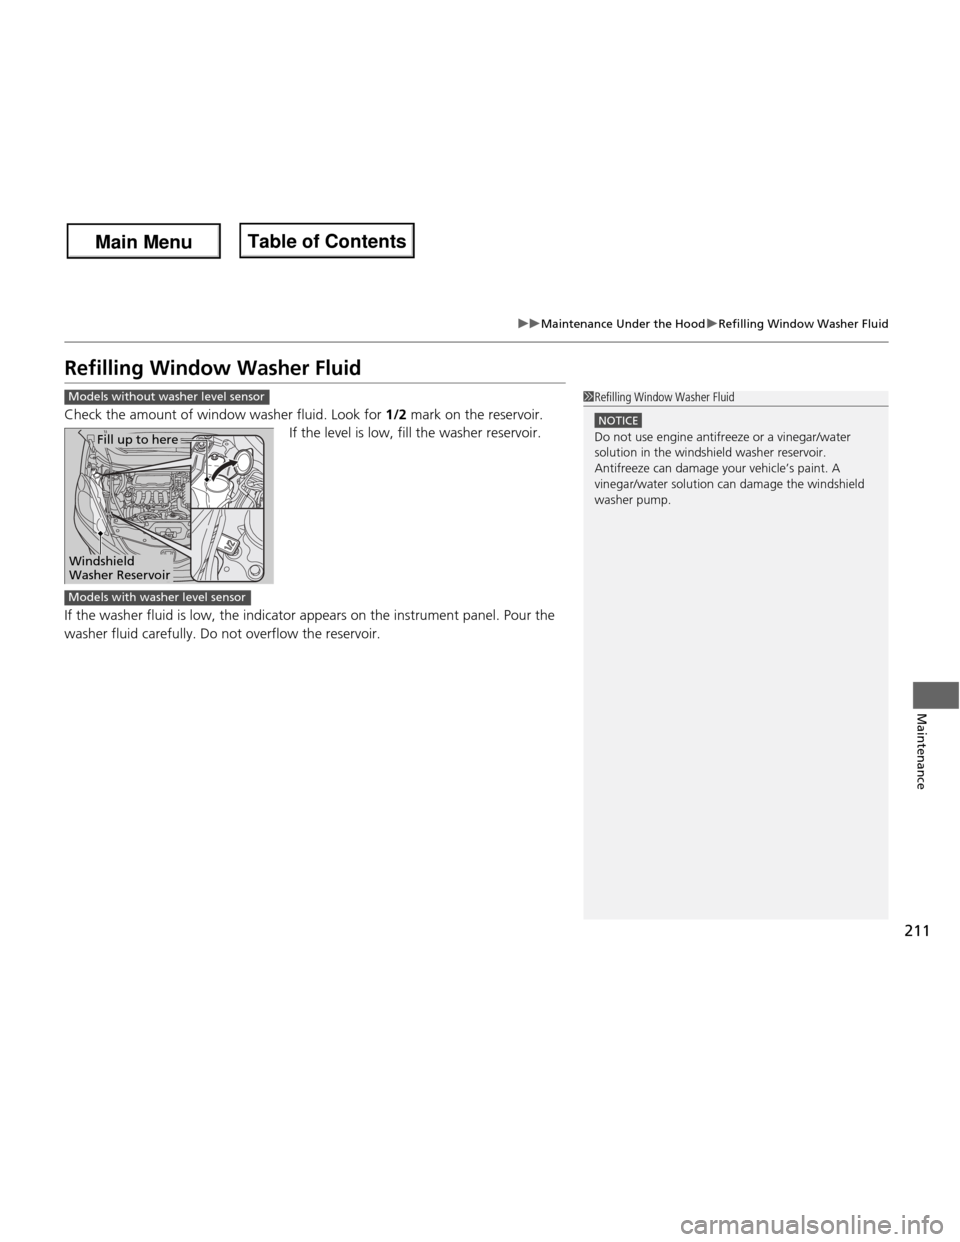
Check the amount of window washer fluid. Look for 1/2 mark on the reservoir.
If the level is low, fill the washer reservoir.
If the washer fluid is low, the indicator appears on the instrument panel. Pour the
washer fluid carefully. Do not overflow the reservoir.
1Refilling Window Washer Fluid
NOTICE
Do not use engine antifreeze or a vinegar/water
solution in the windshield washer reservoir.
Antifreeze can damage your vehicle’s paint. A
vinegar/water solut ion can damage the windshield
washer pump.
Models without washer level sensor
Windshield Washer Reservoir
Fill up to here
Models with washer level sensor
Main Menu
Main MenuTable of Contents
Page 240 of 286
239
Continued
Handling the Unexpected
If a Tire Goes Flat
Changing a Flat Tire *
If a tire goes flat while driving, grasp the steering wheel firmly, and brake gradually
to reduce speed. Then, stop in a safe place. Replace the flat tire with a compact
spare tire. Go to a dealer as soon as possible to have the full size tire repaired or
replaced. 1. Park the vehicle on firm, level, non-slippery surface and apply the parking brake.
2. Move the shift lever to
(P .
2. Move the shift lever to
(R .
3. Turn on the hazard warning lights and turn the ignition switch to LOCK
(0 .
1Changing a Flat Tire *
Periodically check the tire pressure of the compact
spare. It should be set to the specified pressure.
Specified Pressure: 60 psi (420 kPa, 4.2 kgf/cm 2
)
When driving with the compact spare tire, keep the
vehicle speed under 50 mph (80 km/h). Replace with
a full size tire as soon as possible.
The compact spare tire and wheel in your vehicle are
specifically for this model.
Do not use them with another vehicle.
Do not use another type of compact spare tire or
wheel with your vehicle.
Do not mount tire chains on a compact spare tire.
If a chain-mounted front tire goes flat, remove one of
the full-size rear tires and replace it with the compact
spare tire. Remove the flat front tire and replace it
with the full size tire that was removed from the rear.
Mount the tire chains on the front tire.
Do not use a puncture-repairing agent on a flat tire,
as it can damage the tire pressure sensor.
U.S. models only
Automatic transmission models
Manual transmission models
All models
Main Menu
Main MenuTable of Contents
Page 245 of 286
uuIf a Tire Goes FlatuChanging a Flat Tire*
244
Handling the Unexpected
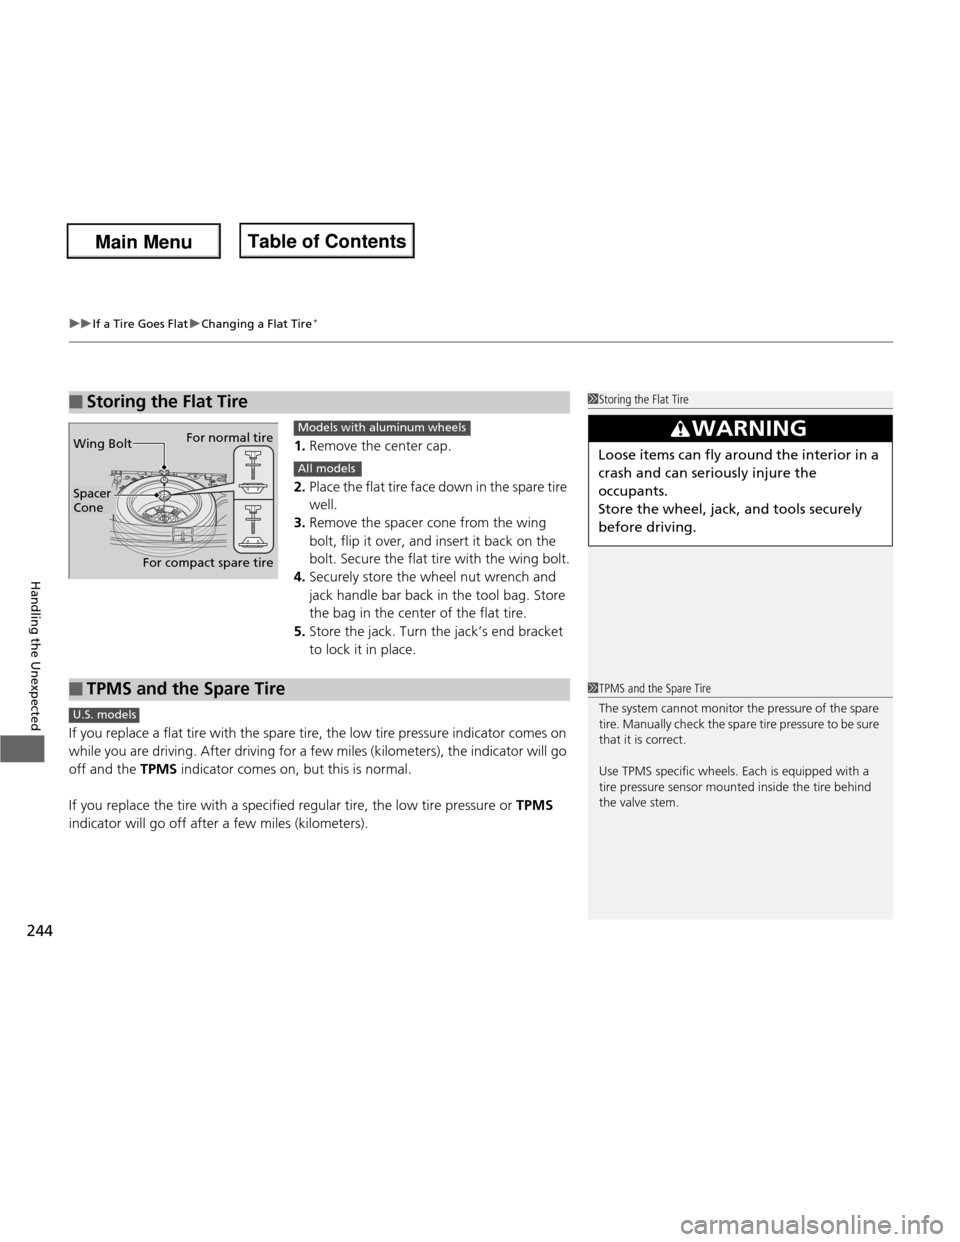
1. Remove the center cap.
2. Place the flat tire face down in the spare tire well.
3. Remove the spacer cone from the wing
bolt, flip it over, and insert it back on the
bolt. Secure the flat tire with the wing bolt.
4. Securely store the wheel nut wrench and
jack handle bar back in the tool bag. Store
the bag in the center of the flat tire.
5. Store the jack. Turn the jack’s end bracket
to lock it in place.
If you replace a flat tire with the spare tire, the low tire pressure indicator comes on
while you are driving. After driving for a few miles (kilometers), the indicator will go off and the TPMS indicator comes on, but this is normal.
If you replace the tire with a specified regular tire, the low tire pressure or TPMS
indicator will go off after a few miles (kilometers).
■Storing the Flat Tire1Storing the Flat Tire
3WARNING
Loose items can fly around the interior in a
crash and can seriously injure the
occupants.
Store the wheel, jack, and tools securely before driving.
For normal tire
For compact spare tire
Wing Bolt
Spacer
Cone
Models with aluminum wheels
All models
■TPMS and the Spare Tire1TPMS and the Spare Tire
The system cannot monitor the pressure of the spare
tire. Manually check
the spare tire pressure to be sure
that it is correct.
Use TPMS specific wheels. Each is equipped with a
tire pressure sensor mounted inside the tire behind
the valve stem.
U.S. models
Main Menu
Main MenuTable of Contents
Page 246 of 286
245
uuIf a Tire Goes FlatuTemporarily Repairing a Flat Tire
Continued
Handling the Unexpected
Temporarily Repairing a Flat Tire
If the tire has a large cut or is otherwise severely damaged, you will need to have the
vehicle towed. If the tire only has a small puncture, from a nail for instance, you can
use the tire repair kit so that you can drive to the nearest service station for a more
permanent repair.
If a tire goes flat while driving, grasp the steering wheel firmly, and brake gradually
to reduce speed. Then stop in a safe place. 1.Park the vehicle on firm, level, and non-slippery ground.
2. Put the shift lever in
(P .
3. Set the parking brake.
4. Turn on the hazard warning lights and turn the ignition switch to LOCK
(0 .
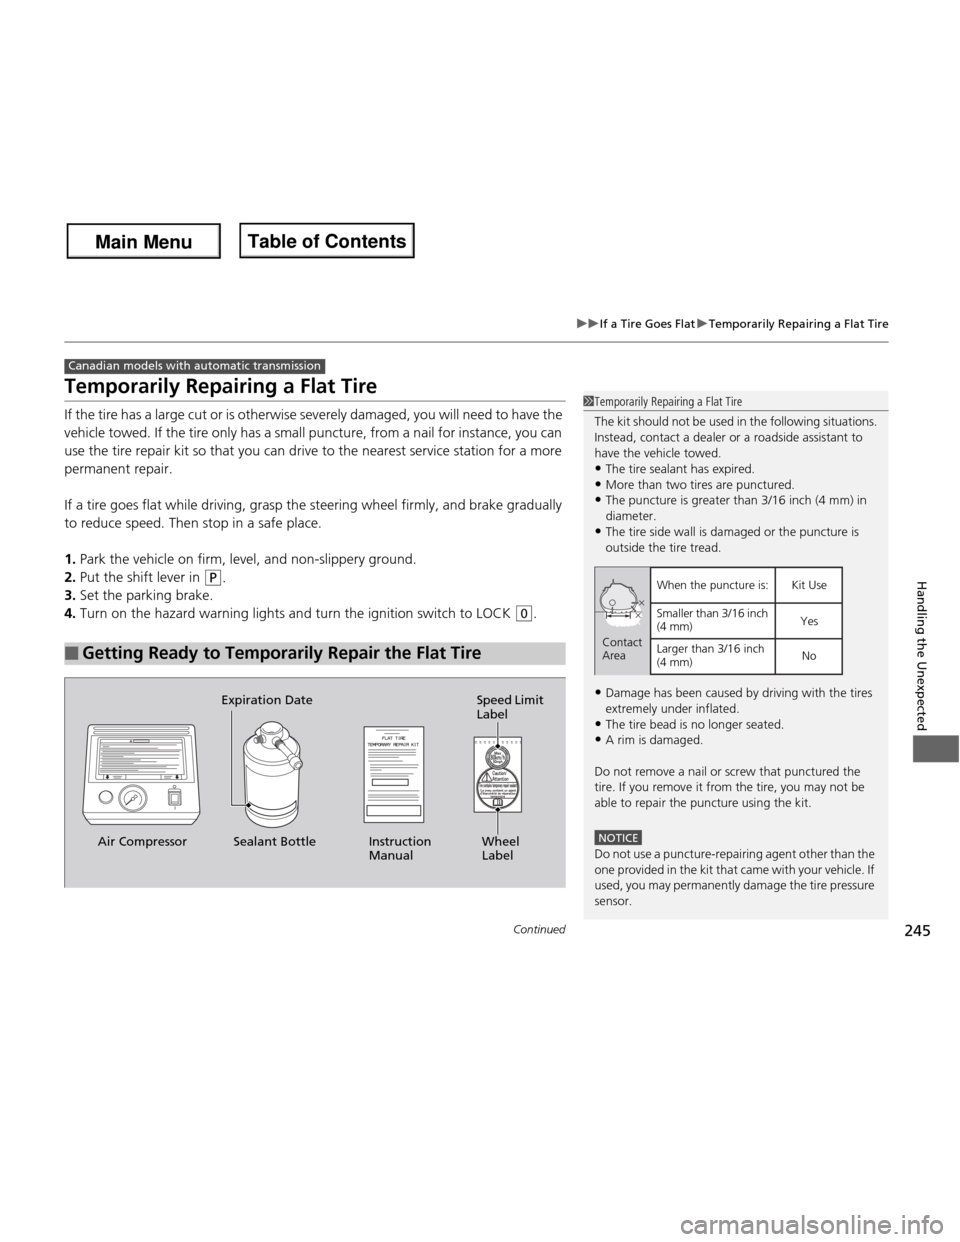
■Getting Ready to Temporarily Repair the Flat Tire
Canadian models with automatic transmission
1Temporarily Repairing a Flat Tire
The kit should not be used in the following situations.
Instead, contact a dealer or a roadside assistant to
have the vehicle towed.
• The tire sealant has expired.
• More than two tires are punctured.
• The puncture is greater than 3/16 inch (4 mm) in diameter.
• The tire side wall is damaged or the puncture is
outside the tire tread.
• Damage has been caused by driving with the tires
extremely under inflated.
• The tire bead is no longer seated.
• A rim is damaged.
Do not remove a nail or screw that punctured the
tire. If you remove it from the tire, you may not be
able to repair the puncture using the kit.
NOTICE
Do not use a puncture-repairing agent other than the
one provided in the ki t that came with your vehicle. If
used, you may permanently damage the tire pressure
sensor.
When the puncture is:
Smaller than 3/16 inch
(4 mm)
Larger than 3/16 inch
(4 mm) Kit Use
YesNo
Contact
Area
Instruction Manual
Air Compressor
Wheel
Label
Sealant Bottle
Expiration Date
Speed Limit Label
Main Menu
Main MenuTable of Contents
Page 280 of 286

Index
279
Index
Index
A
ABS (Anti-lock Brake System).................. 183
Accessories and Modifications ................ 190
Accessory Power Socket ........................... 115
Active Head Restraints ............................. 107
Additives Coolant .................................................. 206
Engine Oil ............................................... 201
Washer ................................................... 211
Additives, Engine Oil ............................... 201
Adjusting
Armrest .................................................. 110
Front Seats.............................................. 103
Head Restraints ....................................... 105
Headlights .............................................. 212
Mirrors.................................................... 102
Rear Seats ............................................... 108
Steering Wheel ....................................... 101
Air Conditioning System
(Heating and Cooling System) ................ 118
Cooling................................................... 120 Defrosting the Windshield and
Windows ................................................ 120
Dust and Pollen Filter .............................. 233
Heating................................................... 119
Air Pressure ...................................... 223, 269
Airbags ....................................................... 34
Advanced Airbags ..................................... 40
After a Collision ........................................ 38
Airbag Care .............................................. 48
Event Data Recorder ................................. 19 Front Airbags (SRS) .................................... 37
Indicator ........................................ 45, 67, 69
Passenger Airbag Off Indicator .................. 46
Sensors ...................................................... 34
Side Airbag Cutoff System ......................... 43
Side Airbag Off Indicator ........................... 47
Side Airbags .............................................. 41
Side Curtain Airbags .................................. 44
Anti-lock Brake System (ABS) .................. 183
Indicator .................................................... 67
Armrest ..................................................... 110
Audio System ............................................ 122
Adjusting the Sound ................................ 126
Auxiliary Input Jack .................................. 123
Error Messages ........................................ 135
General Information ................................ 137
MP3/WMA/AAC ...................................... 133
Recommended CDs ................................. 137
Recommended Devices ............................ 139
Remote Controls ......................................... 3
Security Code .......................................... 124
Theft Protection ....................................... 124
USB Adapter Cable .................................. 123
USB Flash Drives ...................................... 139
Authorized Manuals ................................. 277
Auto Door Locking/Unlocking ................... 84
Customize ................................................. 85
Automatic Transmission ........................... 164
Creeping ................................................. 164
Fluid ........................................................ 208
Kickdown ................................................ 164 Operating the Shift Lever........... 13, 166, 168
Sequential Shift Mode ............................. 169
Shift Lever Does Not Move ...................... 253
Shifting ........................................... 165, 167
Auxiliary Input Jack .................................. 123
Average Fuel Economy .............................. 74
B Battery ...................................................... 231
Charging System Indicator................. 65, 256
Jump Starting .......................................... 251
Maintenance (Checking the Battery) ........ 231
Maintenance (Replacing) ......................... 232
Belts (Seat) .................................................. 26
Beverage Holders ..................................... 114
Bluetooth ® HandsFreeLink ®..................... 140
Booster Seats (For Children) ...................... 60
Brake System ............................................ 181
Anti-lock Brake System (ABS)................... 183
Brake Assist System ................................. 184
Fluid ........................................................ 210
Foot Brake............................................... 182
Indicator............................................ 64, 258
Parking Brake .......................................... 181
Brightness Control (Instrument Panel) ...... 99
Bulb Replacement .................................... 212
Brake Light, Taillight, Back-Up Light and Rear Turn Signal Lights .......................... 216
Fog Lights ............................................... 214
Headlights ............................................... 212
Main Menu
Main Menu