display HONDA FIT 2016 3.G Quick Guide
[x] Cancel search | Manufacturer: HONDA, Model Year: 2016, Model line: FIT, Model: HONDA FIT 2016 3.GPages: 75, PDF Size: 5.39 MB
Page 51 of 75
94 || 95
DRIVING
DRIVING
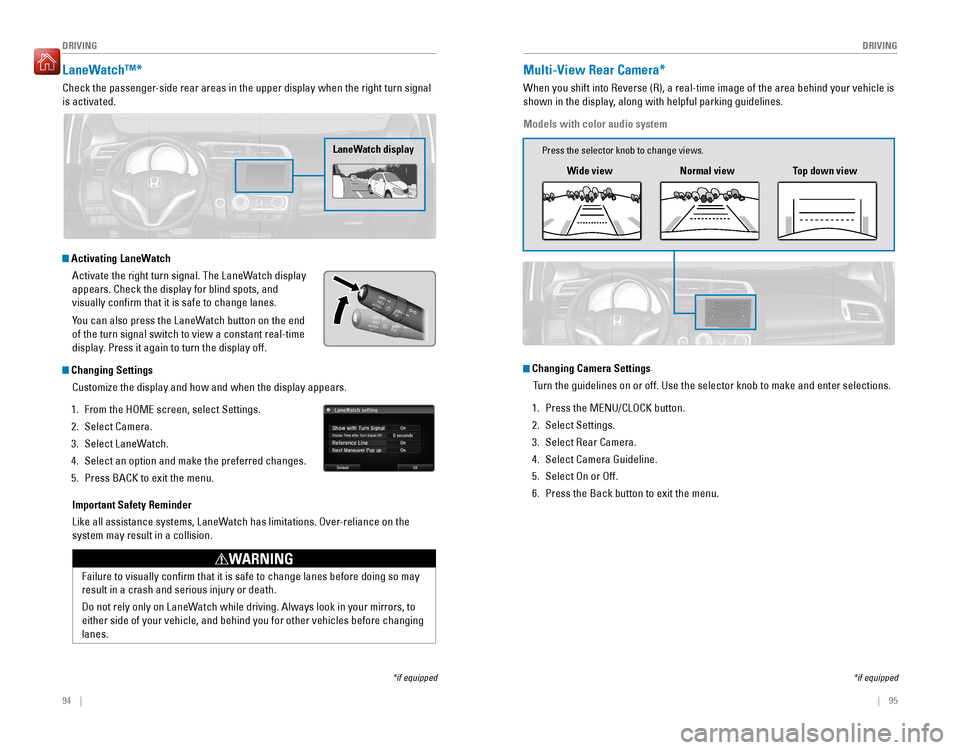
LaneWatch™*
Check the passenger-side rear areas in the upper display when the right turn signal is activated.
LaneWatch display
Activating LaneWatch
Activate the right turn signal. The LaneWatch display
appears. Check the display for blind spots, and visually con�rm that it is safe to change lanes.
You can also press the LaneWatch button on the end of the turn signal switch to view a constant real-time
display. Press it again to turn the display off.
Changing Settings
Customize the display and how and when the display appears.
1. From the HOME screen, select Settings.
2. Select Camera.
3. Select LaneWatch.
4. Select an option and make the preferred changes.
5. Press BACK to exit the menu.
Important Safety Reminder
Like all assistance systems, LaneWatch has limitations. Over-reliance on the system may result in a collision.
Failure to visually conirm that it is safe to change lanes before doing so may result in a crash and serious injury or death.
Do not rely only on LaneWatch while driving. Always look in your mirrors, to either side of your vehicle, and behind you for other vehicles before changing lanes.
WARNING
*if equipped
Multi-View Rear Camera*
When you shift into Reverse (R), a real-time image of the area behind your vehicle is
shown in the display, along with helpful parking guidelines.
Models with color audio system
Wide view Normal view Top down view
*if equipped
Changing Camera Settings
Turn the guidelines on or off. Use the selector knob to make and enter selections.
1. Press the MENU/CLOCK button.
2. Select Settings.
3. Select Rear Camera.
4. Select Camera Guideline.
5. Select On or Off.6. Press the Back button to exit the menu.
Press the selector knob to change views.
Page 52 of 75
96 || 97
DRIVING
DRIVING
The rear camera view is restricted. You cannot see the corner ends of the bumper or what is
underneath the bumper. Its unique lens also makes objects appear closer or farther than they actually are.
Visually conirm that it is safe to drive before backing up. Certain conditions (such as weather,
lighting, and high temperatures) may also restrict the rear view. Do not rely on the rearview display, which does not give you all information about conditions at the rear of your vehicle.
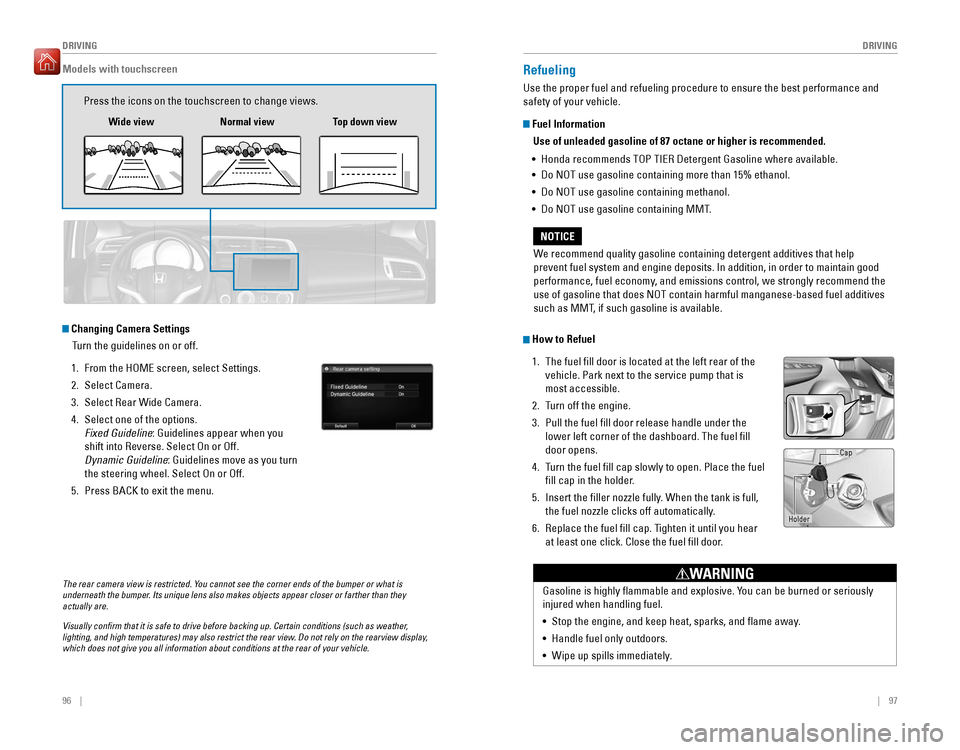
Changing Camera Settings
Turn the guidelines on or off.
1. From the HOME screen, select Settings.
2. Select Camera.
3. Select Rear Wide Camera.
4. Select one of the options. Fixed Guideline : Guidelines appear when you
shift into Reverse. Select On or Off.
Dynamic Guideline : Guidelines move as you turn
the steering wheel. Select On or Off.
5. Press BACK to exit the menu.
Models with touchscreen
Press the icons on the touchscreen to change views.
Wide view Normal view Top down view
Refueling
Use the proper fuel and refueling procedure to ensure the best performance and safety of your vehicle.
Fuel Information
Use of unleaded gasoline of 87 octane or higher is recommended.
• Honda recommends TOP TIER Detergent Gasoline where available.
• Do NOT use gasoline containing more than 15% ethanol.
• Do NOT use gasoline containing methanol.
• Do NOT use gasoline containing MMT.
How to Refuel
1. The fuel �ll door is located at the left rear of the vehicle. Park next to the service pump that is most accessible.
2. Turn off the engine.
3. Pull the fuel �ll door release handle under the lower left corner of the dashboard. The fuel ill door opens.
4. Turn the fuel �ll cap slowly to open. Place the fuel
�ll cap in the holder.
5. Insert the iller nozzle fully. When the tank is full,
the fuel nozzle clicks off automatically.
6. Replace the fuel �ll cap. Tighten it until you hear at least one click. Close the fuel �ll door.
We recommend quality gasoline containing detergent additives that help
prevent fuel system and engine deposits. In addition, in order to maintain good
performance, fuel economy, and emissions control, we strongly recommend the use of gasoline that does NOT contain harmful manganese-based fuel additives
such as MMT, if such gasoline is available.
NOTICE
Gasoline is highly lammable and explosive. You can be burned or seriously injured when handling fuel. •
Stop the engine, and keep heat, sparks, and �ame away.
• Handle fuel only outdoors.
• Wipe up spills immediately.
WARNING
Holder Cap
Page 60 of 75
112 || 113
MAINTENANCE
MAINTENANCE
Safety Precautions
Some of the most important safety precautions are listed below; however, we cannot warn you of every conceivable hazard that can arise in performing maintenance. Only you can decide whether or not you should perform a given task.
Maintenance Safety
•
To reduce the possibility of ire or explosion, keep cigarettes, sparks, and lames
away from the battery and all fuel-related parts.
• Never leave rags, towels, or other lammable objects under the hood.
• To clean parts, use a commercially available degreaser or parts cleaner, not gasoline.
• Wear eye protection and protective clothing when working with the battery or
compressed air.
• Do not run the engine in conined spaces where carbon monoxide gas can
accumulate.
Vehicle Safety
• The vehicle must be stationary, and parked on level ground with the parking
brake set and the engine off.
• Be aware that hot parts can burn you. • Be aware that moving parts can injure you.
Improperly maintaining this vehicle or failing to correct a problem before driving can cause a crash in which you can be seriously hurt or killed. Always follow the inspection and maintenance recommendations according to the schedules in this guide.
WARNING
Failure to properly follow maintenance instructions and precautions can cause you to be seriously hurt or killed. Always follow the procedures and precautions in this guide.
WARNING
Learn about basic maintenance that you can perform on the vehicle yourself, as well as information about how to best maintain the vehicle.
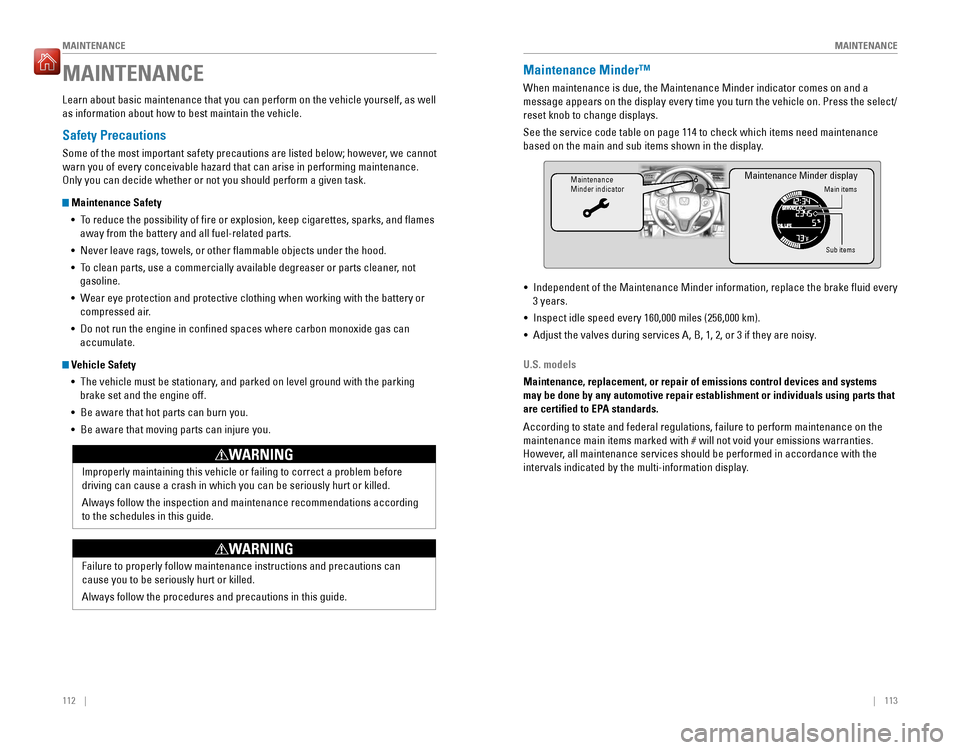
MAINTENANCEMaintenance Minder™
When maintenance is due, the Maintenance Minder indicator comes on and a
message appears on the display every time you turn the vehicle on. Press the select/reset knob to change displays. See the service code table on page 114 to check which items need maintenance
based on the main and sub items shown in the display.
Maintenance Minder indicatorMain items
Sub items
Maintenance Minder display
• Independent of the Maintenance Minder information, replace the brake luid every 3 years.
• Inspect idle speed every 160,000 miles (256,000 km).
• Adjust the valves during services A, B, 1, 2, or 3 if they are noisy.
U.S. models
Maintenance, replacement, or repair of emissions control devices and systems may be done by any automotive repair establishment or individuals using parts that
are certi�ed to EPA standards. According to state and federal regulations, failure to perform maintenance on the
maintenance main items marked with # will not void your emissions warranties.
However, all maintenance services should be performed in accordance with the
intervals indicated by the multi-information display.
Page 61 of 75
114 || 115
MAINTENANCE
MAINTENANCE
Maintenance Minder Service Codes
These codes indicate what services are due on your vehicle.
*1: If a message SERVICE does not appear more than 12 months after the display is reset, change the engine oil every year.
#: See information on maintenance and emissions warranty.
CODEMaintenance Main Items
A �
Replace engine oi l*1
B�
Replace engine oil and oil �lter
� Inspect front and rear brakes/service as necessary
� Check parking brake adjustment
� Inspect tie rod ends, steering gearbox, and boots
� Inspect suspension component s
� Inspect driveshaft boot s
� Inspect brake hoses and lines (Including ABS/VSA)
� Inspect all �uid levels and condition of �uids
� Inspect exhaust system #
� Inspect fuel lines and connections #
*2:If you drive in dusty conditions, replace the air cleaner element every 15,000 miles (24,000 km).*3:If you drive primarily in urban areas with high concentrations of soot in the air from industryand diesel-powered vehicles, replace the dust and pollen �lter every 15,000 miles (24,000 km).
CODEMaintenance Sub Items
1 �
Rotate tires
2�Replace air cleaner element *2
� Replace dust and pollen �lte r*3
� Inspect drive belt
3 �
Replace transmission �uid
4�Replace spark plugs
� Inspect valve clearance
5 �
Replace engine coolan t
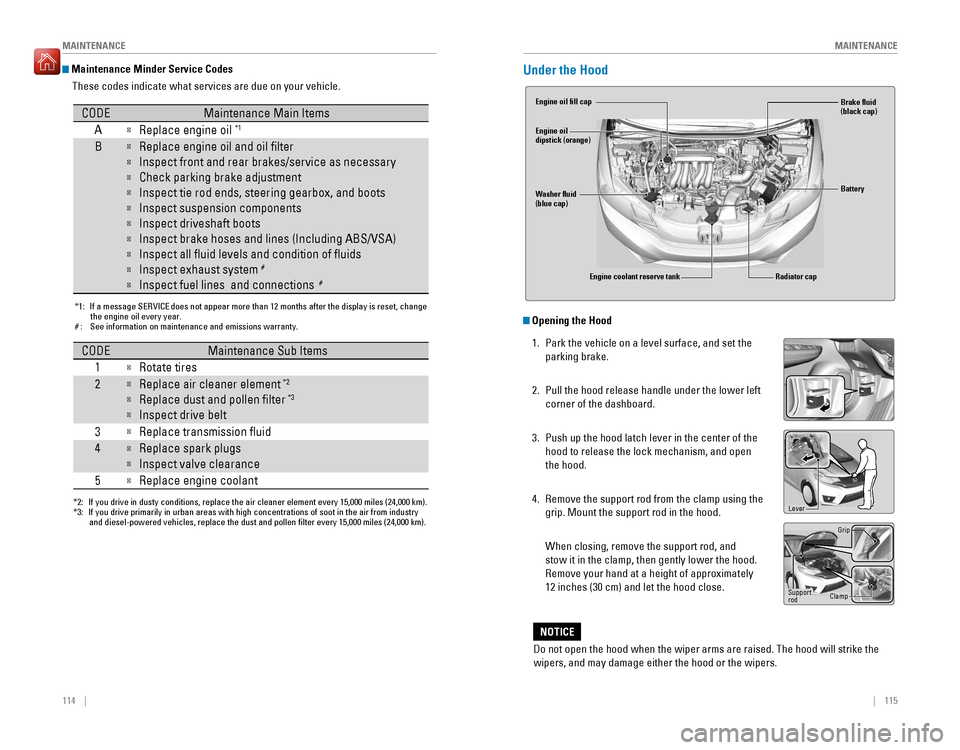
Under the Hood
Opening the Hood
1. Park the vehicle on a level surface, and set the
parking brake.
2. Pull the hood release handle under the lower left corner of the dashboard.
3. Push up the hood latch lever in the center of the hood to release the lock mechanism, and open the hood.
4. Remove the support rod from the clamp using the grip. Mount the support rod in the hood.
When closing, remove the support rod, and stow it in the clamp, then gently lower the hood. Remove your hand at a height of approximately 12 inches (30 cm) and let the hood close.
Do not open the hood when the wiper arms are raised. The hood will strike the wipers, and may damage either the hood or the wipers.
NOTICE
Engine coolant reserve tank
Washer �uid (blue cap)
Engine oil �ll cap Engine oil dipstick (orange)
Brake �uid (black cap) Battery
Radiator cap
Lever
Support rod Grip
Clamp
Page 62 of 75
116 || 117
MAINTENANCE
MAINTENANCE
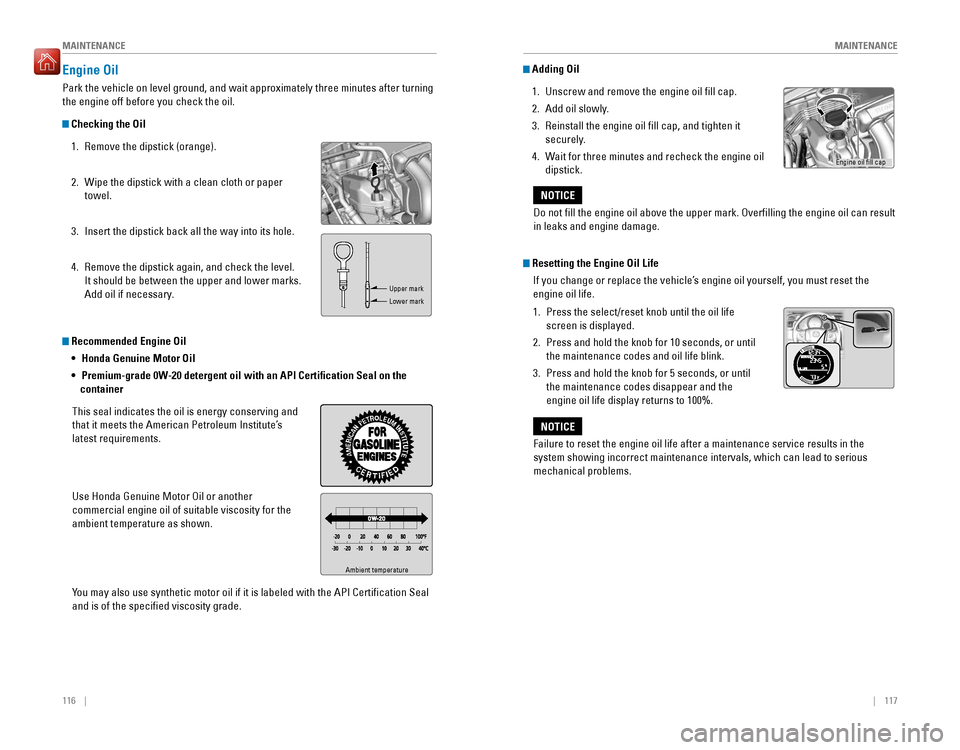
Recommended Engine Oil
• Honda Genuine Motor Oil
• Premium-grade 0W-20 detergent oil with an API Certi�cation Seal on the
container
This seal indicates the oil is energy conserving and
that it meets the American Petroleum Institute’s latest requirements. Use Honda Genuine Motor Oil or another commercial engine oil of suitable viscosity for the ambient temperature as shown.
You may also use synthetic motor oil if it is labeled with the API Certiication Seal and is of the speci�ed viscosity grade.
Engine Oil
Park the vehicle on level ground, and wait approximately three minutes after turning the engine off before you check the oil.
Checking the Oil
1. Remove the dipstick (orange).
2. Wipe the dipstick with a clean cloth or paper towel.
3. Insert the dipstick back all the way into its hole.
4. Remove the dipstick again, and check the level. It should be between the upper and lower marks.
Add oil if necessary.
Ambient temperature
Upper mark Lower mark
Adding Oil
1. Unscrew and remove the engine oil �ll cap.
2. Add oil slowly.
3. Reinstall the engine oil �ll cap, and tighten it securely.
4. Wait for three minutes and recheck the engine oil dipstick.
Resetting the Engine Oil Life
If you change or replace the vehicle’s engine oil yourself, you must reset the engine oil life. 1. Press the select/reset knob until the oil life screen is displayed.
2. Press and hold the knob for 10 seconds, or until the maintenance codes and oil life blink.
3. Press and hold the knob for 5 seconds, or until the maintenance codes disappear and the engine oil life display returns to 100%.
Do not ill the engine oil above the upper mark. Overilling the engine oil can result in leaks and engine damage.
NOTICE
Failure to reset the engine oil life after a maintenance service results in the
system showing incorrect maintenance intervals, which can lead to serious mechanical problems.
NOTICE
Engine oil ill cap
Page 71 of 75
134 || 135
VOICE COMMAND INDEX
CUSTOMER INFORMATION
Honda Roadside Assistance
24-hour emergency road service is available to you in the United States and Canada
throughout your 3-year/36,000-mile warranty term. Services include jump starting, �at tire and lockout assistance, towing, and more (limitations apply). Call (866) 864-5211 (U.S.) or (800) 465-7587 (Canada).
Warranty Coverages
Below is a brief summary of the warranties covering your new vehicle.
New Vehicle Limited Warranty: Covers your new vehicle, except for the emissions
control system and accessories, against defects in materials and workmanship.
Emissions Control Systems Defects Warranty and Emissions Performance
Warranty: Covers your vehicle’s emissions control systems. Time, mileage, and
coverage are conditional.
Seat Belt Limited Warranty: Covers seat belts that fail to function properly.
Rust Perforation Limited Warranty: Covers all exterior body panels that rust through
from the inside.
Accessory Limited Warranty: Covers Honda accessories.
Replacement Parts Limited Warranty: Covers all Honda replacement parts against
defects in materials and workmanship.
Replacement Battery Limited Warranty: Provides prorated coverage for a
replacement battery purchased from a Honda dealer.
Replacement Muf�er Lifetime Limited Warranty: Covers a replacement muf�er for
the duration of the ownership.
Restrictions and exclusions apply to all these warranties. See the Warranty Manual on the Owner Information CD or at owners.honda.com (U.S.) or myhonda.ca
(Canada) for complete descriptions of each warranty, including time, mileage, and other conditional limitations.
Your vehicle’s original tires are covered by their manufacturer. Tire warranty information can be found on the Owner Information CD or at owners.honda.com
(U.S.) or myhonda.ca (Canada). Learn about all available voice commands to help you operate the vehicle. Available on vehicles with navigation.
Press the Talk button before you say a command. To view a list of available commands in the vehicle, say
“Voice help.” Select a category to hear the commands
read aloud. Global Commands
The system accepts these commands on any screen.
Navigation Commands
The system accepts these commands on the map/guidance screen.
General Commands
• Display map
• Display navigation • Go home 1 (or 2)
Map Display Commands
• Voice help
• Display menu
• Display setting
• Display navigation
• Display information • Display audio
• Display phone
• Back/Cancel•
What is today’s date?
• What time is it?
• Display current location
• Display/Hide (specify icon type): �AT M
� gas station
� restaurant
� post of�ce
� grocery store
� lodging (hotel, motel)
� parking garage
� parking lot
� school � hospital
� freeway exit information
�
trafic*
� trafic speeds*
� trafic icons*
• Display north up
• Display heading up
• Display 3D map
• Display zoom in
• Display zoom out
VOICE COMMAND INDEX
*U.S. models only
Page 72 of 75
136 || 137
VOICE COMMAND INDEX
VOICE COMMAND INDEX
Navigation Commands (continued)
Find Place Commands
• Find nearest (specify place):
� Fuel and auto
� Honda dealers
� Gas station
� Auto parts & electronics
� Auto repair & maintenance
� Car wash & detailing
� Motorcycle dealers
� Other car dealerships
� Roadside assistance
�AT M
� Bank
� Check cashing
� Currency exchange
� Community
� Business
� City hall
� Civic center
� Convention center
� Court house
� Higher education
� Library
� Post of�ce
� School
� Emergency room
� Hospital
� Police station
� Veterinarian
� Lodging
� Bed & breakfast
� Hotel
� Resort
� Recreation
� Amusement park
� Golf course
� Historical monument
� Marina
� Movie theater
� Museum
� Park � Performing arts
� Sports complex
� Tourist attraction
� Restaurant
� American restaurant
� Californian restaurant
� Chinese restaurant
� Coffee shop
� Continental restaurant
� Fast food
� French restaurant
� German restaurant
� Greek restaurant
�
Indian restaurant
� Italian restaurant
� Japanese restaurant
� Korean restaurant
� Mexican restaurant
� Pizza
� Seafood restaurant
� Thai restaurant
� Vegetarian restaurant
� Vietnamese restaurant
� Other restaurant
� Shopping
� Shopping area
� Accessory store
� Book store
� Clothing store
� Grocery store
� Home improvement store
� Mall
� Of�ce supply store
� Pharmacy
� Pet food store
� Sewing store
� Shoe store
� Sporting goods store
� Toy store
Route Commands
The system accepts these commands when a route is set.
• How long to the destination?
• How far to the destination?
• Display destination map
• Display entire route � Travel center
� Airport
�
Automobile club
� Bus station
� Camping
� Commuter rail station
� Ferry terminal
� Named place
� Park & ride � Parking garage
� Parking lot
� Rental car agency
� Rest area
� Ski area
� Tourist information
� Train station
� Travel agency
� Truck stop
Climate Control Commands**
The system accepts these commands on most screens.
Available on Canadian
models only.
• Climate control automatic
(maintains selected temperature)
• Climate control on*
• Climate control off*
• Air conditioner on*
• Air conditioner off*
• Rear defrost on*
• Rear defrost off*• Climate control fresh air
• Climate control recirculate
• Climate control vent
• Climate control bi-level (vent and
�oor •
Climate control �oor
• Climate control �oor and defrost
• Fan speed up
• Fan speed down
• Fan speed # (#: 1 to 7)
• Temperature # degrees
(#: 57 to 87°F / 15 to 29°C)
• Temperature up
• Temperature down
• Driver temperature up
• Driver temperature down• Temperature max heat
• Temperature max cool
*These commands toggle the function on and off, so the command may not match your intended action. **if equipped
•
Cancel route
• Repeat guidance
• Route menu
Page 74 of 75
140 || 141
INDEX
VOICE COMMAND INDEX
Phone Commands
The system accepts these commands on most screens.
Info Commands
The system accepts these commands on most screens.
• Trip computer
• Display trafic list*
• Display trafic on my route* • Display clock
• Display wallpaper
On-screen Commands
The system accepts these commands on any screen where applicable. All
available commands are highlighted in yellow when you press the Talk button.
• Next (or previous)
• Up (or down)
• Right (or left)
• Return
• OK (excluding Startup Con�rmation screen)
• Delete
*if equipped
• Dial/call by number
• Dial/call by name
• Call (phone number or name)
INDEX
ABS
............................................................. 25
Accessory Power Socket ...............................47
Airbags ............................................................... 9
About Your Airbags ...................................... 11
Advanced Airbags ......................................... 9
Airbag Care ................................................... 14
Airbag System Components .......................13
Airbag System Indicators ...........................11
Front Airbags (SRS) ....................................... 9
Passenger Airbag Off Indicator .................12
Side Airbags .................................................. 10
Side Curtain Airbags ....................................10
SRS indicator ................................................ 11
Air Conditioning System..................................43 Anti-Lock Brake System (ABS) ................25, 91
Audio Commands ........................................... 138
Audio Operation ............................................... 47
Accessory Power Socket ...........................47
Auxiliary Input Jack ..................................... 48
Bluetooth ®
Audio ................................... 55, 63
Color Audio System ..................................... 50
Compact Disc (CD) .................................52, 60
FM/AM Radio .......................................... 51, 58
HDMI Port ...................................................... 47
HDMI Video ................................................... 65
HondaLink™ .................................................. 57
iPod ®
....................................................... 53, 61
Pandora ®
....................................................... 64
SiriusXM ®
Radio ........................................... 59
Sound ............................................................. 49
Steering Wheel Controls .............................48
Touchscreen Operation ..............................56
USB Flash Drive ...................................... 54, 62
USB Port ........................................................ 47
AUX Commands..............................................139Auxiliary Input Jack ......................................... 48
Battery ........................................................... 120
Bluetooth ®
Audio ....................................... 55, 63
Bluetooth ®
Audio Commands ......................139
Bluetooth ®
HandsFreeLink ®
(HFL) ................. 66
E-Mail ............................................................. 74
HFL Controls ............................................ 66, 69
HondaLink™ Assist ...................................... 73
Making a Call .......................................... 68, 72
Pairing a Phone ...................................... 67, 71
Phonebook .............................................. 68, 72
Siri Eyes Free ................................................ 75
SMS Text Messaging ..................................74
Speed Dial ............................................... 68, 73
Talk Button Tips ............................................ 70
Brake Assist System........................................91Brake Fluid ...................................................... 119
Brake system .............................................. 24, 25Braking
............................................................. 90
Brightness Control ........................................... 35
Calibration ....................................................... 102
Carbon Monoxide Gas .......................................4
Changing a Flat Tire ....................................... 104
Changing Settings ............................................ 46
Changing Wiper Blades ................................121
Charging system...............................................24Child Safety ....................................................... 15
Child Seat .......................................................... 17
Adding Security with a Tether ...................20
Installing a Child Seat ..................................18
Selecting a Child Seat .................................17
Childproof Door Locks .....................................31
Climate Control Commands ..........................137
Climate Control System ...................................44
Clock ............................................................. 45
Color Audio System ......................................... 50
Compact Disc (CD) ..................................... 52, 60
Compact Disc (CD) Commands ....................138
Contact Us ....................................................... 133
Continuously Variable Transmission (CVT) ...88
Coolant ........................................................... 118
Cruise Control ............................................. 27, 93
Customer Information ....................................132
Customized Features ....................................... 46
Dashboard and Other Controls ........................2
Destination ........................................................ 79
Detour ............................................................. 82
Dialing a Number ....................................... 68, 72
Door Mirrors ..................................................... 42
Doors ....................................................... 30, 31
Door/tailgate open ........................................... 26
DOT Tire Quality Grading ..............................127
Driving ............................................................. 83
Braking ........................................................... 90
Cruise Control ............................................... 93
ECON button .................................................. 92
Ignition ........................................................... 87
LaneWatch™ ................................................ 94
Maximum Load Limit ....................................85
Multi-View Rear Camera ............................95
Paddle Shifters ............................................. 89
Power Mode ................................................. 88
Refueling ........................................................ 97
Shifting ........................................................... 88
Vehicle Stability Assist (VSA ®
) .................. 92
ECON button ......................................................92
ECON mode ....................................................... 27
Electric power steering ...................................25
Electronic Stability Control (ESC) ..................92
E-Mail ............................................................. 74
Emergency Engine Stop ................................101
Page 75 of 75
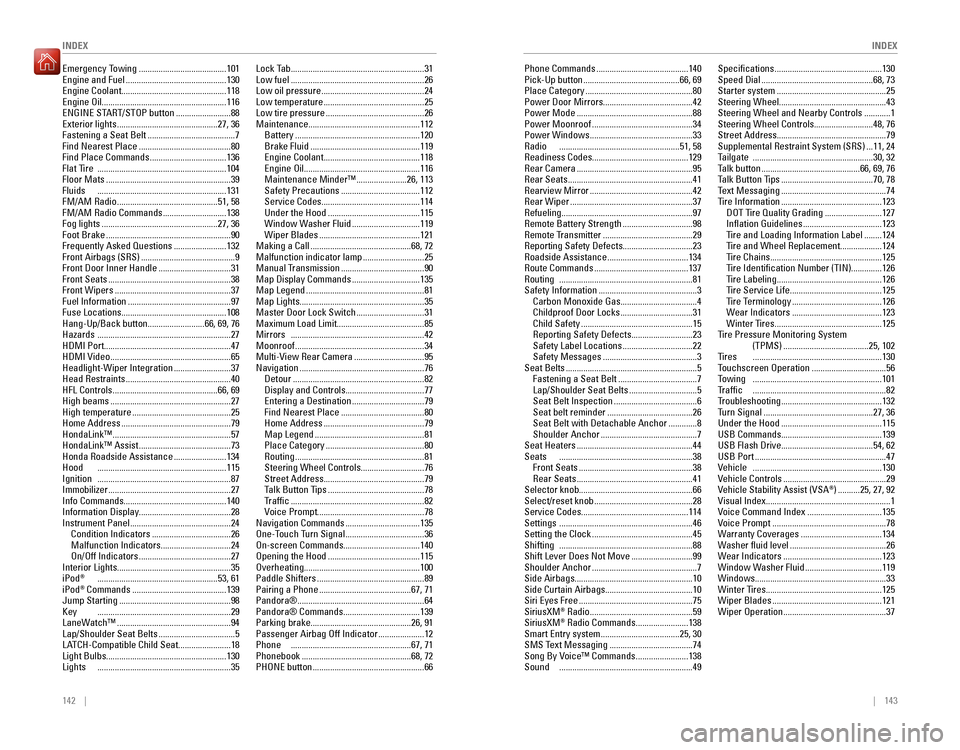
142 || 143
INDEX
INDEX
Emergency Towing ........................................ 101
Engine and Fuel .............................................. 130
Engine Coolant ................................................118
Engine Oil .........................................................116
ENGINE START/STOP button .........................88
Exterior lights .............................................. 27, 36
Fastening a Seat Belt ........................................ 7
Find Nearest Place .......................................... 80
Find Place Commands ...................................136
Flat Tire ........................................................... 104
Floor Mats ......................................................... 39
Fluids ........................................................... 131
FM/AM Radio .............................................. 51, 58
FM/AM Radio Commands .............................138
Fog lights ..................................................... 27, 36
Foot Brake ......................................................... 90
Frequently Asked Questions ........................132
Front Airbags (SRS) ........................................... 9
Front Door Inner Handle .................................31
Front Seats ........................................................ 38
Front Wipers ..................................................... 37
Fuel Information ............................................... 97
Fuse Locations................................................108 Hang-Up/Back button ..........................66, 69, 76
Hazards ............................................................. 27
HDMI Port ..........................................................47
HDMI Video ....................................................... 65
Headlight-Wiper Integration ..........................37
Head Restraints ................................................ 40
HFL Controls ................................................ 66, 69
High beams ....................................................... 27
High temperature ............................................. 25
Home Address .................................................. 79
HondaLink™ ...................................................... 57
HondaLink™ Assist .......................................... 73
Honda Roadside Assistance ........................134
Hood ........................................................... 115
Ignition ............................................................. 87
Immobilizer ........................................................ 27
Info Commands ...............................................140
Information Display ..........................................28
Instrument Panel .............................................. 24
Condition Indicators .................................... 26
Malfunction Indicators ................................24
On/Off Indicators .......................................... 27
Interior Lights ....................................................35
iPod ®
....................................................... 53, 61
iPod ®
Commands ........................................... 139
Jump Starting ................................................... 98
Key ............................................................. 29
LaneWatch™ .................................................... 94
Lap/Shoulder Seat Belts ...................................5
LATCH-Compatible Child Seat ........................18
Light Bulbs .......................................................130
Lights ............................................................. 35Lock Tab
............................................................. 31
Low fuel ............................................................. 26
Low oil pressure ............................................... 24
Low temperature .............................................. 25
Low tire pressure ............................................. 26
Maintenance...................................................112 Battery ......................................................... 120
Brake Fluid .................................................. 119
Engine Coolant ............................................ 118
Engine Oil ..................................................... 116
Maintenance Minder™ .......................26, 113
Safety Precautions .................................... 112
Service Codes ............................................. 114
Under the Hood .......................................... 115
Window Washer Fluid ...............................119
Wiper Blades .............................................. 121
Making a Call .............................................. 68, 72
Malfunction indicator lamp ............................25
Manual Transmission ...................................... 90
Map Display Commands ...............................135
Map Legend ...................................................... 81
Map Lights.........................................................35Master Door Lock Switch ...............................31
Maximum Load Limit........................................85Mirrors ............................................................. 42
Moonroof ........................................................... 34
Multi-View Rear Camera ................................95
Navigation ......................................................... 76
Detour ............................................................ 82
Display and Controls ....................................77
Entering a Destination .................................79
Find Nearest Place ...................................... 80
Home Address .............................................. 79
Map Legend .................................................. 81
Place Category ............................................. 80
Routing ........................................................... 81
Steering Wheel Controls .............................76
Street Address .............................................. 79
Talk Button Tips ............................................ 78
Traf�c ............................................................. 82
Voice Prompt.................................................78
Navigation Commands ..................................135
One-Touch Turn Signal ....................................36
On-screen Commands...................................140Opening the Hood .......................................... 115
Overheating.....................................................100Paddle Shifters ................................................. 89
Pairing a Phone .......................................... 67, 71
Pandora® .......................................................... 64
Pandora® Commands ...................................139
Parking brake ..............................................26, 91
Passenger Airbag Off Indicator .....................12
Phone ....................................................... 67, 71
Phonebook .................................................. 68, 72
PHONE button ................................................... 66Phone Commands
.......................................... 140
Pick-Up button ............................................ 66, 69
Place Category ................................................. 80
Power Door Mirrors .........................................42
Power Mode ..................................................... 88
Power Moonroof .............................................. 34
Power Windows ............................................... 33
Radio ....................................................... 51, 58
Readiness Codes............................................129 Rear Camera ..................................................... 95
Rear Seats ......................................................... 41
Rearview Mirror ............................................... 42
Rear Wiper ........................................................ 37
Refueling............................................................97Remote Battery Strength ................................98
Remote Transmitter ......................................... 29
Reporting Safety Defects ................................23
Roadside Assistance .....................................134
Route Commands ........................................... 137
Routing ............................................................. 81
Safety Information ............................................. 3
Carbon Monoxide Gas ...................................4
Childproof Door Locks .................................31
Child Safety ................................................... 15
Reporting Safety Defects ............................23
Safety Label Locations ................................22
Safety Messages ........................................... 3
Seat Belts ............................................................ 5
Fastening a Seat Belt ....................................7
Lap/Shoulder Seat Belts ...............................5
Seat Belt Inspection ...................................... 6
Seat belt reminder ....................................... 26
Seat Belt with Detachable Anchor .............8
Shoulder Anchor ............................................ 7
Seat Heaters ..................................................... 44
Seats ............................................................. 38
Front Seats .................................................... 38
Rear Seats ..................................................... 41
Selector knob ....................................................66
Select/reset knob ............................................. 28
Service Codes.................................................114Settings ............................................................. 46
Setting the Clock .............................................. 45
Shifting ............................................................. 88
Shift Lever Does Not Move ............................99
Shoulder Anchor ................................................ 7
Side Airbags ......................................................10
Side Curtain Airbags ........................................10
Siri Eyes Free .................................................... 75
SiriusXM ®
Radio ............................................... 59
SiriusXM ®
Radio Commands ........................138
Smart Entry system .................................... 25, 30
SMS Text Messaging ...................................... 74
Song By Voice™ Commands ........................138
Sound ............................................................. 49Speci�cations
................................................. 130
Speed Dial ................................................... 68, 73
Starter system .................................................. 25
Steering Wheel.................................................43Steering Wheel and Nearby Controls ............1
Steering Wheel Controls...........................48, 76
Street Address..................................................79Supplemental Restraint System (SRS) ...11, 24
Tailgate ....................................................... 30, 32
Talk button ............................................. 66, 69, 76
Talk Button Tips .......................................... 70, 78
Text Messaging ................................................ 74
Tire Information .............................................. 123
DOT Tire Quality Grading ..........................127
Inlation Guidelines .................................... 123
Tire and Loading Information Label ........124
Tire and Wheel Replacement ...................124
Tire Chains ................................................... 125
Tire Identiication Number (TIN) ..............126
Tire Labeling ................................................ 126
Tire Service Life .......................................... 125
Tire Terminology ......................................... 126
Wear Indicators ......................................... 123
Winter Tires ................................................. 125
Tire Pressure Monitoring System (TPMS) ....................................... 25, 102
Tires ........................................................... 130
Touchscreen Operation ..................................56
Towing ........................................................... 101
Traf�c ............................................................. 82
Troubleshooting .............................................. 132
Turn Signal .................................................. 27, 36
Under the Hood .............................................. 115
USB Commands..............................................139USB Flash Drive ..........................................54, 62
USB Port ............................................................ 47
Vehicle ........................................................... 130
Vehicle Controls ............................................... 29
Vehicle Stability Assist (VSA ®
) .......... 25, 27, 92
Visual Index .........................................................1
Voice Command Index ..................................135
Voice Prompt .................................................... 78
Warranty Coverages ..................................... 134
Washer �uid level ............................................ 26
Wear Indicators ............................................. 123
Window Washer Fluid ...................................119
Windows............................................................33
Winter Tires ..................................................... 125
Wiper Blades .................................................. 121
Wiper Operation ............................................... 37