dashboard HONDA HR-V 2017 2.G Quick Guide
[x] Cancel search | Manufacturer: HONDA, Model Year: 2017, Model line: HR-V, Model: HONDA HR-V 2017 2.GPages: 78, PDF Size: 5.33 MB
Page 44 of 78
80 || 81
NAVIGATION
NAVIGATION
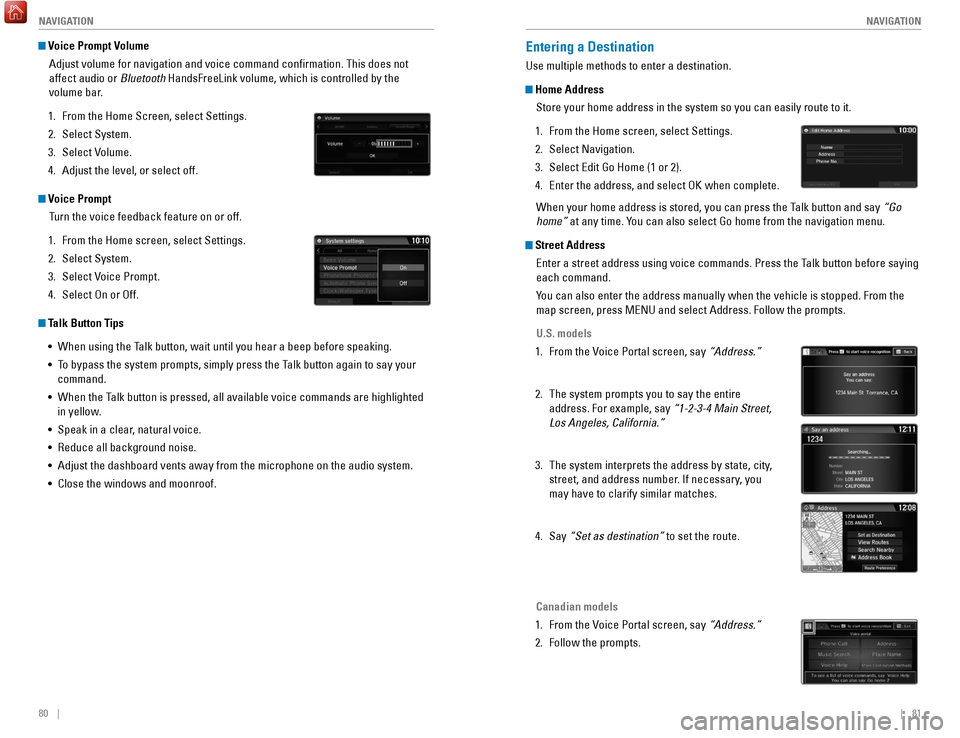
Voice Prompt Volume
Adjust volume for navigation and voice command confirmation. This does\
not
affect audio or Bluetooth HandsFreeLink volume, which is controlled by the
volume bar.
1.
From the Home Screen, select Settings.
2.
Select System.
3.
Select V
olume.
4.
Adjust the level, or select off.
Voice PromptTurn the voice feedback feature on or off.
1.
From the Home screen, select Settings.
2.
Select System.
3.
Select V
oice Prompt.
4.
Select On or Off.
Talk Button Tips•
When using the T
alk button, wait until you hear a beep before speaking.
•
T
o bypass the system prompts, simply press the Talk button again to say your
command.
•
When the T
alk button is pressed, all available voice commands are highlighted
in yellow.
•
Speak in a clear
, natural voice.
•
Reduce all background noise.
•
Adjust the dashboard vents away from the microphone on the audio system.\
•
Close the windows and moonroof.
Entering a Destination
Use multiple methods to enter a destination.
Home AddressStore your home address in the system so you can easily route to it.
1.
From the Home screen, select Settings.
2.
Select Navigation.
3.
Select Edit Go Home (1 or 2).
4.
Enter the address, and select OK when complete.
When your home address is stored, you can press the T
alk button and say “Go
home” at any time. You can also select Go home from the navigation menu.
Street Address
Enter a street address using voice commands. Press the Talk button before saying
each command.
You can also enter the address manually when the vehicle is stopped. From the
map screen, press MENU and select Address. Follow the prompts.
U.S. models
1.
From the V
oice Portal screen, say “Address.”
2.
The system prompts you to say the entire
address. For example, say
“1-2-3-4 Main Street,
Los Angeles, California.”
3.
The system interprets the address by state, city
,
street, and address number. If necessary, you
may have to clarify similar matches.
4.
Say
“Set as destination” to set the route.
Canadian models
1.
From the V
oice Portal screen, say “Address.”
2.
Follow the prompts.
Page 55 of 78
102 || 103
HANDLING THE UNEXPECTED
DRIVING
Refueling
Use the proper fuel and refueling procedure to ensure the best performan\
ce and
safety of your vehicle.
Fuel Information
Use of unleaded gasoline of 87 octane or higher is recommended.
•
Honda recommends TOP TIER Detergent Gasoline where available.
•
Do NOT use gasoline containing more than 15% ethanol.
•
Do NOT use gasoline containing methanol.
•
Do NOT use gasoline containing MMT
. Learn about what to do in critical or emergency situations.Smart Entry Remote Battery Strength*
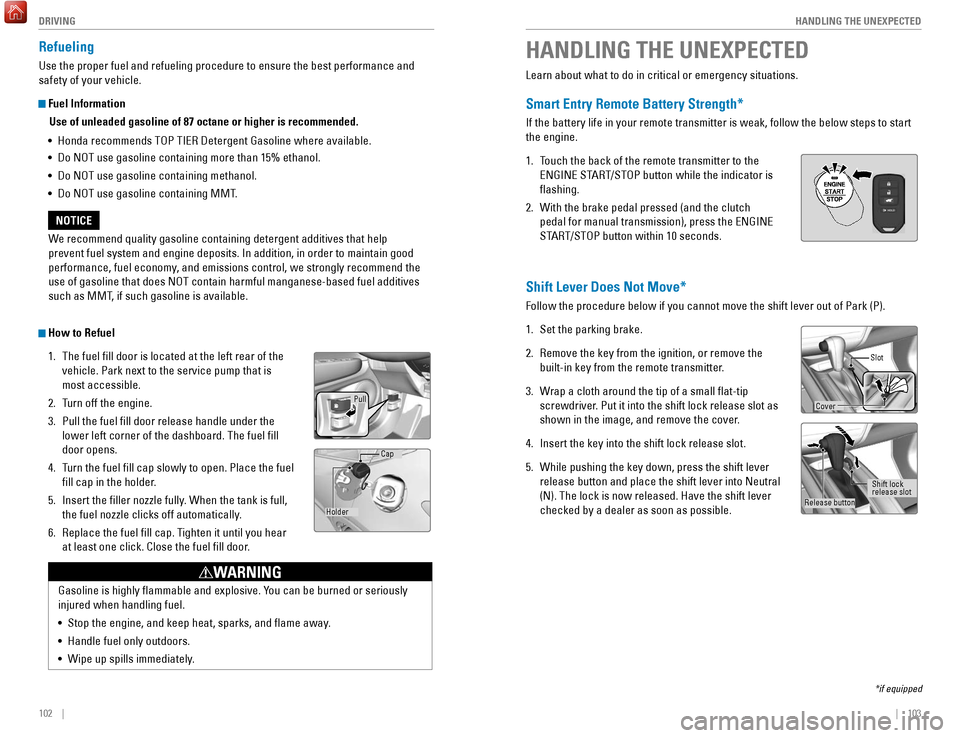
If the battery life in your remote transmitter is weak, follow the below\
steps to start
the engine.
1.
T
ouch the back of the remote transmitter to the
ENGINE START/STOP button while the indicator is
flashing.
2.
With the brake pedal pressed (and the clutch
pedal for manual transmission), press the ENGINE
ST
ART/STOP button within 10 seconds.
HANDLING THE UNEXPECTED
*if equipped
We recommend quality gasoline containing detergent additives that help
prevent fuel system and engine deposits. In addition, in order to mainta\
in good
performance, fuel economy, and emissions control, we strongly recommend the
use of gasoline that does NOT contain harmful manganese-based fuel addit\
ives
such as MMT, if such gasoline is available.
NOTICE
Gasoline is highly flammable and explosive. You can be burned or seriously
injured when handling fuel.
•
Stop the engine, and keep heat, sparks, and flame away
.
•
Handle fuel only outdoors.
•
Wipe up spills immediately
.
WARNING
How to Refuel1.
The fuel fill door is located at the left rear of the
vehicle. Park next to the service pump that is
most accessible.
2.
T
urn off the engine.
3.
Pull the fuel fill door release handle under the
lower left corner of the dashboard. The fuel fill
door opens.
4.
T
urn the fuel fill cap slowly to open. Place the fuel
fill cap in the holder.
5.
Insert the filler nozzle fully
. When the tank is full,
the fuel nozzle clicks off automatically.
6.
Replace the fuel fill cap. T
ighten it until you hear
at least one click. Close the fuel fill door.
Pull
Holder Cap
Shift Lever Does Not Move*
Follow the procedure below if you cannot move the shift lever out of Par\
k (P).
1.
Set the parking brake.
2.
Remove the key from the ignition, or remove the
built-in key from the remote transmitter
.
3.
W
rap a cloth around the tip of a small flat-tip
screwdriver. Put it into the shift lock release slot as
shown in the image, and remove the cover.
4.
Insert the key into the shift lock release slot.
5.
While pushing the key down, press the shift lever
release button and place the shift lever into Neutral
(N). The lock is now released. Have the shift lever
checked by a dealer as soon as possible.
Slot
Release button Shift lock
release slot
Cover
Page 61 of 78
114 || 115
HANDLING THE UNEXPECTED
HANDLING THE UNEXPECTED
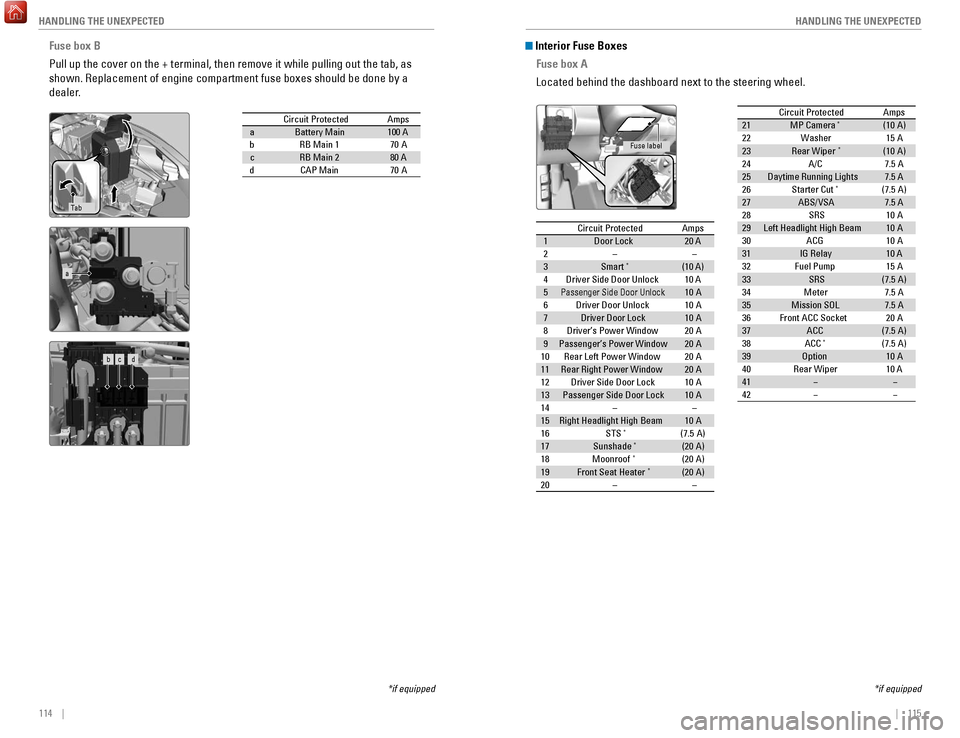
Fuse box B
Pull up the cover on the + terminal, then remove it while pulling out th\
e tab, as
shown. Replacement of engine compartment fuse boxes should be done by a \
dealer.
Circuit Protecte dAmpsaBattery Main100 AbRB Main 170AcRB Main 280 AdCAP Main70 A
Ta b
*if equipped
a
b c d
Circuit ProtectedAmps1Door Lock20 A2––3Smart*(10 A)4Driver Side Door Unlock10 A5Passenger Side Door Unlock10 A6Driver Door Unlock10A7Driver Door Lock10A8Driver’s Power Window20A9Passenger’s Power Window20A10Rear Left Power Window20A11Rear Right Power Window20A12Driver Side Door Lock10A13Passenger Side Door Lock10A14––15Right Headlight High Beam10A16STS*(7.5 A)17Sunshad e*(20A )18Moonroof*(20A )19Front Seat Heater*(20A )20––
Circuit Protecte dAmps
21 MP Camera*(10 A)
22 Washer 15A
23 Rear Wiper
*(10 A)
24 A/C 7.5 A
25 Daytime Running Light s7.5 A
26 Starter Cut
*(7.5 A)
27 ABS/VSA 7.5 A
28 SRS 10A
29 Left Headlight High Beam 10A
30 ACG 10A
31 IG Relay 10 A
32 Fuel Pump 15A
33 SRS (7.5 A)
34 Meter 7.5 A
35 Mission SOL 7.5 A
36 Front ACC Socket 20A
37 ACC (7.5 A)
38 ACC
*(7.5 A)
39 Option 10A
40 Rear Wiper 10 A
41 � �
42 � �
Interior Fuse Boxes
Fuse box A
Located behind the dashboard next to the steering wheel.
*if equipped
Fuse label
Circuit Protected Amps
1 Door Lock 20 A
2 – –
3 Smart
*(10 A)
4 Driver Side Door Unlock 10 A
5
Passenger Side Door Unlock10 A
6 Driver Door Unlock 10A
7 Driver Door Lock 10A
8 Driver’s Power Window 20A
9 Passenger’s Power Window 20A
10 Rear Left Power Window 20A
11 Rear Right Power Window 20A
12 Driver Side Door Lock 10A
13 Passenger Side Door Lock 10A
14 – –
15 Right Headlight High Beam 10A
16 STS
*(7.5 A)
17 Sunshade*(20A )
18 Moonroof*(2 0A )
19 Front Seat Heater*(20A )
20 – –
Circuit ProtectedAmps21MP Camera*(10 A)22Washer15A23Rear Wipe r*(10 A)24A/C7.5 A25Daytime Running Light s7.5 A26Starter Cut*(7.5 A)27ABS/VSA7.5 A28SRS10A29Left Headlight High Beam10A30ACG10A31IG Rela y10 A32Fuel Pump15 A33SRS(7.5 A)34Meter7.5 A35Mission SOL7.5 A36Front ACC Socket20A37ACC(7.5 A)38ACC*(7.5 A)39Optio n10A40Rear Wiper10 A41��42��
Page 62 of 78
116 || 117
HANDLING THE UNEXPECTED
HANDLING THE UNEXPECTED
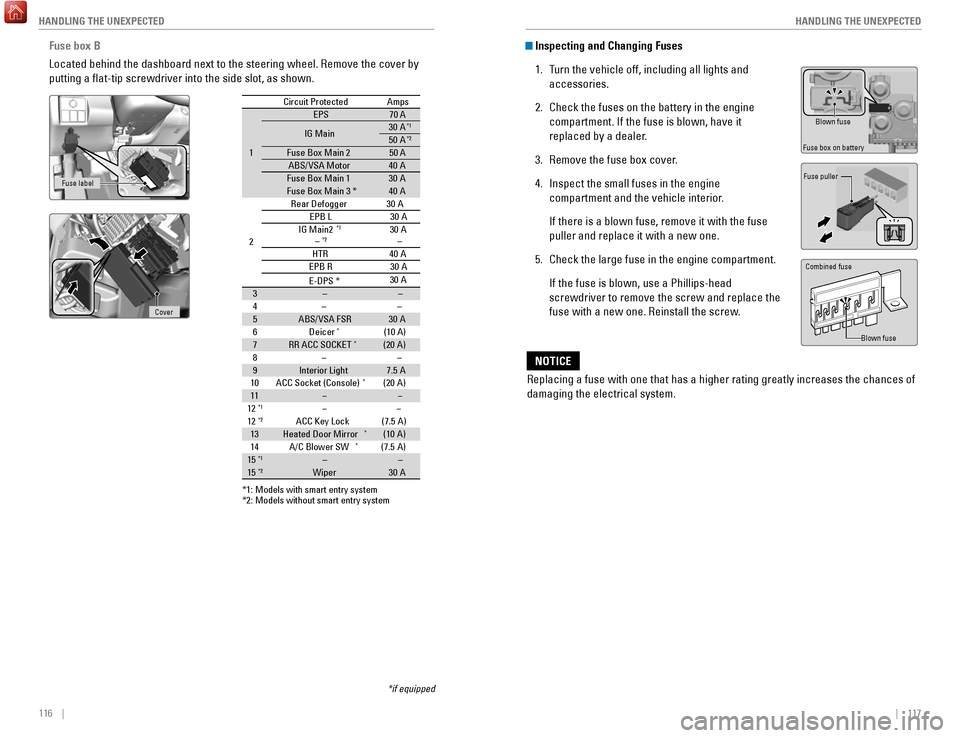
Circuit ProtectedAmps
1
EPS70 A
IG Main30 A*1
50A*2
Fuse Box Main 250 AABS/VSA Motor40 AFuse Box Main 130AFuse Box Main 3 *40A
2 Rear Defogger30A
EPB L30A
IG Main 2*1
–*230A
–
HTR 40A
EPB
R30A
*1: Models with smart entry syste m*2: Models without smart entry system
3––
4– –
5ABS/VSA FSR30A
6D eicer*(10 A)7RR ACC SOCKET*(20 A)
8– –
9Interior Light7.5A
10 ACC Socket (Console)*(20 A)11��
12*1��12*2ACC Key Lock (7.5A)13Heated Door Mirror*(10 A)
14 A/C Blower SW*(7.5 A)15*1––15*2Wiper30 A
E-DPS * 30
A
Fuse box B
Located behind the dashboard next to the steering wheel. Remove the cove\
r by
putting a flat-tip screwdriver into the side slot, as shown.
Fuse label
*if equipped
Cover
Inspecting and Changing Fuses
1.
T
urn the vehicle off, including all lights and
accessories.
2.
Check the fuses on the battery in the engine
compartment. If the fuse is blown, have it
replaced by a dealer
.
3.
Remove the fuse box cover
.
4.
Inspect the small fuses in the engine
compartment and the vehicle interior
.
If there is a blown fuse, remove it with the fuse
puller and replace it with a new one.
5.
Check the large fuse in the engine compartment.
If the fuse is blown, use a Phillips-head
screwdriver to remove the screw and replace the
fuse with a new one. Reinstall the screw
.
Replacing a fuse with one that has a higher rating greatly increases the\
chances of
damaging the electrical system.
NOTICE
Blown fuse
Fuse box on battery
Fuse puller
Combined fuse
Blown fuse
Page 64 of 78
120 || 121
MAINTENANCE
MAINTENANCE
Maintenance Minder Service Codes
These codes indicate what services are due on your vehicle.
*1: If a message SERVICE does not appear more than 12 months after the display is reset, change the engine oil every year.
#: See information on maintenance and emissions warranty.
CODEMaintenance Main Items
A�Replace engine oi l*1
B�Replace engine oil*1 and oil �lter
�Inspect front and rear brakes
�Inspect tie rod ends, steering gearbox, and boots
�Inspect suspension component s
�Inspect driveshaft boots
�Inspect brake hoses and lines (Including ABS/VSA)
�Inspect all �uid levels and condition of �uids
�Inspect exhaust system#
�Inspect fuel lines and connections#
*2: If you drive in dusty conditions, replace the air cleaner element every \
15,000 miles (24,000 km).
*3: If you drive primarily in urban areas that have high concentrations of s\
oot in the air from industryand diesel-powered vehicles, replace the dust and pollen �lter every \
15,000 miles (24,000 km).
*4: Driving in mountainous areas at very low vehicle speeds results in higher transmission temperatures. This requires transmission �uid changes mo\
re frequently than
recommended by the Maintenance Minder. If you regularly drive your vehic\
le under these
conditions, have the transmission �uid changed every 25,000 miles (4\
0,000 km).
CODEMaintenance Sub Items
1
�Rotate tires
2�Replace air cleaner element*2
�Replace dust and pollen �lter*3
�Inspect drive belt
3
�Replace transmission �uid*4
4�Replace spark plugs
�Inspect valve clearance
5
�Replace engine coolan t
6�Replace rear differential �uid*
Continuously variable transmission models only
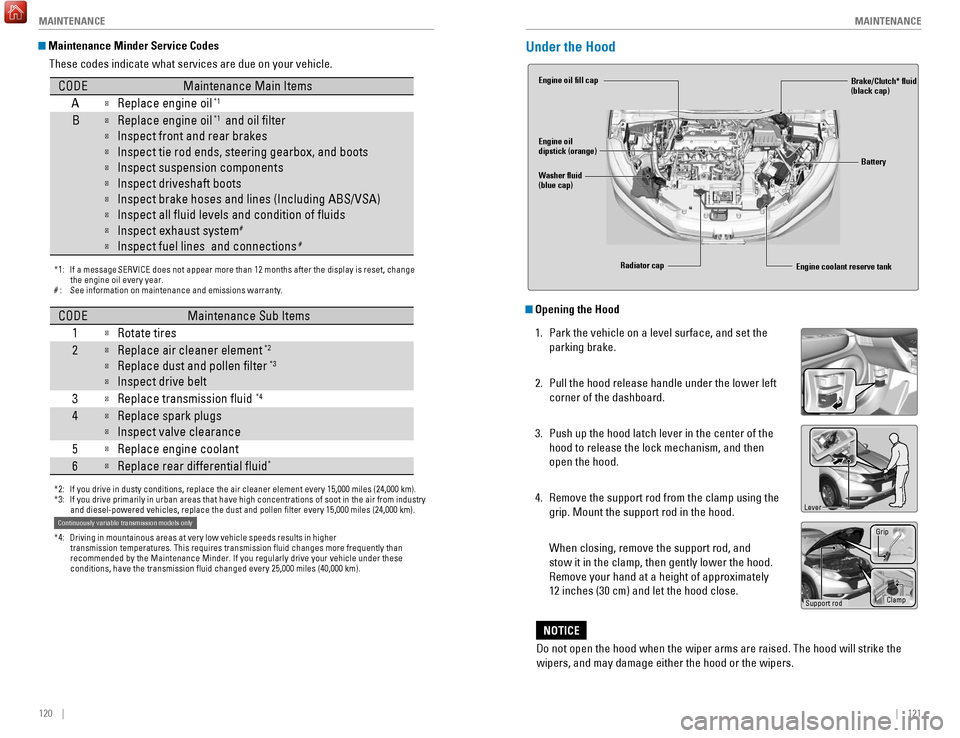
Under the Hood
Opening the Hood
1.
Park the vehicle on a level surface, and set the
parking brake.
2.
Pull the hood release handle under the lower left
corner of the dashboard.
3.
Push up the hood latch lever in the center of the
hood to release the lock mechanism, and then
open the hood.
4.
Remove the support rod from the clamp using the
grip. Mount the support rod in the hood.
When closing, remove the support rod, and
stow it in the clamp, then gently lower the hood.
Remove your hand at a height of approximately
12 inches (30 cm) and let the hood close.
Engine coolant reserve tank
Washer fluid
(blue cap) Engine oil fill cap
Engine oil
dipstick (orange)
Brake/Clutch* fluid
(black cap)
Battery
Radiator cap
Lever
Support rod Grip
Clamp
Do not open the hood when the wiper arms are raised. The hood will strik\
e the
wipers, and may damage either the hood or the wipers.
NOTICE
Page 76 of 78
144 || 145
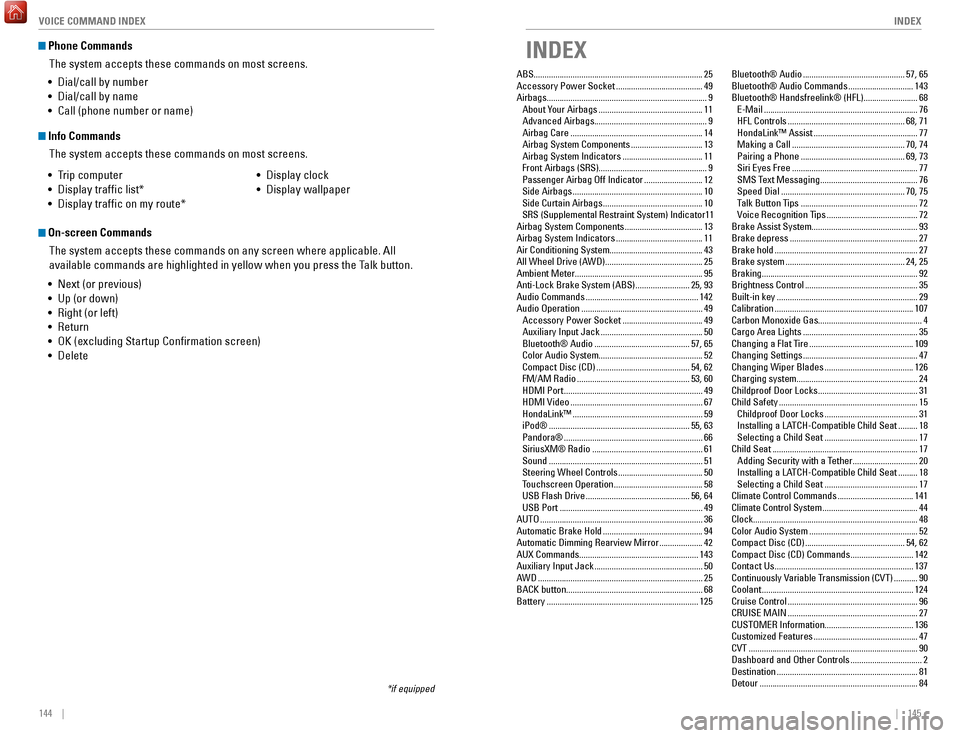
INDEX
VOICE COMMAND INDEX
Phone Commands
The system accepts these commands on most screens.
Info CommandsThe system accepts these commands on most screens.
•
T
rip computer
•
Display traffic list*
•
Display traffic on my route* •
Display clock
•
Display wallpaper
On-screen CommandsThe system accepts these commands on any screen where applicable. All
available commands are highlighted in yellow when you press the Talk button.
•
Next (or previous)
•
Up (or down)
•
Right (or left)
•
Return
•
OK (excluding Startup Confirmation screen)
•
Delete
*if equipped
• Dial/call by number
•
Dial/call by name
•
Call (phone number or name)
INDEX
ABS........................................................................\
...... 25
Accessory Power Socket ........................................49
Airbags........................................................................\
.. 9 About Y
our Airbags
................................................ 11
Advanced Airbags
.................................................... 9
Airbag Care
............................................................. 14
Airbag System Components
.................................13
Airbag System Indicators
.....................................11
Front Airbags (SRS)
.................................................. 9
Passenger Airbag Off Indicator
...........................12
Side Airbags
............................................................ 10
Side Curtain Airbags
.............................................. 10
SRS (Supplemental Restraint System) Indicator
11
Airbag System Components
....................................13
Airbag System Indicators
........................................11
Air Conditioning System........................................... 43
All Wheel Drive (A
WD) ............................................. 25
Ambient Meter........................................................... 95 Anti-Lock Brake System (ABS)
.........................25, 93
Audio Commands
.................................................... 142
Audio Operation
........................................................ 49
Accessory Power Socket
.....................................49
Auxiliary Input Jack
............................................... 50
Bluetooth® Audio
............................................ 57, 65
Color Audio System
................................................ 52
Compact Disc (CD)
........................................... 54
, 62
FM/AM Radio
.................................................... 53, 60
HDMI Port
................................................................ 49
HDMI Video
............................................................. 67
HondaLink™
............................................................ 59
iPod®
................................................................. 55, 63
Pandora®
................................................................ 66
SiriusXM® Radio
................................................... 61
Sound
....................................................................... 51
Steering Wheel Controls
.......................................50
Touchscreen Operation
.........................................58
USB Flash Drive
................................................ 56, 64
USB Port
.................................................................. 49
AUTO
........................................................................\
... 36
Automatic Brake Hold
.............................................. 94
Automatic Dimming Rearview Mirror
....................42
AUX Commands....................................................... 143 Auxiliary Input Jack
.................................................. 50
AWD
........................................................................\
.... 25
BACK button............................................................... 68 Battery
...................................................................... 125Bluetooth® Audio
...............................................57, 65
Bluetooth® Audio Commands ..............................143
Bluetooth® Handsfreelink® (HFL)......................... 68 E-Mail
.......................................................................76
HFL Controls
......................................................68, 71
HondaLink™ Assist
................................................77
Making a Call
....................................................70, 74
Pairing a Phone
................................................69, 73
Siri Eyes Free
..........................................................77
SMS Text Messaging
.............................................76
Speed Dial
.........................................................70, 75
Talk Button Tips
......................................................72
Voice Recognition Tips
..........................................72
Brake Assist System................................................. 93
Brake depress
...........................................................27
Brake hold
..................................................................27
Brake system
.......................................................24, 25
Braking........................................................................\
92 Brightness Control
....................................................35
Built-in key
.................................................................29
Calibration
................................................................107
Carbon Monoxide Gas................................................ 4
Cargo Area Lights
.....................................................35
Changing a Flat Tire
................................................109
Changing Settings
.....................................................47
Changing Wiper Blades
.........................................126
Charging system........................................................ 24 Childproof Door Locks
..............................................31
Child Safety
................................................................15
Childproof Door Locks
...........................................31
Installing a LA
TCH-Compatible Child Seat .........18
Selecting a Child Seat
...........................................17
Child Seat
...................................................................17
Adding Security with a Tether
..............................20
Installing a LATCH-Compatible Child Seat
.........18
Selecting a Child Seat
...........................................17
Climate Control Commands
...................................141
Climate Control System
............................................44
Clock........................................................................\
.... 48 Color Audio System
..................................................52
Compact Disc (CD)
..............................................54, 62
Compact Disc (CD) Commands
.............................142
Contact Us
................................................................137
Continuously Variable Transmission (CVT)
...........90
Coolant
......................................................................124
Cruise Control
............................................................96
CRUISE
MAIN ............................................................27
CUSTOMER Information......................................... 136
Customized Features
................................................47
CVT
........................................................................\
......90
Dashboard and Other Controls
.................................2
Destination
.................................................................81
Detour
........................................................................\
.84