fuel cap HONDA HR-V 2017 2.G Quick Guide
[x] Cancel search | Manufacturer: HONDA, Model Year: 2017, Model line: HR-V, Model: HONDA HR-V 2017 2.GPages: 78, PDF Size: 5.33 MB
Page 16 of 78
24 || 25
I NSTRUMENT P
ANELI
NSTRUMENT P
ANEL
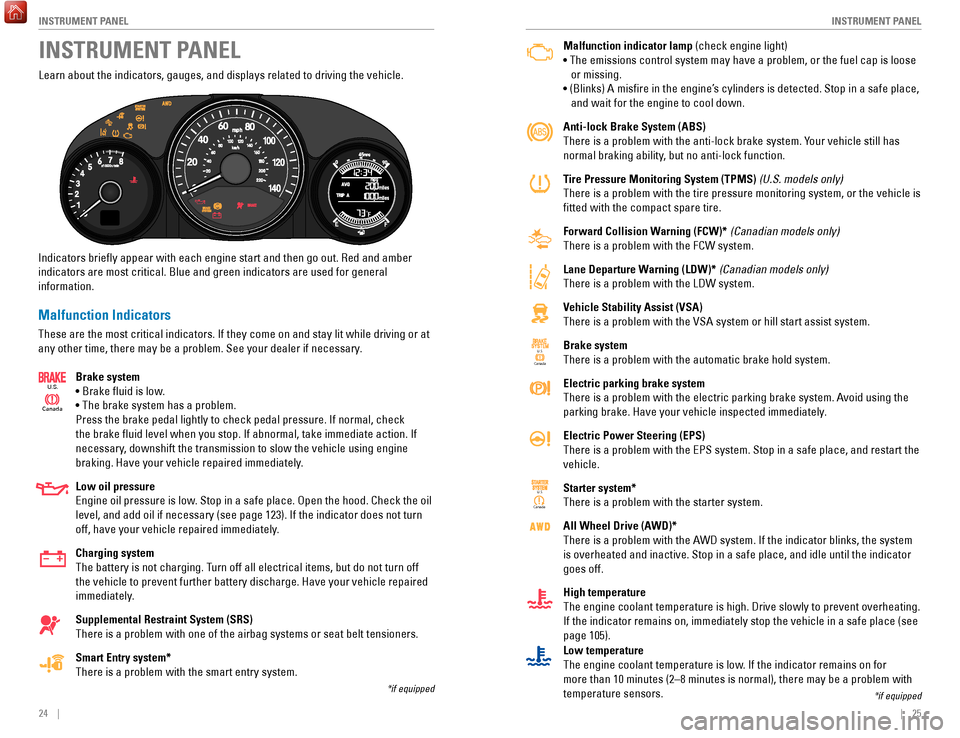
Malfunction indicator lamp (check engine light)
• The emissions control system may have a problem, or the fuel cap is\
loose
or missing.
• (Blinks) A
misfire in the engine’s cylinders is detected. Stop in a safe place,
and wait for the engine to cool down.
Anti-lock Brake System (ABS)
There is a problem with the anti-lock brake system. Your vehicle still has
normal braking ability, but no anti-lock function.
Tire Pressure Monitoring System (TPMS) (U.S. models only)
There is a problem with the tire pressure monitoring system, or the vehi\
cle is
fitted with the compact spare tire.
Forward Collision Warning (FCW)* (Canadian models only)
There is a problem with the FCW system.
Lane Departure Warning (LDW)* (Canadian models only)
There is a problem with the LDW system.
Vehicle Stability Assist (VSA)
There is a problem with the VSA system or hill start assist system.
Brake system
There is a problem with the automatic brake hold system.
Electric parking brake system
There is a problem with the electric parking brake system. Avoid using the
parking brake. Have your vehicle inspected immediately.
Electric Power Steering (EPS)
There is a problem with the EPS system. Stop in a safe place, and restar\
t the
vehicle.
Starter system*
There is a problem with the starter system.
All Wheel Drive (AWD)*
There is a problem with the AWD system. If the indicator blinks, the system
is overheated and inactive. Stop in a safe place, and idle until the ind\
icator
goes off.
High temperature
The engine coolant temperature is high. Drive slowly to prevent overheat\
ing.
If the indicator remains on, immediately stop the vehicle in a safe plac\
e (see
page 105).
Canada U.S.
U.S.
Canada
Learn about the indicators, gauges, and displays related to driving the \
vehicle.
Indicators briefly appear with each engine start and then go out. Red \
and amber
indicators are most critical. Blue and green indicators are used for gen\
eral
information.
Malfunction Indicators
These are the most critical indicators. If they come on and stay lit whi\
le driving or at
any other time, there may be a problem. See your dealer if necessary. Brake system
• Brake fluid is low.
• The brake system has a problem.
Press the brake pedal lightly to check pedal pressure. If normal, check \
the brake fluid level when you stop. If abnormal, take immediate actio\
n. If
necessary, downshift the transmission to slow the vehicle using engine
braking. Have your vehicle repaired immediately.
Low oil pressure
Engine oil pressure is low. Stop in a safe place. Open the hood. Check the oil
level, and add oil if necessary (see page 123). If the indicator does \
not turn
off, have your vehicle repaired immediately.
Charging system
The battery is not charging. Turn off all electrical items, but do not turn off
the vehicle to prevent further battery discharge. Have your vehicle repa\
ired
immediately.
Supplemental Restraint System (SRS)
There is a problem with one of the airbag systems or seat belt tensioner\
s.
Smart Entry system*
There is a problem with the smart entry system.
Canada
U.S.
INSTRUMENT PANEL
*if equipped
*if equipped
Low temperature
The engine coolant temperature is low. If the indicator remains on for
more than 10 minutes (2–8 minutes is normal), there may be a proble\
m with
temperature sensors.
Page 47 of 78
86 || 87
DRIVING
DRIVING
Improper accessories or modifications can affect your vehicle’s handling, and
stability, and performance, and cause a crash in which you can be seriously
hurt or killed.
Follow all instructions in the vehicle owner’s guide regarding accessories and
modifications.
WARNING
In addition:
•
During the first 600 miles (1,000 km) of operation, avoid sudden acc\
elerat
ion or
full throttle operation so as not to damage the engine or powertrain.
•
A
void hard braking for the first 200 miles (300 km). You should also follow this
when the brake pads are replaced.
Your vehicle has been designed primarily for use on pavement; however, its higher
ground clearance allows you to occasionally travel on unpaved roads. It \
is not
designed for trail-blazing or other challenging off-road activities.
If you decide to drive on unpaved roads, you will find that it require\
s somewhat
different driving skills and that your vehicle will handle somewhat diff\
erently than
it does on pavement. Pay attention to the precautions and tips in this s\
ection, and
get acquainted with your vehicle before leaving the pavement.
Improperly operating this vehicle on or off pavement can cause a crash o\
r
rollover in which you and your passengers can be seriously hurt or kille\
d.
Follow all instructions and guidelines in this guide.
Keep your speed low, and don’t drive faster than conditions permit.
WARNING
Maximum Load Limit
Carrying too much cargo or improperly storing it can affect your vehicle\
’s handling,
stability, stopping distance, and tires, and make it unsafe.
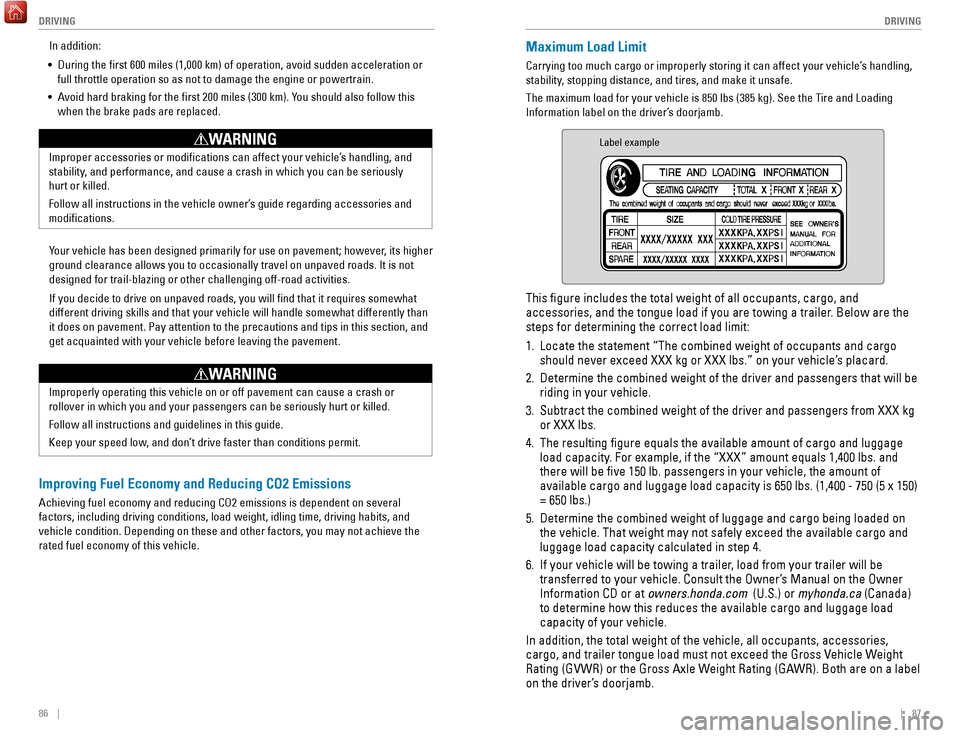
The maximum load for your vehicle is 850 lbs (385 kg). See the Tire and Loading
Information label on the driver’s doorjamb.
Label example
This figure includes the total weight of all occupants, cargo, and
accessories, and the tongue load if you are towing a trailer. Below are the
steps for determining the correct load limit:
1.
Locate the statement “The combined weight of occupants and cargo
should never exceed XXX kg or XXX lbs.” on your vehicle’
s placard.
2.
Determine the combined weight of the driver and passengers that will be \
riding in your vehicle.
3.
Subtract the combined weight of the driver and passengers from XXX kg
or XXX lbs.
4.
The resulting figure equals the available amount of cargo and luggage \
load capacity
. For example, if the “XXX” amount equals 1,400 lbs. and
there will be five 150 lb. passengers in your vehicle, the amount of
available cargo and luggage load capacity is 650 lbs. (1,400 - 750 (5 \
x 150)
= 650 lbs.)
5.
Determine the combined weight of luggage and cargo being loaded on
the vehicle. That weight may not safely exceed the available cargo and
luggage load capacity calculated in step 4.
6.
If your vehicle will be towing a trailer
, load from your trailer will be
transferred to your vehicle. Consult the Owner’s Manual on the Owner
Information CD or at owners.honda.com (U.S.) or myhonda.ca (Canada)
to determine how this reduces the available cargo and luggage load
capacity of your vehicle.
In addition, the total weight of the vehicle, all occupants, accessories\
,
cargo, and trailer tongue load must not exceed the Gross Vehicle Weight
Rating (GVWR) or the Gross Axle Weight Rating (GAWR). Both are on a label
on the driver’s doorjamb.
Improving Fuel Economy and Reducing CO2 Emissions
Achieving fuel economy and reducing CO2 emissions is dependent on severa\
l
factors, including driving conditions, load weight, idling time, driving\
habits, and
vehicle condition. Depending on these and other factors, you may not ach\
ieve the
rated fuel economy of this vehicle.
Page 55 of 78
102 || 103
HANDLING THE UNEXPECTED
DRIVING
Refueling
Use the proper fuel and refueling procedure to ensure the best performan\
ce and
safety of your vehicle.
Fuel Information
Use of unleaded gasoline of 87 octane or higher is recommended.
•
Honda recommends TOP TIER Detergent Gasoline where available.
•
Do NOT use gasoline containing more than 15% ethanol.
•
Do NOT use gasoline containing methanol.
•
Do NOT use gasoline containing MMT
. Learn about what to do in critical or emergency situations.Smart Entry Remote Battery Strength*
If the battery life in your remote transmitter is weak, follow the below\
steps to start
the engine.
1.
T
ouch the back of the remote transmitter to the
ENGINE START/STOP button while the indicator is
flashing.
2.
With the brake pedal pressed (and the clutch
pedal for manual transmission), press the ENGINE
ST
ART/STOP button within 10 seconds.
HANDLING THE UNEXPECTED
*if equipped
We recommend quality gasoline containing detergent additives that help
prevent fuel system and engine deposits. In addition, in order to mainta\
in good
performance, fuel economy, and emissions control, we strongly recommend the
use of gasoline that does NOT contain harmful manganese-based fuel addit\
ives
such as MMT, if such gasoline is available.
NOTICE
Gasoline is highly flammable and explosive. You can be burned or seriously
injured when handling fuel.
•
Stop the engine, and keep heat, sparks, and flame away
.
•
Handle fuel only outdoors.
•
Wipe up spills immediately
.
WARNING
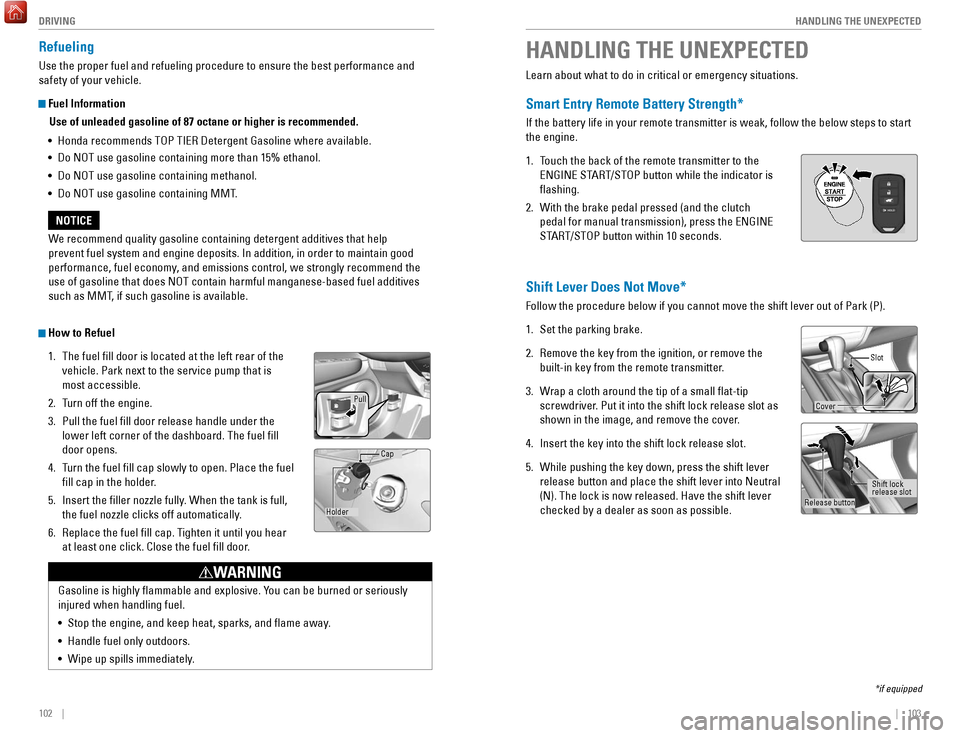
How to Refuel1.
The fuel fill door is located at the left rear of the
vehicle. Park next to the service pump that is
most accessible.
2.
T
urn off the engine.
3.
Pull the fuel fill door release handle under the
lower left corner of the dashboard. The fuel fill
door opens.
4.
T
urn the fuel fill cap slowly to open. Place the fuel
fill cap in the holder.
5.
Insert the filler nozzle fully
. When the tank is full,
the fuel nozzle clicks off automatically.
6.
Replace the fuel fill cap. T
ighten it until you hear
at least one click. Close the fuel fill door.
Pull
Holder Cap
Shift Lever Does Not Move*
Follow the procedure below if you cannot move the shift lever out of Par\
k (P).
1.
Set the parking brake.
2.
Remove the key from the ignition, or remove the
built-in key from the remote transmitter
.
3.
W
rap a cloth around the tip of a small flat-tip
screwdriver. Put it into the shift lock release slot as
shown in the image, and remove the cover.
4.
Insert the key into the shift lock release slot.
5.
While pushing the key down, press the shift lever
release button and place the shift lever into Neutral
(N). The lock is now released. Have the shift lever
checked by a dealer as soon as possible.
Slot
Release button Shift lock
release slot
Cover
Page 61 of 78
114 || 115
HANDLING THE UNEXPECTED
HANDLING THE UNEXPECTED
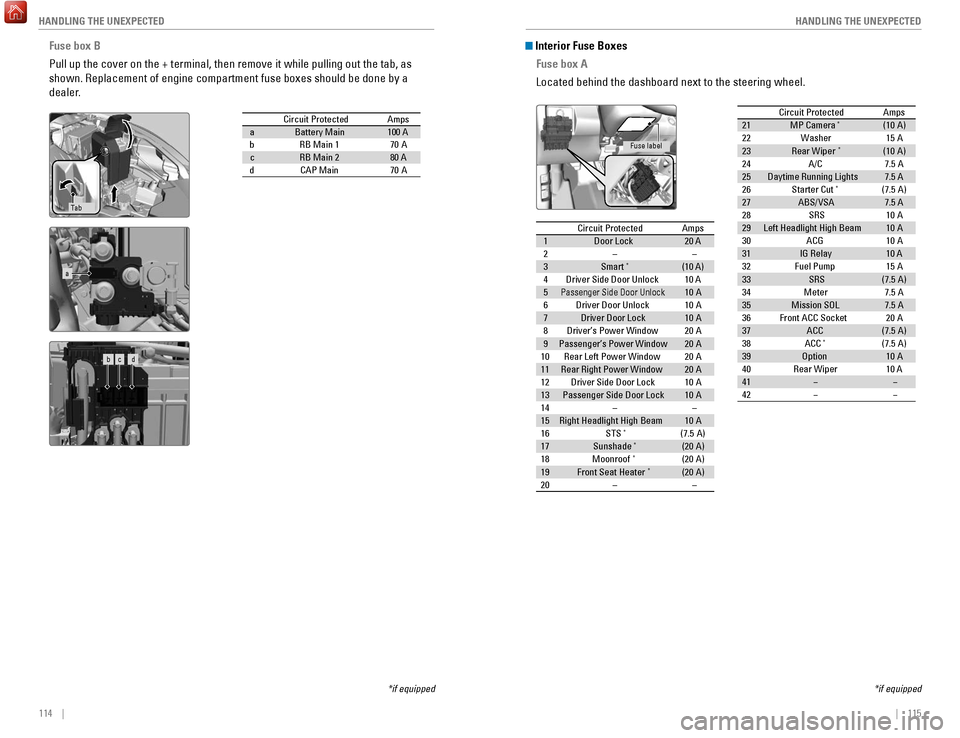
Fuse box B
Pull up the cover on the + terminal, then remove it while pulling out th\
e tab, as
shown. Replacement of engine compartment fuse boxes should be done by a \
dealer.
Circuit Protecte dAmpsaBattery Main100 AbRB Main 170AcRB Main 280 AdCAP Main70 A
Ta b
*if equipped
a
b c d
Circuit ProtectedAmps1Door Lock20 A2––3Smart*(10 A)4Driver Side Door Unlock10 A5Passenger Side Door Unlock10 A6Driver Door Unlock10A7Driver Door Lock10A8Driver’s Power Window20A9Passenger’s Power Window20A10Rear Left Power Window20A11Rear Right Power Window20A12Driver Side Door Lock10A13Passenger Side Door Lock10A14––15Right Headlight High Beam10A16STS*(7.5 A)17Sunshad e*(20A )18Moonroof*(20A )19Front Seat Heater*(20A )20––
Circuit Protecte dAmps
21 MP Camera*(10 A)
22 Washer 15A
23 Rear Wiper
*(10 A)
24 A/C 7.5 A
25 Daytime Running Light s7.5 A
26 Starter Cut
*(7.5 A)
27 ABS/VSA 7.5 A
28 SRS 10A
29 Left Headlight High Beam 10A
30 ACG 10A
31 IG Relay 10 A
32 Fuel Pump 15A
33 SRS (7.5 A)
34 Meter 7.5 A
35 Mission SOL 7.5 A
36 Front ACC Socket 20A
37 ACC (7.5 A)
38 ACC
*(7.5 A)
39 Option 10A
40 Rear Wiper 10 A
41 � �
42 � �
Interior Fuse Boxes
Fuse box A
Located behind the dashboard next to the steering wheel.
*if equipped
Fuse label
Circuit Protected Amps
1 Door Lock 20 A
2 – –
3 Smart
*(10 A)
4 Driver Side Door Unlock 10 A
5
Passenger Side Door Unlock10 A
6 Driver Door Unlock 10A
7 Driver Door Lock 10A
8 Driver’s Power Window 20A
9 Passenger’s Power Window 20A
10 Rear Left Power Window 20A
11 Rear Right Power Window 20A
12 Driver Side Door Lock 10A
13 Passenger Side Door Lock 10A
14 – –
15 Right Headlight High Beam 10A
16 STS
*(7.5 A)
17 Sunshade*(20A )
18 Moonroof*(2 0A )
19 Front Seat Heater*(20A )
20 – –
Circuit ProtectedAmps21MP Camera*(10 A)22Washer15A23Rear Wipe r*(10 A)24A/C7.5 A25Daytime Running Light s7.5 A26Starter Cut*(7.5 A)27ABS/VSA7.5 A28SRS10A29Left Headlight High Beam10A30ACG10A31IG Rela y10 A32Fuel Pump15 A33SRS(7.5 A)34Meter7.5 A35Mission SOL7.5 A36Front ACC Socket20A37ACC(7.5 A)38ACC*(7.5 A)39Optio n10A40Rear Wiper10 A41��42��
Page 64 of 78
120 || 121
MAINTENANCE
MAINTENANCE
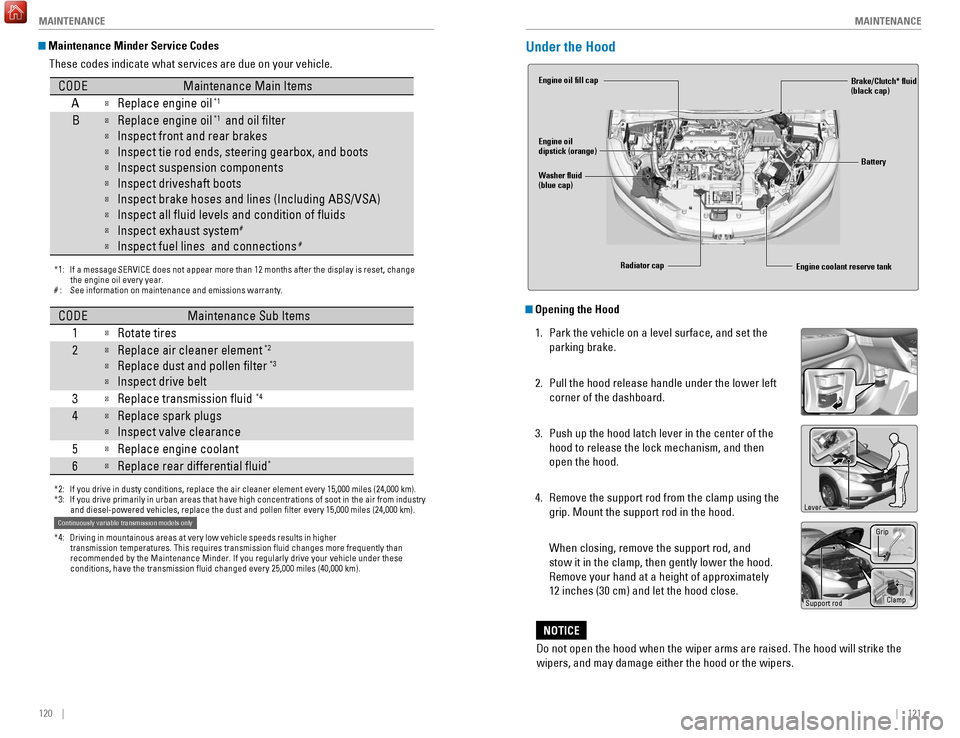
Maintenance Minder Service Codes
These codes indicate what services are due on your vehicle.
*1: If a message SERVICE does not appear more than 12 months after the display is reset, change the engine oil every year.
#: See information on maintenance and emissions warranty.
CODEMaintenance Main Items
A�Replace engine oi l*1
B�Replace engine oil*1 and oil �lter
�Inspect front and rear brakes
�Inspect tie rod ends, steering gearbox, and boots
�Inspect suspension component s
�Inspect driveshaft boots
�Inspect brake hoses and lines (Including ABS/VSA)
�Inspect all �uid levels and condition of �uids
�Inspect exhaust system#
�Inspect fuel lines and connections#
*2: If you drive in dusty conditions, replace the air cleaner element every \
15,000 miles (24,000 km).
*3: If you drive primarily in urban areas that have high concentrations of s\
oot in the air from industryand diesel-powered vehicles, replace the dust and pollen �lter every \
15,000 miles (24,000 km).
*4: Driving in mountainous areas at very low vehicle speeds results in higher transmission temperatures. This requires transmission �uid changes mo\
re frequently than
recommended by the Maintenance Minder. If you regularly drive your vehic\
le under these
conditions, have the transmission �uid changed every 25,000 miles (4\
0,000 km).
CODEMaintenance Sub Items
1
�Rotate tires
2�Replace air cleaner element*2
�Replace dust and pollen �lter*3
�Inspect drive belt
3
�Replace transmission �uid*4
4�Replace spark plugs
�Inspect valve clearance
5
�Replace engine coolan t
6�Replace rear differential �uid*
Continuously variable transmission models only
Under the Hood
Opening the Hood
1.
Park the vehicle on a level surface, and set the
parking brake.
2.
Pull the hood release handle under the lower left
corner of the dashboard.
3.
Push up the hood latch lever in the center of the
hood to release the lock mechanism, and then
open the hood.
4.
Remove the support rod from the clamp using the
grip. Mount the support rod in the hood.
When closing, remove the support rod, and
stow it in the clamp, then gently lower the hood.
Remove your hand at a height of approximately
12 inches (30 cm) and let the hood close.
Engine coolant reserve tank
Washer fluid
(blue cap) Engine oil fill cap
Engine oil
dipstick (orange)
Brake/Clutch* fluid
(black cap)
Battery
Radiator cap
Lever
Support rod Grip
Clamp
Do not open the hood when the wiper arms are raised. The hood will strik\
e the
wipers, and may damage either the hood or the wipers.
NOTICE
Page 71 of 78
134 || 135
SPECIFICATIONS
MAINTENANCE
Testing of Readiness Codes
Your vehicle has readiness codes as part of the onboard self-diagnostic s\
ystem.
Some states use these codes for testing to verify whether your vehicle’\
s emissions
components are working properly. The codes may not be read if you go through the
emissions testing just after the battery has gone dead or been disconnec\
ted.
To check if they are set, turn the vehicle on without starting the engine\
. The
malfunction indicator lamp will come on for several seconds. If it goes \
off, the
readiness codes are set. If it blinks five times, the readiness codes \
are not set.
If you are required to have your vehicle emissions tested before the rea\
diness codes
are set, prepare the vehicle for retesting by doing the following:
1.
Fill the gas tank to approximately 3/4 full.
2.
Park the vehicle and leave the engine off for 6 hours or more.
3.
Make sure the ambient temperature is between 40°F and 95°F (4°\
C and 3
5°C).
4.
Start the engine without touching the accelerator pedal, and let it idle\
for 20
seconds.
5.
Keep the vehicle in Park (P) or Neutral (manual transmission). Incre\
ase
the
engine speed to 2,000 rpm, and hold it there for about 3 minutes.
6.
Let the engine idle with your foot off the accelerator for 20 seconds.
7.
Select a nearby
, lightly traveled major highway where you can maintain a speed
of 50 to 60 mph (80 to 97 km/h) for at least 20 minutes. Drive on the \
highway with
the vehicle in Drive (D) or 5th gear (manual transmission). Do not u\
se cruise
control. When traffic allows, drive for 90 seconds without using the a\
ccelerator
pedal. (Vehicle speed may vary slightly; this is OK.) If you cannot do this for
a continuous 90 seconds because of traffic conditions, drive for at le\
ast 30
seconds, then repeat two more times (for a total of 90 seconds).
8.
Drive in city or suburban traffic for at least 10 minutes. When traffi\
c con
ditions
allow, let the vehicle coast for several seconds without using the accelerator
pedal or the brake pedal.
9.
Park the vehicle and leave the engine off for 30 minutes.
The readiness codes are erased when the battery is disconnected, and set\
again
only after several days of driving under a variety of conditions.
If an emissions testing facility determines that the readiness codes are\
not
set, you
may be requested to return at a later date to complete the test, or see \
your dealer.
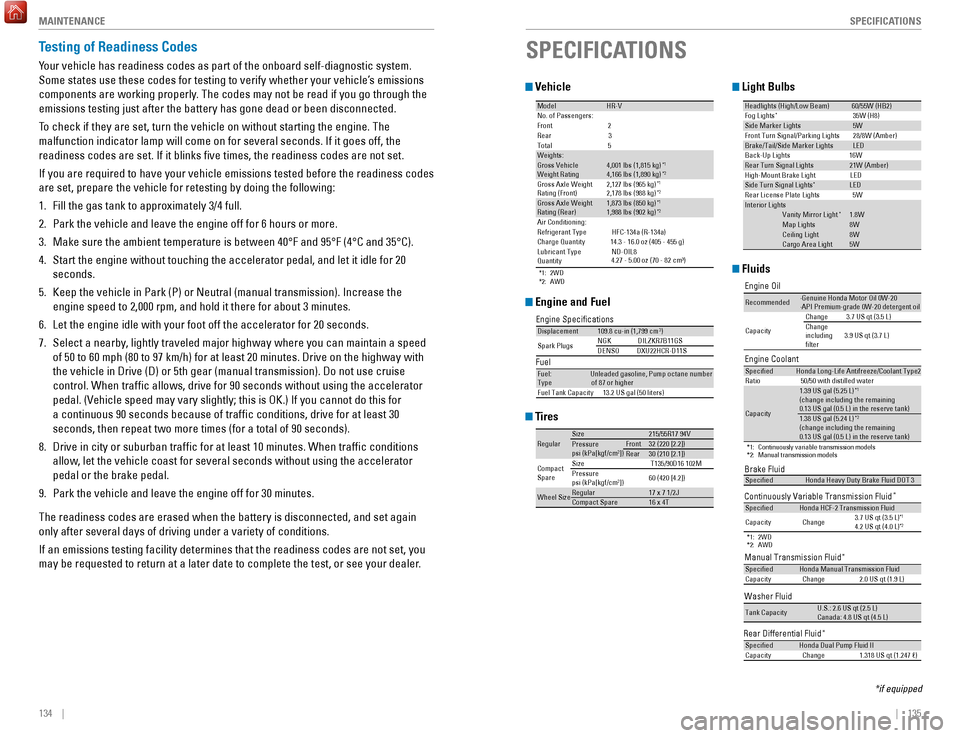
Vehicle
Engine and Fuel
Tires
Light Bulbs
Fluids*1: 2WD
*2: AWD
ModelHR-VNo. of Passengers:
Front 2
Rear 3
Tota l5
Weights:Gross Vehicle
Weight Rating 4,001 lbs (1,815 kg )*14,166 lbs (1,890 kg)*2Gross Axle Weight
Rating (Front )2,127 lbs (965 kg )*12,178 lbs (988 kg)*2Gross Axle Weight
Rating (Rear)1,873 lbs (850 kg )*11,988 lbs (902 kg)*2Air Conditioning:
Refrigerant Type HFC-134a (R-134a)
Charge Quantity 14.3 - 16.0 oz (405 - 455 g)
Lubricant Type ND-OIL8
Quantity4.27 - 5.00 oz (70 - 82 cm³)
Engine Speci�cation
s
FuelDisplacemen t109.8 cu-in (1,799 cm3)
Spark Plugs NG
KD ILZKR7B11GS
DENSODXU22HCR-D11S
Fuel:
TypeUnleaded gasoline, Pump octane number of 87 or higher
Fuel Tank Capacity 13.2 US gal (50 liters)
Re gularSize215/55R17 94 VPressure
psi (kPa[kgf/cm2])Front32 (220 [2.2])Rear30 (210 [2.1])
Compact
Spar e Size
T135/90D16 102M
Pressure
psi (kPa[kgf/cm
2]) 60 (420 [4.2])
Wheel SizeRegular17 x 7 1/2JCo
mpact Spar e16 x 4T
Headlights (High/Low Beam )60/55W (HB2)Fog Lights*35W (H8)Side Marker Lights5W
Front Turn Signal/Parking Light s28/8W (Amber )
Brake/Tail/Side Marker LightsLED
Back-Up Lights 16W
Rear Turn Signal Lights21W (Amber)
High-M ount Brake Light LED
Side Turn Signal Light s*LED
Rear License Plate Light s5W
Interior Light sVanity Mirror Ligh t*1.8WMap Lights8WCeiling Light8WCargo Area Light5W
Brake Fluid
Continuously Variable Transmission Fluid
*
*1: 2WD
*2: AWD
Manual Transmission Fluid*
Speci�edHonda Heavy Duty Brake Fluid DOT 3
Speci�edHonda HCF-2 Transmission Fluid
Capacity Change 3.7 US qt (3.5 L)*14.2 US qt (4.0 L)*2
Speci�e
dHonda Manual Transmission Flui d
Capacity Change 2.0 US qt (1.9 L)
Engine Oil
Engine Coolan t
*1: Continuously variable transmission models
*2: Manual transmission models
Recommended·Genuine Honda Motor Oil 0W-2 0
·API Premium-grade 0W-20 detergent oi l
Capacity Change
3.7 US qt (3.5 L)
Change
including
�lter 3.9 US qt (3.7 L)
Speci�e
dHonda Long-Life Anti freeze/Coolant Type 2
Ratio 50/50 with distilled wate r
Capacity
1.39 US gal (5.25 L)*1(change including the remaining
0.13 US gal (0.5 L) in the reserve tank )
1.38 US gal (5.24 L)*2
(change including the remaining
0.13 US gal (0.5 L) in the reserve tank )
Washer Fluid
Tank CapacityU.S.: 2.6 US qt (2.5 L)
Canada: 4.8 US qt (4.5 L)
Rear Differential Fluid*Speci�edHonda Dual Pump Fluid II
Capacity Change 1.318 US qt (1.247 �)
SPECIFICATIONS
*if equipped