display HONDA HR-V 2018 Navigation Manual (in English)
[x] Cancel search | Manufacturer: HONDA, Model Year: 2018, Model line: HR-V, Model: HONDA HR-V 2018Pages: 263, PDF Size: 56.63 MB
Page 189 of 263
187
uuBluetooth® HandsFreeLink®uReceiving a Call
Bluetooth® HandsFreeLink®
Receiving a Call
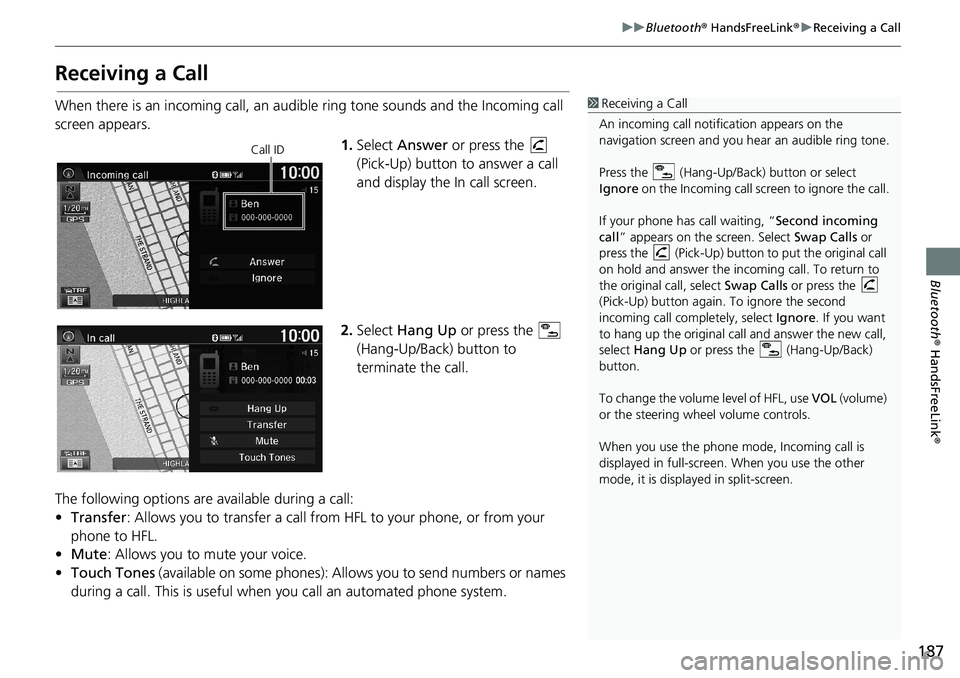
When there is an incoming call, an audible ring tone sounds and the Incoming call
screen appears.
1.Select Answer or press the
(Pick-Up) button to answer a call
and display the In call screen.
2.Select Hang Up or press the
(Hang-Up/Back) button to
terminate the call.
The following options are available during a call:
•Transfer: Allows you to transfer a call from HFL to your phone, or from your
phone to HFL.
•Mute: Allows you to mute your voice.
•Touch Tones (available on some phones): Allows you to send numbers or names
during a call. This is useful when you call an automated phone system.1Receiving a Call
An incoming call notification appears on the
navigation screen and you hear an audible ring tone.
Press the (Hang-Up/Back) button or select
Ignore on the Incoming call screen to ignore the call.
If your phone has call waiting, “Second incoming
call” appears on the screen. Select Swap Calls or
press the (Pick-Up) button to put the original call
on hold and answer the incoming call. To return to
the original call, select Swap Calls or press the
(Pick-Up) button again. To ignore the second
incoming call completely, select Ignore. If you want
to hang up the original call and answer the new call,
select Hang Up or press the (Hang-Up/Back)
button.
To change the volume level of HFL, use VOL (volume)
or the steering wheel volume controls.
When you use the phone mode, Incoming call is
displayed in full-screen. When you use the other
mode, it is displayed in split-screen.
Call ID
Page 192 of 263
190
uuBluetooth® HandsFreeLink®uHFL Menus
Bluetooth® HandsFreeLink®
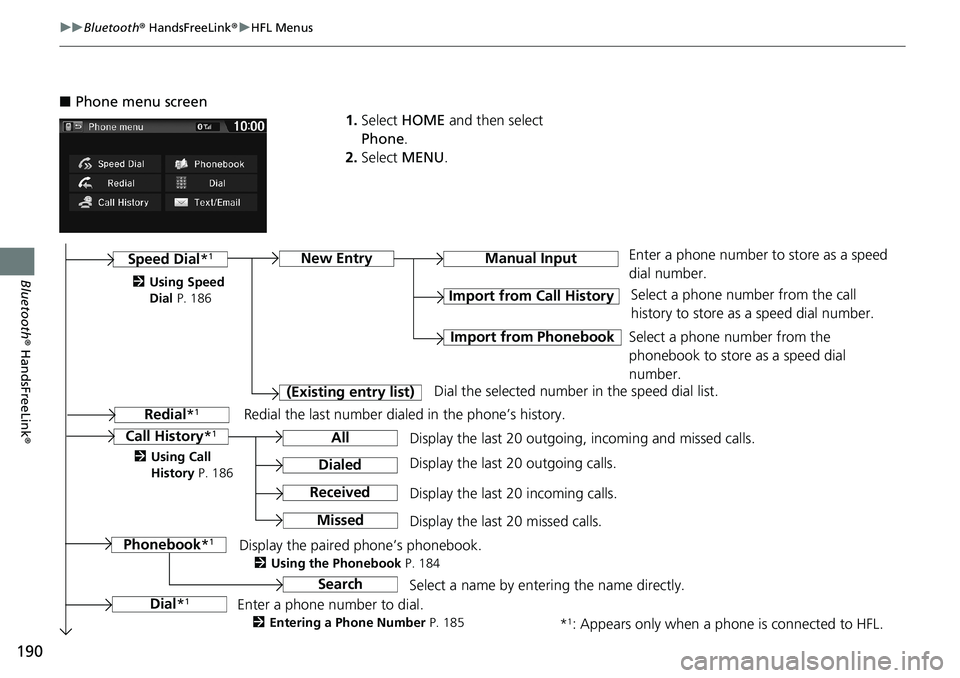
■Phone menu screen
1.Select HOME and then select
Phone.
2.Select MENU.
Display the last 20 outgoing, incoming and missed calls.Select a phone number from the call
history to store as a speed dial number.
Call History*1
Speed Dial*1
All
Manual Input
Dialed
Received
Display the last 20 outgoing calls.
Display the last 20 incoming calls. New Entry
Import from Call History
Import from PhonebookSelect a phone number from the
phonebook to store as a speed dial
number. Enter a phone number to store as a speed
dial number.
*
1: Appears only when a phone is connected to HFL. Missed
Display the last 20 missed calls.
Dial*
1
Redial*1
Enter a phone number to dial.
2Entering a Phone Number P. 185
Redial the last number dialed in the phone’s history. (Existing entry list)
Dial the selected number in the speed dial list.
Phonebook*
1Display the paired phone’s phonebook.
2Using the Phonebook P. 184
2Using Speed
Dial P. 186
2Using Call
History P. 186
SearchSelect a name by entering the name directly.
Page 194 of 263
192
Bluetooth® HandsFreeLink®
Text/E-mail Message
If your paired phone is MAP-compatible, you can receive and hear text or e-mail
messages and reply to them using fixed reply messages.
2Pairing a Phone P. 170
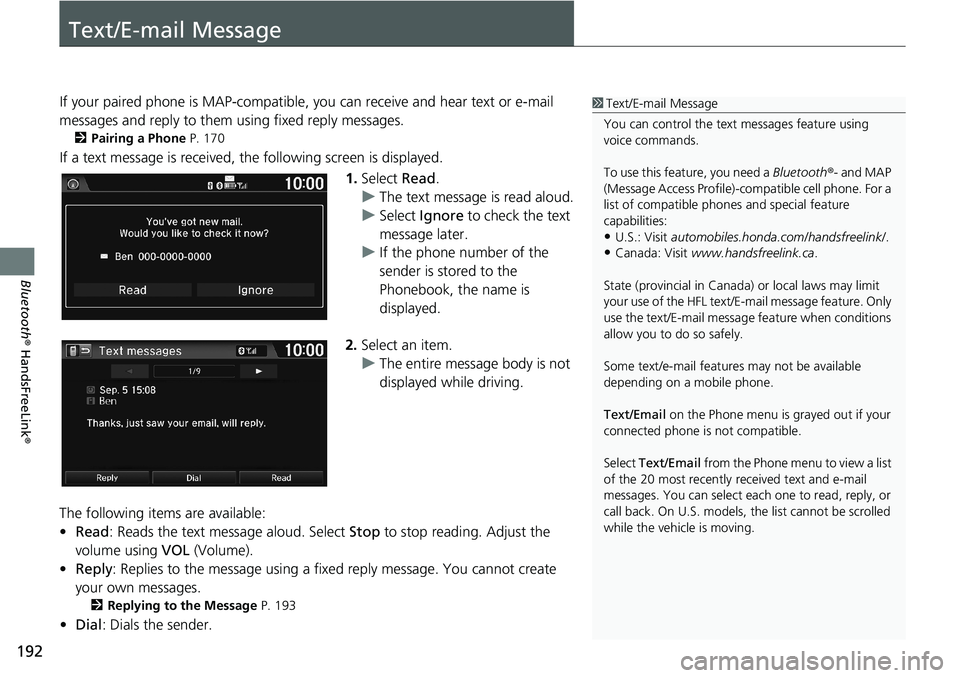
If a text message is received, the following screen is displayed.
1.Select Read.
uThe text message is read aloud.
uSelect Ignore to check the text
message later.
uIf the phone number of the
sender is stored to the
Phonebook, the name is
displayed.
2.Select an item.
uThe entire message body is not
displayed while driving.
The following items are available:
•Read: Reads the text message aloud. Select Stop to stop reading. Adjust the
volume using VOL (Volume).
•Reply: Replies to the message using a fixed reply message. You cannot create
your own messages.
2Replying to the Message P. 193
•Dial: Dials the sender.
1Text/E-mail Message
You can control the text messages feature using
voice commands.
To use this feature, you need a Bluetooth®- and MAP
(Message Access Profile)-compatible cell phone. For a
list of compatible phones and special feature
capabilities:
•U.S.: Visit automobiles.honda.com/handsfreelink/.
•Canada: Visit www.handsfreelink.ca.
State (provincial in Canada) or local laws may limit
your use of the HFL text/E-mail message feature. Only
use the text/E-mail message feature when conditions
allow you to do so safely.
Some text/e-mail features may not be available
depending on a mobile phone.
Text/Email on the Phone menu is grayed out if your
connected phone is not compatible.
Select Text/Email from the Phone menu to view a list
of the 20 most recently received text and e-mail
messages. You can select each one to read, reply, or
call back. On U.S. models, the list cannot be scrolled
while the vehicle is moving.
Page 200 of 263
198
Other Features
Trip Computer
HHOMEuInfouMENUuTrip Computer
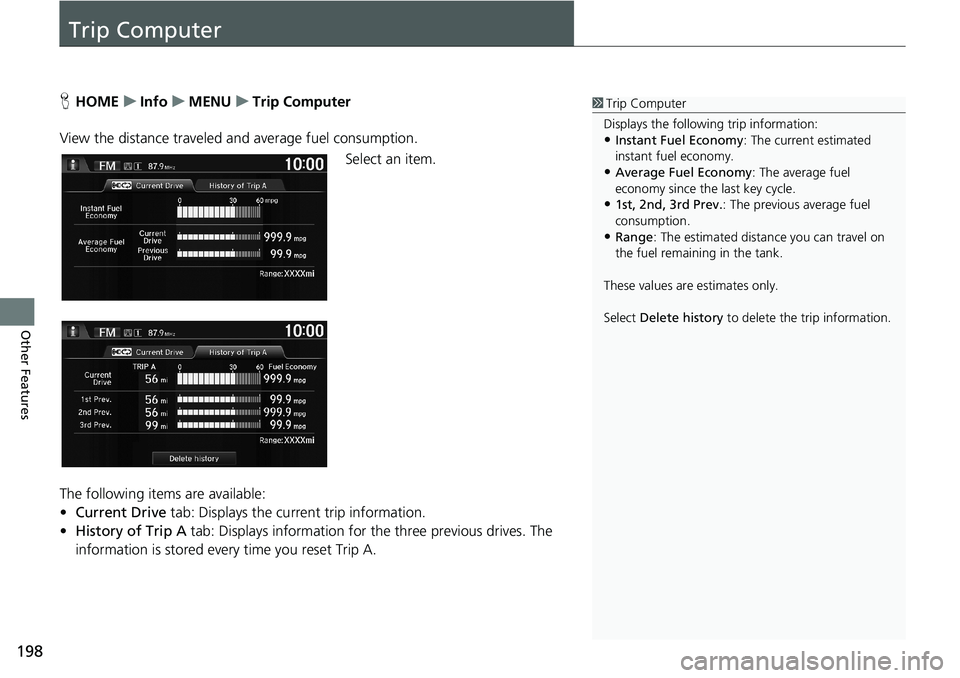
View the distance traveled and average fuel consumption.
Select an item.
The following items are available:
•Current Drive tab: Displays the current trip information.
•History of Trip A tab: Displays information for the three previous drives. The
information is stored every time you reset Trip A.1Trip Computer
Displays the following trip information:
•Instant Fuel Economy: The current estimated
instant fuel economy.
•Average Fuel Economy: The average fuel
economy since the last key cycle.
•1st, 2nd, 3rd Prev.: The previous average fuel
consumption.
•Range: The estimated distance you can travel on
the fuel remaining in the tank.
These values are estimates only.
Select Delete history to delete the trip information.
Page 201 of 263
199
Other Features
Information Functions
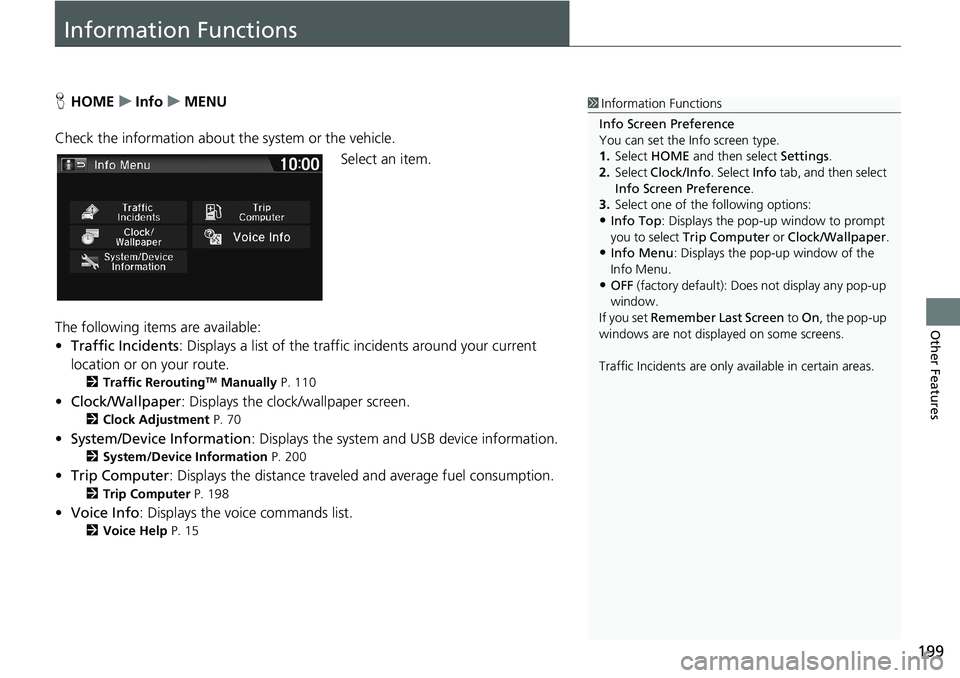
HHOMEuInfouMENU
Check the information about the system or the vehicle.
Select an item.
The following items are available:
•Traffic Incidents: Displays a list of the traffic incidents around your current
location or on your route.
2Traffic ReroutingTM Manually P. 110
•Clock/Wallpaper: Displays the clock/wallpaper screen.
2Clock Adjustment P. 70
•System/Device Information: Displays the system and USB device information.
2System/Device Information P. 200
•Trip Computer: Displays the distance traveled and average fuel consumption.
2Trip Computer P. 198
•Voice Info: Displays the voice commands list.
2Voice Help P. 15
1Information Functions
Info Screen Preference
You can set the Info screen type.
1.Select HOME and then select Settings.
2.Select Clock/Info. Select Info tab, and then select
Info Screen Preference.
3.Select one of the following options:
•Info Top: Displays the pop-up window to prompt
you to select Trip Computer or Clock/Wallpaper.
•Info Menu: Displays the pop-up window of the
Info Menu.
•OFF (factory default): Does not display any pop-up
window.
If you set Remember Last Screen to On, the pop-up
windows are not displayed on some screens.
Traffic Incidents are only available in certain areas.
Page 202 of 263
200
uuInformation FunctionsuSystem/Device Information
Other Features
System/Device Information
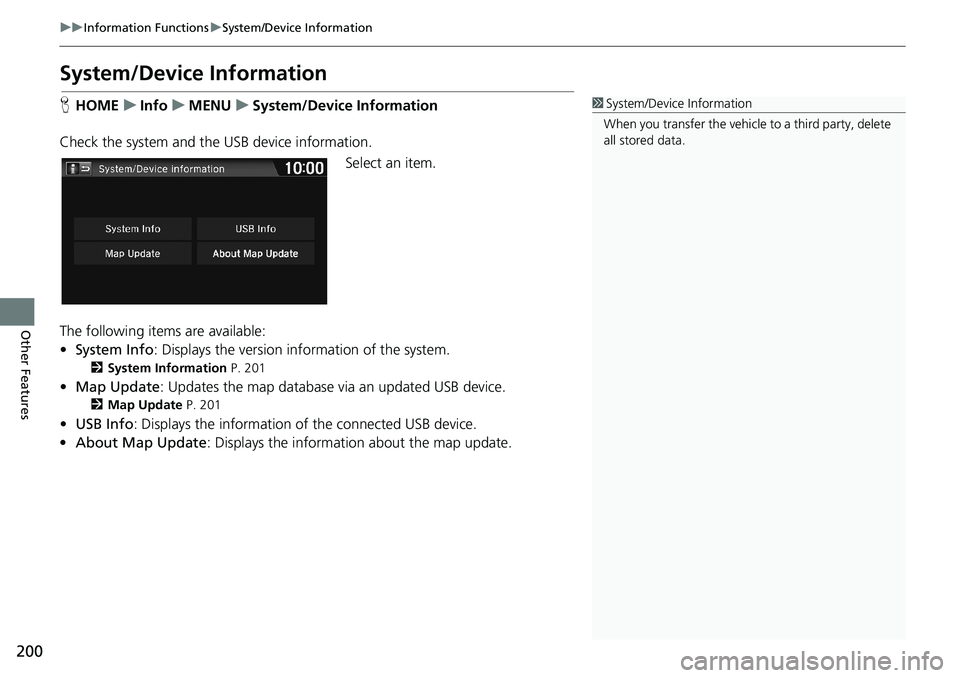
HHOMEuInfouMENUuSystem/Device Information
Check the system and the USB device information.
Select an item.
The following items are available:
•System Info: Displays the version information of the system.
2System Information P. 201
•Map Update: Updates the map database via an updated USB device.
2Map Update P. 201
•USB Info: Displays the information of the connected USB device.
•About Map Update: Displays the information about the map update.
1System/Device Information
When you transfer the vehicle to a third party, delete
all stored data.
Page 204 of 263
202
Other Features
Multi-View Rear Camera
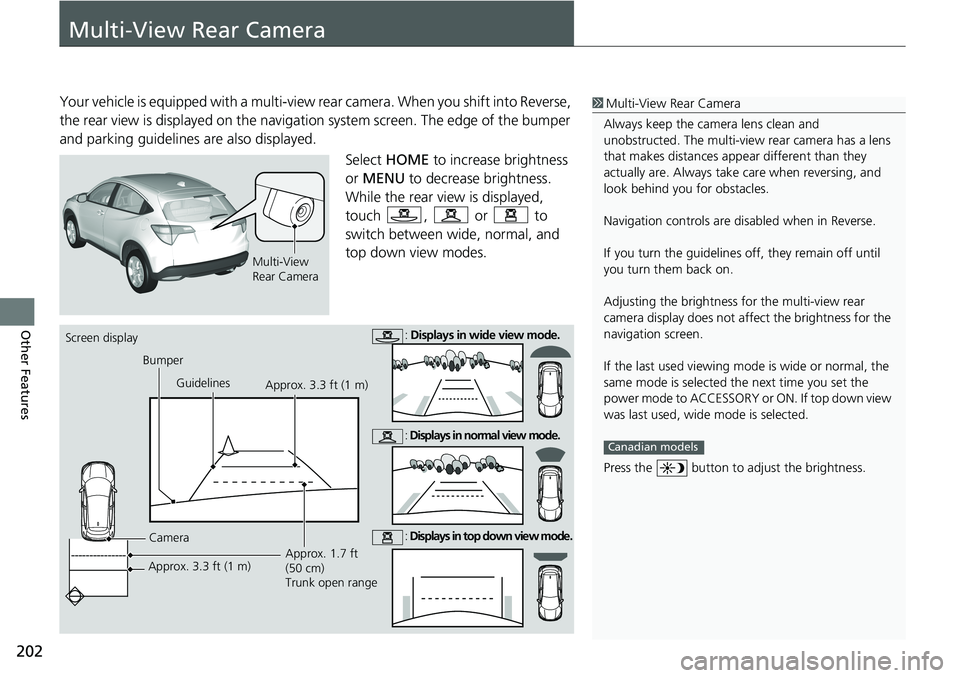
Your vehicle is equipped with a multi-view rear camera. When you shift into Reverse,
the rear view is displayed on the navigation system screen. The edge of the bumper
and parking guidelines are also displayed.
Select HOME to increase brightness
or MENU to decrease brightness.
While the rear view is displayed,
touch , or to
switch between wide, normal, and
top down view modes.1Multi-View Rear Camera
Always keep the camera lens clean and
unobstructed. The multi-view rear camera has a lens
that makes distances appear different than they
actually are. Always take care when reversing, and
look behind you for obstacles.
Navigation controls are disabled when in Reverse.
If you turn the guidelines off, they remain off until
you turn them back on.
Adjusting the brightness for the multi-view rear
camera display does not affect the brightness for the
navigation screen.
If the last used viewing mode is wide or normal, the
same mode is selected the next time you set the
power mode to ACCESSORY or ON. If top down view
was last used, wide mode is selected.
Press the button to adjust the brightness.
Canadian models
Multi-View
Rear Camera
Screen display
Bumper
Guidelines
Camera
Approx. 3.3 ft (1 m)Approx. 1.7 ft
(50 cm)
Trunk open range Approx. 3.3 ft (1 m): Displays in wide view mode.
: Displays in normal view mode.
: Displays in top down view mode.
Page 205 of 263
203
uuMulti-View Rear Camerau
Other Features
HHOMEuSettingsuCamerauRear Camera
The following items are available:
•Fixed Guideline:
–On (factory default): Guidelines appear when you shift into Reverse.
–Off: Guidelines do not appear.
•Dynamic Guideline:
–On (factory default): Guidelines move according to the steering wheel direction.
–Off: Guidelines do not move.
■Rear Camera Setting1Rear Camera Setting
The dynamic guidelines are displayed only on the
wide view mode or the normal view mode.
You can also change the rear camera setting by
selecting MENU on the rear camera screen. When
you select MENU, the following items are available in
additional:
•Display: Adjusts the screen preference of the rear
camera screen.
–Display tab: Adjusts Brightness, Contrast, and
Black Level of the rear camera screen.
–Color tab: Adjusts Color and Tint of the rear
camera screen.
Canadian models
Page 207 of 263
205
Troubleshooting
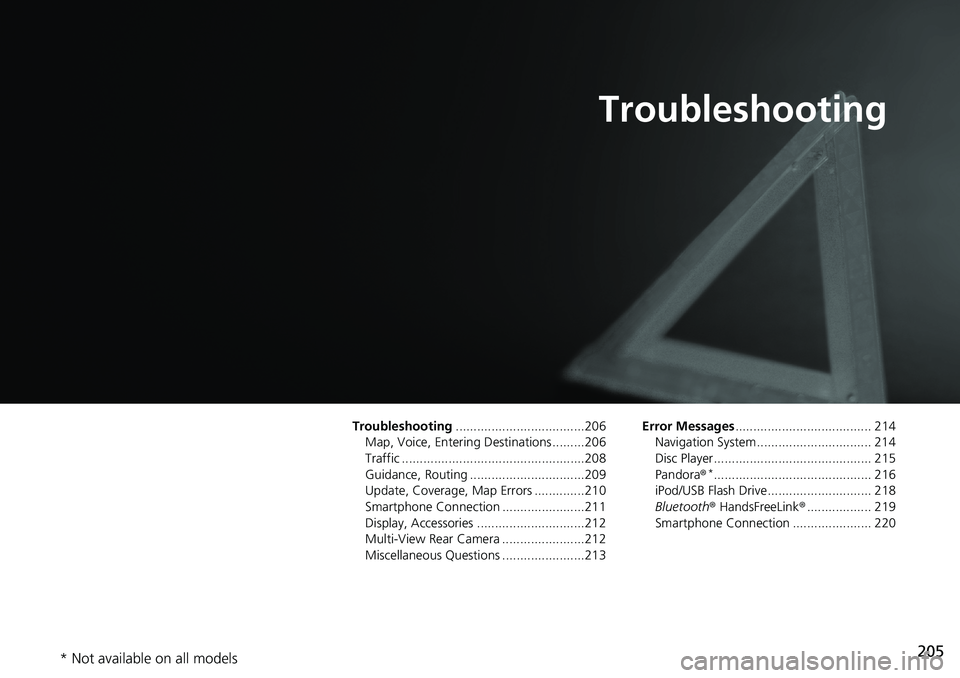
Troubleshooting....................................206
Map, Voice, Entering Destinations .........206
Traffic ...................................................208
Guidance, Routing ................................209
Update, Coverage, Map Errors ..............210
Smartphone Connection .......................211
Display, Accessories ..............................212
Multi-View Rear Camera .......................212
Miscellaneous Questions .......................213Error Messages...................................... 214
Navigation System ................................ 214
Disc Player............................................ 215
Pandora®
*............................................ 216
iPod/USB Flash Drive............................. 218
Bluetooth® HandsFreeLink®.................. 219
Smartphone Connection ...................... 220
* Not available on all models
Page 208 of 263
206
Troubleshooting
Troubleshooting
Map, Voice, Entering Destinations
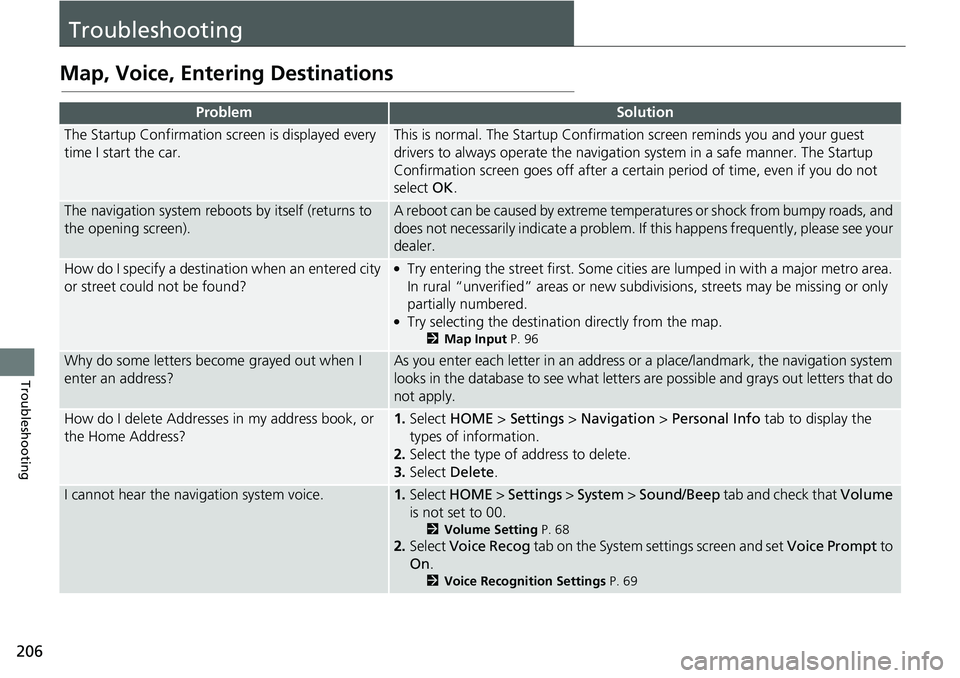
ProblemSolution
The Startup Confirmation screen is displayed every
time I start the car.This is normal. The Startup Confirmation screen reminds you and your guest
drivers to always operate the navigation system in a safe manner. The Startup
Confirmation screen goes off after a certain period of time, even if you do not
select OK.
The navigation system reboots by itself (returns to
the opening screen).A reboot can be caused by extreme temperatures or shock from bumpy roads, and
does not necessarily indicate a problem. If this happens frequently, please see your
dealer.
How do I specify a destination when an entered city
or street could not be found?●Try entering the street first. Some cities are lumped in with a major metro area.
In rural “unverified” areas or new subdivisions, streets may be missing or only
partially numbered.
●Try selecting the destination directly from the map.
2Map Input P. 96
Why do some letters become grayed out when I
enter an address?As you enter each letter in an address or a place/landmark, the navigation system
looks in the database to see what letters are possible and grays out letters that do
not apply.
How do I delete Addresses in my address book, or
the Home Address?1.Select HOME > Settings > Navigation > Personal Info tab to display the
types of information.
2.Select the type of address to delete.
3.Select Delete.
I cannot hear the navigation system voice.1.Select HOME > Settings > System > Sound/Beep tab and check that Volume
is not set to 00.
2Volume Setting P. 68
2.Select Voice Recog tab on the System settings screen and set Voice Prompt to
On.
2Voice Recognition Settings P. 69